Let’s be honest, the magic of Christmas isn’t just in the twinkling lights or the presents under the tree.
It’s in the simple joy of creating something with your own hands, especially when those hands belong to excited children.
I’ve collated 13 amazing Christmas crafts that kids can make and they’re good enough to double as decor.
These projects aren’t just fun activities, they’re memory-makers, skill-builders, and future family heirlooms.
From rustic reindeer paintings to jingly bell wreaths, each craft offers a chance to bond with your little ones while adding a personal touch to your holiday home.
Whether you’re a seasoned crafter or a beginner, these DIY Christmas Crafts for kids will spark creativity and bring the spirit of the season to life in your family.
DIY Handpainted Christmas Decor

Image Credit: d_art.box
This craft features a reindeer painted on a wood slice.
It’s a rustic and festive Christmas decoration that’s easy to make and perfect for kids.
You’ll need a wood slice, acrylic paint in brown, white, and pink, paint brushes, a black sharpie marker and a thin ribbon or twine for hanging.
Once you’ve gathered the above materials, paint the entire wood slice brown and ;et the paint dry completely.
Make sure the base coat is fully dry before proceeding to the next step.
Next, use light brown paint to create the reindeer’s head and dark brown paint for antlers on the wood slice.
You can choose to freehand the design or use a stencil for assistance.
Use black Sharpie markers to draw the reindeer’s eyes and facial features.
For the ears, paint them pink as shown in the image above. For an adorable touch, consider attaching a tiny red pom-pom as Rudolph’s nose, if available.
After everything has dried, secure a piece of ribbon or twine to the top of the wood slice to fashion a hanger.
Decorating tips:
- Add a touch of sparkle by gluing on some glitter after the paint has dried.
- Personalize your reindeer ornament by writing a child’s name or the year on the back of the wood slice.
- For a more rustic look, you can leave the bark on the edges of the wood slice.
- You can also paint other winter or Christmas designs on the wood slice, such as snowflakes, pine trees, or stars.
Difficulty Level: Suitable for older preschoolers and up, with younger children benefiting from adult assistance.
Alternative Materials: Consider using craft paper or cardboard as a substitute for the wood slice.
Age Range: Recommended for children ages 6 and above due to the use of sharpie markers and intricate painting.
Note: Get it laminated or seal it using Mod Podge to offer a rich glossy finish.
Felt Ornament

Craft adorable gingerbread man ornaments with felt festive colors like red, white, and black.
Gather your supplies such as felt, embroidery floss, scissors, needle, glue, and fiberfill stuffing.
If you don’t have a template, draw the gingerbread man shape on paper and cut out two pieces from felt.
Sandwich small felt details like buttons and eyes between the two gingerbread shapes, sewing them on with embroidery floss.
Leave a small opening to stuff the ornament with fiberfill, then sew it closed with a blanket stitch.
These charming felt ornaments are perfect for adding a handmade touch to your Christmas decor.
Decorating Tips:
- Customize each ornament by adding different colored buttons or embroidery details.
- Substitute buttons with beads or sequins for a more sparkly look.
- This craft is suitable for older children with basic sewing skills or younger children with adult supervision.
Difficulty Level: Moderate
Craft Variation Ideas:
- Create variations by making gingerbread women, different facial expressions, or varying Experiment with different fabrics or add embellishments like sequins or beads for a more sparkling effect.
- Encourage kids to write their names or the year on the back of each ornament to make them personalized keepsakes.
Classic Pinecone Christmas Tree Decor
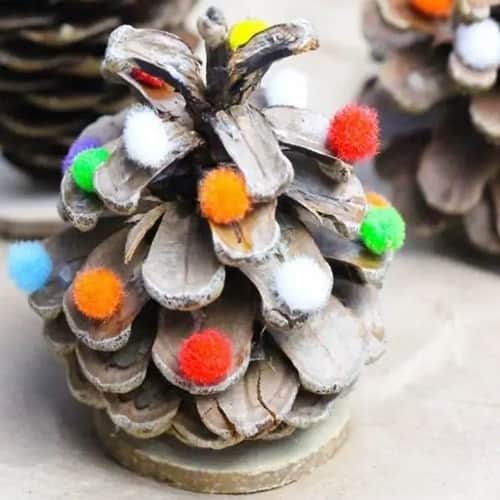
Credit: sugarspiceandglitter.com
Looking for a classic and easy Christmas craft for the kids? These pine cone Christmas trees are absolutely delightful.
Not only will the kids enjoy making them after a fun pine cone scavenger hunt, but they’ll also get to develop their fine motor skills while crafting.
Start by gathering some pine cones, mini pompoms, glue, and wooden slices. If you want to add a touch of color, you can also use paint and paintbrushes.
First, if you’re painting your pine cones, use a paintbrush to apply the paint and let them dry completely.
Next, attach the pine cones to the wooden slices using glue to ensure they have a stable base for display.
Now comes the fun part i.e. apply small amounts of craft glue to the tips of the pine cones and carefully attach the mini pompoms.
To top it all off, you can add a star bead or make a clay star for the top of your tree.
Allow the glue to dry before attaching a loop of string or twine if you plan on turning these into ornaments.
For more detailed, step-by-step instructions, visit the full tutorial on SugarSpiceandGlitter.com.
Alternative Materials: Instead of pompoms, consider using sequins, small beads, or even tiny bells for decoration.
Difficulty Level: Suitable for young children with basic crafting skills, with adult supervision recommended for gluing and handling smaller items.
Wall Mount Felt Christmas Tree Decor
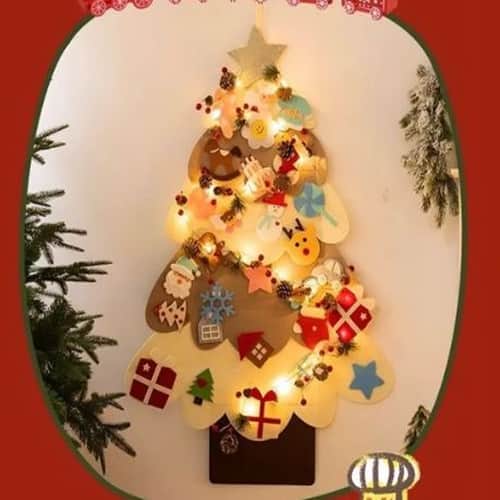
Image Credit: shopatbukubuku
This adorable felt Christmas tree craft is a fantastic and interactive way for kids to get involved in holiday decorating.
The tree is made from felt, which is perfect for little hands to safely handle.
The various felt ornaments, including stars, presents, and festive shapes, can be easily attached and rearranged on the tree.
To make this craft, you’ll need large pieces of felt to create the tree and its base, as well as smaller pieces in various colors for the ornaments.
Cut out the tree shape and the ornaments, then let the kids decorate the tree however they like (Adding string lights gives it an extra festive touch).
Alternative Materials: Instead of felt, consider using fabric or foam for a different texture.
Difficulty Level: Suitable for young children with basic crafting skills.
Light Up Houses as Christmas Decor
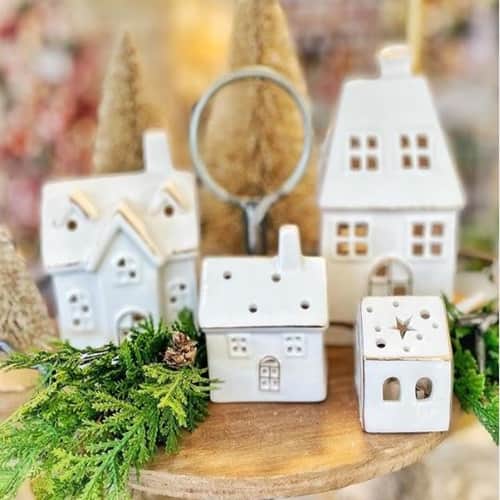
Image Credit: gatherhomeky
These charming ceramic houses make for a delightful Christmas craft that doubles as stunning holiday decor.
The white ceramic finish gives them a cozy, snow-covered look, perfect for creating a serene winter village scene.
Arranged on a wooden base with some sprigs of evergreen, these houses bring a touch of rustic elegance to any display.
To create a similar setup, you can either purchase pre-made ceramic houses or make your own using air-dry clay and paint.
Once you have your houses, arrange them on a wooden tray or tabletop, adding faux greenery for a festive touch.
You can also place LED tea lights inside the houses to illuminate them, adding a warm glow to your holiday decor.
For more inspiration and detailed ideas, check out the original post on Instagram.
Craft Variation Ideas:
- Add artificial snow or cotton batting around the houses for a more wintry effect.
- Paint the houses in traditional holiday colors like red and green, or add festive patterns like stripes or polka dots.
- Include miniature figurines or tiny ornaments to create a lively village scene around the houses.
Alternative Materials: Experiment with different materials like cardboard or papier-mache to create a more budget-friendly version of the houses.
Difficulty Level: Suitable for older children and adults due to the handling of clay and painting (Younger children can participate with adult supervision).
DIY Decor Garland for Christmas

Image Credit: thecraftyangels.com
Creating a paper Christmas tree garland is a delightful and engaging holiday craft for kids that results in charming decor for your home.
With just a few materials like green cardstock, twine, and colorful beads, kids can craft 3D paper Christmas trees that can be strung together into a festive garland.
This activity not only keeps the little ones busy but also allows them to add a personal touch to the holiday decorations.
By drawing and cutting out simple tree shapes, gluing them together, and adding glitter or beads for extra sparkle, kids will have a blast making this project.
The finished garland, adorned with vibrant beads and glittery details, can be hung on mantels, doorways, or walls to bring a touch of homemade holiday cheer to any room.
For a complete guide on this christmas tree garland, visit The Crafty Angels.
Craft Variation Ideas:
- Miniature Garland: Make smaller versions of the trees to create mini garlands for tabletops or windows.
- Theme-based Trees: Design trees in different shapes or themes like snowflakes, stars, or animals for a diverse garland.
Alternative Materials: Instead of cardstock you can use recycled paper or colored craft foam for a different texture.
Difficulty Level: Children of various ages with adult supervision
DIY Adorable Snowman craft for Christmas
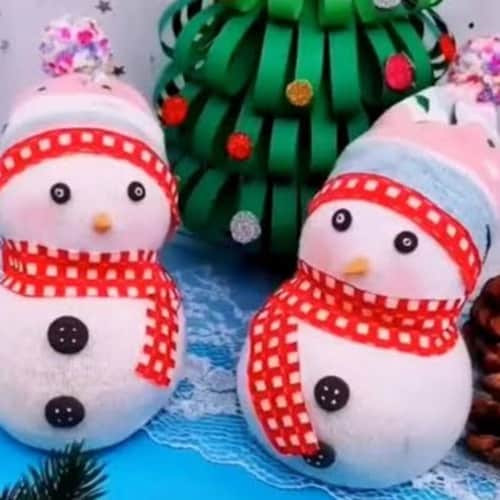
Image Credit: artistdiycraft1
These adorable sock snowmen are a delightful Christmas craft for kids that doubles as charming holiday decor.
Made from simple materials like socks, buttons, and colorful scarves, these snowmen are easy to assemble and add a cozy, handmade touch to any holiday setting.
Kids will have a blast creating these cute characters, and they can be customized with different accessories and decorations to make each one unique.
To get started, fill a white sock with rice or stuffing to form the snowman’s body, then secure it with rubber bands.
Add buttons, eyes, and a small nose using glue.
Finish with a tiny scarf and hat, made from fabric scraps or another colorful sock.
These snowmen are perfect for decorating mantels, windowsills, or as part of a festive centerpiece.
For a detailed video walkthrough, check out the tutorial on Instagram.
Alternative Materials: Instead of rice, consider using polyester stuffing for a lighter, fluffier snowman.
Difficulty Level: Children of all ages (with adult supervision)
Craft Variation Ideas:
- Themed Snowmen: Create snowmen with different themes, such as sports, winter activities, or holiday characters.
- Group Display: Make a family of snowmen and display them together on mantels, windowsills, or as part of a festive centerpiece.
Decorated Pine Cone Christmas Trees
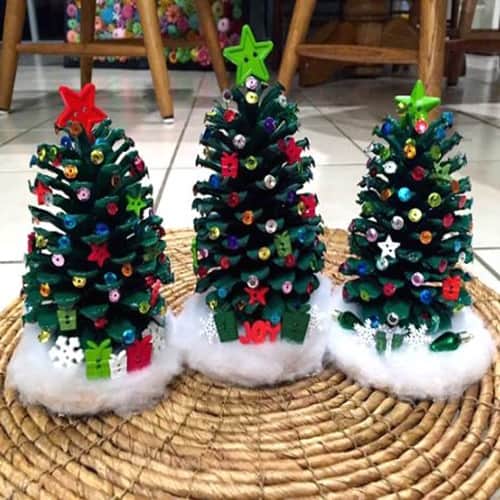
Credit: craftymorning.com
These adorable pinecone Christmas trees, crafted by Dianne Toman Hayes, are a delightful addition to any holiday decor.
Paint the pinecones green and allow them to dry completely.
Securely glue the pinecones onto small coasters for stability and sprinkle fake snow or use cotton balls for a snowy effect.
Let your creativity shine by decorating the trees with sequins, buttons, or other embellishments of your choice.
This easy and fun project is perfect for classroom activities during the Christmas season.
For detailed steps, visit Crafty Morning’s original post here.
Alternative Materials: Instead of sequins or buttons, consider using small beads, glitter, or even tiny ornaments.
Difficulty Level: Suitable for children of all ages (with adult supervision)
Craft Variation Ideas:
- Use natural materials like dried berries, twigs, or leaves for a more rustic look.
- Create a whole forest of pine cone trees in different sizes and display them together for a stunning centerpiece.
Jingle Bell Wreath

Create a festive jingle bell wreath with just a few simple materials
- Green construction paper
- Jingle bells
- Glue
- Scissors, and ribbon.
Start by cutting a large circle from the green construction paper to serve as the wreath’s base.
Next, attach the jingle bells around the outer edge of the circle using glue, leaving a gap at the top for a ribbon hanger.
Secure a folded ribbon loop to the back of the wreath with glue to create a hanger.
Once the glue has dried, hang your charming jingle bell wreath on a door, wall, or window to add a delightful Christmas touch to your decor.
Alternative Materials: Instead of construction paper, you can use a foam wreath form or cardboard for a sturdier base.
Difficulty Level: Suitable for children of all ages with adult supervision for handling scissors and glue.
Craft Variation Ideas:
- Use red or gold construction paper and corresponding jingle bells for different holiday color themes.
- Add an extra layer of construction paper in a contrasting color to give the wreath more dimension.
- Incorporate small ornaments, beads, or ribbons to add extra flair to the wreath.
Christmas Snowflake Ornaments for Decor
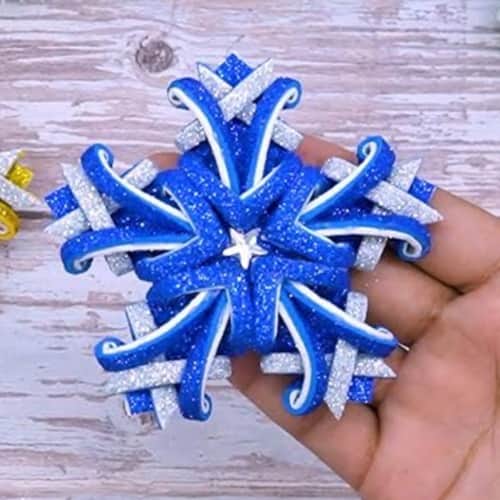
Credit: diycrafts.art
This snowflake decoration is crafted solely from glitter paper and glue, hard to believe, right?
I was skeptical too until I followed a quick tutorial.
Using blue and silver glitter sheets, you can create variations in different colors.
It’s all about cutting and folding the glitter sheets creatively.
To watch the quick tutorial on glitter paper snowflakes click here.
Alternative Materials: You can also use regular colored paper and apply glue and glitter separately for a more hands-on glitter experience.
Difficulty Level: Suitable for children of various ages with adult supervision for handling scissors and glue.
Craft Variation Ideas:
- Use a variety of glitter paper colors to make vibrant and eye-catching snowflakes.
- Glue smaller snowflakes on top of larger ones to create a dimensional effect.
- Attach a loop of string or ribbon to hang the snowflakes from the ceiling, windows, or on a Christmas tree.
DIY Crochet Patterns for Christmas
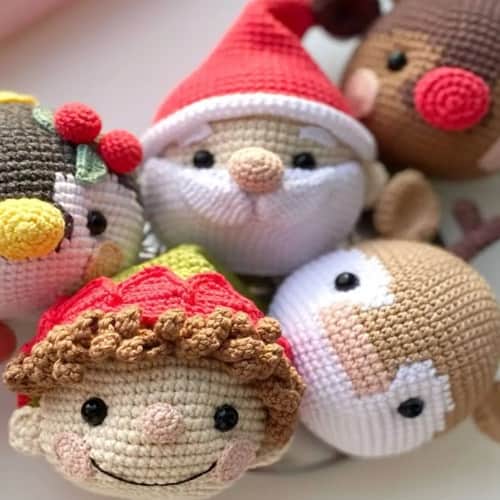
Credit: Nhi Pham via Scribd
Create charming crochet Christmas decorations like moose, deer, Santa, penguin, and elf figures using basic yarn and simple materials.
These handmade ornaments add a whimsical touch to your holiday decor and are surprisingly easy to make.
Whether you’re a crochet enthusiast or a beginner, you’ll find joy in crafting these adorable creations.
Discover the simple steps and common materials needed for each design.
Explore more about these delightful crochet patterns at the original source on Scribd here.
Alternative Materials: Experiment with different types of yarn (e.g., cotton, acrylic, wool) for varied textures and appearances.
Difficulty Level: Suitable for all skill levels, from beginners to experienced crocheters, with patterns available for varying levels of complexity.
Craft Variation Ideas:
- Holiday Characters: Besides moose, deer, Santa, penguin, and elf, try making other festive figures like snowmen, reindeer, or Christmas trees.
- Mini Ornaments: Create smaller versions of each character to use as tree ornaments or gift toppers.
- Gift Sets: Make sets of characters to give as gifts, adding a personal touch to your holiday presents.
DIY Wall mount Christmas Tree

Credit: skygoodiesco
Transform your home into a festive wonderland with this enchanting Christmas decor crafted from wooden sticks, paper ornaments, lights, and simple decorative items.
Despite its impressive appearance, creating this decor is surprisingly straightforward and allows for creative expression.
Begin by arranging wooden sticks or branches in ascending sizes to form a tree-like structure, as shown in the above image.
Wrap strip lights around the sticks to achieve a warm, glowing effect.
The final touches can be personalized with your choice of ornaments and embellishments.
Unfortunately, a full tutorial isn’t available as I could only find the image. That being said, it’s easy to replicate this art work as there isn’t any special trick involved in making a similar decor.
Alternative Materials: Instead of wooden sticks, you can use dowels, bamboo sticks, or even sturdy cardboard strips.
Difficulty Level: Childrens above 9 Years.
Craft Variation Ideas:
- Natural Elements: Incorporate pinecones, leaves, or dried flowers into the design for a more natural look.
- Color Themes: Use a color theme for your paper ornaments and lights to match your overall holiday decor.
- Interactive Tree: Attach small hooks or clips to the sticks so kids can easily change and rearrange the ornaments.
DIY Christmas Wreath Ornaments

Credit: diycrafts.art
Elevate your holiday decor with a stunning Christmas wreath made from craft beads and glitter papers.
Begin by cutting a circle from a glitter sheet and suspending a star at its center using a string.
Then, create a circular wreath shape from green glitter paper and meticulously arrange the beads around it.
This elegant yet simple project adds sparkle and charm to any festive setting.
Watch the full video walkthrough for step-by-step instructions on Instagram here.
Alternative Materials: Use foam sheets or thick cardstock if glitter paper is unavailable. Replace beads with buttons, sequins, or even small pom-poms for a different look.
Difficulty Level: This craft is suitable for children of various ages. Younger kids might need help with cutting and gluing.
Craft Variation Ideas:
- Color Themes: Use glitter paper and beads in colors that match your holiday decor theme.
- Seasonal Shapes: Instead of a star, suspend other seasonal shapes like a bell, snowflake, or heart in the center.
- Layered Wreath: Create a layered effect by adding a second, smaller wreath on top of the first and decorating it with smaller beads or sequins.
Final Thoughts
As a parent, I highly recommend trying these projects with children.
They’re not only fun but also educational and enhance fine motor skills and creativity.
My personal favorites are the pinecone Christmas trees and the felt ornaments, they’re easy to make and add a cozy, homemade touch to any space.
I suggest starting with one or two projects and gradually building your collection of handmade decorations over the years.
Remember, the imperfections in these crafts are what make them special.
Crafting together can become a cherished holiday tradition, creating memories that last far beyond the season.
So gather your supplies, put on some festive music, and let your creativity shine.


