As I gazed out my window at the fading autumn leaves, an idea blossomed in my mind.
Why not bring the beauty of nature indoors with a splash of creativity? That’s when I stumbled upon this enchanting paper flower craft for KIDS that’s perfect for all ages.
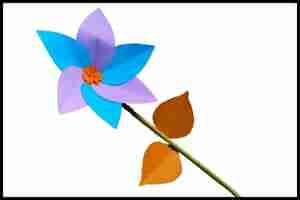
Imagine transforming simple sheets of colored paper into a stunning, long-lasting bloom that never wilts.
With just a few snips, folds, and dabs of glue, you can create a masterpiece that brightens any room.
Whether you’re looking for a rainy day activity, a unique gift idea, or a way to add a personal touch to your decor, this easy flower craft promises hours of fun and a beautiful result.
Ready to let your creativity bloom?
Let’s take a quick look at the list of items required to craft this autumn themed flower.
Step 1: Things You’ll Need For Paper Flower Craft
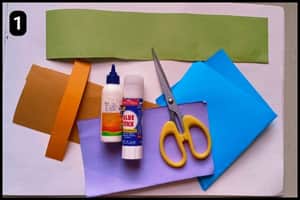
- Colorful Paper Sheets: I have used standard craft papers to cut the petal shapes, leaf, central base structure, and the stem of the paper flower. To further enhance the flower structure you can opt for origami paper or cardstock, etc. For the petals I have used blue and light purple shades, yellow for the central base, green for the stem, and muddy yellow for the leaves. The muddy yellow shade will resemble the autumn effect.
- Scissor: You can use a regular craft scissor to cut the shapes from the papers.
- Glue: To obtain a sturdy structure of the paper flower make sure to use a quality adhesive. A multipurpose glue will do the trick, however, it’s fine to use the regular glue because we will be using it to stick papers together.
Estimate Time To Complete This Project: 10 Minutes
Step 2: Cutting/Preparing the Shapes
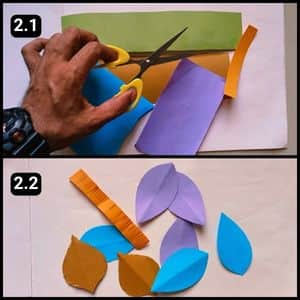
I’ve crafted oval shapes from blue and light purple paper for the petals.
The leaves are cut from a muddy brown paper with slightly roughened edges, as shown in image 2.2. Lastly, I’ve used a strip of yellow paper for the central base.
Step 3: Preparing/Shaping The Center Base
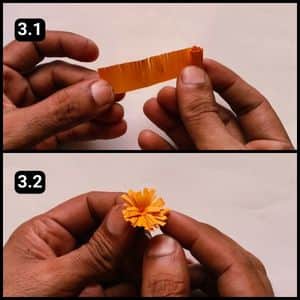
Now that all the shapes are prepared, let’s assemble the central base of the paper flower craft.
Start by cutting a strip from a yellow paper sheet followed by making several cuts along one side of the strip.
Roll up the entire strip, as shown in the above image.
Secure the end with glue to form the central base structure.
Use your fingers to gently spread out the cut portion of the central base for a finished look.
Step 4: Preparing the Stem
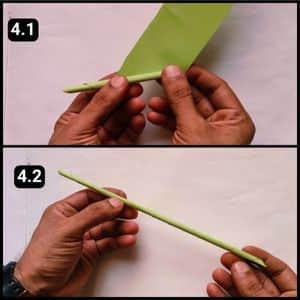
To create the stem of the paper flower, I cut a rectangular shape from green paper.
Roll it tightly to form a paper stick that will serve as the flower’s stem.
Begin by holding one corner of the green paper sheet and gently roll it sideways.
Step 5: Assembling the Paper Flower
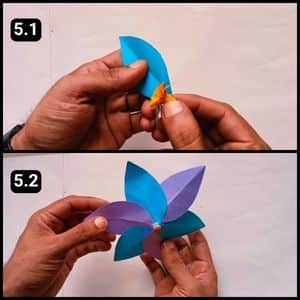
Now that all the necessary shapes and parts of the paper flower are prepared, it’s time to assemble them into the desired structure.
Start by taking the central yellow base and aligning the first petal shape.
Once the first petal is securely attached, align and stick the next piece beside it.
Continue this process, sticking each petal one by one and alternating shades for a balanced look.
Important: Allow each petal to stick properly before attaching the next one, as the base may not be completely even. Once all the paper petals surround the central base, let everything dry for a couple of minutes before handling further.
Step 6: Fixing the Stem and Leaves
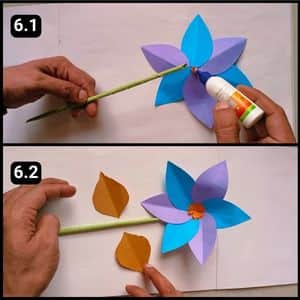
The main structure of the paper flower is complete, and now it’s time to attach the stem and leaves, which marks the final step of the craft.
First, apply glue to the back of the flower structure, as shown in image 6.1.
Then, attach the end of the paper stem to the glued area and allow it to dry.
Next, align the paper leaf shapes along the stem and secure them with glue.
Finally, let the glue dry completely before displaying this beautiful flower structure.
Here’s how the paper flower structure looks like post completion:

Video walkthrough of Paper flower craft for kids
Final Thoughts
This autumn flower craft is a wonderful way to bring a touch of nature indoors, especially during autumn or winter.
I’d recommend experimenting with different color combinations to create various seasonal themes or to match specific decor styles.
For a more eco-friendly approach, consider using recycled paper or even old magazine pages.
To add depth and texture, try curling the petals slightly or adding small details with markers or glitter.
This flower craft could be a great activity for children, teaching them patience and fine motor skills.
Overall, I find this DIY paper flower to be a charming, cost-effective way to add a personal touch to any space, whether as home decor or as a thoughtful, handmade gift.
Note: For your reference, I have also uploaded the complete video walkthrough of this unique flower craft on our official YouTube channel.


