Halloween is just around the corner, and it’s time to rethink our pumpkin decorating game.
Say goodbye to messy carving and hello to a world of vibrant, kid-friendly pumpkin painting ideas. I’ve gathered 11 creative designs that will transform your holiday decor:
- No sharp knives required
- Perfect for all ages and skill levels
- Longer-lasting than carved pumpkins
- Endless possibilities for creativity
From spooky skulls to mystical moons, these designs will spark your imagination and bring a fresh twist to your holiday traditions.
So grab your paintbrushes, gather the family, and let’s dive into a world of colorful Halloween fun that’s safe, engaging, and utterly enchanting.
Spotted Pumpkin Patch
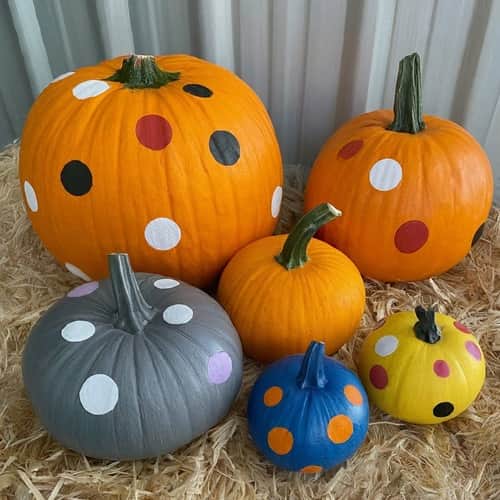
This playful design is ideal for crafting a charming set of pumpkins to adorn your porch or mantel.
Begin by selecting pumpkins of various sizes, and paint each one a solid color such as orange, white, or cream (Allow them to dry completely).
Once they’re dry, use a sponge or the end of a paintbrush to dab on polka dots in contrasting colors, experimenting with different combinations or sticking to a single bright color for a vibrant effect.
If you prefer a different pattern, you can easily substitute the polka dots with stripes, zigzags, or other simple designs.
Smiling Skull Pumpkin

This design strikes a perfect balance between spooky and cute, making it ideal for families with young children.
Begin your pumpkin transformation by coating it entirely in deep black paint, ensuring every inch is covered evenly, and let it dry completely before proceeding.
Once dry, use a pencil to sketch a simple skull design on the front of the pumpkin, featuring large, round eyes, a triangular nose, and a wide, toothy grin.
Carefully fill in the sketch with black paint, emphasizing the eyes, nose, and outlining the teeth.
For a playful twist, paint the teeth in a bright color like yellow or pink.
Finish off by adding a small black stem to complete the charmingly spooky look.
Mummified Mystery Pumpkin (UNIQUE Pumpkin Painting Idea)
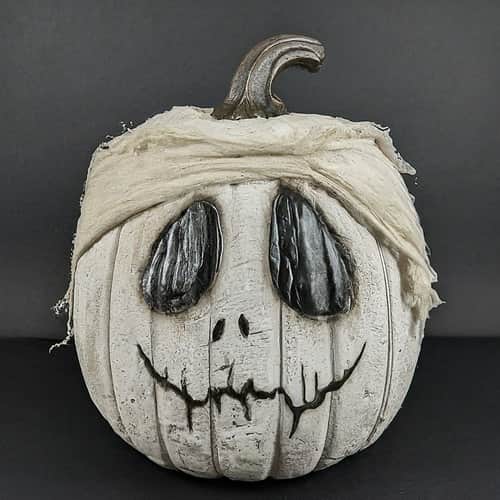
Create a chilling atmosphere on Halloween night with this spooky pumpkin design.
Start by painting your pumpkin white and ensuring it dries completely.
Next, wrap thin strips of white gauze or cheesecloth loosely around the pumpkin and secure the ends with craft glue.
Using a damp sponge or paintbrush, apply light grey or brown paint over the gauze to achieve a tattered, aged appearance, allowing some of the white paint to show through.
Paint eerie, large eyes on the pumpkin using black paint, and consider adding a simple black mouth for an extra creepy touch.
For added mystery, glue on a few small fake spiders or cobwebs around the base of the pumpkin stem.
Striped Pumpkin Trio

For a visually interesting display with minimal effort, gather three pumpkins of varying sizes (preferably round or oblate for a uniform appearance).
Ensure they are thoroughly cleaned and dried.
Select three contrasting colors for your stripes i.e. traditional Halloween hues like orange, black, and white are classic choices, but feel free to explore other combinations.
Use painter’s tape to create neat and evenly spaced stripes around each pumpkin, measuring and marking their circumference beforehand for precision.
Once satisfied with the taped stripes, carefully apply your chosen colors in multiple coats, allowing each layer to dry thoroughly before proceeding.
Finally, gently peel off the painter’s tape once the paint has completely dried to reveal clean, crisp lines.
Mystical Moonlit Pumpkin
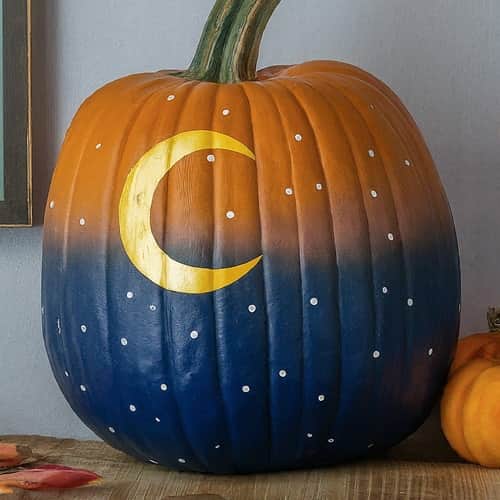
Create a calming and atmospheric Halloween decoration with this elegant design.
Start by selecting a smooth, round pumpkin and painting the entire pumpkin in a deep navy blue or dark blue shade, ensuring it dries completely.
Once dry, use a damp sponge to gently dab lighter shades of orange and light orange paint onto the surface, blending them to achieve a subtle gradient resembling a moonlit sky.
Intensify the deepest blue hue at the base, seamlessly blending it upwards for a gradient that captures the essence of a twilight sky.
Next, either use a stencil or freehand draw a simple crescent moon shape on the upper part of the pumpkin (or simply use a sticker as seen in above image).
For an extra touch of sparkle, consider adding silver details around the moon or stars.
Spooky Silhouette Pumpkin
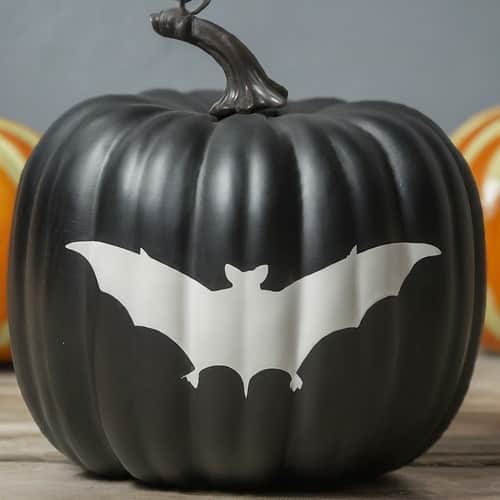
This beginner-friendly pumpkin painting idea is perfect for adding an elegant touch to your Halloween decor.
Commence your pumpkin makeover with a sleek coat of midnight black, ensuring thorough drying for a flawless finish.
Once dry, use a stencil or freehand technique to draw a spooky silhouette, like a bat, cat, or ghost on the pumpkin’s surface.
Opt for white or orange paint to make your silhouette stand out against the dark background.
Finish by painting a simple stem with brown paint, and your spooky silhouette pumpkin is ready to be displayed.
Tips:
- Use a white gel pen for extra crisp lines on the silhouette.
- For a more whimsical touch, use glittery white paint for the silhouette.
Bewitching Cauldron Pumpkin

Choose a round or slightly squat pumpkin for this spooky and fun design.
Begin by painting the entire pumpkin black and allowing it to dry completely.
Once dry, use white or yellow paint to craft a large, bubbling cauldron shape on the front of the pumpkin, adding wispy lines at the top to depict steam rising.
Use vibrant colors like green, purple, and orange to paint small circles or blobs around the base of the cauldron, simulating a bubbling potion.
To heighten the eerie effect, incorporate googly eyes peeking out from the top of the cauldron, or use white paint to draw a spooky face directly on the cauldron itself.
Complete the witch’s brew look by painting the stem brown and adding a few small green leaves.
Mummy Cat Pumpkin
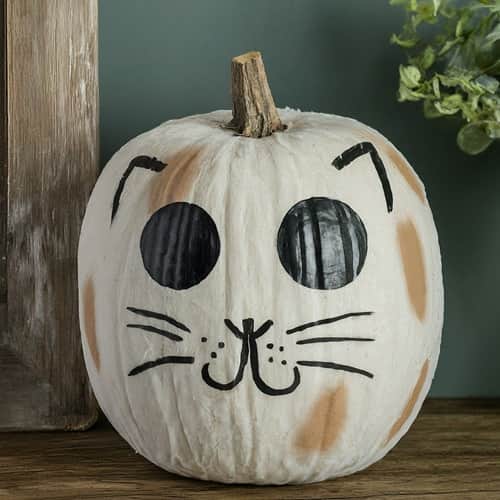
For cat lovers looking to add a whimsical touch to their Halloween decor, select a round or slightly oval-shaped pumpkin.
Begin by painting the entire pumpkin white and allowing it to dry completely.
Next, outline a cute cat face on the front of the pumpkin using a pencil, emphasizing large, round eyes, a small nose, and a playful smile.
If possible, loosely wrap strips of white gauze or cheesecloth around the pumpkin’s body, leaving the cat’s face exposed, and secure the ends with craft glue.
To achieve a mummy-like effect, lightly dab on light grey or brown paint over the gauze, allowing the white paint to show through in areas, particularly around the cat’s face.
Friendly Ghost Pumpkin
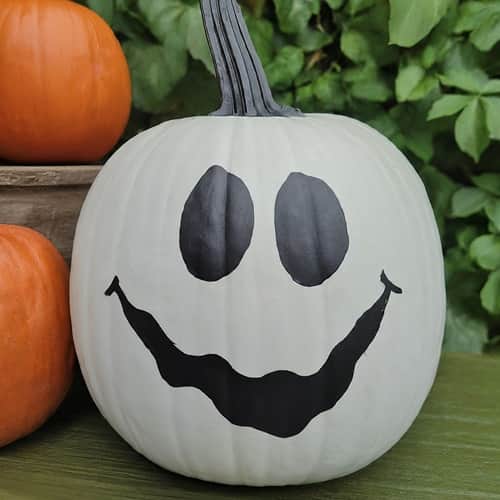
For a touch of playful spookiness on your Halloween doorstep, opt for a white pumpkin, preferably round in shape.
Ensure the pumpkin is thoroughly cleaned and dried before proceeding.
Begin by painting the entire pumpkin white and allowing it to dry completely.
Next, sketch the outline of a friendly ghost face on the front of the pumpkin using a pencil, featuring large, friendly eyes with a slight downward curve at the corners and a simple smile with a slight upward curve.
Next, carefully use black paint to fill in the sketched outline.
Ghost Pumpkin

For a haunted Halloween display with an eerie glow at night, start by selecting a pumpkin of any size or shape and ensuring it is thoroughly cleaned and dried.
Paint the entire pumpkin white and allow it to dry completely.
Using a pencil, lightly sketch the outline of a ghostly face on the front of the pumpkin, keeping it simple with large, round eyes, a small nose, and a slightly open mouth.
Carefully fill in the sketch with black or glow-in-the-dark paint to define the ghost’s features.
For an extra spooky effect, apply a coat of glow-in-the-dark paint over the entire white pumpkin.
This will give it a faint ghostly glow when viewed in low light conditions, enhancing its eerie presence in your Halloween setup.
Creepy Crawly Spider Pumpkin

For those who enjoy a touch of Halloween fright, start with a pumpkin of any size or shape, ensuring it’s thoroughly cleaned and dried.
Paint the entire pumpkin black and let it dry completely.
Using white or yellow paint, create a large spiderweb design on the front of the pumpkin by drawing concentric circles with radiating lines branching outward.
In the center of the web, paint a large spider body using black paint, detailing it with eight long legs and beady eyes created with white paint, complete with a black dot for the pupils.
To enhance the creepy effect, scatter tiny white dots around the web to simulate crawling insects trapped within its grasp.
Final Thoughts
As someone who enjoys Halloween festivities, I believe these projects offer a great way to involve children in holiday decorating while avoiding the mess and potential dangers of carving.
I particularly like the Spotted Pumpkin Patch and Striped Pumpkin Trio ideas for their versatility and ease.
For those seeking a spookier touch, the Mummified Mystery and Creepy Crawly Spider designs are perfect.
I’d recommend starting with simpler designs and progressing to more complex ones as skills improve.
These projects not only serve as fun family activities but also as opportunities to teach color theory and pattern recognition to kids.
Overall, painted pumpkins offer a safer, longer-lasting, and more customizable alternative to traditional jack-O-lanterns.


