If you’re looking for an awesome Halloween castle craft for kids, you’ve come to the right place.
This kids craft is perfect for preschoolers, toddlers, and really kids of all ages.
Using just some basic materials like paper and scissors, we’re going to create the coolest little haunted castle that will have your little ones shrieking with delight.
Get ready to channel your inner ghost or goblin as we construct a scary craft that doubles as the perfect ghoulish decoration.
These paper Halloween crafts are easy enough for even the tiniest crafters to join in on the fun.
And the best part? At the end, you’ll have an adorable spooky craft to proudly display and remember the great time you had creating it together.
Note: Before we begin let me also inform you that you will only need the template, scissor, and glue that’s it.
Step 1: Downloading The Halloween Castle Template

One of the key elements of this Halloween craft is the unique template design.
Check out the image above to see what the Halloween Castle template looks like.
Designing the template took some effort, but the final result is incredibly satisfying.
You can download and print the Castle template for free from our website with just a few clicks.
Step 2: Cutting the Castle Template Shapes
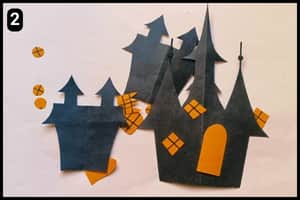
After downloading the Halloween template, I sliced out the shapes using a scissor. You can see how the pieces should look post cutting in the image above.
Step 3: Assembling the Castle
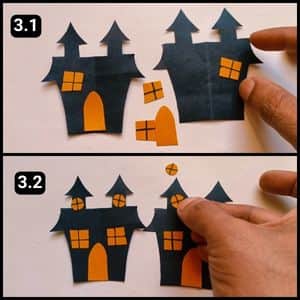
With the cutouts ready, it was time to grab the glue and start assembling the castle structure.
First, I fixed the door and window shapes onto the sides of the main castle structure.
I made sure to stick the door shapes in the middle and then added the square side windows.
Next, I attached the round shapes as small windows at the top, as shown in image 3.2 above.
Finally, I assembled the sides of the main castle, and it was time to prepare the central structure in the next step.
Step 4: Preparing the Central Structure Of Halloween Theme Castle

The image above shows the central structure of the Halloween castle, and it was time to assemble the large door and the two windows.
First, I aligned and stuck the door shape to the center of the structure.
Next, I added the window shape above the door.
Finally, I aligned and attached the designer window shape to the top, as seen in image 4.2 above.
This completed the central structure of the paper Halloween castle.
Now it was time to align and stick all the prepared structures together, which I demonstrated in the next step.
Step 5: Joining the Castle Structures
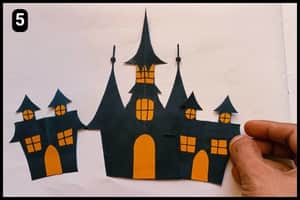
Finally, the last step of the paper Halloween Castle craft is to align and adhere the main structures together.
I positioned the central structure in the middle and aligned the two similar structures on either side.
Next, I applied glue to the joining edges and adhered them securely, completing the castle structure.
Step 6: The Final Structure of the Scary Caste
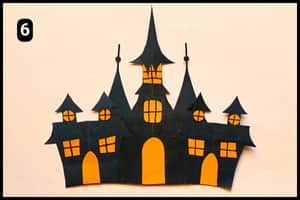
Take a look at the final structure of the Halloween Castle, it looks like you’ve paused your favorite scary show on TV! In reality, it’s truly eye-catching and one of the best craft projects for Halloween.
Note: It took 8 minutes for me to craft the paper Halloween Castle using the template from the website link available in step number 1.
Additional Tips
- Elevate your castle with different textures i.e. Glue on construction paper scraps to create cobblestones around the base or add a textured roof with felt or tissue paper.
- No Halloween craft is complete without some sparkle, so add a touch of magic with glitter glue on the windows or use sparkly craft foam for the roof.
- Take your castle to the next level by creating 3D elements. Fold small paper strips into accordion shapes to create pop-up bats or ghosts that can be attached to the castle walls.
- This is a perfect Halloween activity for a playdate or party. Print out multiple templates if possible and let the kids collaborate on decorating their own spooky castles. You can even hold a competition for the most creative or spookiest design!
- Once the castles are built, use them as props for a fun Halloween story time. Let the kids use their imaginations to create spooky stories about the ghosts and ghouls that might live inside.
Final Thoughts
This Halloween castle craft for kids is an absolute must-try for the spooky season.
The simple materials and easy-to-follow steps also make it a perfect weekend activity for kids of all ages.
I love how it combines creativity with that quintessential Halloween vibe.
My recommendation? Print out a few extra castle templates so the little ones can let their imaginations run wild decorating multiple castles.
You could even turn it into a fun competition to see who can make the spookiest or silliest haunted abode.
No matter if you’re looking for craft ideas for preschoolers, veteran crafters, or just looking for some scary craft fun, this paper Halloween craft is sure to delight.
The affordable materials mean no unnecessary spending, and the memories made will be priceless on Halloween.
Note: I have also shared the complete video walkthrough of the paper Halloween Castle craft on our official YouTube channel.


