As I sat at my desk, surrounded by a rainbow of colored pencils and a blank sheet of paper, I couldn’t help but feel a spark of excitement.
Who knew that the simple act of sharpening these pencils could lead to a world of creativity?
Today, I’m going to show you how to transform those pesky pencil shavings into a miniature floral garden that will make you see waste in a whole new light.

Pencil shavings craft activities are not only economical but also allow you to make creative use of daily waste.
Are you ready to turn trash into treasure? Let’s take a quick look at the list of items required for this garden made using shaved pencil waste.
Step 1: Things You’ll Need For This Mini Flower Garden Craft Using Pencil Waste
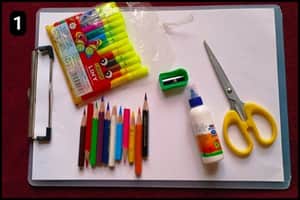
- Pencil Colors: You will need pencil colors pens to draw the stem and other required details. However it’s optional if you already have colorful pencil colors or you can use both.
- Sharpener OR Pencil Shaver: To shave the pencil and gather the waste.
- White Paper: You can use a white paper as the base to stick the pencil waste and form floral structures.
- Paper Board: To hold the white paper in place you can use a paper board while you are working over it.
- Glue: To stick the pencil waste you will need glue and multipurpose glue can come handy to form a sturdy structure.
- Scissor (only if necessary): You can keep a scissor handy as you might need to trim or shape the pencil waste.
Estimated Time taken to make the pencil waste mini floral garden craft: It took 10 to 12 minutes for me to make the floral garden craft for kids.
Step 2: Shave the Pencil Colors
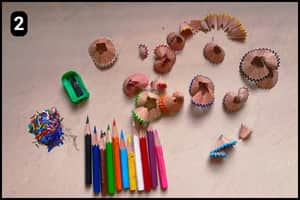
Begin by carefully sharpening the colored pencils of your choice, ensuring you don’t overdo it.
Focus on pencils that genuinely need sharpening to avoid unnecessary waste.
I had an old set of colored pencils, all of which needed sharpening, so I used a regular sharpener to refresh them.
I set aside the leftover pencil shavings for future craft projects.
Step 3: Making the Flower Structures
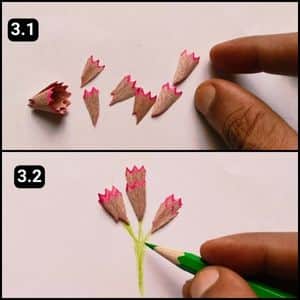
Next up, I grabbed some colored pencil shavings to start creating the first part of the flower structure.
I chose the pink shavings and broke them into even pieces, as shown in image 3.1 above.
I then aligned two pieces one over the other to make three sets and then using glue, I stuck them onto the white paper base and let them dry completely.
Next, I used a green colored pencil to draw the stems of the flowers, as depicted in image 3.2 above (You can use either colored pencils or markers to draw the stems).
Step 4: Assembling the Leaves
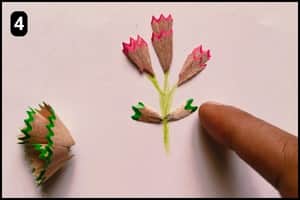
The moment had come to carefully arrange the foliage of the flower plants.
I used the shavings from the green pencil for the leaves, as shown in the image above.
You can customize their positions and stick them wherever you like.
I opted to use two leaves per plant, though you can certainly add more if you prefer a fuller look.
Step 5: Preparing Multiple Structures and their Pots
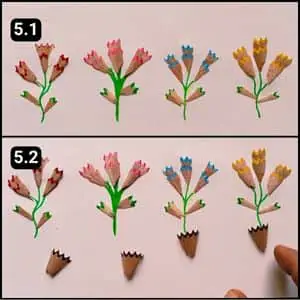
As seen in image 5.1 above, I crafted multiple flower plants using various shades.
Then, it was time to add the pots to their bases.
I used brown pencil shavings for this. I applied glue to each pot and carefully attached them one by one beneath each plant. I let them dry for a while.

If you look at the final image above I have highlighted the ground surface using the brown pencil color.
The mini garden is now filled with colorful flower plants and looks complete.
Video Walkthrough of Mini Flower Garden Using Pencil Waste
Final Thoughts
While the above pencil waste craft project covers the basics, I’d recommend expanding the activity to include discussions about recycling, color theory, and plant biology.
This could transform a simple craft into a multidisciplinary learning experience.
I’d also suggest exploring different textures by incorporating other recyclable materials like paper scraps or fabric remnants.
To enhance the project’s educational value, consider adding a storytelling element, encouraging children to create narratives about their miniature gardens, doing this develops language skills and imagination.
For older kids, introducing basic concepts of landscape design or urban gardening could add depth to the activity.
Overall, this craft offers a wonderful opportunity to nurture creativity, environmental consciousness, and hands-on learning in a fun, engaging way.
Note: To assist you further I have also uploaded a quick video walkthrough of the pencil Shave craft on our official YouTube channel.


