As a parent, I’m always on the lookout for fun and engaging crafts to keep my little ones entertained.
That’s why I’m thrilled to share this Paper Butterfly Craft for Kids using popsicle sticks and a printable butterfly template.
This delightful project is not only a breeze to create but also allows your children to unleash their creativity while honing their fine motor skills.
Imagine their beaming faces as they bring these vibrant butterflies to life with a simple snip and stick! Plus, it’s an eco-friendly option that repurposes everyday materials, making it a guilt-free indulgence.
So, grab your scissors, glue, and let’s dive into this enchanting world of paper butterflies.
In this article, I have provided a step-by-step guide on how to make a butterfly craft using paper and popsicle sticks.
Editor’s note: If you think popsicle stick butterfly isn’t your thing here are the two versions of easy paper butterfly craft.
Things You’ll need to make the popsicle stick paper butterfly are listed below:
- Butterfly Template: I have used the self made butterfly template which is available on our website.
- Popsicle Sticks: I’ve used popsicle sticks as the body structures of the butterflies.
- Glue: To stick the antennas and the wings to the popsicle sticks you will need a glue such as a multipurpose glue or any strong adhesive.
- Paint: I have used standard water color and a paintbrush to paint the popsicle sticks.
- Marker: To highlight the details of the butterflies you will need marker pens. I have used a red marker pen to draw the mouth line, maroon for the body stripes, and black for the eyes.
With all these basic elements ready let’s download and print the butterfly structures in the step below.
Step 1: Preparing/Downloading The Paper Butterfly Template
You can easily find the Butterfly Template Source on our website.
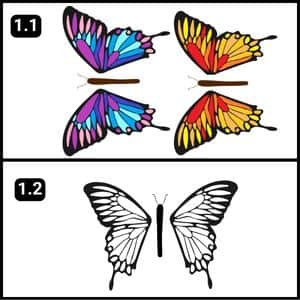
Just take a glance at the image above to see what the templates look like.
I’ve crafted two versions i.e. one with blank outlines and another in vibrant colors.
Just pick the one you like, download, and print it out followed by following the steps shown bellow to get started.
If you’re eager to add your own colors, go for the blank outline template. But if you’re itching to dive right in, opt for the colorful ones.
Step 2: Cutting the Shapes
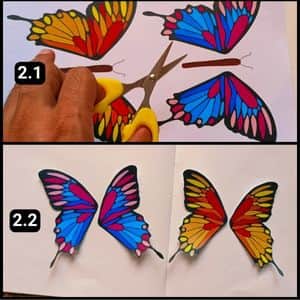
Now that I had the template ready, it was time to cut out the butterfly shapes, and I opted for the colorful templates.
I carefully cut out the wing shapes of the butterflies and left the body shapes untouched since I planned to use popsicle sticks instead.
However, if you prefer not to use popsicle sticks, you can cut out the body shapes of the butterflies and adhere them to cardboard sheets for added strength.
Step 3: Shading the Popsicle Sticks
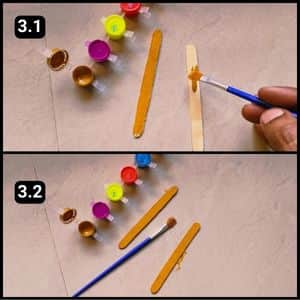
Now that the cutouts were ready, it was time to transform the popsicle sticks into butterfly body structures.
First, I painted them with a muddy yellow color, using regular watercolor and a paintbrush.
After ensuring both sticks were evenly painted, I let them dry for about 5 minutes. Placing them under a running fan helped the watercolor to dry quickly.
Step 4: Highlighting the Popsicle Sticks
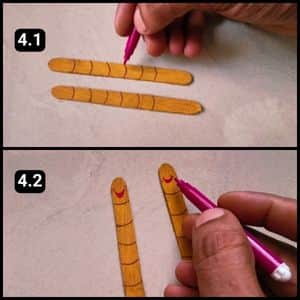
After the popsicle sticks had dried and the color looked vibrant, it was time to accentuate the details of the butterflies.
I grabbed a maroon marker pen to highlight the body stripes and a red marker to draw their mouths.
Then, I used a black marker pen to shade the eyes of the butterflies.
With the shades looking just right, it was time to assemble the butterfly structure, as I’ll explain in the next step.
Step 5: Assemble them all
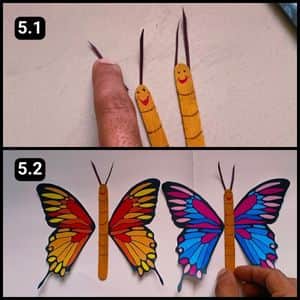
Now that the popsicle sticks were ready as the bodies of the butterflies and the wing cutouts were at hand, it was time to put them together.
But first, I needed to craft the antennas of the butterflies, for which I required four thin strips of paper.
I cut these strips from a dark brown paper sheet and carefully adhered them over the butterflies’ heads, as shown in image 5.1 above.
Next, I applied glue to the edges of the wings and attached them to the back of the popsicle sticks, forming the butterfly’s body.
I repeated this process for the other butterfly structure and allowed it to dry for some time.
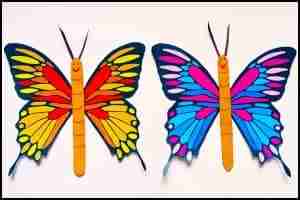
These final butterfly structures are incredibly charming and can also serve as delightful decor to elevate the overall look of your space.
Children happily fluttered around the house, clutching these adorable butterflies with their tiny fingers.
Final Thoughts
I highly recommend trying this craft with your little ones, the sense of accomplishment they’ll feel upon completing their vibrant butterflies is priceless.
Additionally, I suggest letting them personalize their creations by allowing them to choose their own color combinations or adding embellishments like glitter or sequins.
This project is a wonderful way to bond with your children while nurturing their artistic talents.
Lastly, don’t be afraid to get messy and embrace the chaos, that’s where the joy lies.
So, clear your schedules, stock up on supplies, and let the butterfly-making adventure begin
Note: I have also shared the complete video walkthrough of the popsicle sticks butterfly on our official YouTube channel so that you can visually see how the whole process works.
Frequently Asked Questions
How long did it take to craft the paper butterfly using a popsicle stick?
Using the ready template provided on our website, it took me around 15 minutes to create the paper and popsicle stick butterfly. This includes the time needed for the paint and glue to dry thoroughly.
Can I use other materials besides popsicle sticks for the butterfly body?
Yes, you can use straws, pipe cleaners, or even bendy sticks for the butterfly body.
Are there any educational aspects to this craft?
Yes, use this opportunity to teach children about butterfly life cycles, different butterfly species, or even symmetry while creating the wings.