Imagine the sheer delight on your little one’s face as they bring to life a ladybird, that charming beetle with its vibrant spots and glossy elytra (hard forewings).
This delightful paper ladybug craft for kids is sure to captivate their imagination and unleash their creativity.
As a parent, I relish those moments when a simple activity sparks boundless joy and curiosity in my children’s eyes.
That’s precisely what happened when I unveiled the idea of crafting our very own ladybug.
The mere mention of this beloved insect sent waves of excitement rippling through the house, with my kids begging to start immediately.
Witnessing their enthusiasm, I knew we were onto something special, a chance to bond over a fun-filled project while nurturing their artistic talents.
And let me tell you, the sense of accomplishment they felt upon completing their paper ladybugs was truly priceless.
So, without wasting any time let’s dive right into the step by step process to craft a cute looking ladybird.
Step 1: Preparing The LadyBug Template
I’ve crafted this unique ladybug structure, and it’s now up on our website as a handy template for you to use.
I enjoy creating my own templates for various craft projects, including this adorable ladybird.
With a goal of making the design both distinct and simple, perfect for kids I first sketched out the shapes with a pencil, refining them until they were just right.
And then I traced over them with a black marker for clarity.
While you have the option to customize the ladybird template with your own shapes, I’ve already provided one for your convenience.
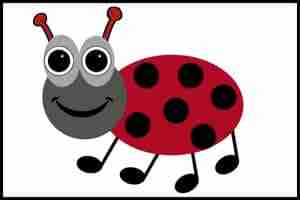
Check out the image above to see the actual ladybug craft template.
I’ve uploaded two versions of the template:
- One with just outlines
- The other one is filled with colors.
If you’re working with a group, simply print out multiple copies of the colorful ladybug template with a few clicks, and you’re ready to get started.
You can download the paper ladybug template here.
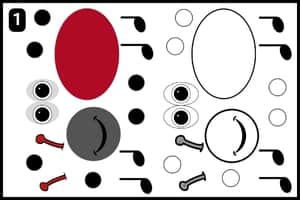
Step 2: Cutting the Shapes
In image 2 above, you’ll see the vibrant ladybird template I’ve utilized.
I’ve printed this template onto standard A4 paper and meticulously cut out the shapes with scissors.
The trickiest part was cutting out the delicate leg shapes and antennas of the lady beetle, as they require precision.
Ensure you cut them accurately to avoid any mishaps with the ladybird shapes.
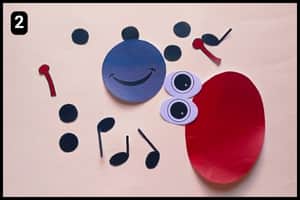
Step 3: The Assembling Process
Now that the cutouts are prepared, it’s time to put together the ladybird beetle’s form.
Starting off, I positioned and adhered the facial features, such as the prominent eyes and antennas.
I’ve placed the eyes of our coccinellid (scientific name) slightly above its facial structure, as depicted in the images.
Then, I affixed the antennas from behind the eye shapes, finishing off the facial structure of the ladybird beetle.
Step 4: Assembling the Body Shades
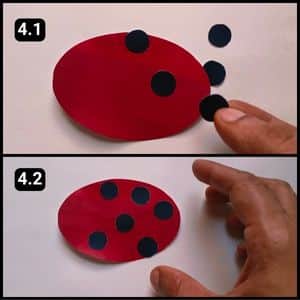
Now that the facial structure is complete, it’s time to arrange the body structure with its characteristic markings (dots).
I fixed the black circles onto the ladybird’s body, mirroring its natural markings.
Step 5: Joining the Facial Structure with Body
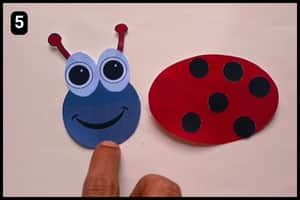
At last, both the facial structure and the main body of the paper ladybug are prepared.
Next, join them by aligning the edge of the facial structure over its body.
With this step, the paper ladybug structure is nearly complete.
Step 6: Fixing the Tiny Legs

It was time to attach the tiny legs to the paper ladybug’s body, marking the final step of our craft project.
Applying glue to the edges of the thin cutouts and sticking them proved challenging, requiring careful handling.
I meticulously applied glue to the edges of each leg, affixing them one by one.
The structure is now finished, and it’s visually stunning, as shown in the image above.
May this ladybug bring you good luck and fortune. Indeed, in many countries, they’re revered as symbols of good luck, often associated with wishes coming true.
Final Thoughts
This ladybug paper craft is an absolute delight, and I can’t recommend it enough for parents seeking quality time with their little ones.
Beyond the obvious fun factor, it fosters crucial skills like patience, dexterity, and creativity.
My advice? Don’t stress over perfection, let your kids take the lead and see where their imagination takes them.
Personalize the design, experiment with different materials, or even make a family of ladybugs.
Most importantly, savor those priceless moments of bonding while crafting this cute beetle.
Lastly, if you wish to change the color of the ladybug, consider using the template with blank outlines (This can be a handy tool for customization).
Note: To further assist you, I have shared the complete video walkthrough of the paper ladybug on our official YouTube channel.
Frequently Asked Questions
How long did it take to craft the paper ladybug structure?
It takes less than 10 minutes to assemble the paper ladybug using the colorful template from our website.
How can I make the ladybug craft more challenging for older children?
To make this ladybug craft more challenging, have them create their own ladybug template with unique features. Let them experiment with different materials like glitter, pipe cleaners for antennae, or buttons for spots. And if possible, encourage them to create a whole ladybug habitat scene with leaves and other insects.
What are some other ladybug facts I can share with my children while crafting?
While crafting, talk about the role of ladybugs and inform them that they eat garden pests like aphids. Furthermore, they also come in many different colors and patterns, not just red with black spots. In some cultures, ladybugs are symbols of good luck and fortune.


