Today, I’m going to share with you an exciting Queen Bumble Bee Paper Craft for Kids that’s perfect for those rainy or sunny days when you want to keep their hands busy and minds engaged.
Using a printable queen bumble bee craft template, your kids can unleash their creativity and bring this adorable insect to life with just a few simple materials.
In this article, I have provided a step-by-step guide to making a paper queen bumblebee. By following these instructions, you and your kids can easily create a similar structure together.
Editor’s Note: I have created multiple versions of bumble bee, below you can find various versions:
Step 1: Preparing/Downloading The Queen Bumblebee Paper Craft Template

I love coming up with creative and unique structures for my craft activities, and my latest project, the queen Bumblebee, is another example.
If you check out the image above, you’ll see two versions of the queen Bumblebee template.
One is already filled with vibrant colors, and the other is a blank outline, perfect for adding your own colors and personal touch.
Most people prefer the colorful template because it’s so easy to download, print, cut out, and assemble.
You can grab it from our website here and then follow the simple steps below.
Step 2: Cutting the Shapes
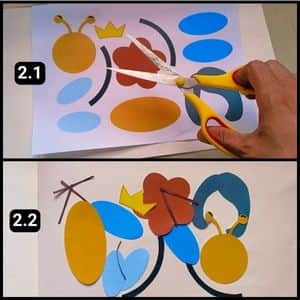
In image 2.1 above, you can see that I’ve downloaded and printed the Queen Bumblebee template.
With the template in hand, I carefully cut out the bee shapes using a fine pair of scissors.
It’s important to cut slowly and precisely to ensure the shapes come out even and clean.
Step 3: Assembling the Queen Bee structure
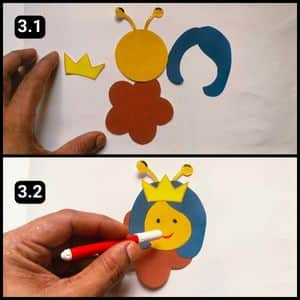
With the cutouts ready, it was time to assemble the bee’s structure, starting with the top section.
First, I stuck the bee’s facial shape (the yellow one with antennas) over the brown flower shapes.
Then, I attached the cutout resembling a female’s hair.
Next, I placed the crown shape around the top of the facial structure.
Finally, I used black and red marker pens to add details like the eyes and the smiling mouth of the queen Bumblebee.
Step 4: Assembling the lower body
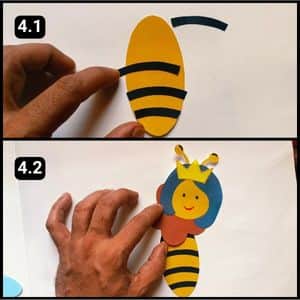
Before attaching the lower body to the top of the bee, I first added the black stripes.
Once the stripes were securely in place, it was time to assemble the two parts.
As shown in image 4.2 above, I applied glue to the joining edges and then carefully stuck the top structure onto the lower body.
Step 5: Assembling the legs and the Wings
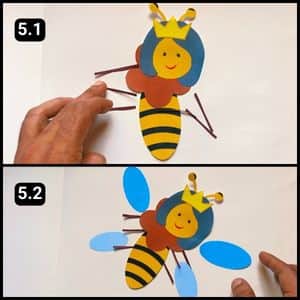
With this, I moved to the final step of the Paper Queen Bumblebee Craft i.e. assembling the legs and wings.
To craft the legs, I cut slightly long strips to have enough space to apply glue to the edges and attach them from behind the bee’s body.
I had six strips for the legs, three for each side, which I stuck on one by one. I made sure the opposite legs were properly aligned and evenly assembled.
Next, I attached the wings to the back of the structure. There were four wings in total, two small and two large ones.
I first attached the large wings, one on each side, followed by the small wings in the same way.
I made sure to position the large wings facing slightly upwards and the small wings tilting downwards, as shown in image 5.2 above.
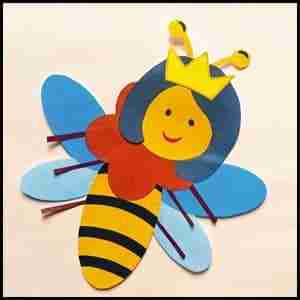
If you look at the image above, you’ll see the final structure of the Queen Bumblebee.
She looks absolutely adorable! The children were delighted with the Queen Bumblebee and had a fantastic time playing with her.
Final Thoughts
The step-by-step instructions make it easy for even the youngest crafters to follow along and create their own unique masterpiece.
However, I would recommend incorporating additional elements to make the craft more engaging and educational.
For instance, you could include fun facts about bumblebees, their role in pollination, and the importance of protecting these fascinating insects.
Additionally, encouraging children to personalize their crafts by adding their own creative touches, such as decorating the wings with patterns or giving the bumblebee a name, can further enhance and boost the creativity..
Overall, this craft is a delightful way to spend quality time with children while fostering their artistic abilities and appreciation for nature.
I highly recommend trying it out and exploring ways to adapt it to suit different age groups and learning objectives.
Note: For your reference, I have also shared the complete video walkthrough of the Paper Queen Bumblebee Craft on our official YouTube channel.
Frequently Asked Questions
How long will it take to craft the Queen Bumblebee?
It should not take more than 10 minutes to craft the paper Queen Bumblebee using the ready template from the website.
Are there any activities I can do with my child alongside the craft?
Yes, as mentioned in the article, you can discuss bumble bees, their role in the environment, and the importance of protecting them. You can also look at pictures of real bumble bees and compare them to your creation.
How can I encourage my child to add their own creative touches to the craft?
Let them choose their favorite colors for the bee’s body and wings. Instead of stripes, they could create a polka dot pattern or another design. They could add details like a stinger or pollen on the bee’s legs. Encourage them to draw a face on the bee or give it a name.


