Today I’m excited to share a fantastic Honeypot Bumblebee Craft For Kids that’s guaranteed to create a buzz in your household.
This smiley face bumble bee craft is more than just a cute activity, it’s a hands-on way to learn about these important pollinators.

Using our free bumble bee template, you’ll have everything you need to dive into this humble bee craft.
We’ll cut colorful shapes, assemble our bee, and even add a tiny honey pot.
This insect craft is perfect for keeping little hands busy and minds engaged.
Whether you’re a seasoned crafter or new to kids crafts, you’ll love how this project combines creativity and learning.
But first let’s take a quick look at the list of minimum craft supplies you’ll need for this kids craft activity.
Step 1: Things You’ll Need for Smiley Face Honeypot Bumblebee Craft

- Colorful Craft Papers: To cut the shapes of the Bumblebee’s structure for assembling you will need colorful craft papers. Make sure to use the shades that resemble a bumblebee.
- Scissor: To cut the bumble bee shapes from craft papers you will need a scissor.
- Glue: To stick the bumble bee paper cutouts you will need glue and you can use a standard crafts glue or a multipurpose adhesive.
- Golden Glitter Paper (Optional): I have used a small piece of golden glitter paper to use as honey spill (You can stick with orange or yellow).
- Honeypot Bumblebee Template: You can use our ready template from the website which includes the shapes of the structure for cutting and assembling. To access the free template you can move to step 2 below.
Estimated Time taken to make the Honeypot Bumblebee craft: It took 10 minutes for me to make this smiley face honeypot bumblebee craft for kids using the ready template from the website.
Step 2: Preparing/Downloading The Bumblebee Template

If you look at the image above this is what the honeypot Bumblebee Template will look like (Once you’ve downloaded it).
You can download and print the template with a few clicks and directly move to the cutting process and then assembling the structure later.
The Honeypot bumble bee template includes the following shapes:
- Head
- Facial Details
- Lower body
- Body stripes
- Antennas
- Tail
- Pot
- And honey spill
Step 3: Cutting The Bumble Shapes

I cut the shapes of the Honeypot Bumble Bee structure from colorful paper sheets using standard scissors.
Note: I made sure to cut the shapes carefully, taking my time to ensure they were precise.
Step 4: Assembling The Bumble Bees Lower Body

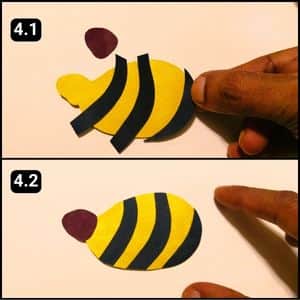
With the shapes ready, it was time to assemble the bumble bee properly, so I grabbed the glue and started with the lower body shape, aligning and sticking the body stripes as shown in image 4.1 above.
Once the body stripes were properly aligned, I attached the blob shape, which formed the bee’s neck.
Step 5: Assembling the Facial Details Of Bumble Bee

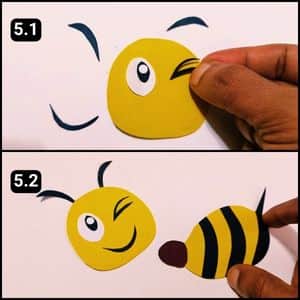
Next up, I assembled the facial details of the bee, including its eyes, mouth, and antennas.
I first attached the large eye shape on the left, followed by the winking eye next to it.
Then, I added the mouth, which was a curved black cutout followed by attaching the antennas evenly over its head.
With the facial features complete, I fixed the head to the bee’s body, as shown in image 5.2 above.
Step 6: Fixing the Wings and Honey Pot

With this, I moved to the final step of the Bumblebee paper craft activity i.e. to assemble the wings and the honey pot onto the structure.
So, I began by aligning and sticking the bee’s wings, using the blue cutouts.
Then, I attached the glitter spill shape to the opening of the pot.
Finally, I handed the honeypot to the bee by fixing it to its body.
The result? Our smiley face honeypot bumblebee craft project is completed and below is how it looks.

Final Thoughts
While this Bumble bee craft project focuses purely on the craft itself, there’s still opportunities to incorporate lessons on bee biology, ecology, and conservation.
You can discuss the importance of bees in pollination and their impact on our food supply.
Additionally, this craft could be adapted for various skill levels and ages, perhaps introducing more complex elements for older children or simplifying it for younger ones.
I’d recommend exploring eco-friendly craft materials to align with the environmental theme.
It might also be interesting to create a series of related crafts, such as flowers or a beehive, to build a more comprehensive understanding of bee habitats.
Ultimately, this craft serves as a wonderful starting point for discussions about nature, environmental responsibility, and the intricate relationships within ecosystems.
Note: I have shared the complete video walkthrough of the Honeypot Bumblebee craft on our official YouTube channel. Also, in the above structure I have actually used a hard paper for the head and the lower body structure of the bee as I wanted a stiffer structure for display.


