Look, I’ll be straight with you – making sufganiyot at home isn’t some impossible culinary mountain to climb.
These fried doughnuts are what my kids beg for every December, and honestly? They’re easier than you think.
The smell of yeast dough hitting hot oil while my family’s gathered around – that’s what Hanukkah traditions are really about.
Let me walk you through this classic Hanukkah dessert the way my grandmother showed me, minus the lectures about patience.
What Makes Sufganiyot Jewish Dessert Different From Regular Donuts?
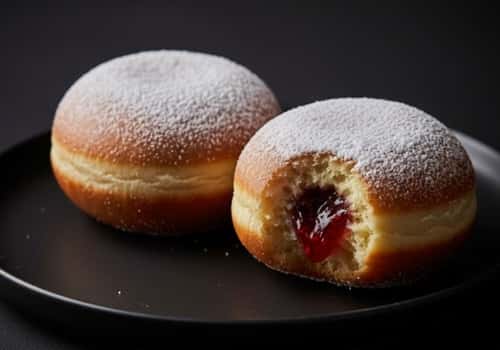
Here’s the thing most people miss. Sufganiyot aren’t just jelly-filled donuts you grab at a bakery. They’re lighter.
The dough texture has this pillowy softness that comes from proper proofing and a touch of citrus zest – something American doughnuts rarely nail.
I’ve burned through enough batches to know the difference between a good sufganiyah and a mediocre one.
The filling matters more than most dads want to admit. Strawberry jam, raspberry preserves, or even custard cream – pick quality ingredients because that’s what your family will taste first.
Not the fancy technique, not your perfect frying temperature. The filling.
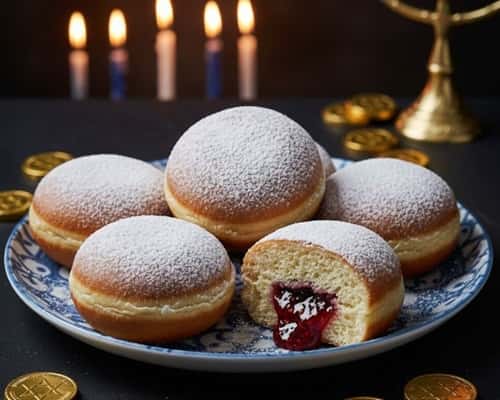
Israeli bakeries flood their windows with these during Chanukah, and there’s a reason.
The oil symbolism connects directly to the Festival of Lights story – that miraculous oil lasting eight nights. We’re not just making dessert here.
We’re frying up history, one golden round at a time.
The Science Behind Perfect Sufganiyot For Hanukkah (Without the Boring Lecture)
Active dry yeast needs warmth and sugar to wake up properly. Think of it like your teenager on a Saturday morning – needs the right conditions or it’s not happening. I proof mine at around 105°F, and if you see bubbles forming after five minutes, you’re golden.
Enriched dough means we’re adding eggs, butter, and milk to the mix. This creates that tender, almost brioche-like interior that makes traditional sufganiyot stand out from basic fried pastries. The fat coats the gluten strands, preventing them from forming tough networks.
Your frying oil temperature should hover between 350-365°F. Too hot? The outside burns while the inside stays raw – classic dad mistake. Too cool? You get greasy, oil-logged disasters that nobody wants to eat. Get yourself a thermometer. I resisted for years, and I was wrong.
Ingredients Needed To Make Sufganiyot For Hanukkah (No Substitutions That Ruin Everything)
For the Dough:
- 4 cups all-purpose flour (plus extra for dusting)
- 2 ¼ teaspoons active dry yeast (one standard packet)
- ¼ cup granulated sugar
- 3 large eggs (room temperature—this matters)
- ⅓ cup whole milk (warmed to 110°F)
- ¼ cup unsalted butter (melted and slightly cooled)
- 1 teaspoon vanilla extract
- Zest of one lemon (don’t skip this)
- ½ teaspoon salt
- Vegetable oil for frying (about 2 quarts)
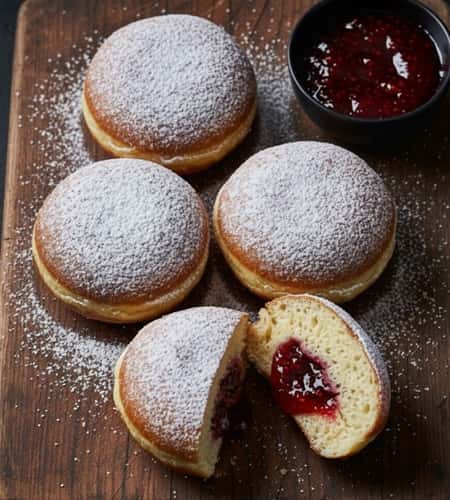
For Filling and Finishing:
- 1 ½ cups jelly or jam (raspberry, strawberry, or apricot work best)
- Powdered sugar for dusting (confectioners’ sugar, lots of it)
- Pastry bag with filling tip or a squeeze bottle
Instructions To Make Sufganiyot Jewish Dessert For Hanukkah
Step 1: Making the Dough (Where Most People Mess Up)
Warm your milk to that sweet spot around 110°F. Feels like a warm bath on your wrist. Stir in a tablespoon of your sugar and sprinkle the yeast on top. Walk away for five minutes – this is your proofing period.
In a large bowl, whisk together flour, remaining sugar, salt, and lemon zest. That citrus note is what makes these Israeli donuts sing.
I learned this from a guy at a Tel Aviv market, and it changed everything.
Beat your eggs in a separate bowl. Once your yeast mixture looks foamy and alive, combine it with the eggs, melted butter, and vanilla.
Pour this wet mixture into your flour bowl and start mixing. Use a wooden spoon at first, then switch to your hands when it gets too thick. The dough consistency should be slightly sticky but manageable.
Knead for about 8-10 minutes. You’re developing gluten structure here – that’s what gives you the chewy, satisfying bite.
I usually do this while listening to a podcast because kneading gets monotonous. When you can stretch a small piece thin enough to see light through it without tearing (the windowpane test), you’re done.
Step 2: The First Rise (Patience, My Fellow Dads)
Grease a large bowl with oil or butter. Plop your dough ball in, turn it to coat, and cover with a damp towel.
Set it somewhere warm – top of the fridge, inside a turned-off oven with the light on, wherever works.
This first proof takes about 90 minutes. The dough should double in size.
I usually prep everything else during this time because standing around watching dough rise is torture.
Clean your kitchen, prep your frying station, or sneak in a few minutes of whatever game you’re into.
Step 3: Rolling, Cutting, and the Second Rise
Punch down your dough – satisfying, right? Turn it out onto a floured surface and roll it to about ½-inch thickness.
Use a round cutter (3-inch diameter works perfectly), or grab a drinking glass if you’re winging it like I usually do.
Place your dough rounds on parchment-lined baking sheets, leaving about 2 inches between each.
Cover them with a clean kitchen towel and let them rise again for 30-45 minutes. They’ll puff up noticeably. This second rise is crucial – rush it and your sufganiyot will be dense.
Here’s a trick I learned the hard way: don’t re-roll scraps too many times. After the second gathering, the dough gets tough. Give those last bits to your kids to play with or just fry them as “test donuts.”
Step 4: Frying
Fill a heavy-bottomed pot or Dutch oven with about 3 inches of neutral oil. Canola, vegetable, or peanut oil all work. Clip a candy thermometer to the side and heat to 350°F.
Test with one donut first. Gently slide it in using a slotted spoon – no dropping, no splashing. It should immediately float and start bubbling.
Fry for about 2-3 minutes per side until deep golden brown. Not pale blonde, not burned – that perfect golden color that makes your mouth water.
Work in small batches. Crowding the pot drops the temperature, and then you’re back in greasy-donut territory.
I usually do three at a time, max. Flip them carefully with a spider strainer or slotted spoon. When done, transfer to a wire rack over paper towels.
The cooking time varies slightly based on your stove and pot size. Trust your eyes and thermometer over the clock.
I’ve fried hundreds of these Hanukkah treats, and every batch teaches me something new about heat control.
Step 5: Filling Your Sufganiyot
Let your fried donuts cool for about 10-15 minutes. Still warm but not scalding. Fill a pastry bag fitted with a long filling tip with your jam or jelly filling.
No pastry bag? Use a squeeze bottle with a narrow tip, or even a ziplock bag with the corner snipped off.
Poke a hole in the side of each donut – insert your tip about halfway through the center.
Squeeze gently until you feel resistance and see the donut swell slightly. You want each one packed with filling but not exploding. I usually do about 2-3 tablespoons per donut.
Some people inject from the top, but side-filling keeps the presentation cleaner. Your powdered sugar dusting covers any entry holes anyway.
Step 6: The Finishing Touch
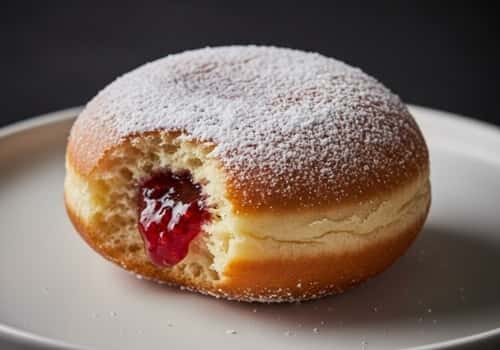
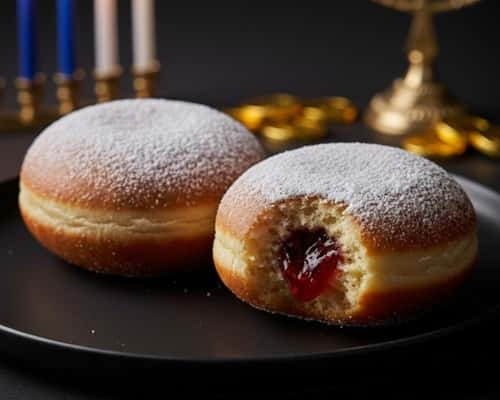
Grab a fine-mesh strainer and pile in your confectioners’ sugar. Dust those babies generously while they’re still slightly warm – the heat helps the sugar stick.
Don’t be shy here. A proper sufganiyah looks like it got caught in a snowstorm.
I like serving these within a few hours of frying. They’re still good the next day, but that just-made magic fades fast.
The crispy exterior softens, the filling soaks in, and while they’re still tasty, they’re not the same show-stopper.
Variations Worth Trying (After You Master the Basic)
Chocolate custard instead of jelly changes the entire game. Vanilla cream filling makes these taste like fancy Boston cream donuts.
I’ve even seen Nutella-filled versions that my kids go absolutely feral for.
Some modern sufganiyot recipes add cardamom or orange zest to the dough. Dulce de leche, salted caramel, even halva cream – Israeli bakeries get creative during Hanukkah celebrations.
Once you nail the basic technique, experiment. That’s where you make these truly yours.
Savory sufganiyot exist too – filled with cheese or even meat mixtures. I haven’t gone there yet, but I’m intrigued.
Common Mistakes and How to Avoid Them
Under-proofing gives you hockey pucks. If your dough hasn’t doubled, give it more time. Temperature matters here -cold kitchens slow everything down.
Over-flouring your work surface makes tough donuts. Use just enough to prevent sticking. I keep a small bowl nearby and add pinches as needed rather than dumping a pile.
Oil temperature fluctuation is the silent killer. After adding each batch, let the oil return to 350°F before adding more. Rushing this guarantees inconsistent results.
Filling them while too hot melts thinner jams and creates a mess. Patience here pays off. I’ve learned this lesson multiple messy times.
Storing and Make-Ahead Tips
These fresh donuts don’t freeze well after frying. But here’s what works: you can freeze the dough after the first rise. Portion it, freeze on a tray, then bag them up.
Thaw in the fridge overnight, let them come to room temperature, proceed with rolling and the second rise.
Day-of eating is best. If you must store them, keep them at room temperature in an airtight container for up to 24 hours. Don’t refrigerate – that dries them out fast.
Leftover filling? Use it on toast, swirl it into yogurt, or save it for the next batch. I always make extra sufganiyot because people devour these Chanukah sweets faster than I expect.
Final Thoughts
Traditional Jewish foods carry weight beyond just taste. Every holiday dessert connects us to generations before us who made the same recipes under wildly different circumstances.
My great-grandmother made these in a tiny kitchen without thermometers, electric mixers, or temperature-controlled stoves.
The Festival of Lights celebrates resilience and miracles. These oil-fried treats specifically commemorate the Hanukkah story of that miraculous oil.
When my kids bite into a warm, sugar-dusted donut packed with sweet filling, they’re tasting history and celebration mixed together.
Hanukkah foods aren’t just about the oil symbolism though. They’re about gathering around the menorah, playing dreidel games, and sharing food that took effort to create. Store-bought doesn’t carry the same meaning.