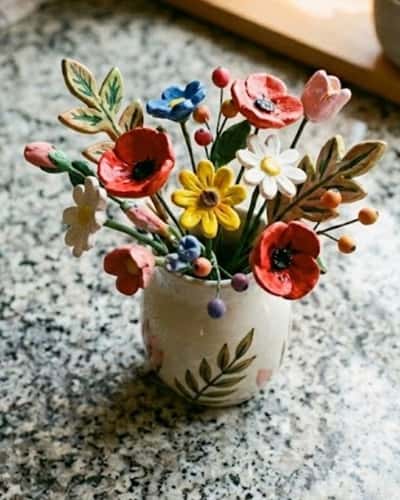
I’ll be honest… the first time I tried making Clay Flower Bouquets for Mom, it was a total mess. Clay stuck everywhere.
My kid made something that looked more like a potato than a flower. But you know what? My wife still kept it.
That’s when it hit me – these little imperfect things matter more than store-bought gifts.
So if you’re thinking about trying a mothers day clay craft with your kids, you’re in the right place.
These ideas are simple, slightly messy (okay… a lot messy), and actually doable even if you’ve never touched clay before. Ready? Let’s make something Mom won’t forget.
1. Classic Air Dry Rose Bouquet

This one feels like the “safe win.” Simple. Pretty. Hard to mess up… kinda.
How I Do It
I start with flower air dry clay because it’s soft and forgiving. Roll a small ball, then flatten it gently with your thumb. That’s your first petal.
Now roll another. Wrap it around the first one. Keep going. Slowly. Don’t rush – it actually looks better uneven.
My son always presses too hard. Guess what? It still looks like a rose.
Steps:
- Roll 5 to 7 small balls
- Flatten into petal shapes
- Wrap layer by layer around a center bud
- Pinch the base slightly to hold it together
- Stick a skewer or straw as the stem
Sensory Tip
The clay should feel cool and slightly damp. If it cracks, add a tiny bit of water. Not too much… learned that the hard way.
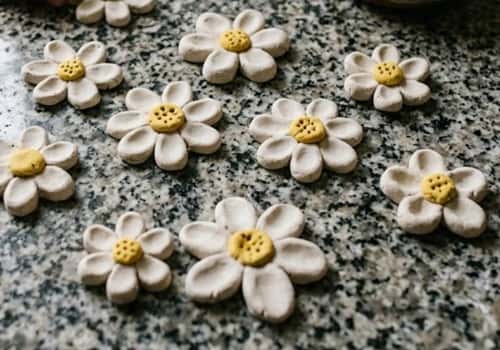
2. Fingerprint Daisy Bouquet
This one is personal. Literally. Tiny fingerprints everywhere.
How I Do It
Roll one small ball for the center. Then I ask my kid to press around it using their fingertip to create petals. That’s it. No tools.
Honestly, this is one of those easy clay flowers that feels special later.
Steps:
- Roll a small ball for the center
- Press gently to flatten
- Use fingertip to press around edges forming petals
- Add a thin rolled stem
- Attach multiple daisies together
Sensory Cue
You’ll feel the clay spread under your finger. Slight resistance. That’s when it’s perfect.
Small Tip
Don’t space fingerprints too evenly. Natural flowers aren’t perfect.
3. Terracotta Style Mini Flower Bundle
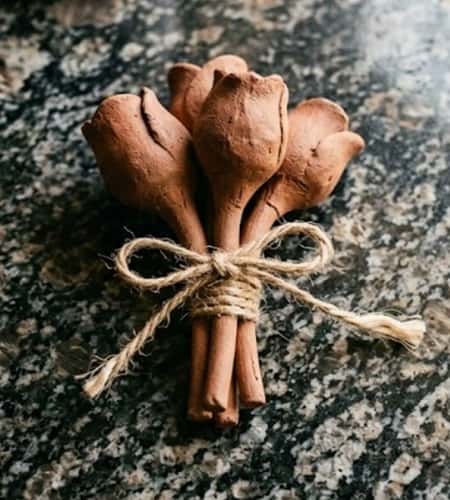
This one surprised me. It looks… expensive? But it’s not.
How I Do It
Use clay in natural tones or paint later to get that terracotta flowers look. These are more like tiny buds grouped together.
Steps
- Roll multiple small oval shapes
- Slightly pinch the top to form bud shapes
- Texture lightly using a toothpick
- Attach to a central stem cluster
- Wrap stems together using thread or clay
Sensory Moment
When you scratch texture with a toothpick, it makes that soft dragging sound. Very satisfying. Kids love it.
Why I Like It
Feels like a mini pottery flower arrangement. Minimal effort, maximum charm.
4. Bright Polymer Clay Tulip Bouquet

Okay… this one is more colorful. Slightly fancy. But still beginner friendly.
How I Do It
I use polymer clay flowers tutorial style here. Tulips are easy because they’re basically closed petals. No need to overthink.
Steps:
- Roll a small oval for the bud
- Create 3 thin petal shapes
- Wrap petals around the oval
- Smooth gently with fingers
- Attach a thin green stem
Small Tip
Don’t overblend the petals. Keep those lines visible – it adds depth.
5. Spiral Clay Flower Bouquet
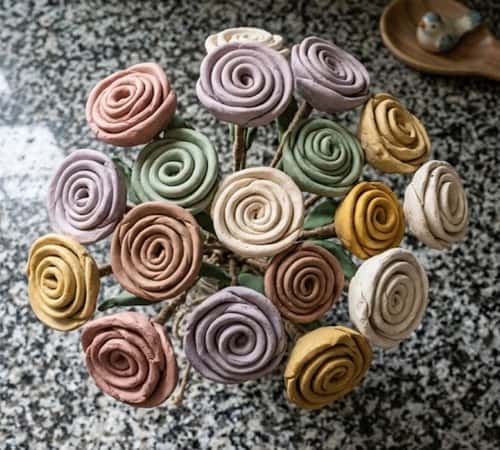
This one is oddly relaxing. Like… you just keep rolling and rolling.
How I Do It
I roll thin clay ropes and then twist them into spirals. That spiral becomes the flower. No petals needed.
Steps:
- Roll long thin clay strips
- Start coiling from one end
- Keep it loose, don’t press too tight
- Flatten slightly at the base
- Attach to a stem
Sensory Cue
You’ll feel the clay stretch slightly as you roll. If it starts cracking, slow down.
Small Tip:
Let the spiral stay uneven. A tight perfect spiral? Looks too artificial.
Why It Works
Great for flower clay ideas when you don’t want to deal with petals.
6. Pressed Leaf Clay Flower Bouquet
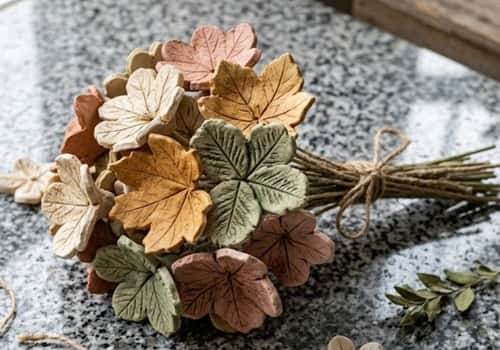
This one feels… a bit magical. Nature + clay.
How I Do It
We go outside, grab random leaves (yes, random), and press them into clay to create textures for petals.
Steps:
- Flatten clay into petal shapes
- Press real leaves gently onto surface
- Peel off to reveal texture
- Shape into flower form
- Attach petals around a center
Why I Love This
Feels like a proper mothers day clay bouquets project with a natural touch.
7. Button Center Clay Flower Bouquet
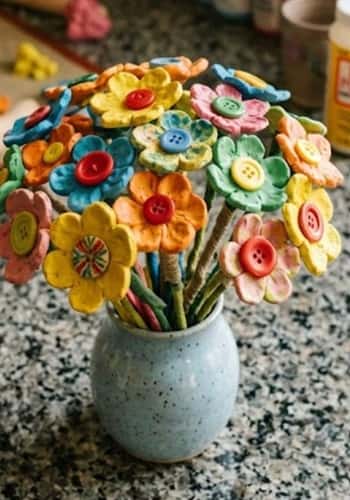
This one saved me when we messed up petals… seriously.
How I Do It
Instead of sculpting a detailed center, I just press a button into the middle. Done. Looks amazing.
Steps:
- Create simple flat petals
- Arrange in a circle
- Press a button in the center
- Add stem at the back
- Combine multiple flowers
Sensory Cue
Pressing the button into clay gives a firm “click” feeling. That’s when it sets right.
8. Mini Pottery Flower Bouquet (3D Style)
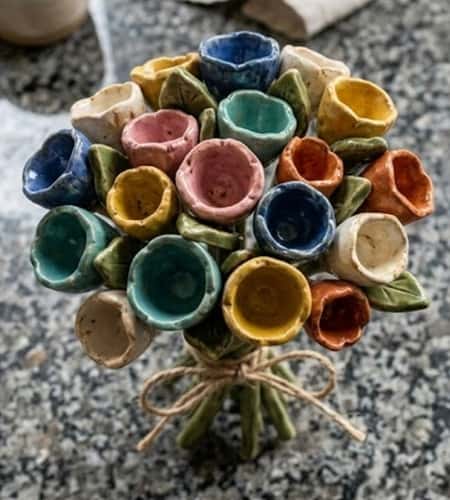
Okay this one… feels like real crafting. Slight upgrade.
How I Do It
Instead of flat flowers, I shape them like tiny cups or bowls. Almost like mini pottery flower designs.
Steps:
- Roll a ball of clay
- Press thumb into center to create a hollow
- Gently shape edges into petals
- Let it hold its 3D form
- Attach to thicker stems
Why This Stands Out
These look like proper how To Make Pottery flowers projects but are actually beginner-level.
Honest Note
One of mine collapsed halfway. We turned it into a “sleeping flower.” Problem solved.
9. Handprint Clay Flower Bouquet
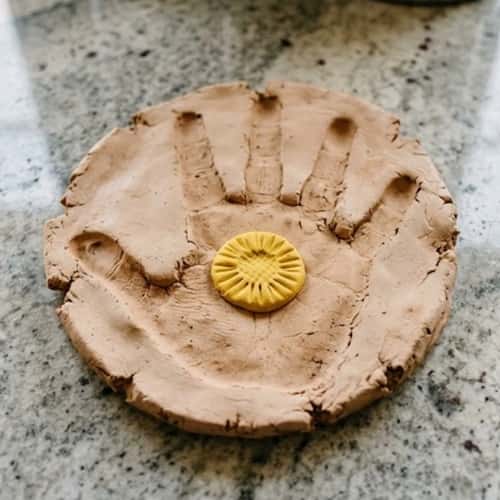
This one hit different. It’s not just a flower… it’s a memory stuck in clay.
How I Do It
I roll out a flat slab of clay, then gently press my kid’s hand into it. That handprint becomes the flower base. Fingers turn into petals.
Steps:
- Roll clay into a flat sheet
- Press hand firmly but gently
- Cut around the handprint shape
- Add a small clay ball in the center
- Attach stem at the bottom
Why It Matters
One of those mother’s day craft ideas that moms actually keep forever.
10. Tiny Wildflower Clay Bouquet

This one is chaos… in a good way. Nothing matches. That’s the point.
We make lots of tiny flowers. Different shapes. Different colors. Then bundle them together like wildflowers.
Steps:
- Create small flowers using any style
- Mix shapes: dots, spirals, tiny petals
- Attach to thin stems
- Group them loosely
- Tie with thread or clay strip
11. Painted Clay Flower Bouquet
This one comes alive at the end. Literally.
How I Do It
We make simple flowers first… then paint them after drying. That’s where the magic happens.
Steps:
- Create basic flower shapes
- Let them dry completely
- Use acrylic paints for coloring
- Add details like dots, lines, shading
- Seal lightly if needed
Small Tip:
Don’t overpaint. A few strokes can look better than fully covering everything.
Final Thoughts
Here’s something I didn’t expect when I started making these Clay Flower Bouquets for Mom… it’s not really about the flowers.
It’s about slowing down. Sitting with your kid. Letting things be imperfect.
Some of these will break. Some will look weird. One might not even look like a flower at all (happened here… more than once). But that’s the whole point.
If you’re trying a mothers day clay craft, don’t chase perfection. Chase the moment. Let your kid mess up. Join them.
And one small thing I always do now – write the date under the flower with a toothpick. Trust me… a year later, that tiny detail hits hard.