If your kitchen table has ever looked like a mini craft tornado, you’re probably already halfway ready for these air dry clay farm animals.
Kids love squishing, rolling, poking, and honestly… farm creatures are the perfect place to start because they’re adorable without needing perfection.
These cute and easy clay animals can turn simple clay into tiny cows, pigs, sheep, and more without fancy sculpting tools.
I haven’t personally tested every single one of these step by step clay ideas myself, but each one is designed to be beginner-friendly, playful, and realistic enough that a parent or child can actually follow along without confusion.
Ready to make farm animal clay crafts that feel homemade in the best possible way?
1. Round Belly Piglet (The Classic Clay Art Pig)
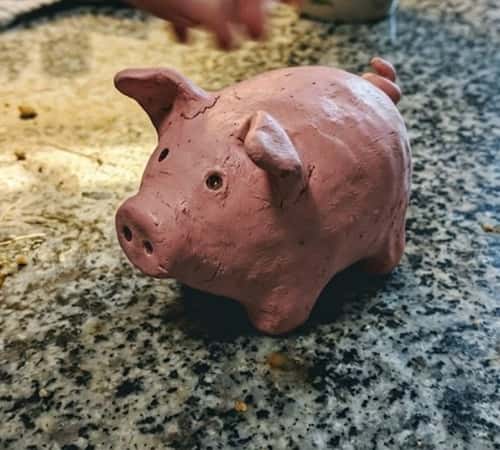
Let’s start with a squishy favorite. A clay art pig is honestly one of the easiest farm animal figurines for beginners because circles are forgiving. If it’s lumpy? Even better.
Start by taking a medium chunk of air dry clay and roll it into a smooth ball about the size of a golf ball.
Gently press one side down just a little so it sits instead of rolling away. That becomes the body.
Now roll a smaller ball, about half the size, for the pig’s head. Press the head onto the body firmly but softly, blending the neck area with your finger so it doesn’t crack apart later.
For the snout, roll a tiny oval and flatten it slightly. Attach it to the center of the face. Use a toothpick to poke two nostrils. Suddenly, pig. Cute already, right?
Make four stubby legs by rolling short clay logs. Keep them thick because skinny legs may collapse while drying. Attach underneath and gently flatten the bottoms. Add triangle ears on top. A curly tail? Roll a tiny snake, twist it, stick it on.
If the clay gets dry while shaping, a damp fingertip helps smooth cracks. Don’t soak it. Too much water gets messy fast.
Let dry for 24 to 48 hours. Once hardened, paint it pink, dusty rose, or even muddy pig brown if your kid wants realism. Imperfect pigs look more charming anyway.
2. Fluffy Cotton Sheep with Clay Face
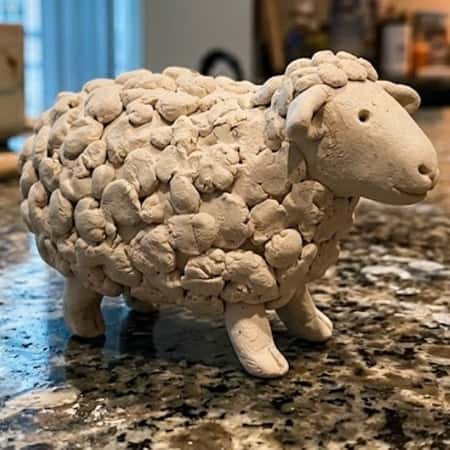
This one feels magical because you mix texture. Kids usually love this, and honestly it looks harder than it is.
Roll one medium oval for the sheep’s body. Don’t worry if it’s not perfect because fluffy wool hides mistakes. Slightly flatten the bottom. For the head, shape a smaller oval and gently narrow one end for the nose.
Attach the head to the body. Blend lightly.
Now here’s where these air dry clay ideas easy small animals get extra fun: instead of sculpting all wool, roll many tiny pea-sized clay balls and press them all over the sheep’s body.
Cover everything except the face and legs. This creates fluffy texture without advanced sculpting. It’s repetitive but weirdly satisfying.
Legs should be sturdy cylinders, not toothpick-thin. Four short pieces attached evenly underneath work best. Add tiny ears on the sides.
Use a toothpick for eyes or glue on mini beads later after drying.
You could also glue tiny cotton pieces after painting if you want more softness, but plain clay bumps look lovely too. Let dry completely before painting white wool and a gray or black face.
Sometimes the sheep may lean funny. Thats okay. Rustic sheep exist too.
3. Chunky Dairy Cow with Spotty Personality
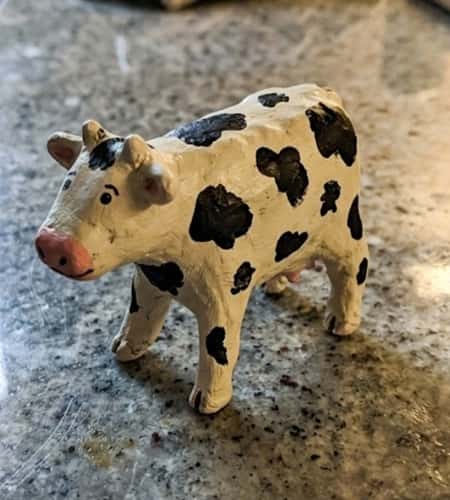
Cows are where farm animal clay crafts get really fun because spots hide imperfections beautifully. Bless the spots.
Start with a large oval body. Keep it slightly longer than a pig. Press gently on the sides for width.
Shape a smaller rounded rectangle for the head. Cows have broader faces, so don’t make it too tiny.
Attach head securely. Blend the neck seam with fingers or a clay tool.
For legs, create four thick cylinders. Support matters here. If one leg is thinner, your cow may wobble like it drank too much lemonade. Attach and flatten bottoms.
Now the muzzle: a flattened oval added to the lower face. Use a toothpick for nostrils. Add two small horns if desired, or skip for a softer cartoon calf.
Ears can be leaf-shaped pieces attached beside the horns.
Tail time – thin rope with a tiny flattened tuft.
Once dry, paint white first, then add black or brown spots randomly. Random really is better. Too patterned can look robotic. These cute and easy clay animals shine more when they’re slightly goofy.
And yes, one uneven spot placement wont ruin it.
4. Sleepy Barn Cat with Curled Tail
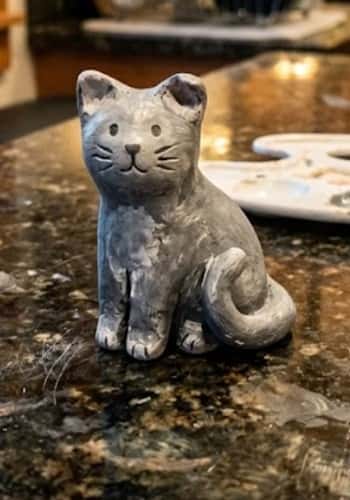
Not every farm buddy has to moo or oink. Barn cats absolutely count, and honestly, this one can look adorable even when it’s a little wonky.
Start by rolling one medium egg-shaped piece for the body. Lay it slightly on its side if you want a resting cat, or keep it upright for sitting.
For beginners, sitting is easier because balance matters less. Roll a smaller ball for the head and gently press it onto the body.
Now pinch two little ears directly from the head or attach tiny triangles. Pointy is best. Cats look weirdly cute when the ears are oversized, so don’t stress perfection.
For legs, sitting cats only need front paws visible. Roll two small tubes and press them in front.
The back can stay rounded as part of the body shape. Tail? Roll a snake-like coil and curve it around the body or upward. That curled tail really makes it feel cat-like.
Use a toothpick for sleepy eyes – simple curved lines work beautifully. Tiny nose dot. Done.
Paint options can go wild here: orange tabby, gray barn cat, white with patches.
Add stripes with a thin brush after the base coat dries. If your lines wobble, it still somehow works. Real cats aren’t symmetrical anyway.
This is one of those step by step clay ideas where less detail often looks better.
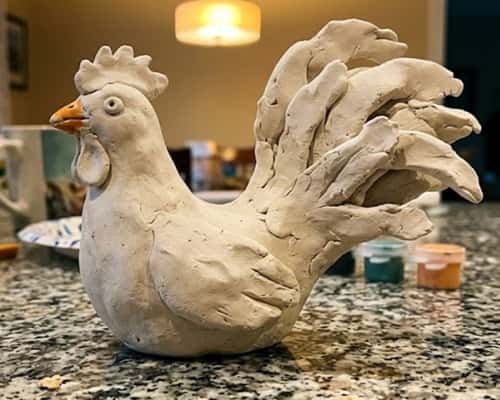
5. Tiny Chicken Hen with Plump Body
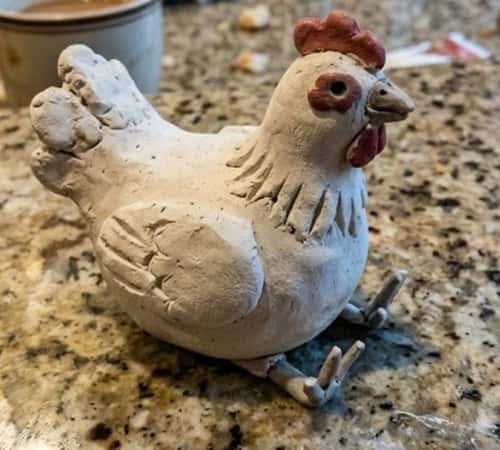
A chicken can look hilariously charming with almost no complicated sculpting. Seriously, don’t overthink this one.
Roll a medium ball, then gently shape one side narrower to create a teardrop body.
The wider side becomes the body, narrow side the neck/head area.
You can either make the whole hen from one piece or attach a separate small round head. One-piece usually means fewer cracks.
For wings, flatten two small teardrops and press onto each side. Keep them slightly raised for dimension.
Now the fun bits – comb and wattle. Roll tiny red clay pieces later if using colored clay, or just sculpt and paint after drying.
The comb sits on top like little rounded spikes. Beak can be a tiny triangle pressed outward.
Chicken legs are trickier, so go simple: two short sturdy cylinders. If tiny feet feel frustrating, just flatten the ends. It still reads as chicken.
Tail feathers should point upward. Attach three flattened leaf shapes at the back.
Some hens look chunky. Some look dramatic. Both are valid.
Paint white, brown, black, or speckled farmhouse style. Adding tiny dot eyes after drying helps avoid smudging.
This fits beautifully into air dry clay farm animals because the shape is simple but still recognizable fast.
6. Long-Eared Donkey with Sturdy Legs
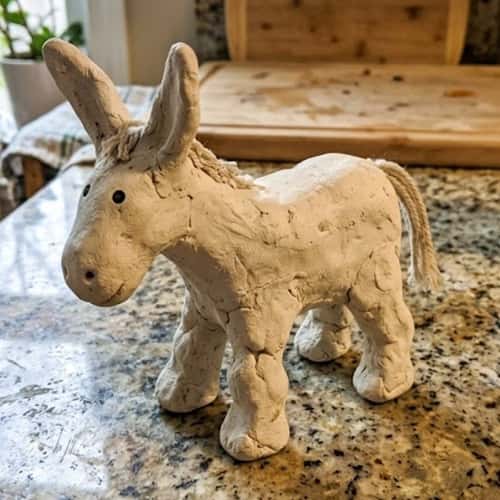
Okay, this one feels slightly more advanced – but only slightly. The ears do most of the heavy lifting.
Start with a thick oval body, slightly narrower than a cow. Shape a medium oval head with a longer face. Donkeys have that gentle stretched muzzle, so don’t make the face too round.
Attach the head carefully and smooth the seam. For neck support, keep it short and sturdy. If it’s too thin, gravity wins.
Legs should be four equal clay logs. Make them thicker than you think you need. Attach and flatten the bottoms. Standing animals need solid foundations or they be falling over before lunch.
Now the ears: roll two long leaf shapes. Press them upward. This instantly transforms horse-ish into donkey.
Tail should be thin with a tiny tuft. Mane can be added by lightly scoring texture down the neck with a toothpick.
Paint gray, dusty brown, or soft beige. Darken the hooves and mane for contrast. A white muzzle adds extra personality.
One crooked ear? Honestly, that usually makes it cuter.
Among farm animal figurines, donkeys often get ignored, but they’re such a fun shape for kids practicing proportions.
7. Proud Rooster with Fancy Tail Feathers
Now this one? A little dramatic. In the best way. Roosters give kids room to go bold without needing precision, which is honestly perfect for cute and easy clay animals.
Start by rolling a medium oval for the body, then angle it slightly upright so the rooster looks alert. Add a small rounded head to the narrower front end. Blend gently.
For the neck, don’t stretch too thin. A rooster still needs support or the head may sag while drying. Short and sturdy wins here.
The magic is in the tail. Flatten several thin teardrop clay pieces and curve them upward at the back.
Layer them like fan feathers. They do not need matching sizes. Actually, slightly mismatched tail feathers often look more realistic. Or more charmingly homemade, at least.
Create wings from flattened side teardrops. Add a pointed beak. On top, shape the comb with tiny rounded bumps or jagged points. Under the beak, add the wattle.
Legs can stay basic: two thicker cylinders with flattened feet. Fancy claws are optional. No one’s judging.
Paint this rooster bright if you’d like – red comb, yellow beak, brown body, maybe even blue or green tail if your child wants whimsy. Farm animal clay crafts should feel playful, not museum-level serious.
Sometimes kids overdo the tail, and honestly? Bigger tail, bigger personality.
8. Gentle Goat with Tiny Horns
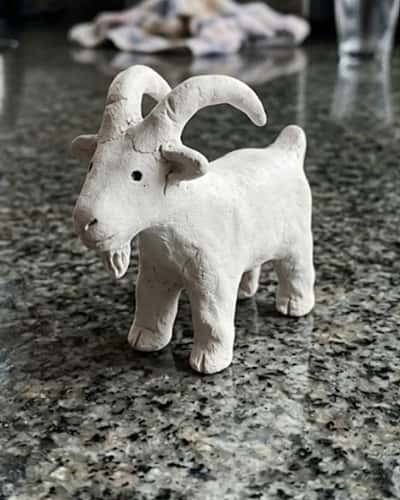
Goats are sneaky-good beginner projects because their shape is forgiving, but the little details make them feel special.
Start with a rounded oval body, slightly slimmer than a sheep. Goats tend to look leaner. For the head, shape a smaller oval with a slightly tapered chin. Attach firmly.
Now ears… make them floppy sideways for a softer goat, or angled upward for a more playful look. Both work.
Horns should be tiny cones curved slightly backward. Keep them short so they don’t snap.
Legs matter here. Four sturdy clay logs, evenly spaced. If one’s shorter, your goat may tilt like it’s climbing a hill. Funny, but maybe frustrating.
For the beard, yes, absolutely add one. Roll a tiny teardrop and attach under the chin. This tiny detail changes everything.
Tail can stay simple and short.
Use a toothpick to lightly score fur texture along the body if desired, especially around the chest or beard. Once dry, paint cream, white, brown, black, or patchy mountain-goat style.
This fits beautifully into air dry clay farm animals because goats balance easy shaping with recognizable personality.
I mean really, who doesn’t love a tiny goat.
9. Muddy Little Duck with Rounded Beak

Ducks may seem simple, but that rounded bill shape really teaches kids how tiny features can define a whole animal.
Roll a medium oval body, then slightly flatten the bottom. Ducks sit low, so wide works better than tall.
For the head, make a smaller smooth ball and attach with almost no neck. Ducks are adorably compact.
Now the beak – flatten a small oval and press it onto the face horizontally. Not too thin. A chunky beak often reads better.
Wings should be soft side shapes pressed gently onto each body side. Tail? Pinch or attach one tiny upward flick at the back.
For feet, you can skip detailed webbing and just use two small flat paddle shapes underneath. Or keep them hidden if your duck is sitting.
Paint yellow for classic duckling vibes, white for farm duck style, or brown for a muddier barnyard look. Orange beak always pops nicely.
This is one of those air dry clay ideas easy small animals projects where simplicity actually makes it more lovable.
If the duck looks a little too round, congrats – it probably looks extra cute.
10. Sleepy Farm Horse with Thick Mane
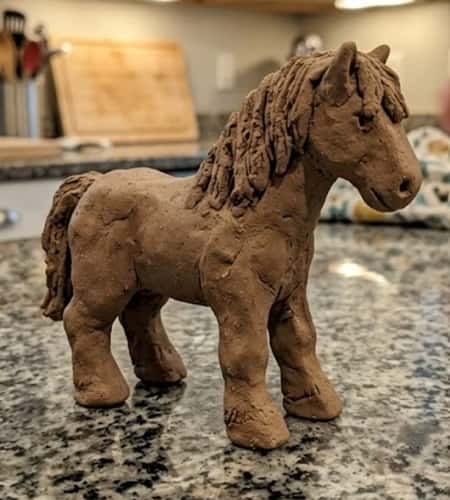
Alright, this one feels a bit more ambitious, but don’t let that scare you off. Horses can absolutely work for beginners if you keep the shapes chunky instead of delicate. Think sturdy toy, not fragile sculpture.
Start with a large oval body. Slightly stretch it longer than your donkey shape from before.
Horses usually look smoother and a bit more balanced. Roll a medium cylinder for the neck, keeping it thicker than you first think – it needs to hold the head. Attach securely, then shape an oval head with a gently rounded muzzle.
Legs are where patience matters. Roll four even clay tubes. Thick, not skinny. Skinny legs betray people. Attach carefully and flatten the hooves.
For ears, small triangles. Tail? A long clay rope with light texture lines. The mane can be added by layering thin strips along the neck or scoring texture directly with a toothpick.
This project shines when kids focus less on perfection and more on recognizable shape. A horse that looks slightly chunky still feels charming. Actually, it maybe looks cuter.
Paint brown, black, cream, or spotted pony style. Darken mane and tail for contrast. A white stripe on the face can add character fast.
Among farm animal figurines, horses often become favorites because they look impressive once finished, even with homemade flaws.
11. Baby Bunny Farm Rabbit with Floppy Ears
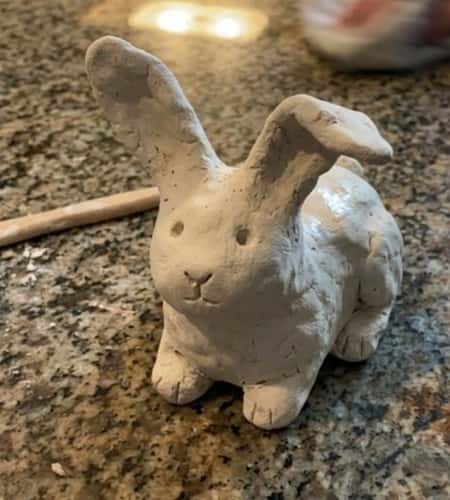
Yes, rabbits can absolutely belong in the farmyard mix, especially when kids want something softer and sweeter. This one is especially great for younger children because rounded forms are forgiving.
Roll one large ball for the body and a smaller ball for the head. Attach the head slightly tilted if you want extra personality. Tilted heads somehow always look more alive.
For ears, roll two long ovals and flatten gently. Stand them upright, angle them outward, or let one flop. Honestly, one floppy ear can save a less-than-perfect rabbit and make it feel intentional.
Front paws should be tiny rounded tubes. Back legs can be larger oval lumps attached at the base sides. Rabbits have that tucked sitting pose, which is easier than standing.
Add a tiny nose bump and small tail puff. A little cotton-ball style clay dot works beautifully.
Paint white, brown, gray, or patchy. Soft pastel details can make this feel extra sweet, though rustic muddy bunny also works surprisingly well.
This is one of those step by step clay ideas where small details i.e. nose, ears, posture… matter more than advanced sculpting skill.
Sometimes the bunny leans weird. Still adorable.
12. Farmyard Turtle Buddy
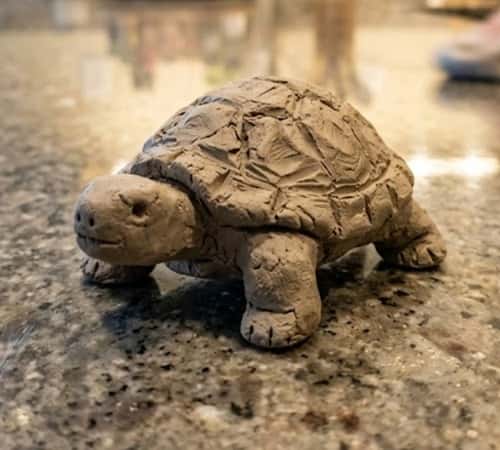
Okay, technically not everyone thinks turtle first when imagining farm animal clay crafts… but on playful kid farms, why not? This one adds variety and teaches shell texture in a fun low-pressure way.
Roll a medium ball, then flatten it into a dome for the shell. Easy already. For the body base, flatten a thinner oval underneath. Attach the shell on top.
Now shape four stubby legs. Keep them short and paddle-like. Attach evenly so the turtle sits flat. Add a tiny rounded head poking out front, plus a small tail nub at the back.
Here’s where this project gets extra satisfying: shell texture. Use a toothpick, pencil tip, or dull skewer to lightly carve geometric shell patterns. Hexagons, lines, little sections—nothing needs perfection.
Paint green, olive, brown, or even whimsical bright colors if kids want fantasy farm vibes.
This project works beautifully for children who want air dry clay ideas easy small animals without balancing issues, because turtles are naturally stable.
And honestly, stable crafts save headaches.
Final Thoughts
The real magic of air dry clay farm animals isn’t flawless results – it’s how these tiny handmade creatures quietly build patience, hand strength, creative confidence, and visual problem-solving all at once.
Kids aren’t just making a clay art pig or barn rooster… they’re learning structure, texture, and imagination through trial and error.
Farm animal figurines also leave room for imperfection, which honestly makes them ideal for beginners.
A lopsided goat or chunky sheep often carries more personality than something overly polished.
So if little hands get messy, uneven, or gloriously chaotic, that’s probably where the best creative learning actually begins.