I’ve been seeing summer clay sea animal crafts everywhere lately, and honestly… they just feel right for slow afternoons at home.
You don’t need fancy tools, you don’t need perfection, you just need a little patience and some clay in your hands.
Ever tried shaping something and it turned out weird but still cute? That’s exactly the vibe here.
These ideas lean into simple clay crafts, slightly messy clay projects, and that relaxed “under the sea clay” mood we all love in summer.
Let’s get into the first 5. Trust me, you can actually make these.
1. Tiny Clay Turtle Trinket Dish
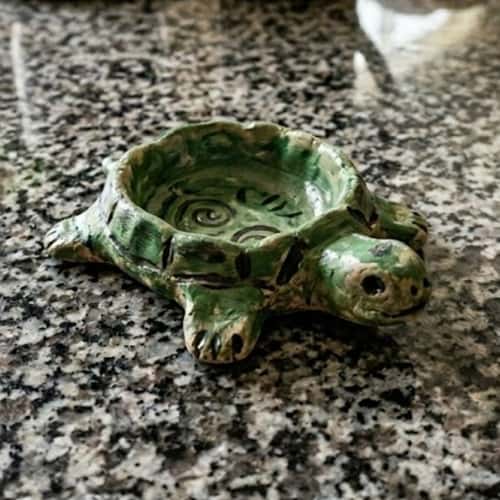
I love starting with this one because it’s forgiving. And also, who doesn’t love a cute turtle air dry clay piece sitting on their table?
Roll a medium ball of air dry clay. Press it gently to flatten into a shallow dish shape. Not perfect, don’t worry. Now pinch the edges slightly upward. This becomes the shell base.
For the turtle body, make a small oval for the head and four tiny cylinders for legs. Attach them by lightly scratching both surfaces (this helps them stick better) and pressing gently.
Use a toothpick to draw shell patterns. Keep it uneven—it actually looks more real. Let it dry fully (usually 24 hours).
Once dry, paint it with greens and browns. Add a little gloss varnish if you want that shiny finish.
It looks kinda uneven but thats what makes it adorable.
2. Clay Starfish Wall Decor
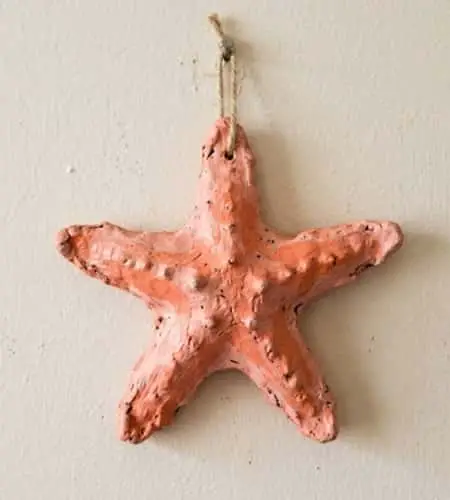
This one screams beach day. I was surprised by how well it looks.
Flatten a piece of clay to a thickness of about 0.5 cm. Draw a rough star shape with five arms. Don’t measure, just eyeball it. Cut using a butter knife.
Now here’s the fun part. Press tiny holes and textures using a toothpick or even a pen cap. Starfish aren’t smooth anyway.
Let it dry completely. After that, use soft pastel shades—peach, coral, sandy beige. Dry brushing works great here (light strokes, not full coverage).
You can glue a string at the back if you want to hang it.
Why does it feel like real beach decor though?
3. Mini Clay Fish Magnets
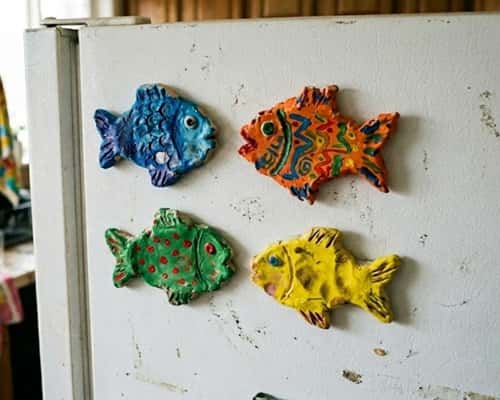
This is my go-to when I want quick clay fish art that actually gets used.
Roll small oval shapes for fish bodies. Flatten slightly. Pinch one side to form the tail. Add tiny fins using leftover clay bits.
Use a toothpick to draw scales. Or skip it. Both looks good honestly.
Let them dry. Then paint in bright colors—blues, yellows, orange. Mix weird combos, fish in real life aren’t boring.
Glue a magnet at the back once dry.
One of mine looked funny but I still put it on the fridge.
4. Clay Seashell Ring Holder

Okay this one feels a little fancy but it’s still beginner friendly.
Flatten a piece of clay into a thick oval. Shape it slightly curved like a shell. Use your fingers to create ridges from one end to the other. Don’t overthink it.
For the ring holder part, roll a small cone and attach it at the center. This is where rings will sit.
Let it dry slowly. If it cracks a little, that’s okay. Adds character.
Paint in pearl white, soft pink, or even metallic gold. Light shading on the ridges makes it pop.
I messed up the first one and it still looked good somehow.
5. Cute Clay Octopus Pencil Topper
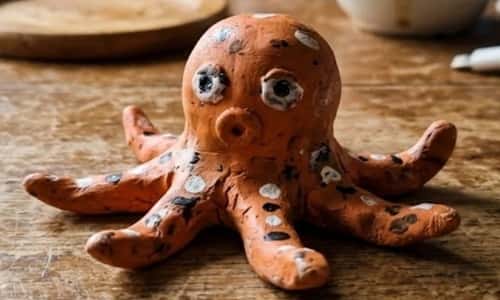
This one is fun. And slightly chaotic. Kids love it.
Roll a small ball for the head. Then roll 8 thin tiny tubes for tentacles. Attach them underneath the head, spreading them slightly outward.
Wrap the tentacles gently around a pencil to shape them. Don’t press too hard.
Add tiny dots for eyes. Or googly eyes if you have them.
Let it dry with the pencil inside or remove carefully after shaping. Paint in bright or pastel colors.
It may look a bit wonky but thats literally the charm.
6. Clay Whale Mini Planter
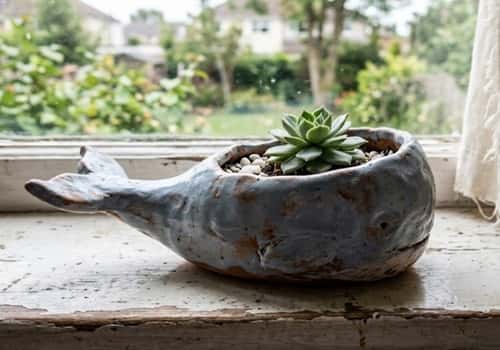
This one surprised me. I didn’t expect a whale to hold a plant, but here we are.
Start by shaping a thick oval for the whale’s body. Slightly curve one end upward to form the tail. Flatten the bottom so it can sit properly.
Now use your thumb to press a hollow space in the top center. This becomes the planter area. Go slow here or the clay might crack.
Add a tiny fin on the side and a small tail at the back. Smooth lightly with wet fingers.
Let it dry fully. Paint in blues or even pastel tones. Add a tiny fake plant or succulent once done.
It kinda looks off at first but then suddenly it works.
7. Jellyfish Hanging Ornament
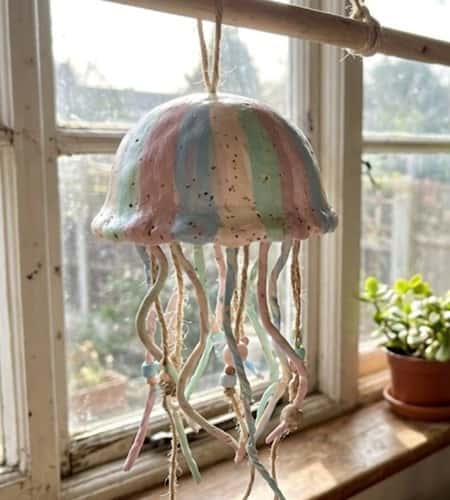
This one feels calming. And a little delicate too.
Roll a small dome shape for the jellyfish head. Flatten the bottom slightly.
For tentacles, roll very thin strands of clay. Attach them underneath. Let them hang naturally, don’t try to control too much.
You can also mix materials – like adding thread or yarn for tentacles after drying. That gives a nice flowy effect.
Make a small hole at the top before drying if you want to hang it.
Paint in translucent colors—light purple, blue, pink. Soft blending works best here.
Why does it feel like ocean vibes instantly?
8. Clay Crab Key Holder
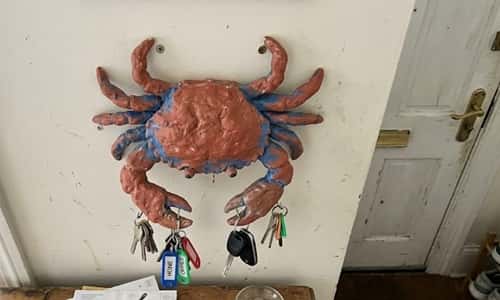
This one is more practical. Also slightly funny looking if I’m honest.
Flatten a round piece for the crab body. Add two small pinch shapes for claws and attach them on both sides.
Roll tiny legs and stick them underneath. They don’t need to be perfect or even equal.
Before drying, insert small hooks (or leave space to glue hooks later). This turns it into a key holder.
Paint it bright red, orange, or even mix colors for a quirky look. Add little eyes on top.
Mine looked a bit crooked but still holds keys fine.
9. Sea Horse Clay Decor Piece
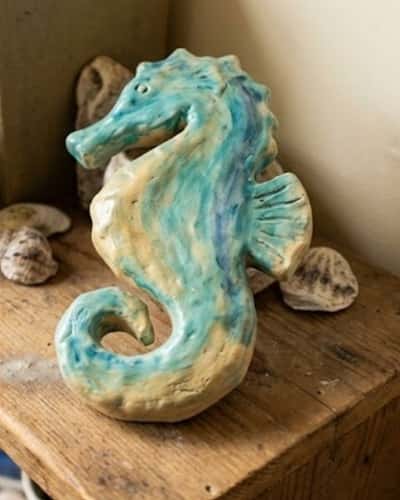
This one takes a bit more patience. But not too much, don’t worry.
Roll a long cylinder and gently curve it into an “S” shape. That’s your base.
Pinch one end to form the head. Use a toothpick to define the snout and eye area.
Flatten small bits for fins and attach along the back. Add light texture using tiny strokes.
Let it dry slowly. Paint in gradients – like blue fading into yellow or pink into orange.
It might not look exactly like a real seahorse, but honestly who’s checking.
10. Clay Dolphin Desk Buddy
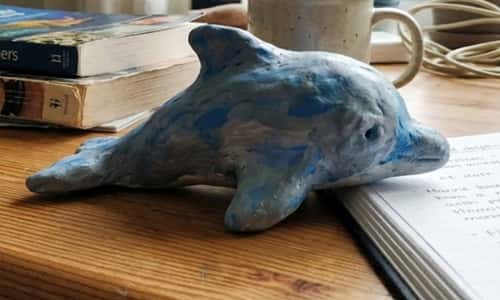
This one fits perfectly if you want something small but cute.
Shape a smooth curved form like a jumping dolphin. Keep the body slightly thick so it doesn’t break.
Add a tiny fin on top and two side fins. Use your fingers to smooth everything out.
Flatten the bottom just a little so it can sit on a desk.
Let it dry and paint in grey, blue, or even pastel tones. Add a tiny smile if you want.
I tried making it too thin once and it broke, so yeah keep it sturdy.
11. Ocean-Themed Clay Coasters
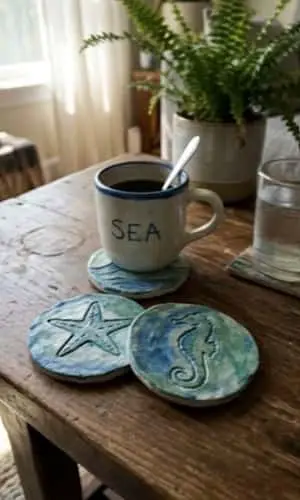
This is where painting air dry clay gets really fun.
Roll out clay flat (around 0.5 to 1 cm thick). Cut into circles using a bowl or lid.
Once slightly dry (not fully), carve simple ocean elements i.e. waves, fish, shells. Keep it light, don’t go too deep.
After drying, paint using ocean shades i.e. deep blue, teal, sandy beige. Blend colors slightly for that water effect.
Seal with varnish so it can handle moisture.
They won’t look factory perfect but they’ll feel way more personal.
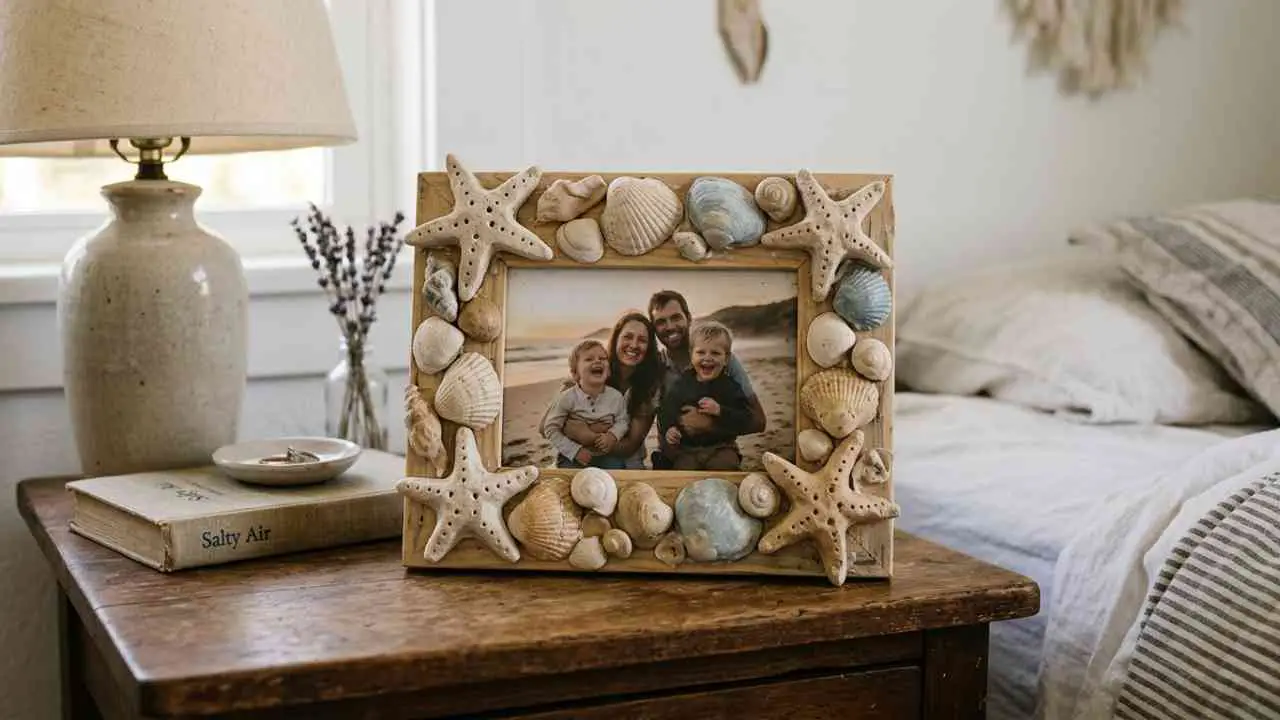
12. Mixed Sea Animal Clay Frame
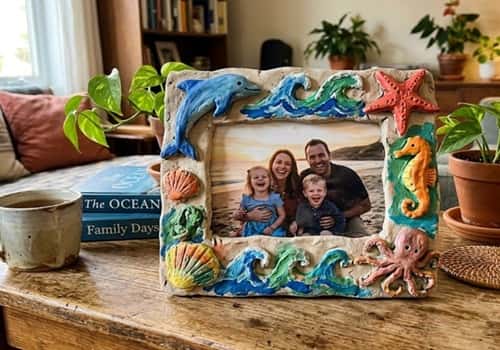
This one ties everything together. A full sea animal clay crafts vibe.
Take a simple photo frame. Now create mini clay elements… tiny fish, shells, starfish, even a mini air dry clay ocean animals turtle.
Stick them around the frame edges using glue after drying. Or attach before drying if your frame allows it.
Paint everything in a mix of bright and soft beach tones. Don’t try to match perfectly, contrast looks better here.
Let it dry fully before use.
It might look a bit crowded but that’s kind of the point.
Final Thoughts
Here’s the thing I’ve noticed with summer clay sea animal crafts – they’re less about perfection and more about feel.
The slightly uneven edges, the paint going outside the lines, the tiny cracks… that’s what makes these clay crafts air dry animals actually look alive.
Funny enough, when I stopped trying to “fix” every mistake, my beachy clay ideas started looking better.
So maybe don’t aim for flawless. Aim for fun. And honestly, if it looks a little weird but makes you smile… that’s already a win.