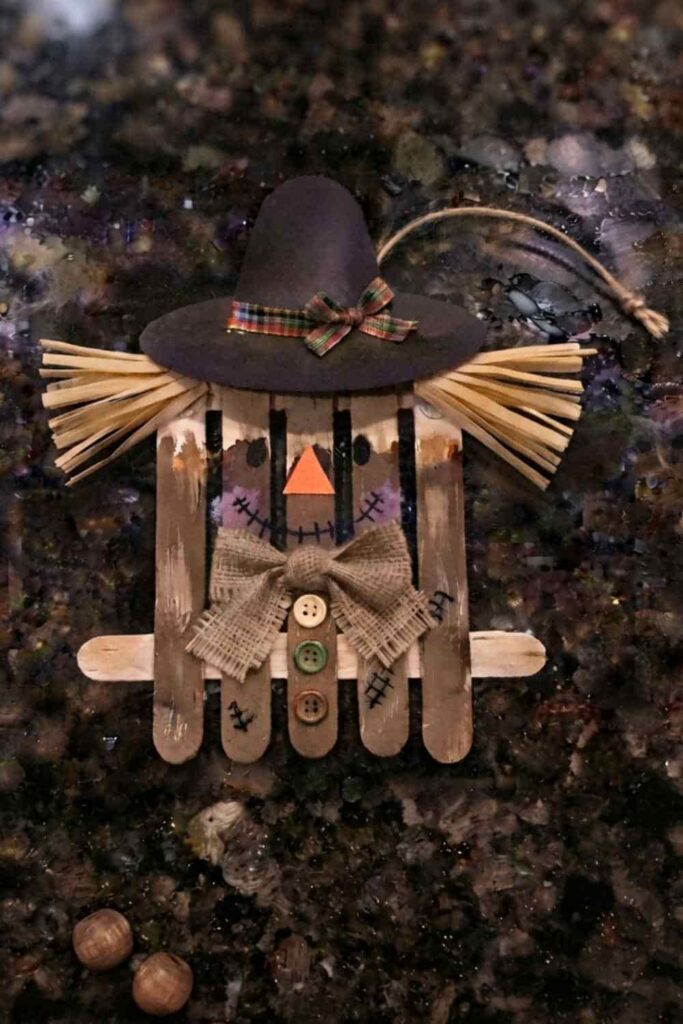
There is something oddly satisfying about turning a handful of plain wooden craft sticks into a cheerful little scarecrow.
I keep coming back to this popsicle stick scarecrow craft every fall because it’s simple, forgiving, and doesn’t need fancy supplies.
Whether you’re looking for a relaxing afternoon kids craft, a preschool craft, or even browsing ideas for thanksgiving crafts, this project checks all the boxes.
Best part? Every scarecrow turns out slightly different, and honestly, that’s what makes them feel alive. Ready to make one that actually looks handmade instead of factory-perfect?
Supplies Needed To Make Popsicle Stick Scarecrow
Keep everything within reach before you start.
- 7 regular popsicle sticks
- Brown acrylic paint
- Beige or peach acrylic paint
- Yellow raffia, yarn, or jute twine
- Orange craft foam or cardstock
- Black paint marker or permanent marker
- Pink paint or blush chalk (optional)
- Small paintbrush
- White craft glue or hot glue (adult supervision)
- Black cardstock
- Small scrap of burlap, plaid ribbon, or fabric
- Mini artificial sunflower (optional)
- Scissors
Helpful Tip: Lay your supplies in the order you’ll use them. It don’t sound important, but it really saves time once the glue comes out.
Step 1: Build the Popsicle Stick Base
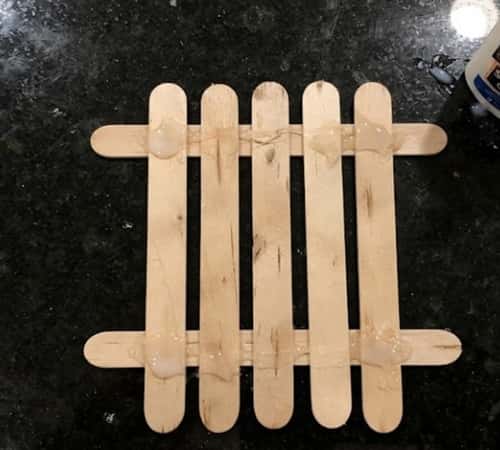
Start by placing five popsicle sticks vertically side by side on your table.
Try nudging them together until the gaps are tiny but still visible because those little imperfections help the finished scarecrow feel handmade.
Now place one popsicle stick horizontally across the top and another across the bottom. These two support sticks hold everything together.
Add a generous line of glue where every stick crosses another. Press gently for about a minute.
Leave it flat for around 20 to 30 minutes until the glue firms up.
Don’t rush this part. Seriously, a sturdy base makes every later step easier.
Step 2: Paint the Background and Face
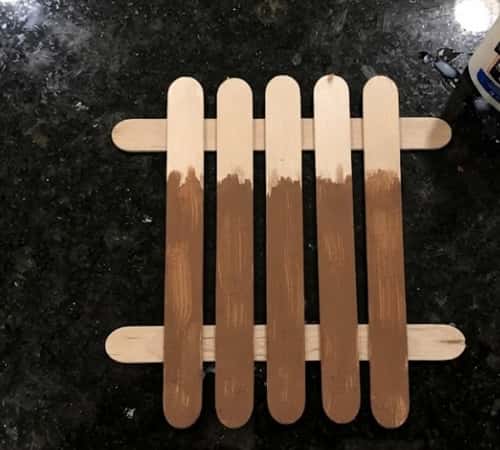
Flip your wooden panel over.
Paint the lower two-thirds brown to become the scarecrow’s shirt.
Don’t worry about perfect brush strokes. A few streaks actually mimic old flannel fabric surprisingly well.
Leave the upper section unpainted for now.
Once the brown paint dries, paint the top section with beige or peach paint to create the face.
Allow everything to dry completely before moving ahead.
If your paint looks patchy, add another thin coat instead of piling on thick paint. Thin coats dries much nicer.
Step 3: Create the Straw Hair and Hat
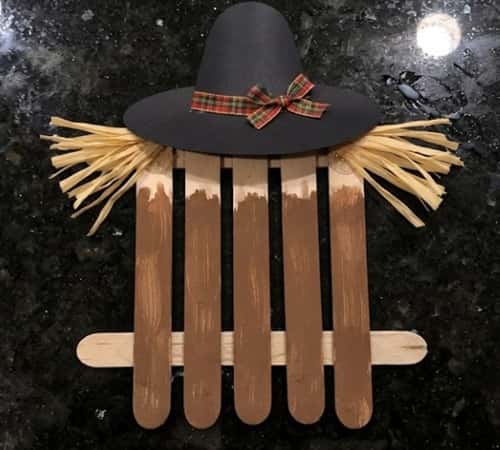
This is where your scarecrow starts getting personality.
Cut several short strands of raffia or yellow yarn around 2½ inches long.
Glue them behind the top corners of the face so they peek out like messy straw hair.
Now cut a rectangle from black cardstock for the hat.
Cut another thinner strip for the brim.
Glue the brim first.
Then attach the larger rectangle just above it.
Want an extra cozy fall look?
Glue a tiny plaid ribbon around the hat band or stick on a miniature sunflower. Little details changes everything.
Step 4: Add the Face
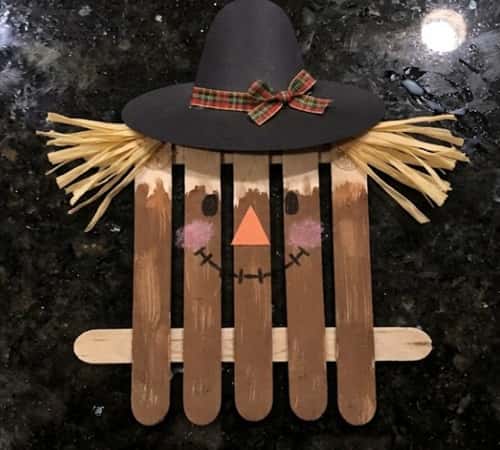
Now comes my favorite part.
Use a black paint marker to draw two simple round eyes.
Add tiny eyelashes if you want a sweeter expression.
Draw small eyebrows with light curved lines.
Cut a small orange triangle for the nose.
Glue it right in the middle.
Using the marker, make a stitched smile with tiny dash marks crossing the mouth.
Lightly dab pink paint or blush onto the cheeks using your fingertip.
Suddenly it starts smiling back at you.
It’s funny how just a few simple lines can give a craft so much character.
Step 5: Decorate the Shirt
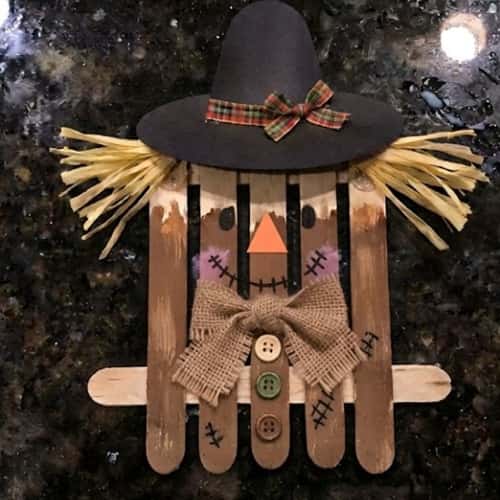
Your scarecrow deserves something better than a plain shirt.
Cut a tiny square from burlap or patterned fabric.
Fold it diagonally into a scarf.
Glue it below the face.
Use tiny paint dots to create shirt buttons.
If you’re using plaid ribbon instead, tie a tiny bow before gluing it down.
Add little stitched lines across the shirt with your marker.
Nobody will measure whether they’re perfectly straight. That’s the charm.
This is also where many people personalize their kids diy project by writing their name on the back before hanging it up.
Step 6: Finish the Details
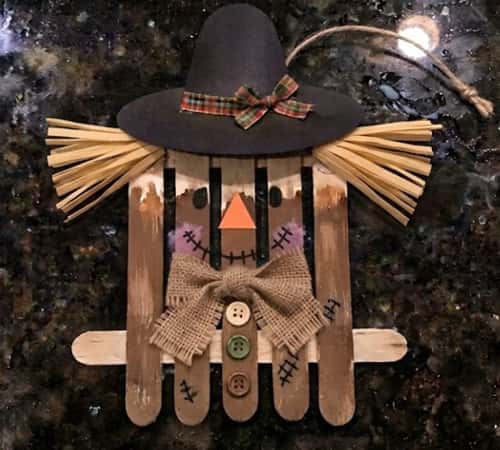
Look closely.
Does the scarecrow need thicker eyebrows?
Maybe slightly rosier cheeks?
A few extra strands of straw?
Now is the time.
Trim any glue strings.
Touch up chipped paint.
If you want to hang it, glue a loop of jute twine behind the top support stick.
Everything dont have to be perfectly symmetrical. Handmade decorations almost never are.
Let the glue dry fully before picking it up.
Step 7: Display Your Popsicle Stick Scarecrow Craft
Your scarecrow is finished.
Now comes the fun part.
Hang it on a classroom bulletin board.
Attach it to a fall wreath.
Glue a craft magnet onto the back for an easy refrigerator display.
Turn several into a cheerful garland.
Use them as table place cards for Thanksgiving dinner.
This project also works beautifully during classroom popsicle stick crafts for kids sessions because every child naturally creates a different face without even trying.
I’ve even seen adults quietly making their own versions during fall crafts for adults workshops, and honestly, nobody looked embarrassed.
That says a lot about how enjoyable this little project really is.
Easy Ways to Personalize Your Popsicle Stick Scarecrow
Instead of making every scarecrow identical, try one of these ideas:
- Use denim fabric for the shirt.
- Paint freckles across the face.
- Add tiny leaf stickers.
- Give the hat a sunflower instead of ribbon.
- Write your child’s name on the brim.
- Make a smiling family of scarecrows in different sizes.
- Add tiny pumpkins beside the finished decoration when displaying it.
These small changes help your diy popsicle stick crafts feel genuinely original without making the project harder.
Helpful Tips for Beginners
- Paint thin layers instead of thick coats.
- Wait for glue to dry before decorating.
- Keep paper towels nearby for quick cleanup.
- Test marker ink on scrap paper first.
- Let children design their own faces instead of copying yours.
- Don’t worry about perfectly straight popsicle sticks. Slightly crooked often looks more rustic.
- Store leftover raffia inside a zip bag because you’ll probably use it again during other fun fall craft projects.
Final Thoughts
One thing I really enjoy about this popsicle stick scarecrow craft is how it quietly teaches more than crafting.
Kids naturally practice planning, patience, hand control, and creative decision-making without realizing they’re learning at all.
That’s pretty neat if you ask me. Instead of aiming for a picture-perfect scarecrow, encourage small differences because those quirky little details often become everyone’s favorite part.
Before long you’ll notice that no two scarecrows ever look alike, even when everyone follows the exact same steps.
And that’s the real magic behind memorable kids craft projects… they leave room for imagination instead of perfection.