Imagine transforming your home into a festive wonderland without breaking the bank.
That’s the magic of “Budget Friendly Christmas Crafts That Look Expensive.”
From glittering mercury glass ornaments to charming fabric scrap garlands, these DIY projects offer a wealth of creative possibilities.
Whether you’re a seasoned crafter or a beginner, these projects promise to infuse your space with holiday cheer while keeping your budget intact.
Let’s explore these 16 clever, cost-effective crafts that will have your guests marveling at your decorating prowess.
Paper Snowflake Garland (Delicate Beauty on a Budget)
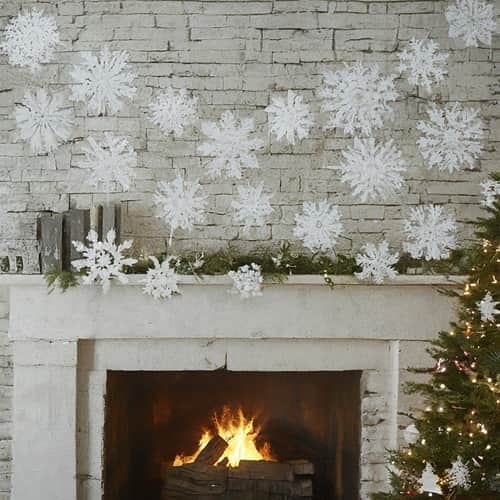
Who knew snowflakes could be so chic? With a few sheets of white cardstock and some string, you can create a stunning snowflake garland that looks like a million bucks.
You can easily find free snowflake templates online or use cookie cutters as stencils.
Trace the snowflakes onto the cardstock and carefully cut them out.
Experiment with different sizes and snowflake designs for a more dynamic look.
String the snowflakes together with white thread or fishing line for a delicate and airy garland.
Hang it across your mantle, fireplace, or doorways for a touch of winter wonderland magic.
I love how versatile this craft is, you can personalize each snowflake with different patterns or add a sprinkle of glitter for extra sparkle.
For a fragrant twist, try attaching small cinnamon sticks to some of the snowflakes before stringing them together.
Also, to make this project eco-friendly, use recycled paper or repurpose old greeting cards. You can even upcycle newspaper or magazines for a unique twist on traditional snowflakes.
Alternatives & Variations:
If you’re short on time, consider using pre-made snowflake templates available online. To add a rustic touch, use recycled brown paper or old book pages instead of cardstock. For a whimsical look, experiment with metallic or patterned paper.
Additional Tips:
- Size and Design: Mix different sizes of snowflakes to create depth and visual interest.
- Hanging Options: Besides mantles and doorways, try draping the garland along stair railings or across windows for a magical winter ambiance.
Mercury Glass Magic (A Budget-Friendly Shimmer)
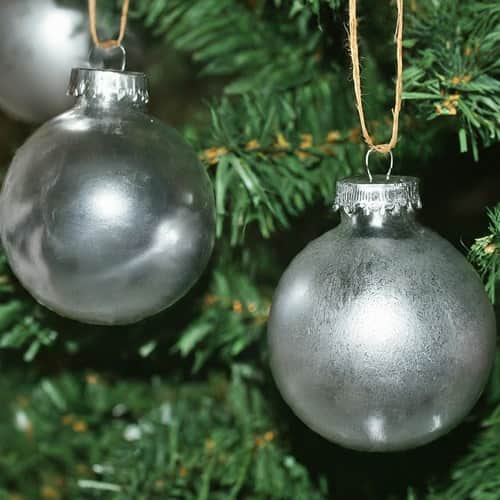
Crafting your own mercury glass ornaments not only saves money but also allows you to create personalized decorations that reflect your unique style.
These ornaments can become heirlooms, cherished for their handmade charm and sentimental value.
You’ll need clear glass ornaments (often found at dollar stores), rubbing alcohol, and acrylic spray paint in your desired metallic color (silver or gold work best).
Clean the glass ornaments thoroughly with rubbing alcohol.
In a well-ventilated area, lightly mist the inside of the ornaments with the spray paint, allowing the paint to drip and create a reflective, mirrored effect.
Once dry, hang them on your tree or group them in a decorative bowl for a touch of glamorous sparkle.
Alternatives & Variations:
If clear glass ornaments are hard to find, repurpose old glass jars or bottles for a similar effect.
Instead of spray paint, try using metallic leaf or even nail polish for a creative twist.
For a rustic look, lightly sand the paint after it dries to reveal hints of the glass underneath.
Additional Tips:
- Preparation: Ensure the glass surface is clean and dry before applying paint to achieve a smooth finish.
- Decoration Ideas: Enhance your ornaments further by tying ribbons around the top or embellishing them with small beads or sequins for added sparkle.
- Sustainability: To reduce waste, consider upcycling old glass containers or thrifted ornaments for this project. Opt for water-based or low-VOC spray paints to minimize environmental impact.
DIY Photo Keepsake Ornaments Craft
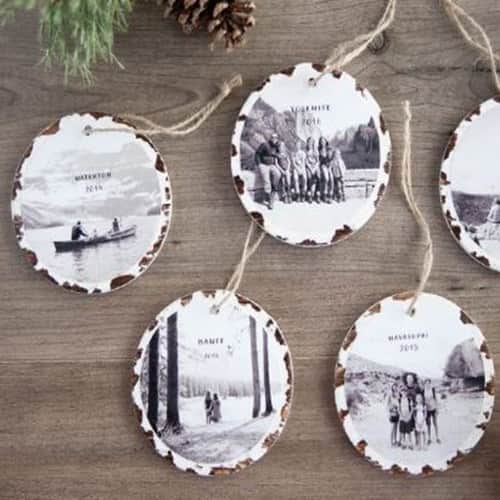
Credit: simpleasthatblog.com
Create cherished memories with DIY Photo Keepsake Ornaments using simple materials like distressed wood ornaments and your favorite photos, personalize each piece with Mod Podge for a glossy finish.
Start by picking your favorite photos – yes, even that one where your dog is stealing the spotlight.
Paint the wooden ornaments white and cut your photos to fit the ornaments and punch a hole at the top.
Apply a layer of Mod Podge to the ornament and stick your photo on it.
Seal it with another layer of Mod Podge and let it dry.
Now it’s ready to be tied with twine and hung on the Christmas tree.
For detailed instructions to make this DIY Photo Keepsake Ornaments Craft visit: simpleasthatblog.com
Alternatives & Variations:
For a rustic look, consider using natural wood slices instead of distressed wood ornaments. Instead of Mod Podge, try using clear resin for a durable, glass-like finish. You can also experiment with different shapes and sizes of ornaments to create a diverse and eclectic tree.
For Sustainability:
To reduce environmental impact, repurpose old wooden ornaments or use reclaimed wood for this project. Print photos on recycled paper and opt for eco-friendly sealants like water-based varnish or beeswax.
Additional Tips:
- Personalization: Mix in handwritten notes or small mementos alongside the photos to add extra personalization.
- Display Ideas: Besides hanging on the tree, consider using these ornaments as personalized gift tags or placing them in a decorative bowl as a holiday centerpiece.
DIY Lit Burlap Garlands
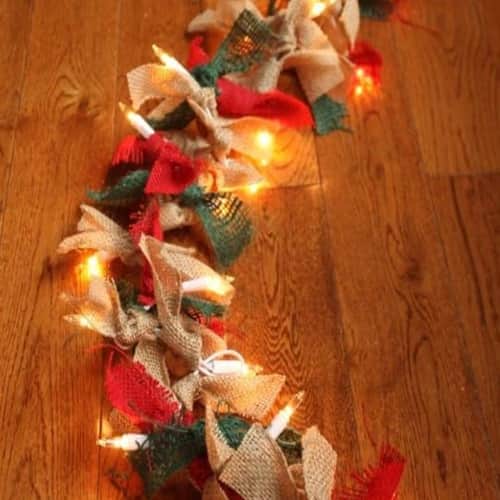
Credit: createcraftlove.com
Create a charming DIY Christmas garland with just a few supplies such as 100 clear white mini lights, natural, red, and green burlap ribbons (about 30 feet each), and scissors.
In this craft you start by cutting the burlap into 8-10 inch pieces, then slice them vertically for a better fit.
Then, choose your color pattern and tie the burlap strips around the light wire.
Personally, I enjoy the tactile nature of working with burlap, it adds a natural, earthy texture to holiday decor.
Mixing different shades of burlap and alternating with mini lights creates a warm and inviting ambiance.
Visit createcraftlove.com to get the complete handholding on how to make this DIY Lit Burlap Garlands.
Alternatives & Variations:
If burlap isn’t your style, consider using cotton fabric strips or even recycled scarves for a cozy, upcycled look.
Experiment with different patterns and textures by incorporating glittery ribbons or lace alongside the burlap.
For Sustainability:
Choose LED mini lights to reduce energy consumption and opt for burlap made from sustainable sources.
Upcycle old burlap sacks or repurpose worn-out fabric into rustic garland strips for an eco-friendly twist.
Additional Tips:
- Assembly: Securely tie each burlap strip around the light wire, spacing them evenly for a balanced look.
- Safety: Ensure lights are UL-listed for indoor use and avoid leaving them unattended for extended periods.
Mismatched Button Wreath: A Whimsical and Textured Masterpiece
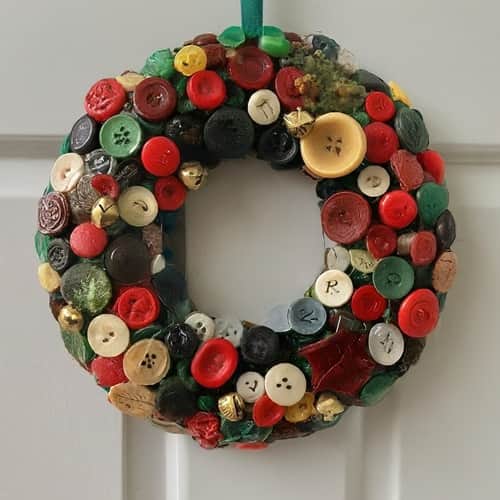
Take advantage of those overflowing button jars and create a one-of-a-kind Christmas wreath that’s both whimsical and surprisingly elegant.
You’ll need a foam wreath form (found at dollar stores or craft stores), a variety of buttons in different sizes, colors, and textures, and a hot glue gun.
Start by applying a base layer of buttons by gluing them flat onto the wreath form, covering any gaps.
Once the base layer is complete, get creative i.e. Layer buttons on top of each other for added dimension, use larger buttons as focal points, and mix and match textures for a visually interesting look.
For a touch of Christmas cheer, incorporate red, green, and white buttons or add a few jingle bells or small ornaments here and there.
Hang your finished wreath on a door, mantel, or above a fireplace for a unique and conversation-starting decoration.
To be honest, I find sorting through buttons and arranging them on the wreath to be quite therapeutic.
Mixing different shapes and textures adds depth, while incorporating seasonal colors like red, green, and white brings a festive touch to the decor.
Alternatives & Variations:
If you prefer a minimalist look, stick to one color palette or use buttons in shades of silver and gold for a glamorous twist.
Consider adding tiny LED lights or small fabric bows between buttons for extra sparkle and dimension.
For Sustainability:
Upcycle old buttons from unused clothing or thrifted items for a sustainable craft.
Opt for biodegradable glue sticks and foam wreath forms made from recycled materials to minimize environmental impact.
Additional Tips:
- Arrangement: Start by arranging larger buttons as focal points and fill in with smaller buttons for a balanced design.
- Decorative Accents: Enhance your wreath with accents like jingle bells, miniature ornaments, or even small pine cones for a festive flair.
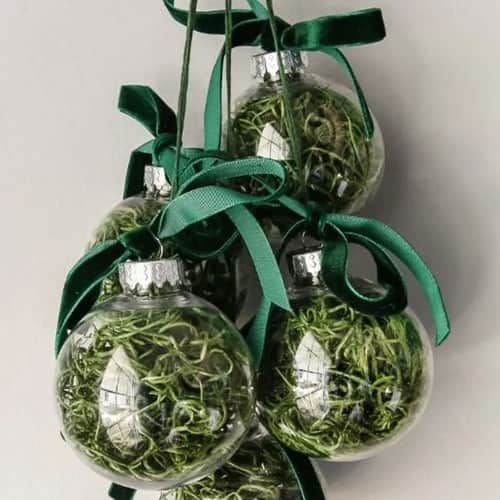
DIY Moss Ball Christmas Ornaments (Looks Expensive)
Credit: charlestoncrafted.com
You can easily make this ornament at home with minimal cost and effort using a glass pot.
Glass pots are perfect for Christmas ornaments, just add some Spanish moss and tie a few ribbons to transform them into stunning decorations.
These ornaments aren’t just for the Christmas tree, they add a charming touch of greenery and decor to any space in your home.
To learn to make this DIY Moss Ball Christmas Ornaments visit: charlestoncrafted.com.
Alternatives & Variations:
For a rustic look, substitute Spanish moss with dried flowers or small pinecones.
Consider painting the outer surface of the glass pots with metallic or chalkboard paint for added customization.
You can also experiment with different shapes and sizes of glass containers for a diverse ornament display.
For Sustainability:
Reuse old glass jars or votive holders as pots for this project, and opt for natural materials like organic moss or biodegradable ribbons.
Repurpose leftover ribbons or fabric scraps from other crafts to minimize waste.
Additional Tips:
- Assembly: Secure the moss inside the glass pot with a dab of hot glue or double-sided tape to prevent shifting.
- Placement: Besides hanging on the tree, place these ornaments on shelves, mantles, or use them as table centerpieces for a year-round decorative touch.
Book Page Ornaments
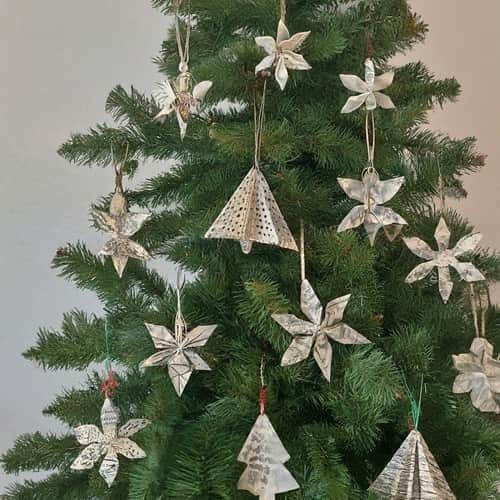
Discover the charm of old books by crafting distinctive literary Christmas ornaments.
Here’s what you’ll need:
- Unwanted hardcovers
- Cookie cutters in festive shapes (stars, snowflakes, trees)
- Decoupage medium (or a mixture of equal parts white glue and water)
- Paint (optional)
- Ribbon or twine for hanging
- Embellishments like glitter, buttons, or dried flowers (optional).
Instructions To Make This Craft:
- Carefully tear out pages from the book, aiming for a mix of text and illustrations.
- Use cookie cutters to trace and cut out shapes from the book pages.
- Brush the decoupage medium onto the back of the paper shapes and stick them to cardboard cutouts (cereal boxes or waste cardboard work great) for added sturdiness.
- Paint the edges of the ornament shapes for a pop of color (This is optional).
- Once dry, brush another layer of decoupage medium over the entire front of the ornament to seal it.
- Punch a small hole at the top and thread ribbon or twine for hanging.
- Get creative with embellishments! Add glitter for sparkle, tiny buttons for a vintage touch, or dried flowers for a rustic charm.
These one-of-a-kind ornaments tell a story and add a touch of literary charm to your Christmas tree. Stay tuned for more budget-friendly Christmas craft ideas.
Alternatives & Variations:
Instead of hardcovers, use pages from damaged books or vintage sheet music for a musical twist.
Consider using thematic cookie cutters that resonate with your favorite holiday motifs.
For Sustainability:
Choose books that are beyond repair or destined for recycling bins to minimize waste.
Opt for eco-friendly decoupage mediums and natural embellishments like biodegradable glitter or dried herbs for a sustainable crafting experience.
Additional Tips:
- Sturdiness: Reinforce the paper shapes by sticking them to cardboard cutouts before applying decoupage medium for added durability.
- Personalization: Write meaningful quotes or messages on the back of the ornaments to personalize them further.
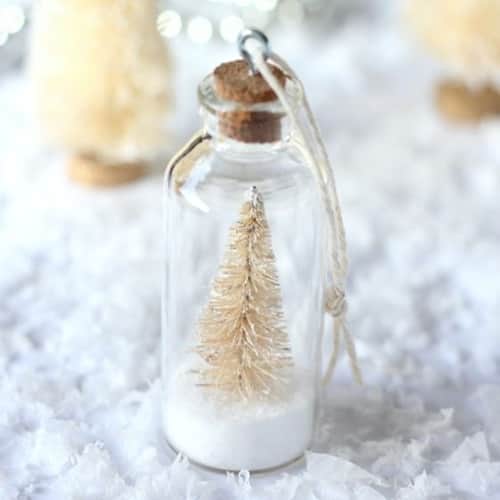
Bottle Brush Tree Ornaments
Credit: satoridesignforliving.com
Creating these bottle brush ornaments is not only cost-effective but also allows for personalization.
You can customize each bottle with different colored glitters or mix and match tree sizes for variety.
The result is a charming, handmade ornament that looks much more expensive than it actually is.
To make DIY Bottle Brush Ornaments, you’ll need mini glass bottles with cork tops, mini bottle brush trees, white fine glitter, fine Epsom salt, mini screw eyes, decorative string, and super glue.
Start by gluing the bottom of a brush tree and placing it into the bottle.
Mix Epsom salt and glitter, then pour it into the bottle.
Attach a screw eye to the cork lid and brush off any debris.
Glue the cork to the bottle rim and let it set. Finally, tie the string to the cork top, and your charming ornament is ready to hang.
There is a comprehensive step-by-step tutorial to make this Bottle Brush Tree Ornaments at: satoridesignforliving.com
Alternatives & Variations:
Instead of glass bottles, repurpose small jars or clear plastic containers for a similar effect.
Try using colored sand or faux snow in place of Epsom salt for a different texture.
Consider adding miniature figurines or tiny bells inside the bottles for extra festive cheer.
For Sustainability:
Opt for biodegradable glitter or natural materials like crushed seashells for a sustainable twist.
Reuse old bottles or jars from your kitchen or recycling bin to reduce waste.
Consider gifting these ornaments as eco-friendly and handmade holiday treats.
Additional Tips:
- Assembly: Secure the bottle brush tree in place with a small dab of super glue to ensure it stands upright inside the bottle.
- Finishing Touches: Decorate the cork top with festive ribbons or personalized tags to add a final touch of charm.
Painted Mason Jar Luminaries
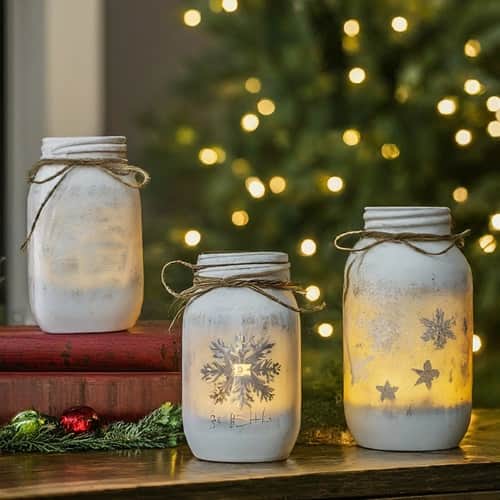
Transform ordinary mason jars into charming and rustic Christmas luminaries with a little paint and creativity.
Here’s what you’ll need:
- Mason jars (various sizes work well)
- White or cream-colored acrylic paint
- Stencils or paint markers for festive designs
- Battery-operated tea lights, and paint brushes
Instructions to make this craft:
- Clean the Jars: Start by washing the mason jars thoroughly followed by drying it.
- Painting Time: Apply a coat of white or cream-colored acrylic paint to the outside of the jars. To achieve the right level of coverage, consider applying two to three coats as needed. But remember that each coat should dry completely before applying the next. (Optional: You can leave some jars unpainted for a more natural look.)
- Decorate: Once the paint is dry, use stencils or paint markers to add festive designs to the jars. For a classic Christmas touch, consider snowflakes, stars, reindeer, or simple geometric patterns.
- Light it Up: Place a battery-operated tea light inside each jar and enjoy the warm and inviting glow of your rustic Christmas luminaries. These can be used as centerpieces, displayed on mantels or shelves, or even hung on porches for a welcoming touch.
This budget-friendly craft elevates inexpensive mason jars into beautiful and versatile Christmas decorations, adding a touch of rustic charm and warm ambiance to your holiday decor.
Alternatives & Variations:
Experiment with different jar sizes and shapes to create a varied display.
Instead of acrylic paint, try chalk paint for a matte finish or metallic paint for a touch of glamor.
Consider adding twine or ribbon around the rim of the jars for added texture and charm.
For Sustainability:
Choose mason jars made from recycled glass and opt for water-based paints to minimize environmental impact.
Repurpose old jars from your pantry or collect them from thrift stores for an eco-friendly crafting experience.
Additional Tips:
- Safety: Use battery-operated tea lights instead of real candles to ensure safety, especially if placing the luminaries in areas with children or pets.
- Display Ideas: Arrange the luminaries in clusters on tables, along staircases, or hang them from tree branches outdoors to create a magical glow.
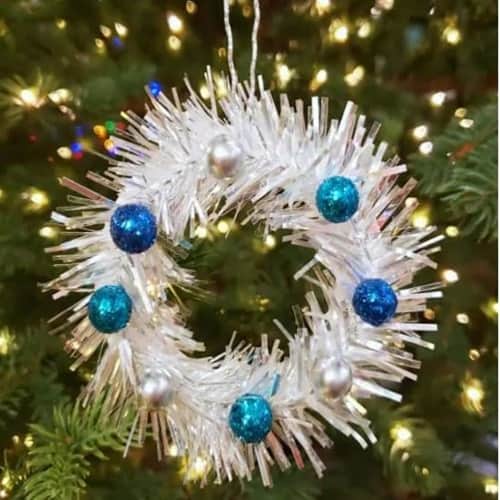
Mini Tinsel Wreath Ornament
Credit: girljustdiy.com
These types of tinsel ornaments combine simplicity with elegance.
The use of tinsel and metallic paint gives them a sophisticated appearance, perfect for adding a touch of glamor to any Christmas tree.
For the Tinsel Mini Wreath Ornament, you’ll need wired silver tinsel, small wood rings, pearl metallic paint, glittery Christmas berry picks, wire cutters, a glue gun, and silver metallic cord.
Begin by painting the wooden rings with pearl metallic paint, then wrap the tinsel wire around them.
Arrange and glue the glitter berries in different shades onto the mini wreath.
Lastly, attach a decorative thread or silver metallic cord as a hanger.
These ornaments are quick and easy to make, requiring minimal supplies, and you can craft multiple in no time.
For detailed instructions to make this Mini Tinsel Wreath Ornament click here.
Alternatives & Variations:
Instead of wood rings, use embroidery hoops or wire frames for a different shape and size.
Experiment with different tinsel colors like gold or red for a festive variation and consider adding small ornaments or beads for extra texture and shine.
Sustainability Angle:
- Reuse leftover tinsel from previous decorations or recycle old Christmas garlands to create these ornaments.
- Opt for biodegradable glitter or natural embellishments to minimize environmental impact.
Additional Tips:
- Assembly: Use a glue gun to securely attach the berries and ensure they are evenly distributed around the wreath.
- Personalization: Add a small initial charm or a tiny jingle bell to the ornament’s hanger for a personalized touch.
Fabric Scrap Garland: A Patchwork of Festive Charm
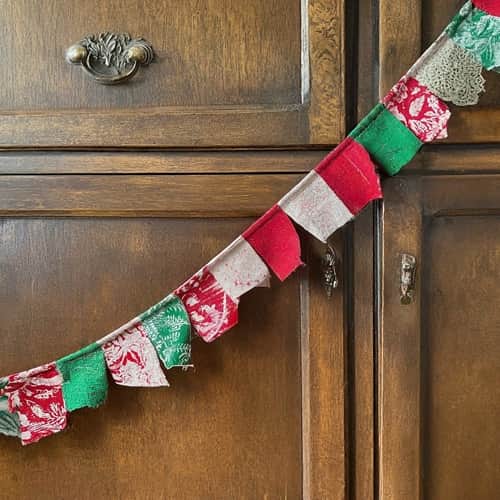
Don’t toss those leftover fabric scraps as they can be transformed into a beautiful and unique Christmas garland that adds a touch of texture and personality to your decor.
Here’s what you’ll need to craft this Fabric Scrap Garland:
- Assorted fabric remnants in festive hues like red, green, white, and gold patterns.
- Pinking shears (optional, for a decorative edge)
- Sewing machine or fabric glue
- Ribbon or twine for hanging
Instructions to make this craft:
- Cutting Capers: Cut your fabric scraps into squares, triangles, or any other shapes you like. Pinking shears can add a decorative touch if you have them.
- Sewing It Together (Optional): If you have a sewing machine, stitch the fabric pieces together into a long strand, leaving space between each piece for a more dynamic look.
- Gluing Goodness (Alternative): For a no-sew option, use fabric glue to adhere the fabric pieces to a length of ribbon or twine, creating your garland.
- Festive Flair: Experiment with different fabric patterns and textures to create a visually interesting garland. You can even add small jingle bells, buttons, or beads for an extra touch of Christmas cheer.
Alternatives & Variations:
If you prefer a no-sew approach, opt for fabric glue to attach the scraps to ribbon or twine.
Experiment with adding small embellishments like jingle bells, buttons, or beads between fabric pieces for extra whimsy.
Also, consider using themed fabrics like plaids, metallics, or holiday prints for a cohesive look.
For Sustainability:
- Choose organic or recycled fabrics for a sustainable twist.
- Upcycle old clothing or linens into fabric scraps for this project, reducing textile waste.
- Use biodegradable fabric glue or opt for sewing to ensure durability and eco-friendliness.
Display Ideas:
Drape the garland along mantels, stair railings, or use it as a festive table runner for added holiday charm.
Decorative Salt Dough Ornaments
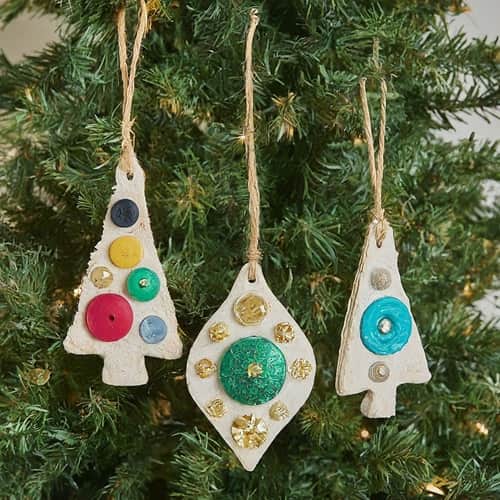
With just flour, salt, and water, you can create charming decorations in various shapes, perfect for painting and embellishing with glitter and ribbons.
This budget-friendly craft allows for endless creativity, making each ornament a cherished keepsake for years to come.
Here’s what you need:
- All-purpose flour
- Salt
- Water
- Cookie cutters in festive shapes (stars, snowflakes, trees)
- Paint (optional)
- Ribbon or twine for hanging
- Embellishments (optional: glitter, buttons, beads)
Instructions to make this decorative salt dough ornament:
- Doughy Delight: Combine equal parts flour and salt in a bowl and slowly mix in water until a soft dough is formed.
- Cookie Cutter Creativity: Roll out the dough on a lightly floured surface and use cookie cutters to create festive shapes.
- Baking Time: Preheat your oven to the lowest possible temperature setting (around 200°F) and bake the salt dough shapes for several hours, or until completely dry and hardened.
- Painting Fun (Optional): Once cool, unleash your inner artist! Paint the salt dough ornaments in festive colors and designs.
- Finishing Touches: After the paint dries, add a touch of sparkle with glitter or embellish with buttons, beads, or tiny ribbons.
- Hanging with Pride: Thread ribbon or twine through a small hole at the top of each ornament for hanging.
These homemade salt dough ornaments are a cherished tradition for many families.
They’re a fantastic way to create unique and personalized decorations on a budget, and the possibilities for customization are endless.
Alternatives & Variations:
Experiment with different textures by adding spices like cinnamon or cloves to the dough for a festive scent.
Use rubber stamps or lace to imprint patterns onto the dough before baking for added detail. Consider mixing food coloring into the dough for vibrant hues.
For Sustainability:
- Choose organic flour and opt for biodegradable glitter or natural embellishments to minimize environmental impact.
- Reuse leftover ribbons or fabric scraps to hang ornaments, promoting eco-friendly practices by minimizing waste.
Additional Tips:
- Baking: Ensure the ornaments are baked at a low temperature to prevent them from browning or cracking during the drying process.
- Storage: Store the ornaments in a cool, dry place after the holidays to preserve them for future use.
DIY Customized Candles for Christmas
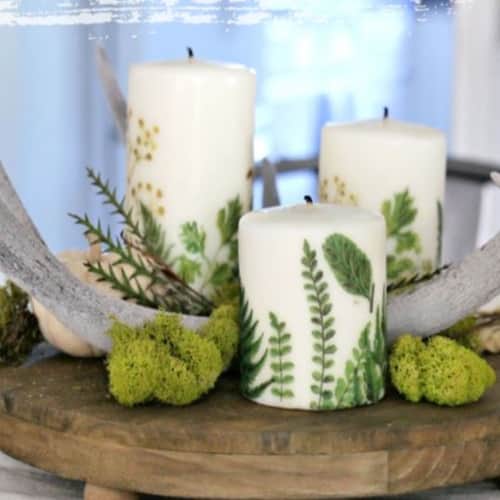
Credit: todayscreativelife.com
Transferring images onto candles using tissue paper is a cost-effective way to customize and sell them for Christmas.
You’ll need candles, patterned napkins or decorative tissue paper, printer paper, wax paper, washi tape, your chosen graphics, a potholder, an inkjet printer, a heat tool or blow dryer, and craft scissors.
Secure the tissue paper to the printer paper using tape on all edges, then proceed to print your design.
Cut out the designs and wrap the printed tissue around the candle, then cover with wax paper.
Carefully blow hot air over the wrapped papers to transfer the design onto the candle.
Full Step by step instructions to make this DIY Customized Candles for Christmas here.
Alternatives & Variations:
- Experiment with different graphics and patterns to suit various occasions beyond Christmas, such as birthdays or weddings.
- Consider using colored tissue paper or combining multiple designs on one candle for a layered effect.
For Sustainability:
Choose eco-friendly candles made from soy or beeswax and opt for recycled tissue paper to minimize environmental impact. And If possible, repurpose old candles or use ones with natural scents for an added sensory experience.
Additional Tips:
- Heat Application: Use a heat tool or blow dryer on a low setting to ensure the tissue paper adheres smoothly to the candle surface without melting it.
- Finishing: Trim any excess tissue paper carefully to achieve a neat and professional-looking finish.
Also Read: 20 Fantastic Last Minute Christmas Crafts To Make And Sell
Pine Cone Wreath
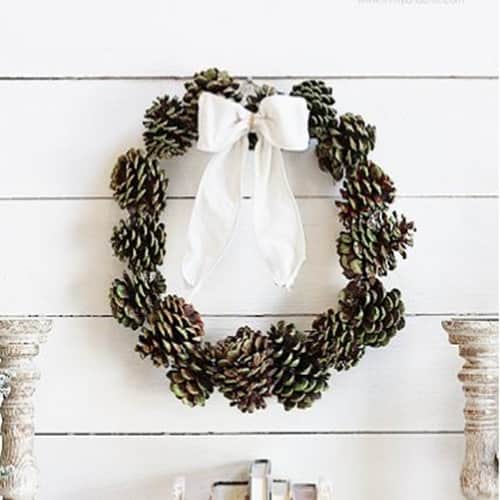
Credit: thriftyandchic.com
To make this festive pine cone ornament, you’ll need pine cones, DecoArt Dazzling Metallics in Festive Green, White Pearl, and Red, floral wire or pony beads, a wire hanger, hot glue, and a bow.
First, unbend the coat hanger and shape it into a circle.
Cut a 10-inch piece of floral wire, wrap it around the middle of a pine cone, and then secure it to the wire hanger.
Gently curve the wire back into the pine cone, alternating directions for each one.
Repeat until the circle is filled, gluing the cones if needed for alignment.
Paint the edges of the pine cones with festive green metallic paint or other desired shades. Lastly, attach the bow with glue to complete your ornament
Here’s a step by step instructions to make this Pine Cone Wreath.
For Sustainability:
- Gather pine cones from your yard or local park to reduce environmental impact.
- Use non-toxic paints and biodegradable glue for a more eco-friendly crafting experience.
Additional Tips:
- Assembly: Secure each pine cone to the wire hanger with hot glue for durability, ensuring they are evenly spaced for a balanced look.
- Decoration: Customize your ornament with additional embellishments like glitter or small beads for added texture and shine.
DIY Frosted Candle Holder
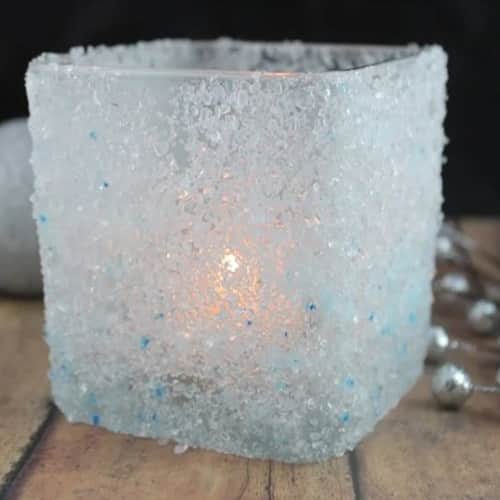
Credit: amomstake.com
Creating a budget-friendly frosted candle holder requires just a few simple supplies such as epsom salt, glass jars (even second-hand ones work fine), food coloring, and Mod Podge.
Begin by thoroughly cleaning the jar to remove any stickers or residue.
Mix epsom salt with your chosen food coloring in a bowl and allow it to dry.
Coat the inside of the glass jar with Mod Podge from the bottom up, ensuring the salt mixture sticks well (Make sure to cover the entire jar). It’s an easy and economical way to craft charming candle holders for your home decor.
Here’s a step-by-step instructions to make this DIY Frosted Candle Holder.
Alternatives & Variations:
Experiment with different textures by using coarse or fine epsom salt for varied effects. Try mixing multiple colors of food coloring for a marbled or ombre look. Consider adding glitter or small embellishments like faux snowflakes or tiny beads to enhance the winter theme.
Sustainability Angle:
- Give new life to glass jars from your kitchen or repurpose pre-loved ones to cut down on waste effectively.
- Use eco-friendly Mod Podge and natural food coloring options for a greener crafting experience.
Additional Tips:
- Preparation: Make sure the glass jars are thoroughly clean and residue-free before applying Mod Podge. Allow each layer to dry completely before adding another coat for a smooth finish.
- Usage: Place tea lights or small candles inside the frosted holders to create a soft, flickering glow that enhances the ambiance of any room.
Budget-friendly Farmhouse Christmas Decor
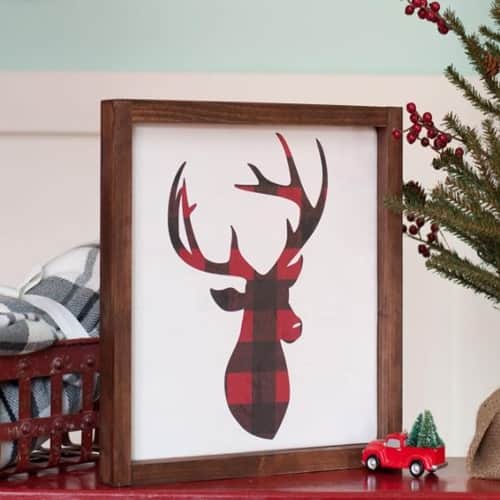
Credit: modpodgerocksblog.com
Here’s a fantastic idea for creating budget-friendly Christmas decor.
Use cardboard or scrap wooden panels to craft the frame.
Polish or paint the frame for a glossy or matte finish.
Choose a fabric or paper as your background material.
Get creative with cloth or paper collages to shape your design
It’s an easy method to craft delightful decorations without overspending.
However to learn how the above decor is made visit: modpodgerocksblog.com
Alternatives & Variations:
Experiment with different textures and patterns of fabric or paper to create diverse designs i.e. from traditional holiday motifs to contemporary abstract compositions.
For Sustainability:
Choose environmentally-friendly paints and adhesives to reduce your ecological footprint. If possible, use scraps of fabric or recycled paper for your collages, promoting sustainable crafting practices.
Additional Tips:
- Assembly: Secure the fabric or paper collage onto the frame using non-toxic glue or double-sided tape for a neat finish (Allow sufficient drying time to ensure durability).
- Display: Hang your handmade decorations on walls, doors, or mantels, or prop them on shelves for a festive touch throughout your home.
Final Thoughts
I particularly love the idea of upcycling everyday items like mason jars and fabric scraps into festive pieces.
The DIY photo keepsake ornaments and salt dough creations offer a personal touch that I think makes decorating more meaningful.
My advice would be to start with crafts that match your skill level and gradually challenge yourself.
Don’t be afraid to experiment with colors and textures to suit your style. Remember, imperfections often add charm to handmade items.
I’d recommend involving family or friends in crafting sessions to create memories along with decorations.
Lastly, consider making extra pieces as thoughtful, personalized gifts.
These crafts not only save money but also allow us to infuse our homes with unique, heartfelt holiday cheer.


