This Easter, I was on the hunt for something unique to spruce up my home.
Inspired by dollar tree craft ideas, I wanted a dash of fun and whimsy, something that wasn’t your everyday decor.
That’s when dinosaurs stomped into my mind for a perfect easter basket (Something that can make an excellent dollar tree craft).
Imagine bringing a prehistoric twist to Easter! It’s not just me, kids and adults alike can’t help but adore these ancient giants.
So, armed with nothing but everyday items from around the house, I set off on my creative adventure.
Why break the bank on store-bought decorations when you’ve got everything you need right at home? I’ve transformed my space with these DIY dinosaur eggs, and trust me, the process was as enjoyable as the outcome.
Here’s a step-by-step guide to make something incredible together.
Things I’ve Used To Make DIY Dinosaur Egg Easter Basket
- Coconut Shell: I’ve used coconut shells as dinosaur eggs because they were perfect to replicate them.
- Basket: I’ve used a plastic basket as the base of the decor which was available in my home.
- Sandpaper: To scrub and smoothen the coconut shell I have used a piece of sandpaper.
- Acrylic Paint and a Paintbrush: I’ve used dark brown shade to paint the internal part of the coconut shell. Off white color is used to paint the outer shell. Finally, I’ve used a golden color to shade the basket.
- Makeover Sponge Balls: Makeup sponge balls replicate eggs and hence they were perfect as decor items for my project.
- Dinosaur Figures: I’ve used a few Dinosaur Figures to add to this specific Decor theme. I picked a few Dinosaur toys from the abandoned collection of my kids.
- Cotton: I’ve used a handful of cotton as a part of my decor. The cotton I’ve used is from an old pillow I had stored for decor purposes.
- Artificial decor: Finally, I used artificial decor to enhance the overall decoration for Easter.
Step 1: Breaking The Coconut
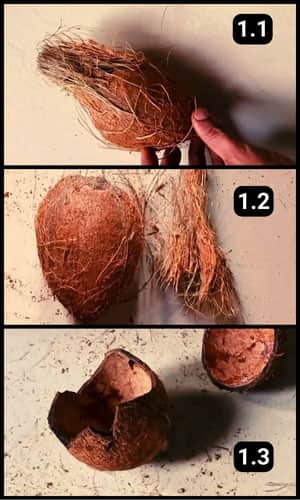
First up, I tackled the coconut, stripping away the husk bit by bit.
Then, with my trusty breaker in hand, I tapped around its middle from every angle until, at last, it cracked open.
The white meat inside? I saved that for cooking.
Now, let’s move on to the next step.
Step 2: Smoothen the Outer Shell
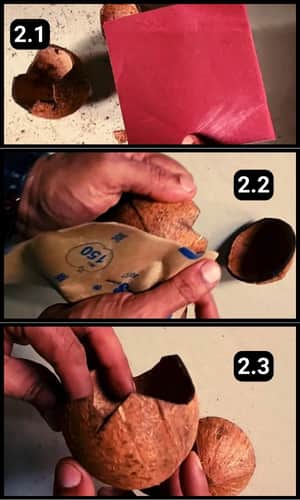
Next, I grabbed some sandpaper to give the coconut shell a smooth finish.
It took a bit of elbow grease, especially on the rougher patches, but I scrubbed away for about 2 to 3 minutes.
The result? A much smoother shell, ready for the next step.
Step 3: Shading the basket
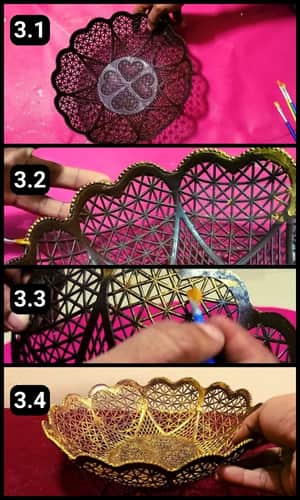
I found an old plastic basket in the kitchen, the kind we used to wash veggies in.
It had seen better days, with its edges all cracked and broken.
Since it was just sitting there unused, I decided to give it a new lease on life by fixing it up with some glue.
It still looked pretty plain, so I went ahead and painted it gold, inside and out.
You wouldn’t believe the transformation, it turned into a stunning decor piece, perfect for the dining table, maybe with some fruit in it.
This goes to show you can repurpose your old baskets too.
But for now, this bucket’s got a special role in my Easter decor project.
Step 4: Shading The Inner Shell
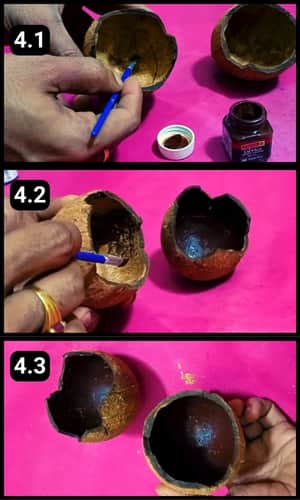
Acrylic paints are my go-to for DIY projects, they’re just unbeatable.
For the inside of the coconut shells, I chose a rich brown hue.
Now that they’re all painted on the inside, it’s time to tackle the outside.
Step 5: Shading the outer shell
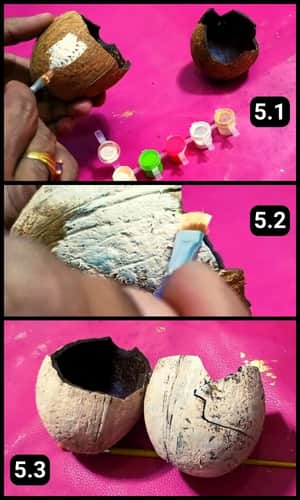
For the outside of the coconut shells, I went with an off-white shade.
I kept it to just one layer, not too thick, aiming for that slightly rough texture. After all, these are going to be our dinosaur eggs.
The color turned out great, so it’s time to dive into the decorating part.
Step 6: Getting the base ready
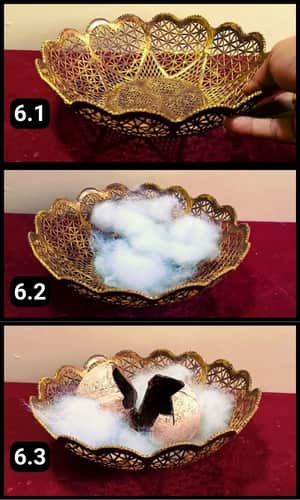
For decoration, I started by setting down the basket I’d painted gold, then I filled it with a layer of cotton for a soft base.
On top of that, I arranged the coconut shells, our makeshift dinosaur eggs.
They really bring the theme to life, just look at the photos above to see how it all came together.
Step 7: Grabbing the Decor Items
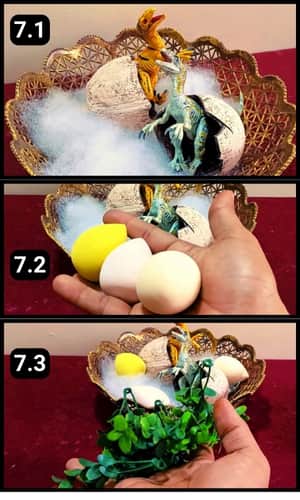
I nestled the dinosaur figures into the broken shells, positioning them so it looked like they were just about to hatch and hop out.
Now, it’s time to mix in some more decor elements.
My wife, a talented beautician, had these makeup sponge balls that uncannily resemble eggs.
I borrowed a few and scattered them around the baby dinos for an extra touch.
To round it all off, I’m adding some artificial greenery around the basket. It’s all coming together beautifully.
Step 8: Decorating the basket and little Dino
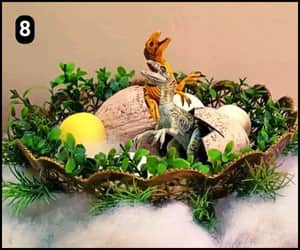
I played around with the decor, arranging things this way and that until everything clicked.
First off, spreading cotton around the basket really elevated the look.
Then, tucking in the artificial bushes inside and around the edges of the basket brought it all together.
It’s exactly the Easter vibe I was aiming for.
Take a quick look at the above image number 8, it turned out amazing.
Step 9: Let the Dino-parents Join them
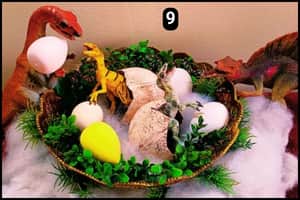
I wanted to create a scene where the parent dinosaurs are watching their eggs hatch, so I placed a couple of them to the sides.
They look like they’re beaming with joy.
To the left, there’s papa dino, seemingly greeting their baby with an Easter egg in hand. It’s such a heartwarming setup.
Final Thoughts
Getting creative with decor projects is always a blast, and I’ve outdone myself this Easter.
The kids were over the moon when they came back from school to find their old dinos turned into playful decorations.
It just goes to show how you can transform your living space with items you already have at home.
I’ve also put together a video walkthrough above for you to see the magic happen step by step. The key is to elevate what is ordinary into something remarkable.
Frequently Asked Questions
How much time did it take to complete this DIY Dinosaur Egg Easter Basket project?
It took about 45 minutes to complete the entire project. However, with all the elements ready it only took about 5 minutes to align them.
What can I use if I don’t have coconut shells for the dinosaur eggs?
If you don’t have coconut shells, you can use large stones or even paper mache to create a similar effect. Just shape them like eggs and follow the painting steps for a dino egg look.
Can I use real plants instead of artificial decor for the greenery?
Absolutely! Real plants can bring a fresh and lively feel to the decor. Small succulents or moss can mimic prehistoric foliage beautifully.
Is there an alternative to makeup sponge balls if I can’t find any?
Yes, you can use small, round objects like ping pong balls or even crumpled paper balls covered in paint or fabric. Anything that can mimic the shape and size of eggs will work.
How can I make the DIY dinosaur eggs more educational for kids?
Incorporate fun facts about dinosaurs and the specific types you’re using as figures. You could also create a mini-scavenger hunt with clues related to different dinosaur species.
Can I add other elements to the Easter basket to make it more festive?
Definitely! Consider adding Easter grass, colored ribbons, or even small Easter-themed toys to enhance the festive look.
How do I ensure the painted coconut shells are safe for kids to handle?
Use non-toxic, child-safe acrylic paint, and make sure the painted shells are completely dry before handling. You can also seal the paint with a clear, non-toxic sealant for extra durability.
What other themes can I explore using this DIY approach for other occasions?
This DIY approach is versatile. For Halloween, you could create pumpkin or ghost-themed decor, and for Christmas, ornaments or mini snowmen.


