If you’ve been following my blog or YouTube channel, you’ll know that I adore creating personalized DIY gifts, especially for those unexpected surprises.
As usual I’m always scouting my home for materials to incorporate into these projects.
Today, on a whim, I decided to whip up a pair of cozy, soft slippers to keep my kid’s feet snug and warm.
Don’t let their appearance fool you, they’re not as challenging to make as they might seem.
Just follow the simple steps outlined below and you’ll see how effortlessly you can put them together to create a DIY Plush Footwear For Your little ones or even gift these plush handmade footwear to someone.
So, without any further ado, let’s dive right into this fun project by taking a quick look at the list of items required for this DIY project.
Step 1: Things You’ll Need For Creating DIY Plush Comfy Slippers For Kids

- Sandal or Slippers of the required sizes: To mark the proper base size I’ve used the regular footwear.
- Thin sheet of thermocol or Foam sheet: To add a layer of thickness I have used a sheet of thin thermocol. It will also ensure maintaining their softness while wearing them.
- Cardboard Sheet: I have used the cardboard sheet to mark the outlines of the proper fit footwears base.
- Plush Towel Sheet: To wrap the thermocol sheet and offer the soft feel to the feet I’ve used a piece of plush towel.
- Rubber Bands: I have used rubber hair bands to make the slipper straps.
- Glue: To stick the required elements I’ve used a multipurpose glue.
In this project, every item used is a common household scrap material, easily obtainable in most homes.
Now that we have all the necessary elements, let’s begin the project.
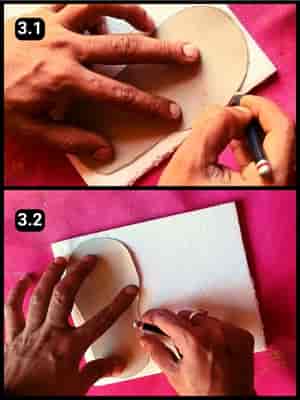
Step 2: Cutting the Base Shape

First, I marked the outlines of the existing footwear to ensure the bases were the right size.
Then, I cut them out according to the needed shape and size for a perfect fit. Post which, I marked and cut the base shapes as shown in image 2.3 above.
These cardboard cutouts proved to be incredibly useful throughout the project, as you’ll see in the next steps.
Step 3: Using Hard Foam Sheet
I have used a thin sheet of thermocol to add it as a layer to the base of the slippers.
To get the appropriate sizes I first marked the outlines with the help of the cardboard cutouts.
Next, using a scissor I cut the shape and kept them aside.
You can also use a sharp cutter or a razor head to cut the shapes out of the thermocol sheet.
As an alternative to the thermocol sheet you can use foam sheets or as per availability.
Step 4: Cut the Plush Towel Shape
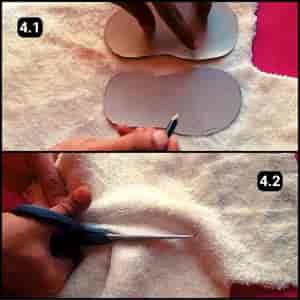
I reached the point where it was time to mold the plush towel around the thermocol sheets.
So, I laid the cardboard cutouts on the towel and trimmed them to size.
I made sure to cut them a bit larger than the base of the slippers, allowing extra towel material to fold and wrap around.
You’ll see why this extra step was crucial in the steps that follow.
Step 5: Sticking the Shapes

It was time to fix the plush towel sheet over the thermocol cutouts.
First, I applied enough glue to the thermocol cutouts to the base center including the edges.
After that, rolling my fingers, I spread the glue evenly all around the base as seen in the images 5.1 and 5.2 above.
I wrapped the plush towel sheet starting from the front surface of the base, followed by fixing it through its edges in an even manner
Next, I glued and fixed the additional piece of towel sheet behind the slippers’ base, as seen in image 5.3 above.
It looked as if it had been wrapped perfectly and had gotten the right shape.
In a similar fashion, I followed the steps with the other pair.
Step 6: Fixing the Footwear Straps
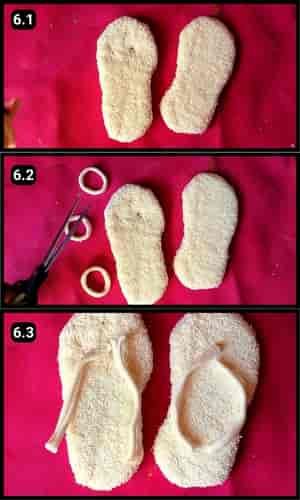
To make the slipper straps I’ve used rubber hair bands for elasticity.
I’ve used a total of 4 rubber bands to make 2 straps for each pair of slippers.
To fix them you will need to create three gaps in each pair of slippers.
You can use any available tool to draw holes that work best for you.
Next, I inserted the edges of the rubber bands and glued them accordingly.
However, you can stitch them using a needle and thread as an alternative (Recommended method).
You can fix them as per your convenience or simply as per available resources.
Step 7: Giving The Final Touch Up

To make them more durable you can visit the nearest cobbler to get the slippers stitched around the edges.
It’s optional, as it can be done at home too, however, it depends completely on your stitching skills.
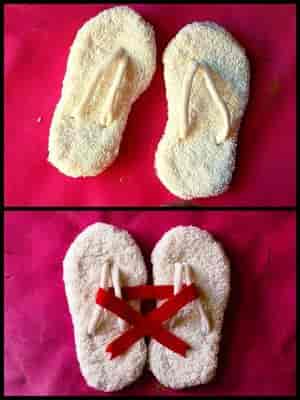
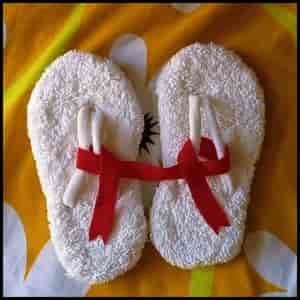
Once finished, these pairs of comfortable slippers look so adorable to the eyes.
I’ve tied them together with a ribbon so that I can present it to my younger one who’ll love it to wear.
This is what the completed DIY Plush Footwear For Kids look like (It makes an excellent gift idea).
Video Walkthrough of DIY Handmade Comfy Footwear for kids
Final Thoughts
These pairs of slippers may look difficult to make initially, but in reality the process isn’t that difficult.
DIY slippers that I made aren’t just footwear, they’re a cozy hug for your little one’s feet, made with love and a sprinkle of craft magic.
Remember, the joy is in the making as much as it is in the giving.
Whether you’re crafting for your own child or as a gift, these slippers are bound to bring smiles.
So, gather those common household scraps and let your creativity lead the way.
Moreover, once you give this idea a try, you’ll soon notice significant savings on regularly used items, which can easily be made at home.
For your reference,I’ve shared the complete video tutorial above of this particular DIY project.
For more useful ideas subscribe to our The Portable Laundry DIY & Crafts YouTube channel where we regularly upload DIY related stuff.
Frequently Asked Questions
How long did it take to make these DIY Kids slippers?
It took about an hour including the drying time, however, it was worth it.
Can I make this DIY Kids Footwear in a different size?
Yes, you can make your DIY Kids Slippers in different sizes depending on the available resources.
How should I clean these DIY Kids Footwear?
It’s recommended that you dry clean these DIY Kids footwear for better results.
Can I use fabric other than a plush towel for the outer layer?
Yes, while plush towels provide softness and warmth, you can experiment with different fabrics according to availability or preference. Fleece or soft felt are great alternatives that also offer comfort and warmth.
Is there a specific type of glue recommended for this DIY Kids Footwear project?
I recommend using a strong, fabric-friendly adhesive that dries clear and remains flexible. Multipurpose or fabric glue works best, ensuring the materials bond well without stiffness.
Can I add soles to these DIY Kids slippers to make them more durable for outdoor use?
Yes, you can add soles to these Kids footwear for extra durability. Consider using thin rubber sheets or purchasing pre-made slipper soles from a craft store. Attach them to the bottom of the slippers using strong glue or by stitching them on for a more secure hold.
How can I customize the Kids footwear size for different age groups?
To customize sizes, simply use the footwear of the person you’re making the slippers for as a base to mark the proper size. Adjust the size of the cardboard cutouts, thermocol sheets, and towel fabric accordingly.
What if I don’t have thermocol or foam sheets for this DIY Kids Footwear Project?
If you don’t have thermocol or foam sheets, you can use layers of thick fabric or felt to create a padded base. These materials can also provide cushioning, though the feel may differ slightly.
Are there any other decorative elements I can add to these DIY Kids slippers?
Feel free to add buttons, sequins, embroidery, or any other decorative elements to personalize the slippers further. Just make sure any added decorations are securely attached and won’t pose a choking hazard for younger children.


