As a parent, I’m always on the lookout for fun activities to keep my kids engaged during the holiday season.
This year, I have shortlisted and compiled a treasure trove of 16 surprisingly easy Christmas crafts for kids that are sure to make our home merrier than ever.
From adorable pine cone trees to charming handprint Santas, these projects are perfect for little hands and big imaginations.
The best part? Many of these crafts double as heartwarming keepsakes or potential holiday market hits.
So, whether you’re looking to entertain restless little ones or create lasting memories, these DIY adventures promise hours of festive fun.
So, without wasting any time let’s dive right into the list of top 13 Christmas crafts for kids that are super easy.
DIY Adorable Christmas craft structures to sell
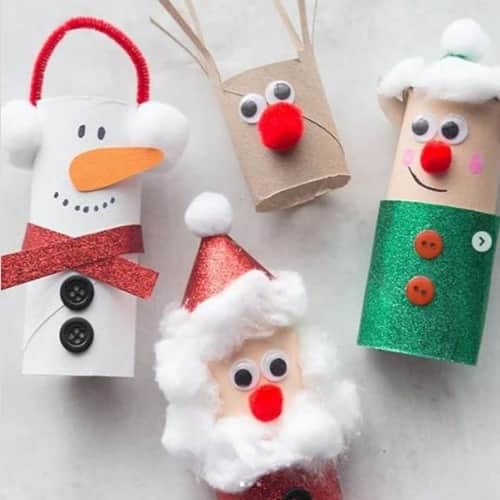
Image Credit: _tigertribe_
You can create these charming structures using basic craft supplies and items found around the house.
Gather materials like toilet rolls, pipe cleaners, googly eyes, mini pom poms, markers, scissors, and glue or a hot glue gun.
Start by saving a toilet roll and selecting a character to color accordingly.
Choose green for the Grinch or red for Santa’s coat as both options are great.
Attach toppings like pom poms, buttons, Rudolph’s red nose, and googly eyes with glue.
Use pipe cleaners creatively as arms, belts, hair, or hats for your characters to add personality and flair to your creations.
Customization Tips:
- Color Choices: Let them choose colors for different characters, such as green for the Grinch or red for Santa’s coat.
- Decorative Options: Use a variety of decorations like pom poms, buttons, and googly eyes. Kids can mix and match these to give each character a unique look.
Low-cost Material Alternatives:
- Toilet Rolls: Substitute with paper towel rolls cut to size or rolled-up cardboard.
- Googly Eyes: Substitute small paper circles or cut-out magazine shapes for eyes.
- Mini Pom Poms: Substitute with rolled-up paper dots or cotton balls.
- Markers: Replace with crayons or colored pencils if markers are unavailable.
Safety Consideration:
- Adult Supervision: Always supervise younger children when using scissors or glue.
- Modifications: For younger kids, pre-cut shapes or use safer alternatives like glue dots instead of hot glue guns.
Pine Cone Christmas Tree Craft for Kids
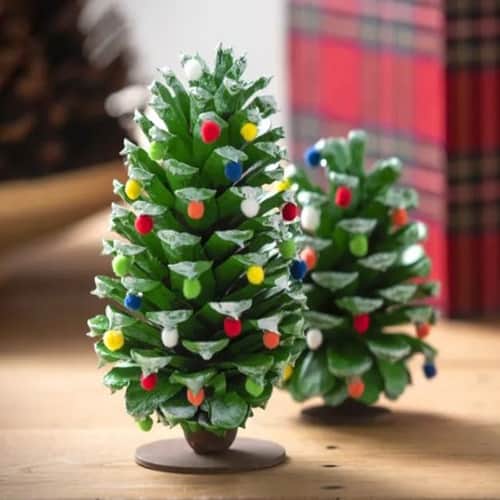
Credit: diycandy.com
Ready to turn your little ones into holiday decorators? Try these adorable pine cone Christmas trees.
Ideal for the entire family, this craft can be personalized to suit every age group.
Plus, it’s a great way to get everyone in the holiday spirit without needing to hide their masterpieces.
To create a similar decor craft, gather supplies like pine cones, wood circles, wood beads, mini pom poms, craft paint (green, white, brown), craft glue, paintbrushes, and a hot glue gun.
Begin by painting the pine cones white, silver, or neutral colors, then add decorative accents with other paint colors.
For the foundation, think about using small wood slices, wine corks, mini terracotta pots, or wooden blocks.
Wrap baker’s twine around the cone to mimic garland or Christmas lights.
Enhance the decor by adding perler beads, pony beads, or other small items as ornaments.
Finally, top the pine cone with a star, pom pom, or another Christmas embellishment to complete the look.
Need detailed steps? Hop over to DIY Candy for the full scoop and make this festive season a crafty one.
Safety Consideration:
- Always keep an eye on younger ones when handling craft glue or a hot glue gun. small items like beads safely.
- Modifications: Simplify the craft for younger children by pre-painting the pine cones or using safer glue alternatives.
Low-cost Material Alternatives:
- Pine Cones: Gather pine cones from your backyard or local park instead of buying them.
- Wood Circles: Use cardboard cut into circles or recycled cardboard from packaging.
- Wood Beads: Substitute with small buttons or rolled-up paper beads.
- Craft Paint: Use acrylic paint in basic colors if specialty craft paint is unavailable.
- Hot Glue Gun: Replace with white glue or craft glue that dries clear, though drying time will be longer.
Button Tree Felt Ornaments
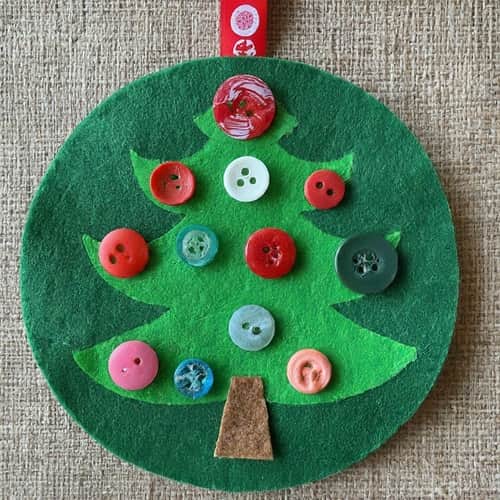
This is a dazzling craft that lets kids unleash their creativity.
Simply cut out green circles from felt (adult supervision required for cutting) and create light green Christmas tree shapes, along with a brown stem from felt fabric.
Provide an array of colorful buttons in various sizes and let your child use glue to decorate their felt tree with the buttons, creating a one-of-a-kind Christmas ornament that sparkles
Customization Tips:
- Provide a wide range of colorful buttons in different shapes and sizes for kids to choose from.
- Teach kids how to apply glue carefully and assist younger children with adult supervision.
Low-cost Material Alternatives:
- Felt: Substitute with construction paper or fabric scraps if felt is not available.
- Buttons: Use sequins, small pieces of colored paper, or beads as alternatives to buttons.
- Glue: White school glue can be used instead of craft glue, though drying time may be longer.
Safety Consideration:
- Ensure adults handle the cutting of felt circles and supervise the use of glue to prevent mess and ensure safety.
- Younger children can use pre-cut shapes and larger buttons for easier handling.
DIY coffee cup sleeve for Christmas
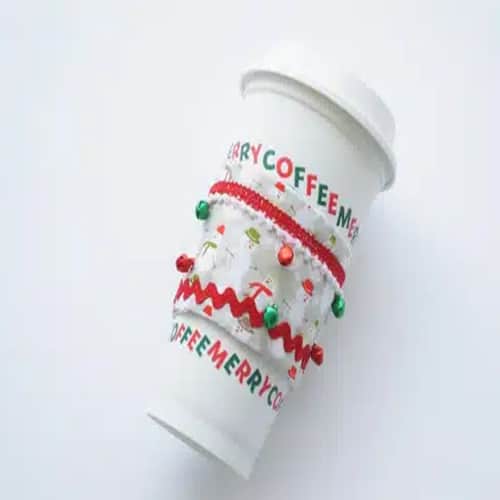
Credit: kitchencounterchronicle.com
Wrap your favorite brew in festive cheer with a DIY Christmas coffee cup sleeve.
Perfect for those Starbucks reusable cups, this craft adds a jingle to your java routine.
Start by printing out the handy sleeve template, then get creative with festive fabric, ribbons, and even jingle bells.
Sew it all together with holiday flair, ensuring your cup stays cozy and stylish.
Whether it’s a gift for a teacher or a treat for yourself, this sleeve spreads Christmas joy while cutting down on waste.
For the full step-by-step guide and to download the template, head over to Kitchen Counter Chronicle.
Suitability:
- Great for School-aged Kids and Teens: School-aged kids and teens can participate in selecting fabrics, ribbons, and decorations. They can also assist with simple sewing tasks under adult supervision.
Customization Tips:
- Use festive fabrics like holiday prints or colors that reflect the Christmas theme.
- Add embellishments like ribbons, jingle bells, or even personalized embroidery to make each sleeve unique.
Low-cost Material Alternatives:
- Festive Fabric: Use scraps of fabric from old clothes or bed sheets instead of buying new fabric.
- Ribbons: Substitute with yarn or twine for a rustic look, or repurpose ribbons from gift wrapping.
- Jingle Bells: Use small buttons or beads instead of jingle bells for decoration.
- Sewing Supplies: Replace sewing machine with hand stitching for those without access to a machine.
Safety Consideration:
- Adult supervision is recommended during sewing to ensure safety with needles and scissors.
- Simplify sewing steps for younger participants or use fabric glue instead of sewing for safer alternatives.
Fingerprint Reindeer Ornaments
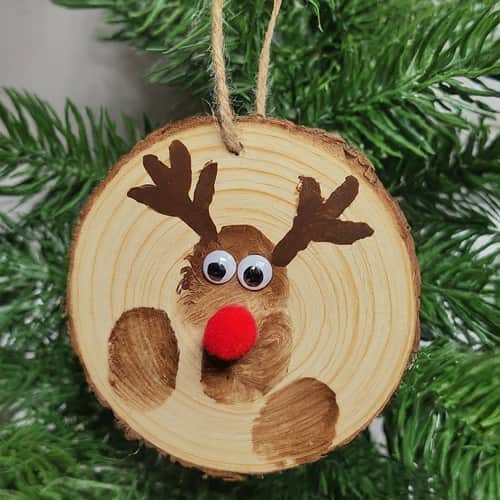
This craft is another adorable way to capture your child’s individuality.
Paint your child’s fingertip brown and let them make brown fingerprint dots on a round wooden ornament to create the reindeer’s body.
Once it’s dry, add googly eyes, a red pom-pom nose, and a small pipe cleaner antler to create a personalized and charming Christmas ornament.
If you don’t have a pipe cleaner for the for reindeers horns, simply paint it as shown in image above.
Customization Tips:
- Fingerprint Colors: Let the kids experiment with different shades of brown or even glitter paint for a sparkly reindeer.
- Decorative Accents: Use a variety of materials like different sized googly eyes, colored pom-poms for noses, and pipe cleaners or paint for antlers.
Low-cost Material Alternatives:
- Wooden Ornament: Substitute with cardboard cutouts or recycled materials shaped into ornaments.
- Googly Eyes: Use small pieces of paper or draw eyes with markers if googly eyes are not available.
- Red Pom-Pom Nose: Substitute with a small bead or rolled-up paper painted red.
- Pipe Cleaner Antler: Use twisted paper or craft wire, or simply draw antlers with markers if pipe cleaners are unavailable.
Safety Consideration:
- Supervise the use of small items like googly eyes and pom-poms to avoid choking hazards, especially with younger children.
- For very young children, pre-paint the wooden ornaments and handle the glue application.
Paper Loop Christmas Craft for Kids
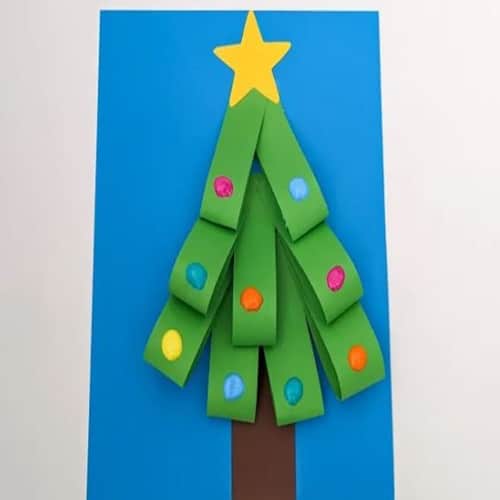
Credit: craftingafunlife.com
Kick off the holiday cheer early with a delightful paper loop Christmas tree craft.
Using simple supplies like cardstock and glue, kids can create their own festive masterpiece.
Start by cutting and looping green paper strips to form the tree’s layers, adding a star on top and decorating with 3D paint or sequins for extra sparkle.
Whether it’s for home or school, this customizable craft is a perfect way to get creative this season.
For step-by-step instructions and more creative ideas, visit Crafting a Fun Life.
Customization Tips:
- Use different shades of green or even mix in some red and gold paper strips for a festive touch.
- Add 3D paint, sequins, or small stickers to create unique decorations. Let kids choose their favorite colors and shapes for extra sparkle.
Low-cost Material Alternatives:
- Cardstock: Substitute with colored paper or recycled cardboard.
- Glue: Use white school glue instead of craft glue, though drying time may be longer.
- Decorative Items: Instead of 3D paint or sequins, use glitter glue or small pieces of foil for sparkle.
Safety Consideration:
- Supervise younger children when using scissors and ensure they use child-safe scissors.
- Pre-cut paper strips for younger children to simplify the process and focus on decorating.
DIY Air Dry Clay bowls for Christmas
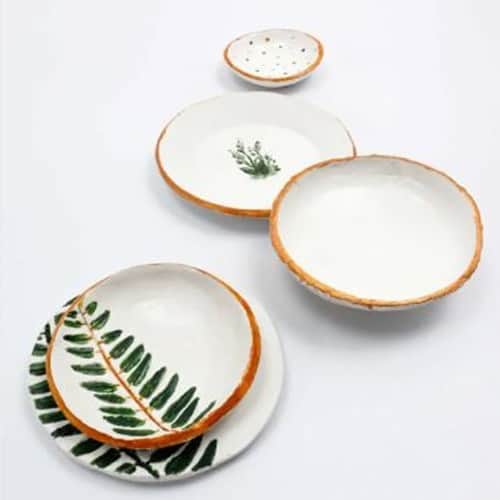
Credit: craftsyhacks.com
Discover the charm of crafting your own air dry clay bowls.
Perfect for gifts or home decor, these bowls are versatile and stylish.
To make a similar type of craft start by rolling out air drying clay and molding it around bowls for shape.
Add textures like chain imprints or leaf patterns for unique designs.
After drying, sand and paint as desired (metallic rims add a touch of elegance).
These bowls make perfect trinket dishes or decorative accents around the house.
For a detailed tutorial and more creative ideas, visit Craftsy Hacks.
Customization Tips:
- Use items like chains, leaves, or stamps to create unique patterns on the bowls.
- Once the bowls are dry, let kids choose their favorite colors and add metallic rims or other decorative touches.
Low-cost Material Alternatives:
- Air Drying Clay: Substitute with homemade salt dough or polymer clay for similar results.
- Textures: Instead of chain imprints, use household items like lace or textured fabrics for imprinting.
- Paint: Use acrylic paint in basic colors if metallic paint is unavailable for rims.
Safety Consideration:
- Supervise the use of clay and ensure kids use non-toxic, child-safe paints. Help younger children with shaping and sanding the bowls.
- For younger children, simplify by pre-rolling the clay or using easier-to-handle materials.
Salt Dough Ornaments

This is a fun and creative craft that allows for some sculpting play.
Make a safe and easy salt dough using flour, salt, and water (adult supervision for mixing and cooking).
Once the dough is cool enough to handle, let your child create ornaments by shaping them into Christmas trees, snowmen, or other festive shapes.
After baking them, decorate with paint, markers, and other embellishments.
Customization Tips:
- Shaping: Let them create a variety of shapes like Christmas trees, snowmen, stars, and more. Use cookie cutters for easy and consistent shapes.
- Decorating: After baking, provide paints, markers, glitter, and other embellishments for decorating. Let kids pick their favorite colors and designs to make it their own.
Safety Consideration:
- Supervise the mixing and cooking of the dough, as well as the use of the oven for baking. Ensure the dough is cool enough to handle before kids start shaping it.
- For younger children, assist with shaping and use larger decorations to make handling easier.
DIY Popsicle Stick Photo Holders for Christmas
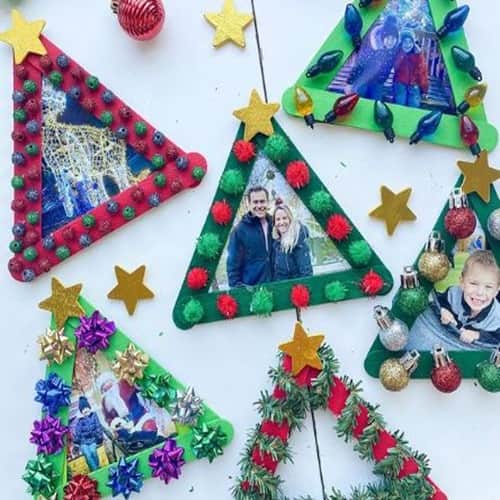
Image Credit: abcdeelearning
These Christmas photo holders can make excellent craft ideas for kids to sell.
Craft triangular frames by arranging popsicle sticks or using robust paper materials with precision and care.
Then, enhance them with paint and glitter for added decoration.
Finish by embellishing with stars, beads, and other festive ornaments (That’s all it takes).
Suitability:
- Preschoolers can help with painting and decorating the frames with guidance.
- School-aged kids can independently assemble, paint, and embellish the photo holders.
- Not Suitable for toddlers
Customization Tips:
- Frame Materials: Create frames using popsicle sticks or sturdy paper. Kids can choose their favorite colors for painting.
- Decorative Accents: Add glitter, stars, beads, and other festive ornaments. Let kids unleash their creativity by mixing and matching decorations to create one-of-a-kind designs.
Safety Consideration:
- Supervise the use of glue and small decorations to avoid choking hazards, especially with younger children.
- For younger children, pre-assemble the frames and let them focus on decorating.
DIY Paper Cutout Christmas craft for Kids
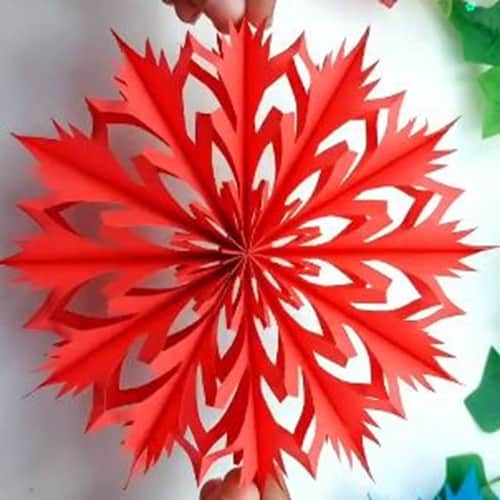
Credit: rezaul_crafty_creations
You can easily create personalized paper decor crafts for Christmas, like the ones shown in the image above.
While it may appear challenging, it’s surprisingly simple.
All you need is to cut out and shape paper pieces, then assemble them to create the structure depicted.
To learn more and for a step-by-step walkthrough visit: rezaul_crafty_creations.
Cardboard Roll Christmas Craft
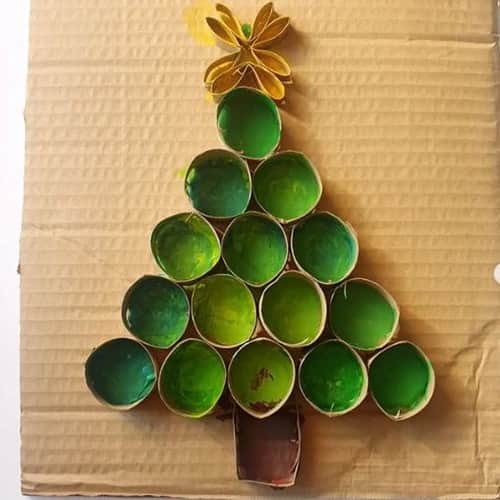
Image Credit: shining_star_ria
Searching for a budget-friendly and enjoyable Christmas craft idea for kids? This Christmas tree Idea is sure to attract a lot of attention from kids.
Start by cutting strips from a toilet paper roll and sticking them onto a piece of cardboard.
Once assembled, let the creativity flow as you or your little ones paint them into vibrant circles.
To add that festive flair, rummage through your craft supplies for ribbons, beads, stars, and of course, glitter (because who can resist a little sparkle?).
For a complete step-by-step video walkthrough to create this whimsical holiday craft, check out the full instructions here.
Customization Tips:
- Paint Colors: Let kids choose vibrant colors for painting the circles.Kids can explore a variety of colors and materials, combining them creatively to craft their own vibrant and unique tree designs.
- Decorative Accents: Use ribbons, beads, stars, and plenty of glitter to add a festive flair. Kids can arrange the decorations in their own unique way.
Safety Consideration:
- Supervise the use of scissors for cutting the toilet paper roll and ensure kids use non-toxic, child-safe paint and glue.
- Pre-cut the strips for younger children and assist with more complex steps.
Handprint Santa Craft for Christmas
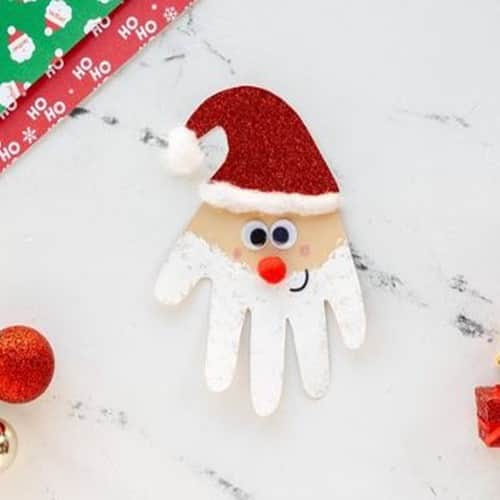
Credit: madetobeamomma.com
Perfect for little hands, this handprint Santa craft craft uses cardstock for durability and introduces paint in a fun way.
To make a similar type of craft, trace and cut out your child’s handprint, then sponge on white paint for Santa’s beard.
Add a glittery red hat with cotton ball, attach googly eyes, a red pom pom nose, and rosy cheeks with a pink crayon.
Finish with a cheerful smile using a black marker.
In under 30 minutes, you should be able to create a festive keepsake or turn it into a tree ornament, fridge magnet, or puppet.
For step-by-step instructions to make this handprint Santa for christmas, visit Made to be a Momma.
Key things to consider:
- Adult Supervision: Supervise the use of scissors for tracing and cutting out the handprint, and ensure kids use non-toxic, child-safe paint and glue.
- Modifications: Pre-cut the handprints for younger children and assist with more intricate steps like adding the details to Santa’s face.
Handprint Christmas Wreath Craft
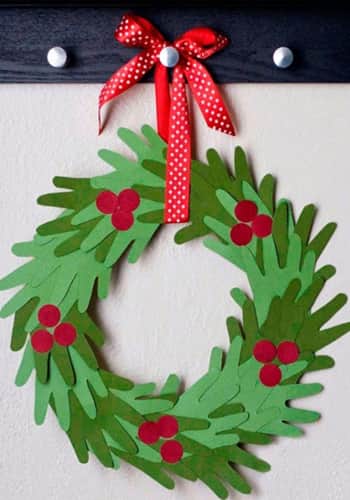
Credit: mynameissnickerdoodle.com
Create cherished memories with your kids this holiday season by crafting a Kids Handprint Christmas Wreath.
This classic project is easy, enjoyable, and requires just chipboard and green cardstock. Simply trace and cut out a wreath form to get started
Here’s how this craft comes together:
- Trace your child’s handprint several times on colored cardstock, varying the direction for a lively appearance.
- Attach the handprints to the wreath using glue, alternating directions to maintain balance.
- Add festive red “berries” punched from cardstock and complete with a ribbon hanger.
- And don’t overlook the most important step i.e.Personalize the wreath by writing your child’s name, age, and the date, transforming it into a heartwarming keepsake.
Visit My Name is Snickerdoodle for detailed instructions and more holiday craft ideas.
Customization Tips:
- Use various shades of green cardstock for a dynamic look and if possible add glitter or metallic cardstock for extra sparkle.
- You can also add festive red “berries” punched from cardstock or use small red pom-poms. Decorate with sequins, stickers, or additional embellishments to make it unique.
Low-cost Material Alternatives:
- Substitute chipboard with cardboard or thick paper for the wreath base.
- Green Cardstock: Use construction paper or recycled paper colored green.
Safety Consideration:
- Pre-cut the handprints for younger children and assist with gluing and arranging them on the wreath.
Final Thoughts
As a parent, I’d recommend starting with simpler projects like the fingerprint reindeer ornaments or button tree ornaments to build confidence.
The pine cone Christmas trees and air-dry clay bowls seem perfect for older children or family activities.
I particularly love the handprint crafts as they create lasting memories.
For those looking to sell crafts, the popsicle stick photo holders could be a hit.
Overall, these projects offer a great mix of creativity, skill-building, and holiday cheer.
I’d suggest choosing crafts that match your child’s interests and abilities, and don’t forget to prioritize the fun over perfection.


