As a parent, I’ve found the perfect activity to brighten up a rainy day or spark creativity in young minds and that kids activity is nothing but the simple Cut & Paste Happy Butterfly Craft.
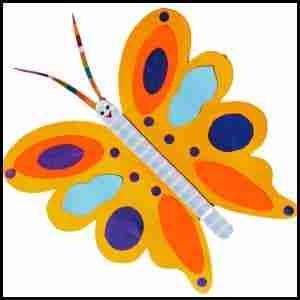
This delightful project transforms simple materials into a vibrant, three-dimensional butterfly that’s sure to bring smiles all around.
With just some colorful paper, glue, and a dash of imagination, your little ones can create their own flutter of butterflies in no time.
Before we begin let’s take a quick look at the craft supplies required to make the happy butterfly craft in step 1 below.
Step 1: Things You’ll Need For Happy Butterfly Craft
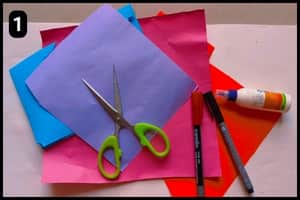
- Hard Paper: I’ve used a hard paper to shape the body structure of the butterfly that will hold the paper wings. However, you can also use a popsicle stick or a cardboard piece to craft the thin body of the butterfly.
- Colorful Papers: To cut the unique shapes of the butterfly wings and patterns you will need colorful craft papers.
- Glue: To assemble the pattern shapes onto the wings, attach the wings to the body, and secure the antennas, you’ll need glue. A multipurpose glue works best for ensuring a sturdy structure.
- Marker: For accentuating the butterfly’s facial features, opt for colorful marker pens. Red and black markers are ideal for highlighting these details.
- Butterfly Template: I have designed a colorful butterfly template so that you can download and print it on paper and cut the shapes to assemble the structure. The colorful template of the butterfly is available on our website, to access it simply scroll down to step #2.
Estimated Completion Time: With the help of the colorful template from our website, it took me only about 10 minutes to craft the paper butterfly.
Note: You will only need glue and scissors if you are using a readymade template as you just need to cut and paste the shapes in order.
Step 2: Preparing/Downloading The Butterfly Template
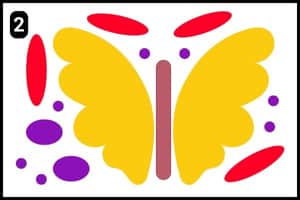
Shown in the image above is the vibrant butterfly template design.
You can fill the pre-cut shapes with vibrant colors or use colorful craft papers to customize your butterfly with various shades.
I’ve also included a butterfly body template that can be substituted with a popsicle stick, cardboard, or sturdy paper.
Download the happy butterfly template here.
Step 3: Cutting/Preparing The Butterfly Shapes
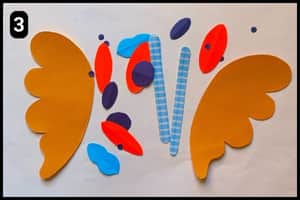
I’ve cut out the butterfly shapes from the provided template, as shown in image 3 above.
To create the butterfly’s body structure, I used a piece of patterned hard paper.
In the image above, you’ll notice two blue stick-like shapes representing its body.
Precision in cutting is crucial for achieving a uniform structure in your paper butterfly.
For small circle shapes, I recommend using a standard paper punch machine, as cutting them by hand can be difficult and time-consuming.
Step 4: Assembling the Wings Patterns
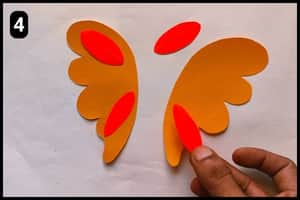
I began assembling the large patterns onto the butterfly wings.
Placing the yellow wing shapes on my desk, I then positioned and fixed the orange oval shapes in their correct spots.
Step 5: Assembling the other shades
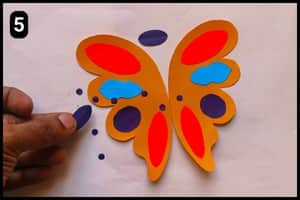
Next, I attached the remaining patterns onto the paper butterfly’s wings to enhance their design.
I applied glue drops to the designated areas on the wings and carefully positioned the large blue and dark purple shapes.
For the tiny circles, I applied glue and then meticulously placed each one in its designated spot.
Step 6: Assembling the Body and Antennas
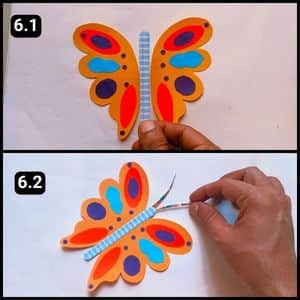
With the wings now assembled with their designs and patterns, they are ready to be attached to the body structure.
I aligned and adhered the wings to the back of the hard paper using a strong multipurpose glue like Fevicol for a secure hold.
For the antennas, I cut thin strips from colorful paper and glued them to the butterfly’s head.
As mentioned in step 3, I previously prepared two pieces of hard paper for the body structure, which I now aligned and firmly secured to the wings from the reverse side.
Step 7: Highlight The Facial Shades
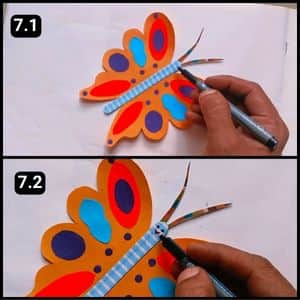
Now, we’re at the final step of the paper butterfly craft i.e. adding facial details.
I used a black marker pen for the eyes and a red marker pen to create a smiling mouth, as shown in the images above (this is important as it gives the happy face impression).
The lower body didn’t need shading because the patterned hard paper I used already had designs.
If you’re using a popsicle stick, you can paint it or draw curved lines to add shading and detail to the body.
Here’s how the completed happy face paper butterfly project looks like:

Video Walkthrough Of Happy Butterfly Craft For Kids
Final Thoughts
This project is not only fun but also educational, teaching children about butterfly anatomy while fostering creativity.
To enhance the experience, consider experimenting with different paper textures or adding glitter for extra sparkle.
You could also turn this into a learning opportunity by researching real butterfly species and mimicking their wing patterns (For an eco-friendly twist, use recycled papers).
Whether you’re crafting solo or with others, this paper butterfly project is sure to bring joy and a sense of accomplishment.
Note: You can also find the quick video walkthrough of this paper butterfly on our official YouTube channel.
You May Also Like
- Super Unique Paper Butterfly Craft for Kids (With Template)
- Easy Paper Plate Butterfly Craft for Kids
- Origami Paper Butterfly craft for kids (New Style)
- Paper Butterfly Craft for Kids (Using Popsicle Sticks)
- Easy Paper Butterfly Craft for Kids (Includes Template)
- How I Made a DIY Adorable Origami Paper Butterfly?


