The process of hooking up a portable washer to the sink is not that tricky and difficult.
You just need to follow a few steps and you are done with it.
The majority of manufacturers, provide you with the basic accessories and a guide to connect your portable washer.
While those instruction manuals help a lot, today we will be covering the basics of how to connect the portable washer with the sink in an easy way, that too in less than 30 minutes.
We will be covering the below points in detail.
Table of Contents
Let’s take a quick look at how easy the process is.
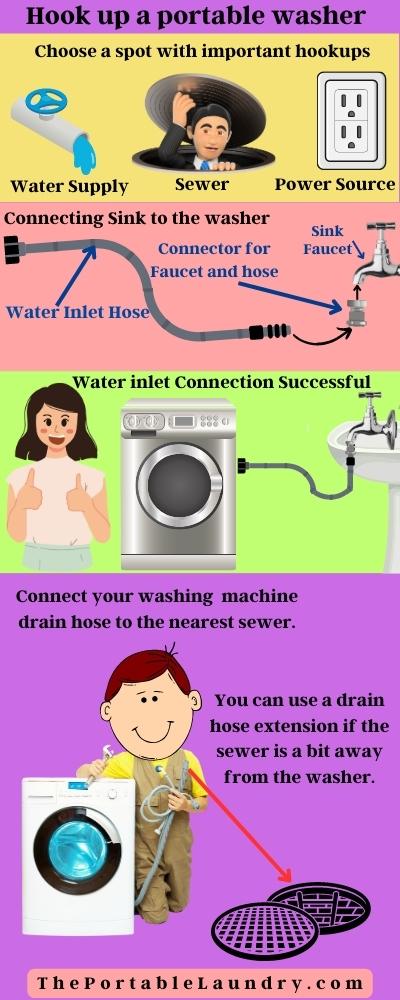
Hooking up portable washing machine (Illustration)
The process to Connect your Washer
How to Hookup a portable washer to sink?
Total Time: 30 minutes
Step 1: Once you open unbox your portable washer, look out for the following.
1.) Drain hose with clamp
2.) Water Hoses
3.) Connectors to connect to the sink
4.) User Manual
5.) Carpenters Leveler (Need to be brought separately)
6.) Pliers & Wrench (Need to be brought separately)
Step 2: Remove the Aerator from Faucet
Remove the Aerator from faucet so you can connect the water hose connector
Step 3: Check if the Faucet has internal or external thread
Check if the Faucet has Internal or External threads, depending on the connection type you will need to configure the quick connector.
Step 4: Connect the faucet connector to the sink
Based on the thread type, connect the faucet connector to the sink.
Note: If the sink where you will be connecting the water hose has an internal thread, keep the rubber washer as it is. If the sink has an external threads, remove the rubber washer.
Step 5 : Connect the water hose
Take the water hose and connect it to the quick connector.
Note: Make sure you tighten the connection using the pliers.
Step 6: Connect the Sink with Washer
Now connect one end of the water hose connector to the sink and the other end with your portable washer.
Step 7: Connect the drain hose
1.) Now connect the drain hose (Don’t forget to attach the clamp), And squeeze the clamp to tighten it further.
2.) Place the other end of the drain hose where you want the water to be drained.
Step 8: Check for Leaks
Turn on the faucet and check for leaks
Step 9: Check if the Washer is evenly balanced from all sides
Use the carpenter’s leveler to check if your portable washer is tilted or not, if it’s tilted you may want to correct it and it should be balanced properly (This will help you to reduce the noise and vibration).
Step 10: Power on
Plug in the power cord, turn on your washing machine, and you are done.
While the above steps will help you to get started with your portable washer, you may still need to buy adaptors and hoses.
The length of a hose might be short to fulfill the requirement, so you just need to purchase its extension.
You will also require a set of pliers to adjust the hook and faucet together.
Having difficulty following the above instructions? We have found a nice video that covers similar steps shown above.
Now, that you know how to hook up a portable washer, let’s take a quick look at some of the key important things to consider while you do the hookup.
Beware of additional costs involved in hooking up the washer
While the basic hookup process can be performed with the equipment provided by the manufacturer, it’s important to note that you may incur additional costs. Here are some potential expenses to consider:
- Extension Hoses: Depending on the distance between your sink and the washer, you might need extension hoses to ensure a proper connection. Extension hoses can typically be purchased at hardware stores or online.
- Pliers and Wrenches: While not included in the manufacturer’s package, you may need pliers and wrenches to securely fasten certain connectors. Therefore, budgeting is required if you don’t already have these tools.
- Carpenter’s Leveler: If your portable washer isn’t on a perfectly level surface, you might need to buy a carpenter’s leveler to ensure it’s balanced correctly. This can contribute to reducing noise and vibration during operation.
- Adaptors and Connectors: In some cases, you may need specific adaptors or connectors to ensure compatibility with your sink’s faucet. These can be found at plumbing supply stores or online.
READ: How to Use Portable Washing Machine Effectively?
Are there any other hookup methods?
Technically, when it comes to hooking up a portable washing machine, you have various methods to choose from, depending on your preferences and specific circumstances.
In general, there are four ways or approaches you can take.
Permanent Hook-Up
If you have sufficient floor space and want a more traditional washing machine setup, you can opt for a permanent hook-up.
This method involves connecting the water inlet hose of the portable washer to a sink faucet, ensuring both hot and cold water connections if the washer supports it.
Additionally, you need to set up the drain hose to empty the dirty water into a floor drain.
It’s important to note that dedicating permanent space for the washer is necessary for this method.
Temporary Hook-Up
For most portable washing machines, the temporary hook-up method is commonly used.
With this approach, you can easily attach and detach the washer after each use.
To achieve this, you’ll need a faucet adapter or a faucet diverter adapter.
These adapters allow you to connect the portable washer’s inlet hose to the sink faucet.
By removing the faucet aerator and attaching the adapter with the inlet hose, you can establish the water supply.
The drain hose is then set up in the sink, tub, or floor drain to dispose of the dirty water.
This method is convenient for those who have limited space or frequently move the washer.
Manual filling
Some portable washing machines, particularly semi-automatic or more compact models, offer the option of manual water filling.
So, instead of connecting to a water inlet, you can manually fill water into the washer for each wash cycle.
However, keep in mind that you’ll need to fill water both during the wash cycle and the rinse cycle.
In this method, you only require a power supply and a properly set up drain hose to direct the dirty water away.
Note: Certain portable washing machines are designed for small laundry loads and do not require any hookups. These machines typically don’t need a power supply either, making them truly portable. To use them, you manually fill water into the machine and empty the dirty water through a drain valve into a container. This method is suitable for those who prioritize portability and have limited access to water and drainage facilities.
Things to consider when you hook up a portable washer
To hook up a portable washer into the sink, you need to consider the following factors:
Measure and Prepare
Before starting, measure the distance between your sink and the desired washer location.
Ensure the area is clean and free from any obstacles that may hinder the setup process.
Use Teflon Tape
To prevent leaks, apply Teflon tape on the faucet threads before attaching the connectors.
This will create a secure seal and reduce the risk of water leakage.
Hoses length
The hoses that come with portable washing machines are usually not long enough to easily reach the sink.
To increase its length, attach braided tubing and secure it with a hose clamp.
Make sure that both the things are attached properly, or else if the tube is detached during the draining process, your apartment may become messy.
You can increase the hose length according to your requirement, but try to place the washer near a sink.
Also Read: Choosing the Perfect Portable Washer for an Apartment
Proper Hose Positioning
Position the water inlet and drain hoses in a way that allows smooth water flow and efficient drainage.
Avoid kinks or bends in the hoses that could restrict water movement.
Check Faucet Compatibility
Confirm that the portable washer’s faucet connector is compatible with your sink’s faucet.
Some sinks may have non-standard or uncommon threads, requiring additional adapters.
READ: 14 Things you shouldn’t wash in your washer?
Close placement to the sink
An alternative to buying an extension to the hose is to place the washer as close to the sink as possible.
You may want the washer to be placed near a wall that already has a power socket for the portable washer.
The machine should be close to both an electric point and a sink.
Furthermore, make sure you place the washer in such a way that cleaning your portable washer is not a challenge. Also, placing it strategically can help you to troubleshoot issues with your portable washer if any.
Since portable washers are movable, having a static placement is not a good idea as it makes cleaning and troubleshooting difficult.
READ: How to wash a down jacket in a washing machine?
Strengthen the adapter
You must be careful not to over-tighten it as it could damage the rubber washer, also it may lose its shape, thereby triggering leakage and the seal might not work as expected.
READ: Portable Washers: How They Work & their working principles
Connecting with a portable machine
Attach the drain hose to the back of the washer’s drain outlet.
On most portable washers, the drain hose has a friction clamp at one end and a hose connector at the other end.
Compress the tension clamp with the help of pliers and drive over the drain port until the washer cabinet is reached by the hose.
Shift the fastener over the hose and drain outlet.
READ: How to clean mold from Washing Machine?
Connection with a cold side
The hose that needs a water supply should be connected to the connection that gives cold water.
You have to control the water temperature by faucet control.
Mostly the rinse cycle has to be cold, you need to hook it to a cold side and make it work.
Secure the Drain Hose
Make sure the drain hose is properly attached and secured in place to prevent accidental disconnection during the washing process.
READ: Can Vinegar damage a washing machine?
Use Anti-Vibration Pads
Place anti-vibration pads under the portable washer to reduce noise and vibration during operation, especially if the washer is placed on a hard surface.
Ending the setup
Ensure that all the connections are fixed and tight.
Turn on the water at the temperature that you want, run it, and do your laundry.
If you like to do a cold rinse, you can change the setting of a faucet in the mid-cycle. But prevent changing the settings frequently during the cycle.
Just do it when necessary.
READ: 15 things you must know about washing machine detergents
Potential Challenges When Hooking Up a Portable Washer
Faucet Leaks
Improperly connected or worn-out faucet connectors may cause leaks.
Ensure all connections are tightened securely and regularly check for any signs of leakage.
Hose Length Limitations
The provided hoses may not be long enough to reach the desired location.
Invest in high-quality extensions or longer hoses to avoid positioning limitations.
Drainage Issues
Improperly positioned or clogged drain hoses can lead to drainage problems. Regularly check and clean the drain hose to ensure smooth water flow.
Water Pressure Problems
In some cases, portable washers may not function optimally due to low water pressure.
Confirm that your sink’s water pressure is adequate for the washer to work effectively.
Unstable Washer
If the washer is not evenly balanced, it may vibrate excessively during use.
Use a carpenter’s leveler to check and adjust the washer’s balance to minimize vibration.
Safety Precautions for Hooking Up a Portable Washer
- Turn off the Faucet: Always ensure the sink faucet is turned off when the portable washer is not in use. This step prevents accidental water leakage and wastage.
- Follow User Manual: Refer to the manufacturer’s user manual that comes with your portable washer. It contains specific safety guidelines and operating instructions tailored to your appliance model. Following the manufacturer’s recommendations is vital for safety.
- Avoid Overloading: Do not overload the washer with laundry beyond its stated capacity. Overloading can strain the machine, lead to imbalance, and affect its performance. Follow the guidelines provided in the user manual to determine the appropriate load size.
- Regular Maintenance: Perform regular maintenance on your portable washer, including cleaning filters and hoses. Regular maintenance helps keep the washer in optimal condition, prevents clogs, and avoids potential issues. Follow the manufacturer’s maintenance recommendations as outlined in the user manual.
- Electrical Safety: Ensure that the power cord and electrical connections are kept away from water sources. This is essential to prevent electrical hazards. Make sure all electrical connections are secure and dry.
- Hose Connections: Check and tighten all hose connections, including both the water inlet and drain hoses. Ensure there are no loose or leaking connections that could result in water damage.
- Hose Length Limitations: Be aware of the limitations of the provided hoses. The hoses that come with portable washing machines are often not long enough to reach distant sinks. Consider investing in high-quality extensions or longer hoses to avoid positioning limitations.
- Drainage Issues: Improperly positioned or clogged drain hoses can lead to drainage problems. Regularly check and clean the drain hose to ensure smooth water flow and avoid water damage.
- Water Pressure: Ensure that your sink’s water pressure is adequate for the portable washer to function effectively. Low water pressure can impact the washing machine’s performance.
- Anti-Vibration Pads: To reduce noise and vibration during operation, especially if the washer is placed on a hard surface, consider placing anti-vibration pads under the portable washer. This step helps maintain stability and prevents excess movement during the wash cycle.
- Close Placement: If possible, place the portable washer close to the sink, ensuring it is near an electric socket. This proximity facilitates easy access to water and power sources and simplifies troubleshooting and cleaning.
- Strengthen the Adapter: When connecting the faucet connector, take care not to over-tighten it, as it may damage the rubber washer. Ensure that it’s secure but not excessively tight to prevent leakage.
READ: 11 Things you must know about High-Efficiency Laundry detergents
Conclusion
Fitting the hose is not as tough and complex as one thinks it to be.
You can do it easily by following instruction manuals in most cases.
Lastly, do not turn the tap off while the running washing cycle.
Hope this helps you to connect the washer.
If you still have further queries related to connection or anything related to portable washers, there are high chances we might have addressed that on our Portable Washer’s FAQ Section.