Listen up, because I’m about to share a secret weapon for creating unforgettable moments with your kids.
Ever felt like you’re missing out on those picture-perfect family activities? Well, not anymore.
In just 10 minutes, I’ll show you how you can transform ordinary paper into a masterpiece that’ll have your kids thinking you’re the next Picasso.
Today, we’ll be making a paper peacock handprint craft that almost guarantees to give you an instant “cool parent” status.
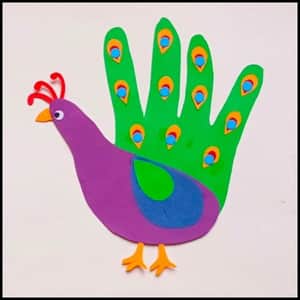
Ready to turn your living room into a creative powerhouse? Let’s make some magic happen and show those peacocks who’s boss.
Let’s go through the list of basic craft supplies you’ll need to make your handprint peacock structure in step 1 below.
Step 1: Materials Needed To Make Handprint Peacock
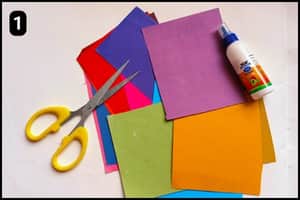
- Craft Papers: You will need colorful craft papers according to Peacock’s real structure.
- Scissor: To cut the shapes from the paper of the Peacock’s structure you will need a standard scissor.
- Glue: To stick the paper cutouts you will need glue and it can be either standard crafts glue or a multipurpose glue (both works equally well).
- Handprint Peacock Template: You can use the ready template from our website to proceed with the activity and to access the same move to step 2 below.
Estimated Time Taken to Make The Handprint Peacock Craft: It took 10 minutes for me to make the Handprint Peacock Craft.
Step 2: Handprint Peacock Template
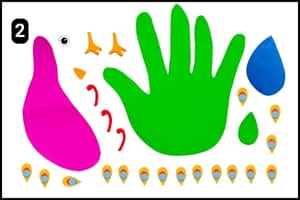
If you look at the image above this is what the Handprint Peacock Template will look like.
It includes the handprint shape and other designs that will resemble a Peacock’s structure after assembling.
You can download and print the above template with a few clicks and remove the hassle of arranging colorful craft papers.
Simply download, print, cut the shapes, and assemble the Peacock structure.
Step 3: Cutting The Handprint Peacock Shapes
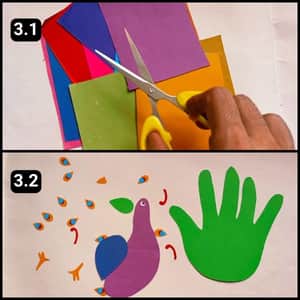
If you are about to use the ready template then you can skip this step, however, if you don’t have access to a printer then simply grab colorful craft papers.
Once you have the colorful papers ready, start cutting the shapes similar to the one you see in the Template above.
I know that preparing cutouts from various colored papers can be time-consuming, but trust me it’s worth it.
It’s important to be patient, especially when working on the peacock’s feather designs.
Finally, you can trace the outline of your or children’s palm for the handprint shapes.
Step 4: Assembling the Main Body Of Our Peacock
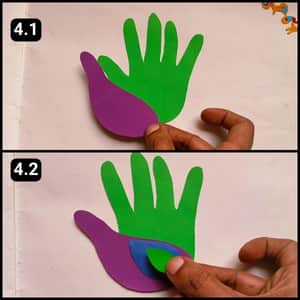
With all the shapes and cutouts ready it’s time to assemble the handprint Peacock.
I began by assembling the main body of our handprint peacock.
I made sure to use the green handprint shape as the base of the structure.
Next, I placed the purple thumb-shaped cutout over the green handprint to resemble the peacock’s body.
Then, I assembled the side wings using the dark blue and green oval shapes, as shown in the images 4.1 and 4.2 above.
Step 5: Assembling The Facial Details and Legs
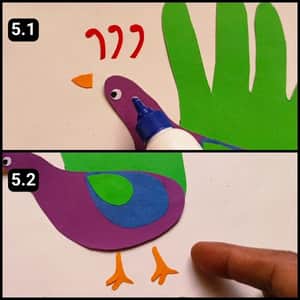
It’s time to add the facial details and assemble the legs shapes of our paper peacock.
I started by aligning and securing the peacock’s eye shape.
Then, I attached the beak by applying glue to the back of the structure.
Next, I fixed the crest to the head using the three red antenna-like shapes.
Finally, I aligned the leg shapes and glued them into place, ensuring they were attached from the back of the structure to the bottom of its body.
Step 6: Preparing The Paper Peacock’s Feather

Finally, we have moved to the last step of the fingerprint peacock craft which is to glue the feather design shapes.
To make sticking them easier, I applied glue drops to the areas where I wanted to attach them and placed each design one by one onto the glued surface.
To be very honest this approach helped save time and effort.
In the end, the Handprint Peacock structure was ready, and it looked truly amazing (as seen in image 6.2 above).
Final Thoughts
In wrapping up this paper peacock handprint craft, I can’t stress enough how much joy these creative moments can bring.
In my case not only did I enjoy working with the kids, but I also discovered that crafts like this can serve as powerful bonding experiences.
I would say, always have a few extra hands available (whether it’s a friend or family member) because their enthusiasm can elevate the entire project.
And don’t forget to take pictures of your creations, you’ll want to capture these priceless memories.
Note: To assist you further I have also shared a short video tutorial of this handprint Peacock Craft on our official YoutTube Channel as well.
