Have you ever looked at a paper plate and seen a graceful swan? No? Well, you’re about to.
Today, I’m thrilled to share with you a magical transformation that turns ordinary paper plates into elegant swans.
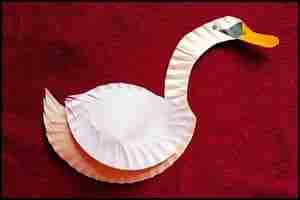
This paper plate swan craft isn’t just about creating something beautiful, it’s about unleashing your creativity, bonding with loved ones, and maybe even learning a thing or two about these majestic birds.
Imagine the pride on your child’s face as they bring a swan to life with their own hands, or the satisfaction you’ll feel watching a pile of disposable plates become a flock of decorative birds.
Ready to dive into this feathered adventure? Let’s spread our creative wings and soar.
Step 1: Things You’ll Need For Paper Plate Swan Craft
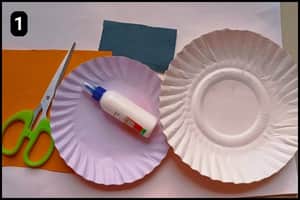
- Paper Plates: I have used two paper plates to craft the Swan’s structure. I had two paper plates of different sizes, however, you can use similar ones.
- Craft Papers: I have used a black and yellow craft paper to make the Swan’s Beak.
- Scissor: To cut the paper plates and the craft papers you’ll need a standard scissor.
- Glue: To stick the paper and paper plate shapes together you will need glue. Make sure to use a quality glue because paper plates can be difficult to stick.
Step 2: Shaping the Large Paper Plate
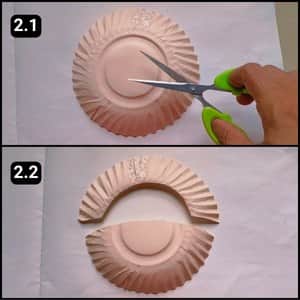
I used the large paper plate to cut and shape the Swan’s neck and lower body (Refer to image 2.2 to understand the required shapes).
First, I cut the shape from the middle, curving to form the lower section, then trimmed the upper part of the plate.
For the upper part, I made sure to cut through the circular edges so it appeared like a typical Swan’s bending neck.
Step 3: Preparing the Beak Shape
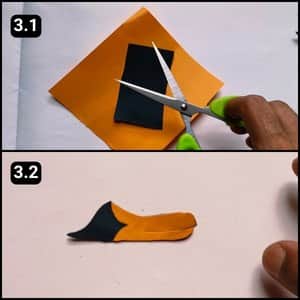
Let’s prepare the Swan’s beak using black and yellow paper sheets.
Swans typically have a long yellow tip, so I cut the yellow paper accordingly.
Then, I cut a black patch and stuck them together to form the beak shape, as shown in image 3.2 above.
Step 4: Fixing the Beak and Neck
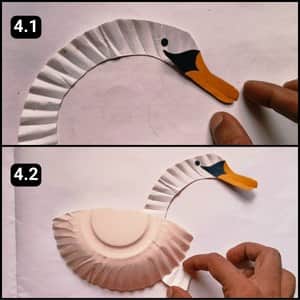
I aligned and stuck the beak shape onto the tip of the Swan’s neck structure.
I cut a small black circle for the eye and placed it near the tip of the beak.
For the eye, you could either cut a small circle from black paper or draw it with a black marker.
Then, I aligned and attached the neck shape to the lower body structure. In image 4.2, there’s a small excess portion of the neck that needed to be cut, which I pointed out with my fingers.
I trimmed the excess with scissors and then glued the edges together using multipurpose glue.
Step 5: Shaping the Second Paper Plate
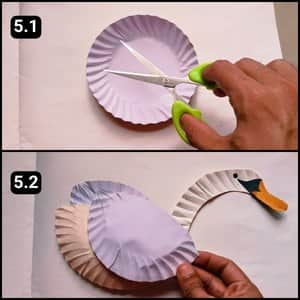
I grabbed the second paper plate and shaped it into the main wings of the Swan.
I cut the paper plate down the middle, curving slightly from the center.
Once divided into two parts, I aligned one part to the back of the structure and the other to the front, as shown in image 5.2 above.
Note: To create the side feather shapes, you could also use craft papers instead of a paper plate.
Step 6: Assembling the Tail Feather
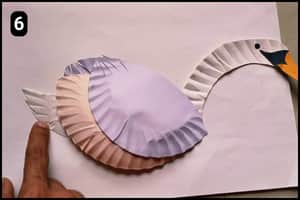
We have now moved to the final step of the paper plate Swan Craft which is to fix its tail end.
I used a piece of leftover paper plate and shaped it like the Swan’s tail feather.
Then, I aligned and attached it to the back of the structure, as seen in image 6 above.
If you look at the final structure of the paper swan it’s complete and ready.
You can craft multiple structures of swan bird using different sizes of paper plates.
Video Walkthrough of Paper Plate Swan Craft for KIDS
Final Thoughts
This paper plate swan craft is an excellent way to upcycle paper plates and engage children in a creative activity.
To enhance the project, I’d suggest experimenting with paint or colored paper plates for added visual interest.
For a more eco-friendly approach, consider using recycled paper or cardboard instead of paper plates.
To make this a learning experience, I recommend incorporating facts about swans or discussing their habitats while crafting.
This could be an opportunity to teach children about wildlife conservation.
For older kids or adults, you could challenge them to create more complex designs or even a family of swans in different sizes.
Note: To assist you further I have shared the complete video tutorial of the paper plate Swan on our official YouTube channel.


