Watch the video below to see Jeremy from School of Wok London demonstrate how to make this delicious dish (red braised chicken), and read on for a detailed breakdown of the recipe!
Choose Your Chicken Preferences For This Recipe
Make Using Organic Chicken Thighs | Make Using Regular Chicken Thighs
What You’ll Learn
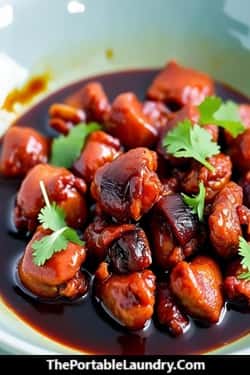
In this video centric blog post, you will learn how to create a mouthwatering red braised chicken dish inspired by traditional Chinese home cooking.
To make the instructions easy, I have laid down the step by step procedure below to get the exact (in fact better version) version of this recipe.
You’ll learn the secrets behind caramelizing dark soy sauce and sugar to achieve that signature deep red hue, as well as tips for searing chicken to lock in flavor.
Along the way, I’ll also recommend essential kitchen tools and ingredients to help you master this dish with ease.
Ingredients Used In This Red Braised Chicken
Here’s what you’ll need to recreate this succulent red braised chicken at home:
- Chicken thighs (boneless or bone-in, skin-on or skinless – your choice!)
- Fresh ginger , sliced into thin pieces
- Spring onions , roughly chopped
- Cooking oil (preferably neutral-flavored like vegetable or peanut oil)
- Dark soy sauce (5 to 6 tablespoons) – Buy Dark Soy Sauce Here
- Palm sugar (or brown sugar/Rock Sugar) – 2 tablespoons – Buy Palm Sugar Here
- Shaoxing rice wine – 3 to 4 tablespoons – Buy Shaoxing Rice Wine Here
- Light soy sauce – 1½ to 2 tablespoons – Buy Light Soy Sauce Here
- Chicken stock (or water) – enough to cover the chicken
- Optional: Steamed rice and vegetables for serving
Pro Tip: If you’re new to Asian cooking, investing in a quality wok can elevate your dishes significantly. Check out this Professional Non-Stick Wok , designed for even heat distribution and easy cleanup.
Affiliate Disclosure: Kitchen tools and ingredients mentioned in this post have been carefully selected based on years of professional experience. Some links above and within the article are affiliate links, meaning I earn a small commission if you make a purchase. Rest assured, I only suggest or recommend kitchen essentials or things I use and trust in my own kitchen.
Step-by-Step Instructions To Make This Red Braised Chicken
Step 1. Prepare Your Ingredients
Start by slicing fresh ginger into thin pieces and roughly chopping spring onions.
These aromatic ingredients create the foundation of the dish’s rich flavor.
Cut your chicken thighs into bite-sized chunks – Jeremy prefers thicker pieces to keep them juicy and tender.
Step 2: Sear the Ginger and Spring Onions
Heat a generous amount of oil in your wok over medium-high heat.
Add the sliced ginger first, allowing it to sizzle until golden brown.
Once the ginger starts browning, toss in the spring onions.
Stir-fry until they soften and begin to wilt, releasing their fragrant oils into the pan.
This step creates a quick “ginger-spring onion oil” that infuses the entire dish with depth and aroma.
Recommended Tool: For precise control over heat levels, consider using an Induction Cooktop . It ensures consistent results every time.
Step 3: Brown the Chicken
Turn up the heat to high and add the chicken pieces to the wok.
Let them sear undisturbed for 2–3 minutes per side, ensuring each piece develops a beautiful golden-brown crust.
Browning not only enhances texture but also locks in moisture, keeping the chicken succulent during braising.
Step 4: Build the Sauce
Now comes the magic – the creation of the rich, glossy red sauce.
Reduce the heat slightly and pour in 5–6 tablespoons of dark soy sauce.
The key here is maintaining high heat so the soy sauce begins to caramelize almost instantly.
Next, add 2 tablespoons of palm sugar (or brown sugar) and let it melt into the sauce, creating a luscious glaze.
To balance the sweetness, splash in 3 – 4 tablespoons of Shaoxing rice wine, followed by 1½ to 2 tablespoons of light soy sauce for added saltiness.
Scrape the bottom of the wok to incorporate any caramelized bits stuck to the surface.
As the alcohol cooks off, the sauce will thicken and coat the chicken beautifully.
Step 5: Braise Until Tender
Pour in enough chicken stock (or water) to submerge most of the chicken.
Bring the mixture to a boil, then lower the heat to medium and let it simmer gently for 15–20 minutes.
During this time, the sauce will reduce further, intensifying its flavors and developing that iconic reddish-brown color.
Step 6: Serve and Enjoy
Once the sauce reaches a syrupy consistency, remove the wok from heat.
Spoon the chicken and sauce generously over steamed rice, garnishing with extra spring onions if desired.
Pair it with stir-fried greens or roasted vegetables for a complete meal.
Tips and Tricks
- Use Fresh Ingredients: High-quality ginger, spring onions, and soy sauces make all the difference in achieving authentic flavors.
- Don’t Rush the Caramelization: Taking the time to properly caramelize the soy sauce and sugar adds unparalleled depth to the dish.
- Invest in Essential Tools: A sturdy bamboo spatula (Bamboo Spatula Link) is ideal for stir-frying without scratching your cookware.
Final Thoughts
With minimal prep work and straightforward techniques, it’s accessible for beginners while offering advanced cooks room to experiment.
Plus, the combination of savory, sweet, and umami flavors makes it universally appealing.
Ready to try it yourself? Watch the full video tutorial above for a visual guide, and don’t forget to check out our recommended products to take your cooking game to the next level.