I keep a pack of crayola air dry clay on the craft shelf because it’s simple, forgiving, and honestly a little addictive once you start shaping things.
These crayola air dry clay crafts are perfect if you want easy clay models that don’t require a kiln or fancy tools.
Some projects look fancy but they’re actually very beginner friendly. Others feel playful and slightly messy, which is the fun part.
Ever noticed how even uneven fingerprints make clay art feel more personal? That’s the beauty of homemade air dry clay projects.
Below are 12 ideas anyone can try. I haven’t personally made these, but the steps are detailed enough so you can absolutely create them on your own.
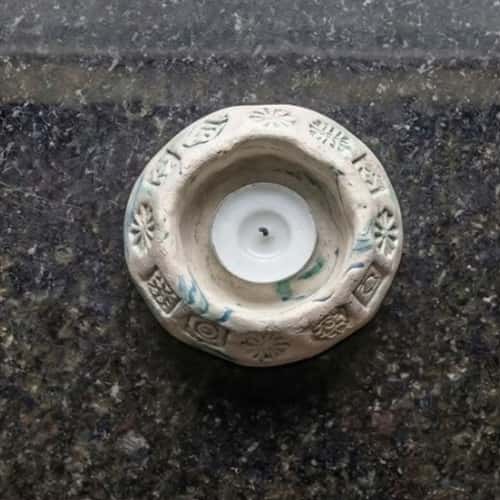
1. Marbled Clay Jewelry Dish
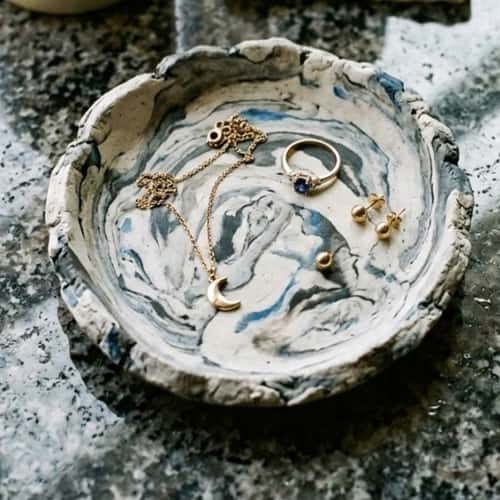
This one looks complicated but really isn’t. Actually it’s one of the easiest crayola clay craft ideas I’ve seen.
Start by taking two small pieces of crayola air dry clay. Roll each piece into a snake shape about 6 inches long.
Twist the snakes together like a rope. Don’t over mix it though or the marbled clay effect disappears.
Flatten the twisted clay with a rolling pin or a glass bottle. Aim for about ¼ inch thickness.
Now place a small bowl upside down on the slab and trace around it with a butter knife. Remove extra clay.
Lift the circle carefully and place it inside a small bowl to shape the edges upward.
Let it dry 24 hours. Once dry, you can lightly sand rough spots and paint the rim with acrylic paint.
Small tip: uneven edges actually make the dish look handmade, so don’t panic if it’s not perfect.
2. Mini Succulent Clay Planters
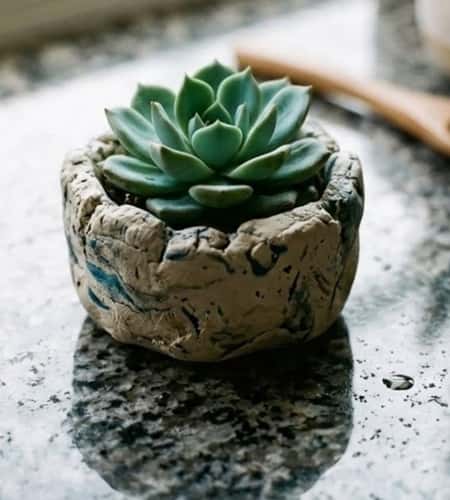
Tiny planters are such cute clay decor pieces.
Start with a ball of crayola air dry clay about the size of a lemon. Press your thumb into the center to create a bowl shape. Slowly pinch the sides upward to form the planter walls.
Turn the planter upside down and poke a small drainage hole with a pencil.
Let it sit for 30 minutes so the clay firms slightly. Then use a toothpick to scratch simple patterns like dots or lines. These small details make the clay art projects feel more handmade.
Dry it for about 24 to 36 hours.
Once dry, paint it with soft earthy colors. Now place tiny mini succulents or even fake ones inside.
Does it matter if the planter is slightly crooked? Nope. Plants hide the flaws anyway.
3. Clay Leaf Imprint Coasters
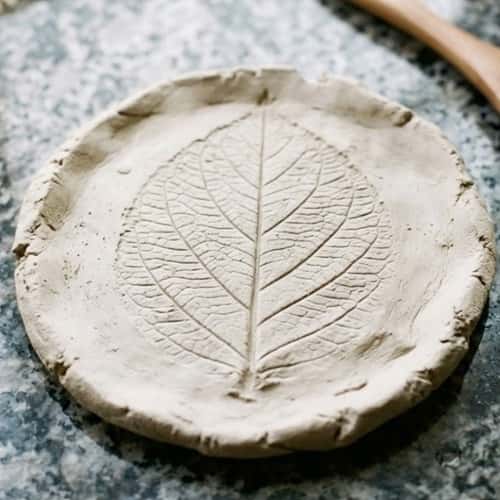
Nature + clay = surprisingly beautiful result.
Roll a slab of crayola air dry clay about ¼ inch thick. Go outside and grab a real leaf with visible veins. Place the leaf face down onto the clay.
And I would say use a rolling pin or your fingertips to gently press. Then slowly peel the leaf away.
The vein texture stays behind and looks amazing.
Cut a circle around the imprint using a cup rim. Smooth edges with damp fingers.
Let it dry for a full day. After drying, seal the coaster using clear acrylic sealer so drinks won’t damage it.
Some leaves work better than others, and honestly it’s a little trial and error.
These are simple easy clay models, yet they look almost store bought.
4. Cute Clay Animal Keychains
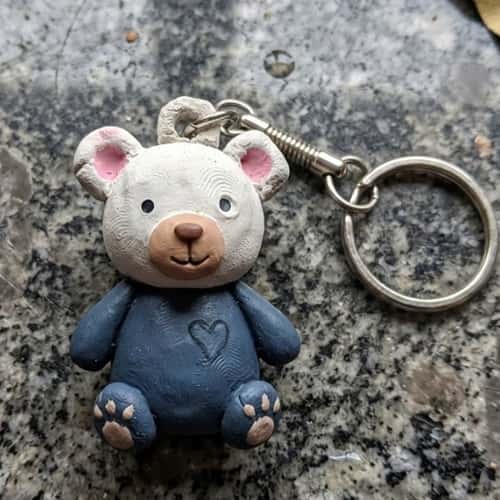
This project is great if you like cute clay designs.
Take a small piece of clay and make a ball out of it. Flatten slightly to make the animal face.
For example a bear.
Add two tiny clay balls for ears and press them onto the top.
Use a toothpick to draw eyes, nose, and small facial details. If the face looks funny… good. Handmade crafts should look a bit quirky.
Insert a small metal eye screw at the top before drying.
Let it dry completely. After that paint the face using acrylic paints.
Attach a keychain ring.
Kids especially love these clay art projects.
5. Clay Ring Holders
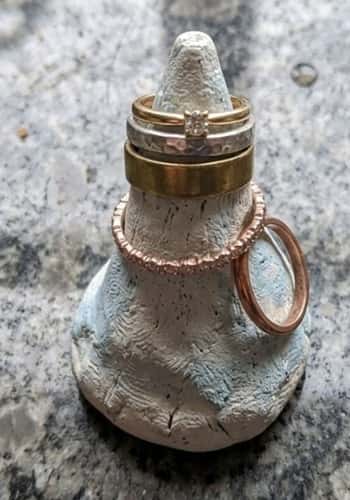
Jewelry holders made from clay are surprisingly practical.
Start by forming a small flat circle base using crayola air dry clay. About 2 inches wide works well.
Now roll a thick clay snake about 2.5 inches long. This will hold the rings.
Attach one end of the clay snake to the base so it stands upright like a cone. Smooth the connection with damp fingers.
Let it dry slowly for 24 hours.
After drying, paint it with soft colors or leave it natural.
This is one of those crayola air dry clay crafts that looks fancy but is really beginner level.
Honestly the slightly wobbly cone shape gives it personality.
6. Textured Clay Wall Hanging
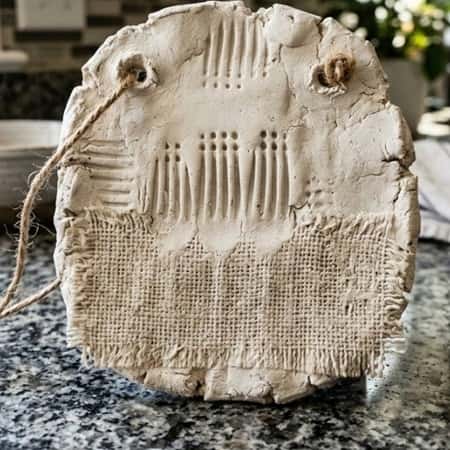
If you want something decorative for a clay wall display, try this.
Roll clay into a rectangle slab roughly 5×3 inches.
Use random household items to press textures. Forks, buttons, fabric, even bubble wrap works.
Punch two holes near the top using a straw. These holes will hold the hanging string later.
Let the slab dry overnight.
After drying, lightly brush gold or white paint across the raised textures. This highlighting technique makes the patterns pop.
Thread twine through the holes and tie a knot.
Suddenly you’ve got wall decor.
Not bad for such simple air dry clay projects, right?
7. Clay Name Tags for Plants
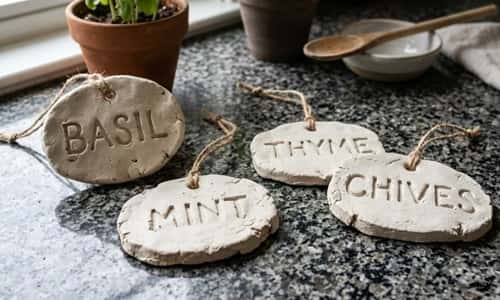
Garden lovers might enjoy this one.
Roll a flat clay slab about ¼ inch thick.
Cut small rectangles roughly 3 inches long. These will become plant labels.
Use a toothpick to carve plant names into the clay. Basil, mint, rosemary etc.
Attach a thin clay stick at the bottom to create the stake.
Let everything dry for 24 hours.
Once dry, paint lightly so the carved letters remain visible.
These simple crayola clay craft ideas work great for indoor herb pots.
Also they’re easier to read than plastic tags.
8. Mini Clay Picture Frames
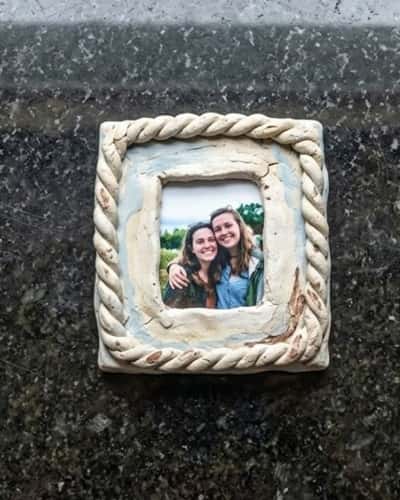
This one turns clay into memory holders.
Roll clay into a thick rectangle. About 5×4 inches works well.
Cut out a smaller rectangle in the center to create the photo window.
Roll thin clay ropes and press them around the border as decoration.
Let the frame dry completely.
After drying, paint it with acrylic colors or keep the natural clay color.
Glue a cardboard stand to the back so it can stand on a table.
It might look uneven the first time but that’s okay, clay has a mind of its own sometimes.
These little frames are charming clay art projects.
9. Marbled Clay Beads
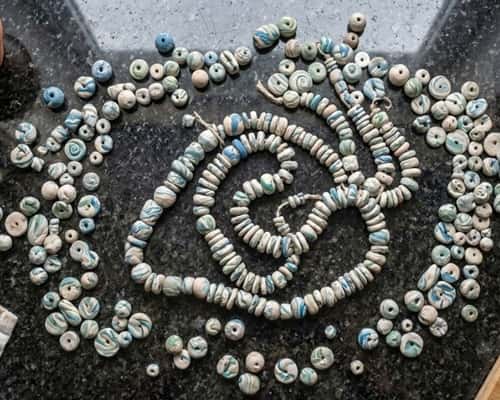
Back to marbled clay, but this time tiny beads.
Take two different clay colors. Roll them into thin snakes and twist together gently.
Pinch small pieces and roll into bead shapes using your fingers.
Use a toothpick to poke holes through each bead before drying.
Let them dry fully.
Once dry, thread them onto string or elastic to make bracelets.
Some beads will look odd shaped… which is actually kind of cool.
These small crayola air dry clay crafts make great handmade jewelry.
10. Clay Candle Holder
A simple candle holder adds cozy vibes.
Start with a thick clay disk about 4 inches wide.
Press a tea light candle gently into the center to mark the cavity. Remove the candle afterward.
Smooth edges with damp fingers.
You can decorate the sides with stamped textures or simple patterns.
Let the holder dry for 24 to 36 hours.
Paint or seal once dry.
Just remember, this works best for LED tea lights.
These beginner friendly easy clay models are great for home decor.
11. Cute Clay Fridge Magnets
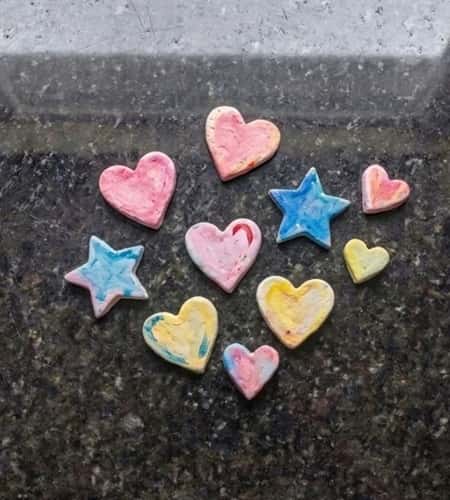
Tiny magnets are fun weekend crafts.
Roll clay into small shapes like hearts, stars, or tiny animals. Keep them about 1 to 2 inches wide.
Add small details using a toothpick.
Let the shapes dry completely.
Glue small magnets on the back using strong craft glue.
Once painted, these become colorful cute clay fridge decorations.
And honestly, some shapes might come out weird looking… but weird can be charming too.
Kids usually love making these clay art projects.
12. Clay Spoon Rest
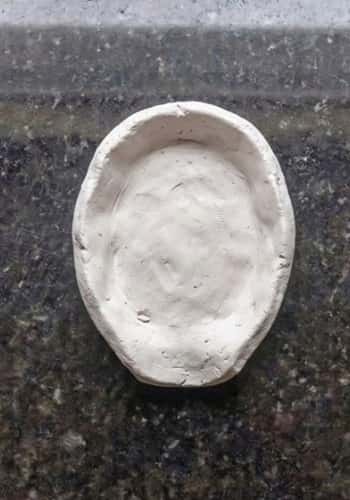
Kitchen crafts are surprisingly satisfying.
Roll a slab of crayola air dry clay about ¼ inch thick.
Cut an oval shape roughly 6 inches long.
Press the center gently to create a shallow dip where the spoon will sit.
Curl the top edge slightly upward so sauce drips don’t escape.
Let it dry slowly for about 36 hours.
Once dry, seal it with food-safe sealer if you plan to actually use it in the kitchen.
This might become your favorite air dry clay projects piece.
Or it might turn slightly lopsided… clay sometimes does that.
Final Thoughts
Something interesting about crayola air dry clay crafts is how forgiving the material really is. Unlike pottery clay, there’s no kiln pressure or firing mistakes waiting to happen.
You shape it, leave it alone, and time does the rest. Many beginners start with easy clay models, then slowly experiment with textures, marbled clay, and sculpting small decor pieces.
Over time you’ll notice your hands naturally understand the clay better. That’s when simple crayola clay craft ideas quietly turn into real creative habits.
And honestly… the slightly crooked handmade ones usually end up being everyone’s favorite.