I love how a simple ceramic mug clay craft can turn into something full of personality.
This Maneki-neko ceramic mug clay craft is one of those projects that feels playful yet deeply rooted in traditional charm.
That little raised paw, the soft smile – it instantly gives that lucky vibe.
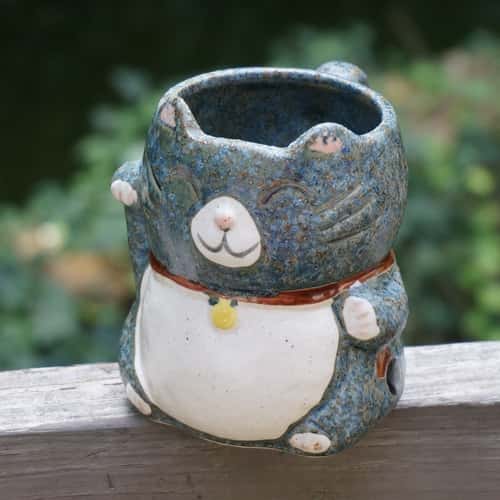
If you’ve been exploring a lucky cat clay project or stepping into beginner pottery, this one feels like the perfect mix of fun and learning without being overwhelming.
Affiliate Disclaimer: Some of the links in this post may be affiliate links, which means I may earn a small commission if you choose to make a purchase through them – at no extra cost to you. I only share products that genuinely fit this project and can help make your ceramic mug clay craft process easier and smoother. Your support helps keep ideas like this coming.
Tools & Materials You’ll Need
Before starting your ceramic mug clay craft, gather everything in one place. It makes the process smoother and way less frustrating.
- Clay (stoneware or air-dry depending on your goal)
- Rolling pin (or even a glass bottle works)
- Craft knife or blade
- Sponge + small bowl of water
- Toothpick or carving tool
- Slip (clay + water mixture)
- Acrylic paints or underglaze
- Clear sealant (for decorative mugs)
Quick tip: Keeping tools simple actually helps beginners focus more on the pottery handbuilding process instead of getting overwhelmed.
Step 1: Pick Your Clay (Important First Decision)
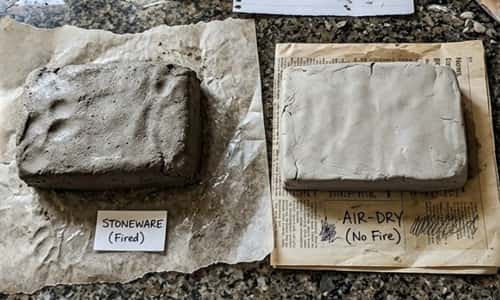
Alright, pause here. What are you making this for?
If you want a real drinking mug → go with stoneware clay + kiln firing (true ceramics pottery mugs).
If you just want decor → air-dry or polymer clay works fine.
I personally suggest beginners try decorative first. Less stress. Less heartbreak if it cracks.
Step 2: Shape the Basic Mug Body (Slab Method)
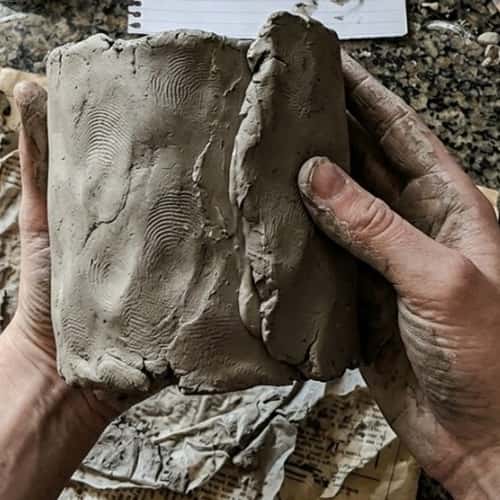
This is where slab pottery comes in.
Roll your clay into a flat sheet (about 6 to 8 mm thick). Don’t obsess over perfection. Slight unevenness actually looks better for handmade clay mugs.
Cut a rectangle. Wrap it into a cylinder. Join the edges using slip (water + clay mix). Press gently. Not too hard… it might collapse, I did that once.. LOL
Attach a flat circular base.
Step 3: Smooth & Strengthen the Structure
Now slow down. This step matters more than you think.
Use a damp sponge or fingers to smooth the seams inside and outside. If you skip this, cracks will show later… and yeah, that hurts.
Check thickness. Too thin? It breaks. Too thick? Looks bulky. Balance it.
It don’t need to be perfect, just stable.
Common Mistakes Beginners Make (And How to Avoid Them)
Let’s be real – this is where most beginner pottery projects go wrong.
- Skipping proper sealing of joints → leads to cracks later
- Making walls uneven → causes weak spots
- Drying too fast → biggest reason for breakage
- Adding details before structure sets → things slide off
If something feels off, pause and fix it early. Clay is forgiving… until it isn’t.
Step 4: Sculpt the Cat Features (Fun Part!)
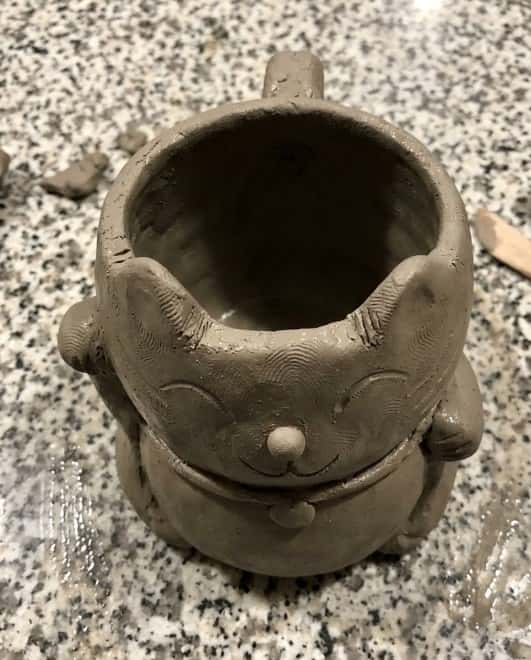
Now we turn this into a maneki-neko ceramic mug.
Add:
- Two small ears on the rim
- A raised snout area
- Tiny paws on the front
- Optional: a tail on the side
Use small clay pieces and attach with slip. This is basically sculpture art clay work.
And hey… don’t worry if the face looks funny. Cute > perfect.
Step 5: Carve Facial Details
Use a toothpick or carving tool.
Draw:
- Closed smiling eyes
- Whiskers
- Nose details
Keep it minimal. Overworking ruins it sometimes. I’ve seen that happen more than once.
This step turns it from random mug into a pottery sculpture piece.
Step 6: Drying (Patience Test)
Let it dry slowly. Not under direct sun.
If it dries too fast → cracks.
If it dries uneven → warping.
Cover loosely with plastic for first day.
Honestly… this part feels boring, but skipping patience ruins everything.
Pro Tips to Make Your Mug Look Better Instantly:
- Always score + slip before attaching anything
- Rotate your mug while working (don’t keep it in one position)
- Slightly compress clay edges to prevent cracking
- Always keep a damp cloth nearby as it will save you lots of time (thank me later for this.. lol)
Small things… but they make a huge difference in hand built pottery quality.
Step 7: Firing (If Using Ceramic Clay)
If you used real clay:
- Bisque fire first
- Then glaze
- Then final firing
No kiln? You’ll need a local pottery studio.
This is what makes it truly food safe ceramic mug.
Step 8: Painting & Finishing
Now the personality shows up.
Use:
- Underglaze (for ceramic)
- Acrylic paint (for decorative)
Classic lucky cat clay mug colors:
- White body
- Colored collar
- Gold coin detail
Seal if needed.
This is basically DIY pottery painting, so enjoy it.
Final Thoughts
Here’s something I’ve noticed – projects like this sit right in between craft and therapy. You’re not just making a mug. You’re learning control, patience, and honestly… letting go of perfection. That’s what hand built pottery teaches best.
Even if your maneki-neko ceramic mug clay craft ends up a little tilted or quirky, that’s the whole charm of it.
Machine-made mugs don’t have stories, yours will. And weirdly enough, those tiny flaws? They’re what make people ask, “Did you really make this?”