I still remember the first time I tried a clay duck sculpture… it looked more like a potato with a beak. Funny? Yes. Useful? Also yes, because I learned what not to do.
So what if I show you a way that actually works, even if you’ve never touched clay before?
This guide is simple, but not basic. It’s messy, a little imperfect, and very real. We’ll shape a duck with clay that has character, not that factory-made stiffness.
Ready to try a duck clay project that doesn’t feel like a school assignment?
Things Needed To Make Clay Duck Sculpture
I don’t overcomplicate supplies anymore. You don’t need fancy tools.
- Air dry clay (white or terracotta)
- A bowl of water
- Toothpicks or a blunt knife
- Old cloth or tissue
- Pencil or wooden skewer
- Acrylic paints (yellow, orange, black, optional brown)
- Clear varnish (optional but nice)
And yes, your hands will do most of the job.
Step 1: Build the Core Shape (The “Blob” Stage)
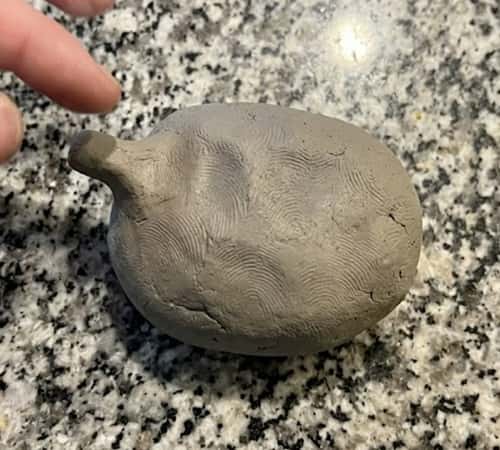
Start with a lump of clay. Not too big. About the size of your palm.
Roll it into an oval. Now slightly flatten the bottom. Why? So your duck doesn’t keep falling like it’s drunk.
Now pinch one end gently upward. That becomes the neck. Don’t overthink it.
Wait, is it looking like a duck yet? Nope. And that’s fine.
This is the base of your clay sculpture, and honestly, most beginners mess up right here by trying to rush details too early.
Step 2: Shape the Neck and Head (Slow and gentle)

Use your fingers to slowly pull the neck upward. Don’t pinch too hard or it will crack.
Now round the top slightly to form the head.
Does it look weird? Good. Real ducks aren’t perfect circles either.
Smooth the surface using slightly wet fingers. Not dripping wet. Just damp.
I once used too much water and the whole head collapsed, so yeah… less is more.
This step is where your duck with clay starts getting personality.
Step 3: Create the Beak (Tiny but important)
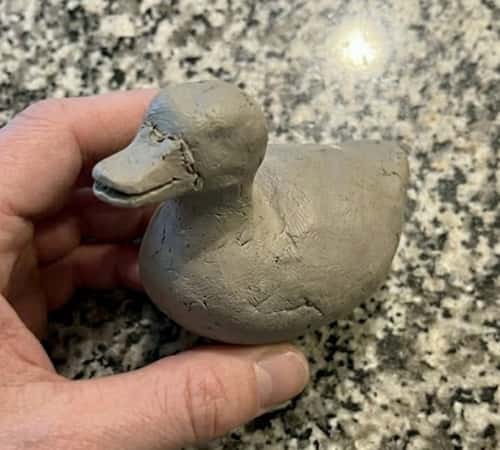
Take a small piece of clay.
Roll it into a mini oval. Flatten it slightly.
Attach it to the front of the head. Press gently.
Now use a toothpick to define the mouth line.
Too big? It’ll look like a cartoon duck. Too small? It disappears.
So aim for balance. You’ll feel it.
Honestly, this is the moment your duck either comes alive… or turns into something questionable.
Step 4: Add Wings (Don’t skip this)
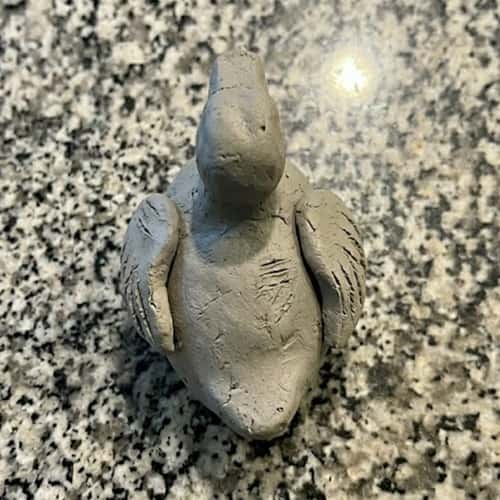
Roll two small oval shapes.
Flatten them slightly.
Attach them to the sides of the body.
Now here’s the trick—don’t just stick them flat. Slightly curve them outward.
Use a toothpick to carve feather lines. Not too neat. Ducks aren’t robots.
You see what’s happening now? It’s slowly turning into a proper clay duck sculpture.
Step 5: Shape the Tail
Pinch the back slightly upward.
Now split it gently into two tiny points using a toothpick.
That’s your tail.
It’s small, yes. But without it, the duck looks unfinished.
I used to ignore this step. Big mistake.
This is what separates random clay blobs from actual clay duck craft ideas worth keeping.
Step 6: Smooth and Fix Cracks (Patience test)
Now go over the whole sculpture with slightly damp fingers.
Fix cracks. Blend joints.
Don’t over-smooth. A little texture makes it look handmade.
Why remove all the character?
Also check balance. Does it sit properly? Adjust the base if needed.
This step feels boring, but it’s where your easy air dry clay crafts level up.
Step 7: Let It Dry (The waiting game)

Place your duck in a dry spot.
Let it air dry for 24 to 48 hours.
Don’t rush this. If you paint too early, it will crack.
I know waiting is annoying. But this step decides durability.
And yes, it might look slightly different after drying. That’s normal.
This is part of learning how to make a duck out of air dry clay properly.
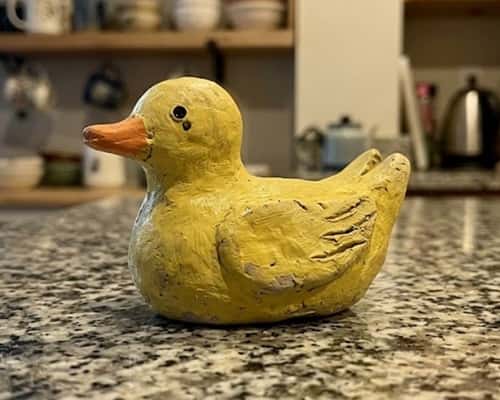
Step 8: Paint Your Duck
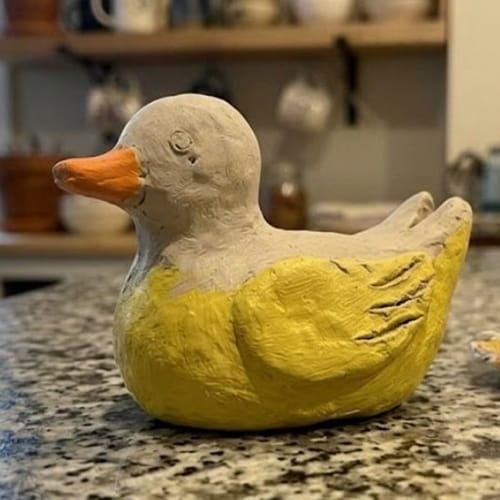
Start with a base coat. Usually white or light yellow.
Let it dry.
Now paint the beak orange. Add black dots for eyes.
Want more detail? Add light brown shading on wings.
Or keep it minimal. Your call.
I once over-painted mine and it looked like a festival decoration… so keep it subtle.
This is where your duck clay project becomes personal.
Step 9: Optional Finish (Seal it or leave it raw)
Apply a clear varnish if you want shine.
Or leave it matte for that rustic handmade look.
Both are good. Depends on your vibe.
I usually skip varnish for a more natural feel.
And honestly? Slight imperfections make it feel real.
Final Thoughts
Here’s something I realized – this isn’t about making a perfect duck. It’s about understanding form, balance, and patience through a simple clay sculpture.
You start noticing details. Shape, pressure, timing. That’s the real win.
And weirdly, once you make one duck, you start seeing ideas everywhere… different poses, textures, even storytelling through clay.
So next time you sit with clay, don’t just “make something.” Try observing it while you shape it.
That’s when your clay duck sculpture stops being a craft… and starts becoming a skill.