I’ll be honest… this clay Sunflower craft idea caught my attention because it’s simple but still feels special.
You don’t need fancy tools, just patience and a bit of messy creativity. Ever tried making clay Sunflowers at home with kids and ended up with a blob? Same here. But this one works.
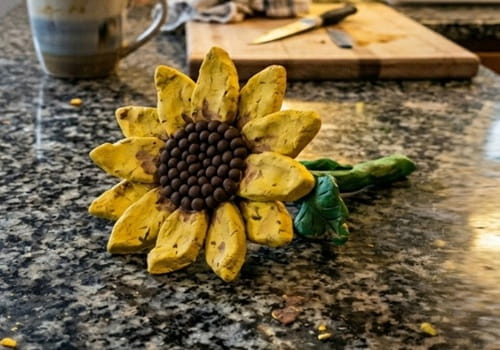
It’s perfect for rainy day crafts, quick weekend projects, or even when you’re exploring new kids pottery ideas.
Stick with me, I’ll walk you through everything step-by-step so you can actually make it.
What You’ll Need (Keep It Simple)
- Air-dry clay or baking clay
- Yellow, brown, and green acrylic paint
- Rolling pin (or glass bottle works too)
- Toothpick or blunt knife
- Small bowl (for shaping, optional)
- Old cloth or newspaper
- Glue (if needed later)
- Clear varnish (optional but nice)
Before You Start (Quick Prep)
Spread newspaper. Trust me, clay gets everywhere.
Keep a little bowl of water nearby… helps smooth cracks.
Don’t rush, clay hates being rushed.
Instructions To Make Clay Sunflower Craft
Step 1: Create the Base Disc
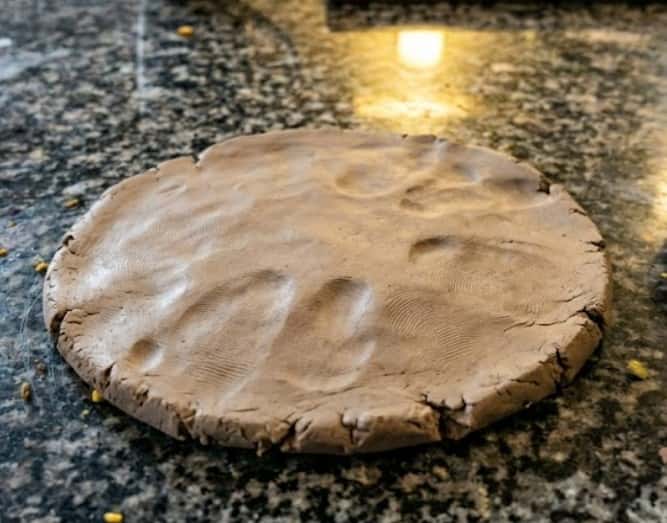
Take a chunk of clay and roll it into a ball. Now flatten it gently.
Not too thin, not too thick… about 0.5 cm is good.
Use your fingers to smooth the edges.
Oops, cracked edges? Dip finger in water and fix it.
If you want to turn this into a Sunflower bowl, press the flattened clay slightly into a small bowl for shape.
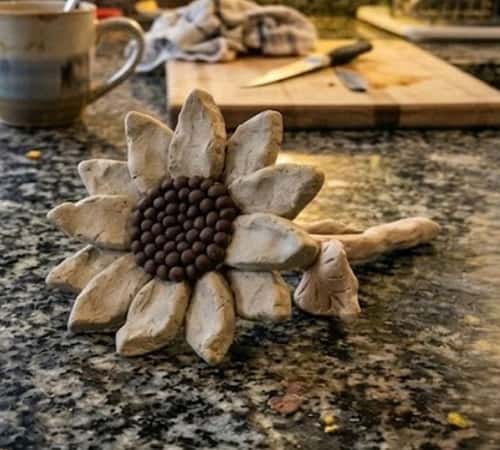
Step 2: Build the Center (The Seed Part)
Roll a small ball of clay. Press it in the middle.
Now here’s the trick – don’t just leave it smooth.
Use a toothpick and poke tiny dots all over.
It should look rough, uneven, almost messy. That’s what makes it real.
Step 3: Shape the Petals (This Part is Fun)
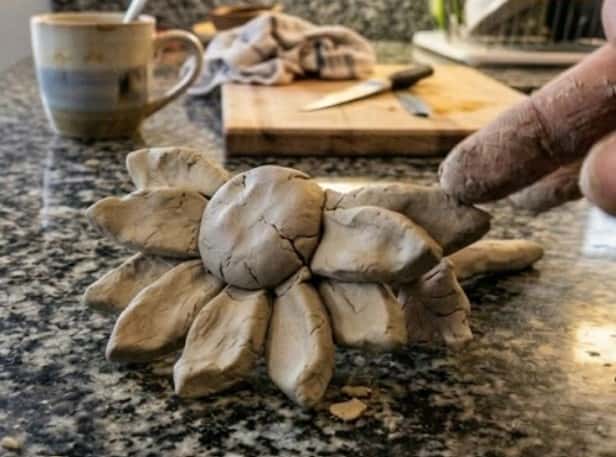
Pinch small bits of clay. Roll them into tiny oval shapes.
Flatten each piece and attach around the center.
One by one. Slowly.
Ask yourself – are they perfect? Good, they shouldn’t be.
Layer them slightly overlapping.
Add a second layer if you want fuller clay Sunflowers.
Step 4: Add Texture to Petals
Use a toothpick or knife. Draw soft lines from base to tip.
Not too deep. Just enough to mimic real petals.
Some petals can bend. Some can curl.
Honestly, uneven petals looks better.
Step 5: Make Leaves (Optional but Worth It)
Roll green clay. Flatten and cut leaf shapes.
Add veins using a toothpick.
Attach under the flower base.
Or skip it if you’re making a Sunflower bowl.
Step 6: Drying Time (Don’t Rush This)
Leave it to air dry for 24 to 48 hours.
Touch it after a few hours… still soft? Leave it.
If using baking clay, follow instructions and bake carefully.
Burnt clay is not fun, trust me.
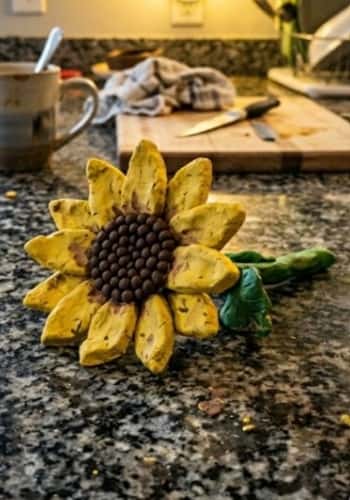
Step 7: Painting (Where It Comes Alive)
Start with yellow petals. Don’t overthink shading.
Paint center with dark brown.
Add tiny black dots for depth.
Leaves go green. Mix a little yellow for highlights.
Oops, paint went outside? Let it dry and fix later.
Step 8: Seal It (Optional but Looks Nice)
Use clear varnish once paint is fully dry.
It gives a soft shine.
Also protects your craft.
Make It More Interesting (Creative Variations)
Now this is where things get fun. Because one flower is never enough, right?
Idea 1: Mini Fridge Magnets
Stick a magnet at the back.
Now you’ve got tiny clay Sunflowers on your fridge.
Kids love this, especially during spring crafts for kids.
Idea 2: Sunflower Bowl for Trinkets
Remember that bowl shape?
Use it to store rings or keys.
It becomes a functional Sunflower bowl.
Idea 3: Wall Hanging Cluster
Make 3 to 5 flowers.
Glue them on a cardboard base.
Hang it using thread.
Looks rustic. Very “I made this at home” vibe.
Idea 4: Clay Sunflower Keychain
Make a smaller version.
Add a hole before drying.
Insert key ring later.
Perfect for kids recycled crafts when paired with old key rings.
Idea 5: Name Plate Decor
Write your child’s name below the flower.
Use clay letters or paint it.
Great for room decor.
Idea 6: Sunflower Candle Base
Flatten base slightly bigger.
Place a small candle holder in center.
Remove before drying, then reinsert.
Looks cozy at night.
Idea 7: Clay Sunflower Coasters
Make flat discs.
Paint and seal well.
Use as coasters.
Not fully waterproof tho, so be careful.
Idea 8: Garden Marker
Attach a stick at the back.
Write plant names.
Great addition to kids pottery gardening fun.
Idea 9: Gift Tags
Make tiny Sunflowers.
Write names at the back.
Tie with thread to gifts.
Idea 10: Frame Decoration
Glue finished flowers around a photo frame.
Looks warm. Personal.
Not perfect, but that’s the charm.
Common Mistakes (I’ve Seen These A Lot)
- Making petals too thick → they crack later
- Not attaching petals properly → they fall off
- Painting before fully dry → disaster
- Over-smoothing → loses handmade charm
And yes, uneven is good. Don’t chase perfection here.
Final Thoughts
Here’s the thing… this isn’t about making the “perfect” flower. It’s about learning how clay behaves in your hands.
Once you get that, everything changes. Even simple baking clay projects start feeling intuitive.
And honestly, these small projects quietly build patience in kids (and adults too, I think).
Try it once, mess it up, try again. That’s where the real magic is hiding, not in perfection but in repetition.