Starting a clay slab project can feel oddly intimidating… until you realize it’s basically rolling, cutting, shaping, and a little patience. That’s it. No fancy pottery wheel. No art degree.
Just your hands, some clay, and maybe a rolling pin you probably already own.
I haven’t personally made all these slab clay projects myself, but I dug deep into beginner-friendly methods that actually sound doable.
Some lean toward air dry clay, others fit traditional slab pottery or ceramics slab ideas if you’ve got kiln access.
Ready to turn flat clay into something charming, slightly imperfect, and wonderfully handmade? Good. Let’s get your table messy.
1. Botanical Imprint Trinket Dish
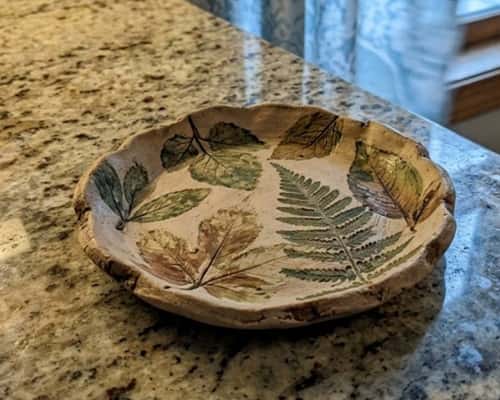
This one feels fancy, but honestly, it’s sneaky simple. A botanical trinket dish is one of those clay slab ideas that looks expensive even when your edges come out crooked. And they might. That’s okay.
Start by rolling your clay into an even slab, about 1/4 inch thick. You can use wooden dowels on both sides if thickness keeps getting weird.
Uneven slabs can crack later, so try your best here. Not perfect, just decent. Press fresh leaves, ferns, or textured herbs like rosemary firmly onto the surface.
A rolling pin over the top helps press those tiny veins in better. Peel slowly. If it tears, no panic, just try another patch.
Use a round bowl or cookie cutter to cut your shape. Maybe circle, maybe oval, maybe that oddly shaped mug lid that somehow works.
Gently drape it over an upside-down bowl covered in plastic wrap so it curves naturally. This creates your dish shape. Leave it there to dry until leather-hard.
Want extra personality? Brush on wax resist before painting so raised leaf lines stay visible after color.
Once dry, paint with acrylics or glaze depending on your material. Seal air dry clay with waterproof varnish because moisture is not your friend.
This clay craft works beautifully for rings, keys, or those random earrings that always disappear.
2. Rustic Hanging Herb Markers for Garden Pots
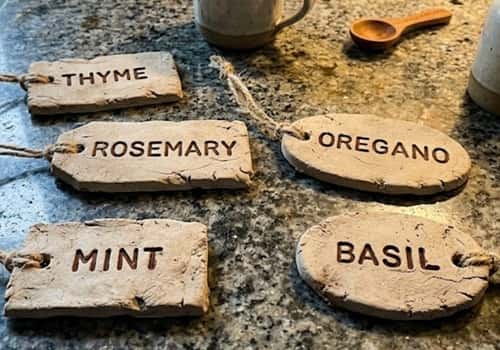
Now here’s a clay slab project that feels useful, decorative, and a little old-soul farmhouse all at once. If you like practical clay craft more than shelf clutter, these are honestly kinda brilliant.
Roll out your slab pottery sheet to about 1/8 to 1/4 inch thick. Thinner slabs dry faster, but too thin and snap… which is annoying.
Cut long tag shapes, rectangles, tiny arch plaques, or even imperfect circles if measuring sounds exhausting today.
Before they dry, use a straw or skewer to poke a hanging hole near the top. Don’t wait too long or the clay can crack instead of punch cleanly.
Stamp or carve herb names like basil, mint, rosemary, or thyme using a toothpick, alphabet stamps, or even the dull edge of a butter knife. No need for perfection here.
Actually, slightly wobbly lettering makes it look more handmade. You could press lace, burlap, or rough fabric around the borders too for texture. That little detail? It changes everything.
Once dry, sand rough edges lightly. If using air dry clay, paint with muted greens, terracotta, or creamy whites.
For waterproofing, outdoor-safe sealant matters because rain does not care how cute your project is. Thread twine, jute, or thin wire through the hole and tie around planters.
These slab clay projects fit beginner hands because they teach cutting, texturing, stamping, and drying control without requiring complicated assembly. Plus, if one breaks… make another. Seriously.
3. Handmade Geometric Pottery Platter for Keys or Snacks
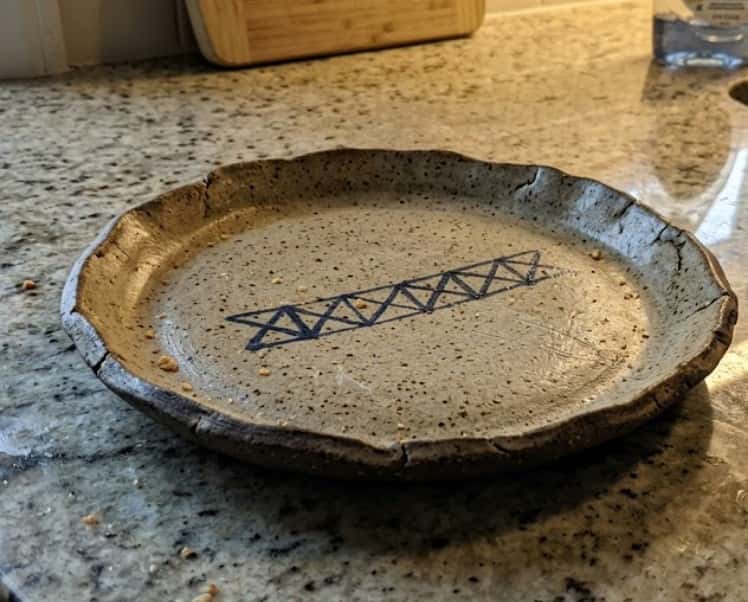
This one steps into functional pottery territory, and honestly… it can look wildly modern even if your corners come out a little wonky. A pottery platter made from slabs gives flat clay serious personality.
Roll your slab slightly thicker here, around 1/4 inch, especially if you plan to hold snacks or heavier objects. Too thin and sagging might happen.
Cut geometric shapes like hexagons, long rectangles, or asymmetrical freeform trays.
Don’t overthink symmetry unless that’s your thing. Some of the prettiest clay slab ideas look almost accidental.
To create raised edges, gently score along border lines about half an inch from each edge without cutting through.
Then lift those sides upward carefully. For corners, score and slip small joins where edges meet.
Slip is basically watery clay glue, and yes, it matters more than beginners expect. Skip it, and things fall apart later.
Smooth seams with damp fingers or a silicone tool. You can leave finger marks if you want character.
Add texture using mesh, woven placemats, or carved lines. If you’re trying ceramics slab ideas for kiln firing, glaze inside surfaces for food-safe use. Air dry clay versions work better as catch-all trays unless sealed carefully.
Metallic paint accents or matte neutrals can completely shift the mood. Fancy? Minimalist? Rustic? Your call.
And listen, slight warping sometimes happens. That’s not failure. That’s handmade energy.
4. Crescent Moon Wall Hanging With Texture Layers
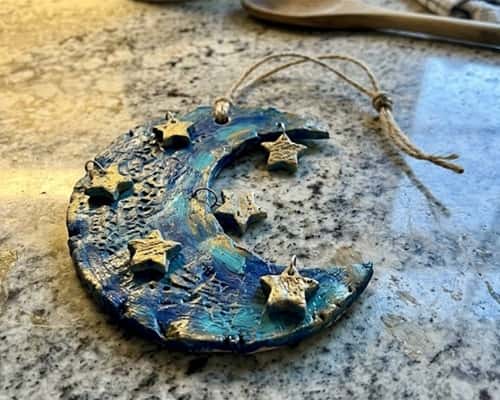
This one leans decorative, a little dreamy, and honestly… it can look surprisingly expensive for something made from flat clay on your kitchen counter.
If you’ve been eyeing clay slab ideas that feel artsy but still beginner-safe, this is a good one.
Roll out your slab to roughly 1/4 inch thick so it holds shape without bending weirdly. Use paper first.
Seriously, sketch a crescent moon template and cut it out before touching clay.
Lay it on top, trace with a craft knife, then remove extra clay slowly. Fast cuts can drag edges, and then things gets messy.
Now for the fun part – texture. Press lace, coarse fabric, dried flowers, or even the ridged bottom of a glass into sections of the moon. Don’t cover everything.
Leaving smooth areas beside textured ones gives more contrast. Want layered charm? Cut tiny stars, circles, or abstract shapes separately and attach using score and slip.
This creates dimension without complicated pottery skills.
Poke 2–3 small holes along the bottom for hanging beads, twine, or little clay drops later. One top hole is needed too. Dry flat first so it doesn’t warp, because floppy moons look… odd.
Paint softly with chalky white, muted sage, terracotta, or metallic dry brushing. Wax resist can help preserve texture if you’re glazing in slab pottery.
This clay craft works beautifully in bedrooms, nurseries, or awkward blank wall spots nobody knows what to do with.
5. Pinch-and-Slab Hybrid Clay Bowl With Sculpted Rim
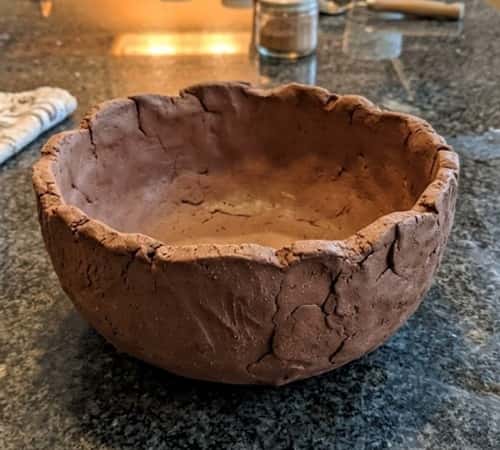
Okay, this one’s extra satisfying because it combines slab pottery structure with a softer hand-built look.
A clay bowl doesn’t have to be perfectly round to feel beautiful. Actually, slightly odd shapes often feel more alive.
Start with a rolled slab about 1/4 inch thick for your bowl base. Cut a circle using a plate, bowl lid, or whatever round-ish object you find. Then roll a long strip for the side wall.
This strip wraps around your base, creating bowl height. Score and slip where the strip meets the base and itself. Join carefully, because weak seams are sneaky.
Now here’s where it gets interesting – don’t leave the rim plain.
Pinch, wave, scallop, or gently fold sections to create an organic edge. This transforms basic into “where’d you buy that?” real quick. Keep a damp sponge nearby so cracks don’t form while shaping.
For added detail, carve repeating patterns or press seed pods, shells, or stamps around the outer wall.
If making this with air dry clay, remember it’s better for decorative use unless sealed really well. Ceramic versions can become genuine functional pottery after firing.
Dry slowly upside down or supported by soft cloth so shape holds. Rushing drying can cause splitting, and that part is frustrating.
This project teaches structure, joining, and design all in one go.
6. Personalized House Number Plaque or Name Plate
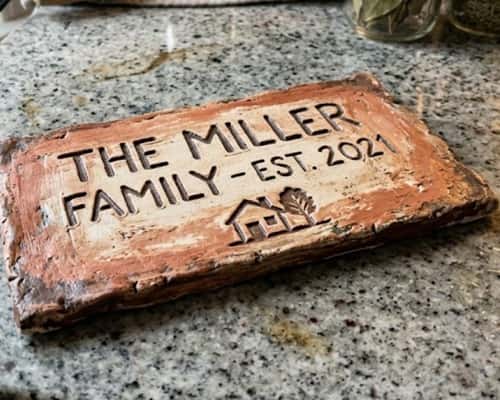
Not every clay slab project needs to sit on a shelf collecting dust. This one? Functional, customizable, and surprisingly giftable too.
Roll a slab around 1/4 inch thick for durability. Thicker is better here because outdoor or hanging pieces need strength.
Cut into rectangle, arch, cottage shape, or even a quirky freeform design.
Before decorating, smooth your surface because carving text on bumpy clay can become a headache real fast.
Use stencils, stamps, or hand-carve house numbers, family names, garden signs, or playful phrases.
If freehanding, sketch lightly first with a pencil or toothpick. You do not wanna realize spacing is off halfway through “Welcome.”
Add border details using rope, lace, leaves, or simple line carving. For hanging, poke balanced holes before drying.
If mounting flat, no holes needed. Consider raised letters by attaching cut clay shapes instead of carving inward. That adds boldness.
Outdoor-safe sealant is a must for air dry clay versions. Weather can wreck unprotected work faster than expected. Ceramic slab ideas obviously hold up better long-term if kiln-fired.
Paint choices really matter here. Matte black with white letters feels modern. Terracotta with cream? More rustic. Gloss glaze can look polished, but handmade imperfections still shine through.
And honestly… crooked little letters sometimes feel warmer than machine-perfect signs.
7. Layered Boho Coaster Set With Texture Mixing

This clay slab project is practical, gift-worthy, and honestly a sneaky good way to practice precision without making anything too complicated. Coasters sound basic… but layered textures can make them feel wildly custom.
Roll your slab evenly, around 1/4 inch thick. Consistency matters here because wobble can make cups tip, which nobody wants.
Cut circles, hexagons, arches, or irregular pebble-like shapes. A glass rim works fine for tracing, and no, fancy cutters are not required.
Now instead of stopping there, create thin accent shapes – mini rainbows, half moons, strips, dots – and score and slip them onto the coaster base.
This layered approach gives a boho, ceramics slab ideas kind of look without advanced pottery skills.
Press textures into different sections using woven placemats, burlap, carved lines, or even old jewelry.
Contrast is everything. Smooth plus rough looks more intentional than all-over chaos.
Keep edges slightly softened with damp fingers. Sharp edges can chip easier, plus they look less cozy.
If using air dry clay, seal both top and bottom to help reduce moisture damage. Cork backing can also stop scratching on tables, which feels like a small detail but really matters.
Neutral earthy tones, dusty blush, muted mustard, or speckled white finishes work beautifully. Or go bold if your space likes drama.
These slab clay projects are ideal when you want to experiment without committing to larger builds.
8. Mini Desk Organizer Tray With Divided Sections
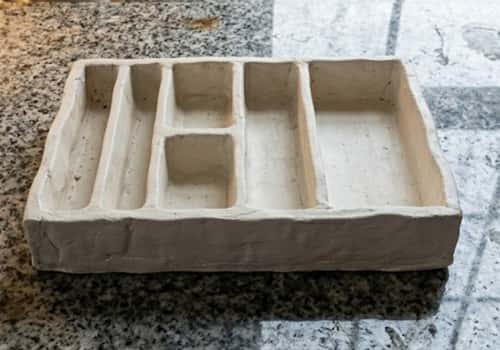
If random paperclips, rings, charger bits, or tiny chaos keeps taking over your desk, this clay slab project actually solves something. Functional pottery doesn’t always mean bowls and mugs, right?
Roll out a slab about 1/4 inch thick for the base. Choose your shape first – rectangle is easiest, but rounded corners feel softer.
Cut carefully, then create walls using rolled strips. Attach side walls with score and slip. This part takes patience because rushed joins often separate later. Press gently but firmly.
Now divide the inside. Add thinner slab strips to create sections for jewelry, keys, coins, or office bits.
Think of it like building little rooms. Keep dividers lower than outer walls for a balanced look. Don’t obsess over perfection though. Slight unevenness gives handmade charm.
Texture the outside walls if you’d like – simple grooves, pressed leaves, or geometric stamps all work.
For a cleaner modern vibe, leave it smooth and let shape do the talking. Dry slowly on a flat surface. If one wall leans? Adjust early. Wet clay is forgiving, dry clay… not so much.
Air dry clay works beautifully here for decorative desk use, while kiln-fired slab pottery gives more durability. Acrylic sealing helps with everyday wear.
This project teaches structure and planning better than most beginner clay slab ideas.
9. Story Tile Wall Squares With Symbols or Quotes
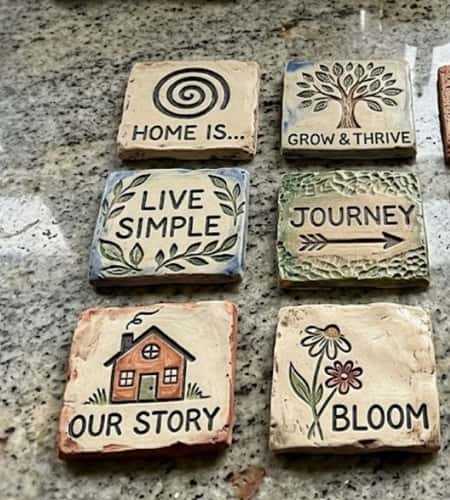
This one feels deeply personal, and maybe that’s why it stands out. Instead of one big slab pottery piece, you create a collection of smaller tiles that tell a story – family words, nature symbols, abstract patterns, or even tiny seasonal reminders.
Roll clay slabs to about 1/4 inch thickness, then cut into matching or intentionally mismatched squares, rectangles, or circles.
Uniformity looks polished, but imperfect sets often feel more soulful.
Before drying, carve initials, meaningful words, simple sketches, botanical impressions, moon phases, or house motifs. You could even try wax resist techniques for layered finishes later.
Texture matters a lot here. Press different fabrics, stamps, combs, or natural objects into backgrounds so every tile feels unique.
Poke hanging holes if stringing together, or leave solid if mounting separately.
Dry flat. Warping can ruin alignment if you’re making a set, so rotate occasionally. Paint each tile differently or keep one shared palette for cohesion.
Think earthy ceramics, washed white, dusty blue, aged copper. Overly glossy finishes can sometimes hide those beautiful handmade details.
These slab clay projects work well for gallery walls, memory corners, or thoughtful gifts. Plus, smaller pieces mean lower pressure if mistakes happen.
Honestly, one imperfect tile can still become your favorite.
10. Sculpted Recipe Card Holder With Slab Base
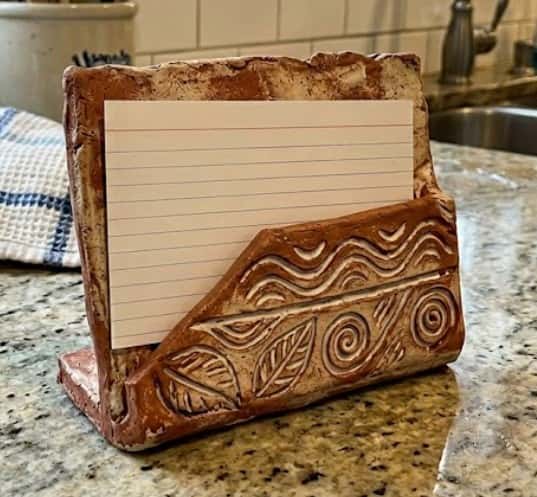
This clay slab project feels unexpectedly clever because it mixes decor with actual everyday usefulness.
If you’ve ever propped a recipe card, phone, or note against random kitchen stuff… yeah, this fixes that in a prettier way.
Start with a sturdy slab rolled about 1/4 inch thick for the base. Rectangle, oval, or farmhouse tag shapes all work.
Keep it broad enough so it won’t tip over every time someone walks by. Then create either a vertical backplate or sculpted wedge support.
A simple angled slab attached to the back can hold recipe cards beautifully, while a pinched groove across the front can support cards or tablets.
Score and slip every joining point really well. Seriously, this isn’t the time to rush. Weak structure means heartbreak later.
You can also sculpt tiny side lips or raised edges to keep cards from sliding. Cute and useful.
Decorate with carved kitchen quotes, floral impressions, measuring spoon motifs, or subtle rolling pin textures.
For farmhouse charm, distressed white or soft sage works nicely. For modern kitchens? Matte charcoal, minimal lines. If using air dry clay, seal thoroughly since kitchens can get humid and messy.
Dry slowly and test balance before fully hardening. A leaning holder can still be fixed early, but later… nope.
This project blends slab clay projects, clay craft, and functional pottery in a way beginners can absolutely handle while learning structure and design confidence.
Final Thoughts
A good clay slab project isn’t really about perfection, and honestly that’s what makes slab pottery so approachable.
Flat clay can become keepsakes, useful home pieces, or wildly personal art without needing a wheel or studio setup.
Sometimes the fingerprints, uneven rims, or odd little bends are what gives functional pottery its warmth.
Whether you’re exploring air dry clay for casual weekends or diving deeper into ceramics slab ideas, the real skill often comes from experimenting, messing up, and noticing what the clay teaches back.
Weirdly enough, mistakes can shape better clay slab ideas than plans ever do.