Looking for a Thanksgiving craft that’s both engaging and educational? Our handprint turkey craft is perfect for kids to dive into the festive spirit while learning about turkeys.
This fun activity transforms simple materials into vibrant, colorful turkeys using just craft papers, scissors, and glue.
With easy-to-follow steps and a ready-made template, this project turns handprints into eye-catching turkey decorations.
Ideal for classroom activities or family fun, this craft not only sparks creativity but also provides a hands-on way to explore these fascinating birds.
Let’s take a quick look at a small list of basic craft supplies you’ll need to craft a similar turkey bird structure that brings joy and excitement to children of all ages.
Step 1: Materials You’ll Need To Make Handprint Turkey
- Craft Papers: Colorful Craft Papers are the main elements you’ll need to prepare the handprint Turkey birds. To make a vibrant structure you will need colorful craft papers, however, make sure to include a dark shade such as black color sheet for the handprint shape as the base of the craft.
- Scissor: You can use a standard craft scissor to cut the paper sheets into the various shapes needed for the turkey’s body.
- Glue: To secure or assemble the cutouts or the required shapes of the Turkey bird you can use a regular craft glue.
- Handprint Turkey Template: To ease your task I have designed a ready template that includes the required shapes for assembling the Turkey’s structure. To access the ready template you can move to step number 2 below.
Estimated Time Taken to Craft the Handprint Turkey Bird: If you’ll use the uniquely designed ready template from our website then it will take about only 6 to 8 minutes to craft the Handprint Turkey structure.
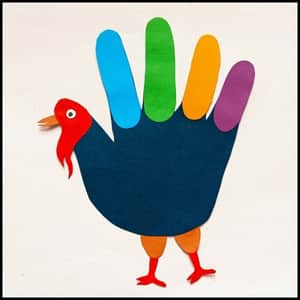
Step 2: Handprint Turkey Template
If you look at the image above it includes the black handprint shape, colorful finger shapes, legs, and the facial details of the Turkey bird.
It includes all the necessary shapes to recreate the turkey structure just like the one I’ve made.
You can download and print the above template with a few clicks and quickly move to the cutting and assembling steps.
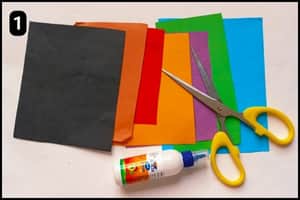
Step 3: Cutting The Handprint Turkey Shapes Manually

Using our ready-made template simplifies the process – just cut out the shapes and move on to the next steps.
If you don’t have the template, no worries! Grab some colorful craft papers and cut out the necessary shapes yourself.
Refer to the final turkey craft structure to ensure you use the right colors for each part.
Once all your pieces are cut and prepared, you’re ready to start assembling.
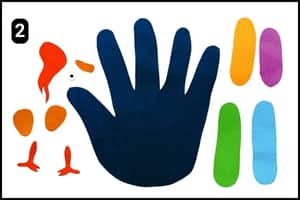
Step 4: Assembling The Vibrant Feathers Of Turkey
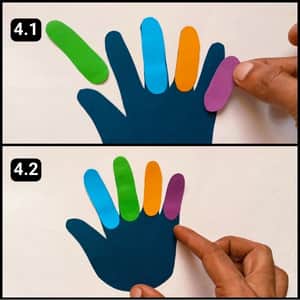
With the required shapes handy let’s assemble Turkey’s structure.
I began by attaching the colorful shades to the handprint fingers to mimic the vibrant feathers of the turkey.
I customized the structure by selecting my preferred colors, cutting them to the right sizes, and then applying them to the handprint.
Step 5: Fixing The Facial Details
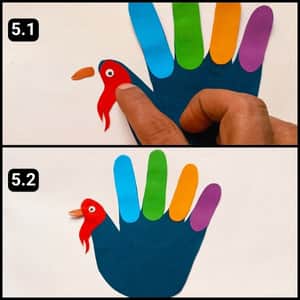
It’s now time to assemble the facial details of the handprint Turkey.
I first aligned and attached the turkey’s eye shape onto the red cutout, which represented its face and wattle.
Then, I glued the red facial detail (the wattle) onto the thumb of the handprint.
Next, I carefully positioned and secured the Turkey’s beak in place.
With everything aligned, the facial details were firmly in place, as shown in the images 5.1 and 5.2 above.
Step 6: Assembling The Turkey Legs

We have finally moved to the last step of the handprint Turkey bird craft which is to prepare and secure the strong legs of the Turkey bird.
I began by attaching the lower leg shapes to the thigh shapes, as shown in image 6.1 above. Then, I secured the legs in place, completing the handprint turkey bird structure.
Looking at the final image above, I’m confident this will become one of your favorite turkey craft creations.
Final Thoughts
This handprint turkey craft activity is a wonderful way to blend creativity with education, teaching children about turkeys while they express themselves artistically.
I recommend making this a yearly tradition, perhaps even incorporating new elements each time to keep it fresh and exciting.
If possible, consider displaying your child’s creation as part of your Thanksgiving decor, it’s a great conversation starter and a source of pride for the little ones.
Whether you use the ready-made template or go freestyle, the joy in your child’s eyes when they see their turkey come to life is truly priceless.
Note: I have also uploaded a complete video walkthrough of this handprint craft project on our official YouTube channel.