Today, we’re crafting a solution that’s as adorable as it is impractical (but hey, sometimes cuteness trumps practicality, right?).
We’re talking about a paper umbrella craft for kids, yes, you read that right, a mini masterpiece made entirely of paper that’ll keep you dry…ish.
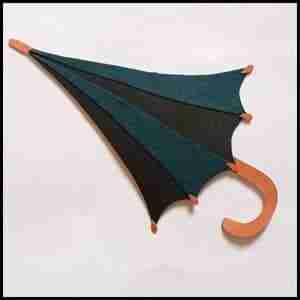
During playtime, at least, This little charmer won’t withstand a real storm, but it’s perfect for rainy day parades around the living room or adding a touch of whimsy to a dollhouse.
So, grab your scissors, unleash your inner artist, and let’s craft a paper umbrella that’s bursting with personality
In this article, I have provided step-by-step instructions for creating a paper umbrella craft, accompanied by illustrative images (so that you can follow it properly).
So why wait, quickly grab the minimum craft supplies and let’s begin with the activity.
Step 1: The Making of Paper Template
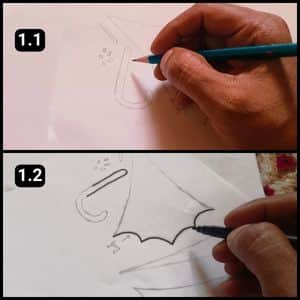
Before moving forward, I’d like to guide you through the process of creating a paper umbrella template.
As I typically do, I’ve drawn the outlines of the necessary cutout shapes for the different structures, including the paper umbrella.
After completing the final shapes, I used a black marker pen to trace the outlines, which is typical of Home Life chic blog style.
Step 2: The Paper Umbrella Template Source
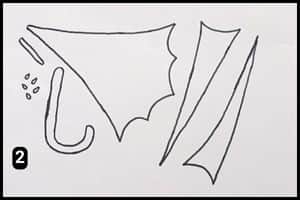
For your convenience, I’ve uploaded the paper template to our blog.
To proceed with the next steps, download and print the template (this will save time).
Step 3: Cutting the Shapes
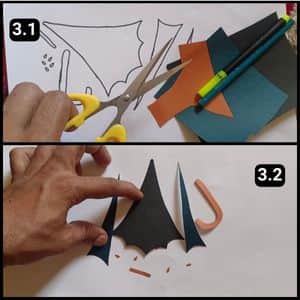
It’s time to cut the shapes of the paper using colorful craft paper sheets OR Construction paper.
I have used black, gray, and brown color papers which are the typical shades of an umbrella.
However, you can choose your own color schemes to customize your paper umbrella.
Step 4: The Assembling of the Shapes

With the cutouts prepared, I began the assembling process of the paper umbrella.
First, I used the large black cutout as the base of the paper umbrella craft.
Next, I aligned and stuck one of the gray shades over the base (I made sure to align it evenly).
Step 5: Sticking the second Shade
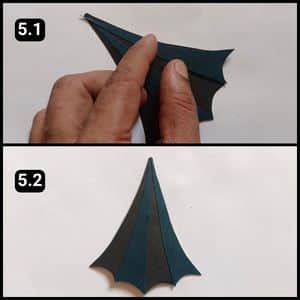
Starting with the second Shade, I will now align and attach it securely in place.
The Shades are now perfectly aligned and firmly attached to the base of the umbrella craft.
Step 6: Fix the Supporting Handle
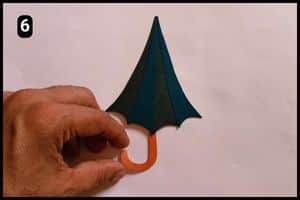
Rather than utilizing a single long strip as the handle, I have fashioned it into two separate parts.
This modification will simplify the alignment and attachment process to the paper umbrella.
As depicted in the image above, I have securely attached the umbrella handle to the bottom of the overall structure.
Step 7: Sticking the tip
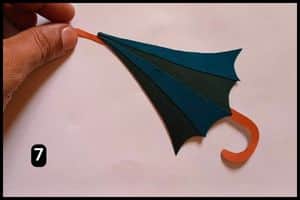
I was able to fix the handle easily so I will stick the tip to the top of the umbrella structure.
It appears like a typical long handle of an umbrella from top to bottom.
Step 8: Fixing the tiny hooks
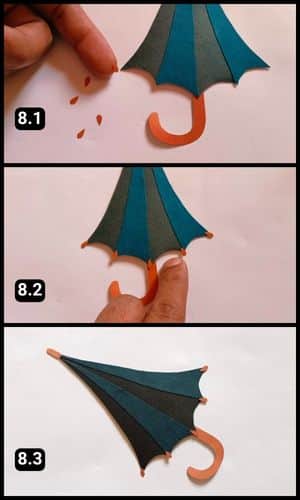
Now, for the finishing touch! I secured those tiny hooks to the umbrella’s bottom edge.
Let me tell you, those little cutouts can be tricky to place perfectly.
But fear not, with a little patience (and maybe a helpful pair of tweezers), you can get them all attached.
Here’s a tip: Apply a dab of glue to each cutout, then use a small clip to hold it in place while you position it on the umbrella. Once all the hooks are securely fastened, it should look something like this.
Video Walkthrough Of Paper Umbrella Craft
Final Thoughts
Don’t be limited to traditional umbrella colors for this umbrella craft.
If possible, encourage your child’s imagination to run wild with vibrant patterns, glitter accents, or even stickers.
You can now use the similar steps to craft this amazing paper umbrella with children.
It’s a perfect fun activity for weekends especially during the monsoons and children will love to be involved with this particular activity.
For your reference I have also uploaded the complete video walkthrough of the paper umbrella craft on our official YouTube channel.
Remember, with a little creativity, this paper umbrella craft can become a cherished playtime companion or a unique handmade gift.
Frequently Asked Questions
How long will it take to make this paper umbrella craft?
It took 10 minutes for me to make this paper umbrella craft using the ready template from our blog.
Is there a way to make this craft even more educational?
Yes, use the umbrella craft as a springboard to discuss weather patterns, the water cycle, or the history of umbrellas. You can even have children research different types of umbrellas from around the world.
Is there a way to make this paper umbrella open and close?
While this design is for a static umbrella, you can get creative and add a simple hinge mechanism.
Is there anything else I can add to the paper umbrella to make it more visually interesting?
Consider using different textures for the umbrella canopy. Cut out a piece of lace or mesh to create a sheer overlay or use tissue paper for a translucent effect. You can even glue on small coffee filters for a more textured look.


