What do you find in the search results when you use online resources like “Google” to look up information about washing machine hoses?
In most cases, It’s simply a list of washers inlet and or the drain hoses.
Isn’t it true?
Do you know there’s another type of hose in your washing machine often known as Tub-to-Pump hose?
The tub-to-pump hose is an important component in your washer and if that hose is damaged or worn out, leakage is imminent.
In this article, you will learn about the Tub-to-Pump hoses along with their functions. Moreover, you will also understand when and how to replace them yourself.
Let’s dive right into it.
What is a Tub-to-Pump hose in a washing machine?
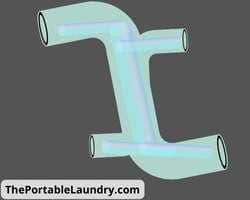
A Tub to pump hose connects the outer tub of the washing machine to the inlet of a drain pump.
It is usually made up of durable rubber and is flexible.
With that said, it is also the smallest hose in the washing machine.
Why do you replace the Tub-to-Pump hose?
Replacing such hoses should be done immediately as soon as you see any signs of wear-out or damage.
A worn-out tub-to-pump hose will cause leakage from the bottom of the machine.
Moreover, the leak can reach out to the other components of the washer such as the drain pump. And you must know that an internal leakage can cause damage to several components of the washer.
How to replace the tub to pump hose in a washing machine?
Replacing an internal hose of the washer such as the Tub-to-Pump hose will require you to detach several panels.
Your washer’s type and model will determine which panel needs to be disassembled.
For top loaders, you may need to disassemble the back panel. Likewise, for front loaders, it can be the front and top panels including the control panel frames.
For better understanding simply peep into the user manual of your washer.
You can replace the tub to pump hose yourself with the below steps.
Things you may need
- Screwdriver
- Wrench and Pliers (Optional)
- The user manual of your washer model
- A suitable replacement Tub-to-Pump hose
- A helping hand to tilt your washer
Instructions to Replace the Tub-to-Pump Hose
Step 1: Disconnect the Supplies
Unplug the washer and disconnect the other supplies such as the water inlet and the drain.
Step 2: Move the Unit
Safely shift the washer away from the back wall to gain better access.
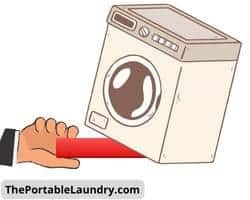
Next, Lift the washer slightly up from the back or front depending on the required disassembly to easily access its bottom.
You can do this by placing a block beneath the washer’s opposite end.
While doing this just make sure the washer is well balanced to its position when you tilt them.

Step 3: Detach the required panels
For top loaders: Simply, unscrew and remove the back panel, to access the internal hose.
For front loaders: It may be a risky task depending on the washer model type.
- You may have to remove the top and front panels.
- Begin by removing the detergent drawer from the front panel’s top frame.
- Now unscrew the control panel frame off the front panel.
Note: Before removing the front panel make sure to open the door to remove the gasket rubber.
Step 4: Gain access to the Tub-to-Pump hose
The outer tub will have a small black hose attached using a clamp at the bottom part. This small hose connects right to the drain pump’s inlet slot.
Simply, remove it by unlocking the ring clamp with a push by fingers.
For some washer models, it will be fixed using screws. If that’s the case, unscrew and remove the clamp locking with the help of a screwdriver.
Follow the same steps at the opposite end of the hose. The opposite end connects to the drain pump inlet in most cases.
Ideally, a tub-to-pump hose has 2 ends or slots but some may have more.
In some front load washers, there may be 3 to 4 openings (outlets) in a single hose for different ports. (Like a multi-connector hose).

Remove them all safely as per their fixtures.
Step 5: Carefully pull out the hose
After removing their clamps from either end, you will now need to pull the hose off the fixtures.
It may become a difficult task because the ends of the hoses have a water-tight seal.
So, gently pull to remove the hose from either end.
Step 6: Clean the surface
Once you disassemble the existing hose, it’s time to clean the surface.
Use a damp cloth and wipe the reachable areas and the port openings.
You can also make use of a cleaning solution.
Doing this will ensure a clean surface when you install the new hose.
Step 7: Discard the old hose and clamps
The new hose usually comes with clamps on either end. In this case, you can discard the old clamps and the worn-out hose.
Step 8: Use the sliding trick
It may look difficult to install and push the new hose to its place as there isn’t enough room to wrap your fingers around them.
The new hoses are usually sturdy, therefore you need to fix them using a simple trick.
In this situation, you can make use of a sprayer. Simply, fill soap and water in a spray bottle and mix it well.
Next, spray the solution around the hose ends to create a slippery environment.
As an alternative make use of oil or a greasy substance. Simply give the fastening ends a touch of oil to make them glide.
Step 9: Fix the Tub-to-Pump hose
Now fix one end of the hose to the washer’s outer tub outlet and the other end to the drain pump’s inlet.
Depending on the washer type fix all the available ports of the hose to their location.
Next, press the clamp lock and slide it to the adjoining surface and leave it for a sturdy grip. Do this on both ends.
Step 10: Reinstall everything
Reinstall the front panel by realigning it to its mounting pins and screwing them carefully to their place.
While doing so, do not forget to align the rubber seal around its door.
Now fix the control panel cover to the bracket and reconnect all the mounting screws followed by pushing the detergent drawer to its place.
Now, Install the top panel and fix the retaining screws.
Common Signs of Tub to Pump Hose Wear
Cracks and Fraying
Examine the hose carefully for any visible cracks or fraying along its length.
These are evident indicators of wear and tear, signaling that the hose has reached the end of its serviceable life.
Bulges and Swelling
A hose that appears swollen or exhibits unusual bulges is a cause for concern.
Such deformities are clear signs that the hose has weakened and should be replaced promptly to prevent future issues.
Brittleness
Gently flex the hose. If it feels brittle or inflexible, it has likely become compromised and needs replacement.
A healthy hose should remain pliable.
Leaks and Moisture
Any visible leaks or moisture around the hose connections should not be ignored.
These are unmistakable indications that the hose is no longer functioning properly.
The Importance of Using the Correct Replacement Hose
Choosing the right replacement hose is a critical aspect of this process.
While our guide emphasizes the importance of consulting your washer’s user manual for specific instructions, it’s equally vital to comprehend why using the correct replacement hose is imperative.
Why It Matters?
- Compatibility: Washing machines come in various makes and models, each with specific requirements. The wrong hose may not fit correctly, leading to compatibility issues, leaks, and even potential damage to other washer components.
- Performance: The Tub-To-Pump hose plays a crucial role in the machine’s functionality. An incompatible hose may compromise the washer’s performance, affecting its ability to drain water efficiently.
- Safety: Using the correct hose ensures the safety of your appliance and your home. It reduces the risk of leaks and water damage, which can be costly to repair.
Troubleshooting Tips for a Smooth Replacement Process
While our guide provides step-by-step instructions for Tub-To-Pump hose replacement, it’s essential to anticipate potential challenges and know how to address them.
Here are some valuable troubleshooting tips to ensure a smooth replacement process:
1. Stuck Clamps: If you encounter clamps that are difficult to remove, apply a lubricant or use pliers for a better grip. Be cautious not to damage the hose or connections in the process.
2. Fitting Issues: Aligning the new hose with the connections can sometimes be tricky. Gentle heating or cooling methods can help make the fitting process more manageable. Never force the hose onto the connections.
3. Leak Detection: After the replacement, conduct a thorough leak test. Keep a bucket or towels on hand to quickly identify and address any unexpected leaks. It’s essential to confirm the integrity of the new hose installation.
Final Thoughts
The Washing Machine includes various components to function including the Tub-to-Pump hoses.
These hoses are among the least discussed parts of a washing machine.
Over time they can wear out like any other components of the washer.
Replacing them is not as challenging as it looks.
However, if you are unable to replace them on your own, it’s recommended to reach out to a professional.
Lastly, it is always recommended to follow the user manual instructions of your washer model before you proceed.
You May Also Like
- How To Replace The Drain Hose In Washing Machine?
- How To Replace Washing Machine PCB Board?
- How to Replace The Outer Panels Of A Washing Machine?
- How To Replace The Door Of Your Top Load Washer?
- How To Replace The Washing Machines Detergent Drawer?
- How to replace the Inner Tub of a Front-Load Washing Machine?
- How To Replace The Gearbox In a Washing Machine?
- Are all washing machine hoses the same?
- What Are Washing Paddles? (Explained)
- How to Transport a Washing Machine Safely?
- What is Pulsator Roller in a Washing Machine?
- What is a Washing Machine Clutch? (Explained)


