Easter crafting always pulls me toward simple materials. Cornstarch clay is one of those things that looks fancy but is surprisingly easy to make. And when you shape it into little carrots? Instant spring vibe.
These cornstarch clay carrot easter crafts are playful, beginner-friendly, and honestly perfect for messy kitchen table crafting.
I haven’t personally tried every idea below, but each one follows the same simple clay method so anyone can make them.
These carrot-inspired crafts will keep your hands occupied and your home feeling extremely springtime if you like cornstarch clay crafts, small handcrafted decorations, and inventive Easter crafts.
Before starting any idea, here is a simple clay recipe most of these cornstarch clay carrot easter crafts use:
Basic Cornstarch Clay Recipe
Ingredients:
- 1 cup cornstarch
- 1 cup baking soda
- ¾ cup water
Instructions:
- Add cornstarch, baking soda, and water to a saucepan.
- Heat on medium while stirring constantly.
- Within a few minutes it thickens like mashed potatoes.
- Remove from heat once it forms a soft dough.
- Let it cool slightly, then knead until smooth.
If it sticks, add tiny bit cornstarch. Too dry? A drop of water fixes it. Easy.
1. Mini Easter Basket Clay Carrots
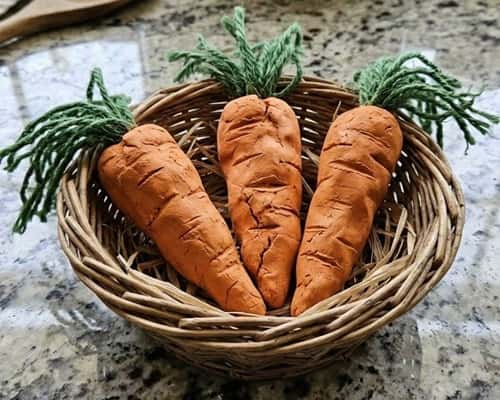
Tiny carrots in baskets look adorable on tables. I honestly smiled just imagining them.
Start by coloring the clay. Knead a small drop of orange acrylic paint into the dough until evenly tinted. Now roll tiny carrot shapes – about 1.5 inches long.
Make them slightly uneven, real clay carrots should not look factory perfect.
Use a toothpick to draw light lines down the carrot to mimic natural texture. Next roll small green clay pieces and pinch them into leafy tops.
Let everything dry overnight.
Place three carrots inside a tiny basket or bowl. This instantly becomes cute easter crafts decor for shelves or tiered trays.
2. Clay Carrot Garland

Garlands are one of my favorite seasonal decorations. This one looks rustic and homemade.
Roll several small carrot shapes using orange clay. Keep them about 2 inches long. Before drying, poke a hole through the top of each carrot using a skewer.
Make green tops separately. Press them into the hole so they stay attached.
Allow the carrots to dry completely. This may take 24 hours depending on humidity.
Once hard, thread jute twine through the holes. Leave space between each carrot.
Hang across a window, kitchen shelf, or entryway. Simple carrot crafts suddenly become cheerful spring decor.
3. Easter Clay Carrot Magnets
Fridge magnets made from cornstarch clay crafts are surprisingly fun.
First shape several small carrots about the size of your thumb. Don’t worry if one carrot looks crooked. Mine probably would too.
Use a toothpick to add ridges across the carrot surface. That tiny detail makes them look realistic.
Attach small green clay leaves at the top.
After drying fully, glue a flat magnet to the back using strong craft glue. Let the glue cure properly.
Now your refrigerator becomes a little Easter display. Small things like this makes kitchen feel festive.
4. Clay Carrot Place Card Holders
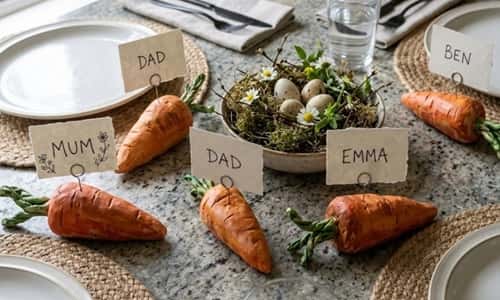
Hosting Easter brunch? These help guests find their seats.
Roll thick carrot shapes around 3 inches long. Leave the top slightly thicker.
Before drying, insert a small slit across the top using a butter knife. This slot will hold the name card later.
Add leafy tops made from green clay. Slightly messy leaves actually look charming.
Once dry, paint lightly if needed. Orange paint with faint brown dry brush makes texture pop.
Slide a small paper name card into the slit.
These easter clay activities turn into functional decorations for the table.
5. Clay Carrot Gift Tags
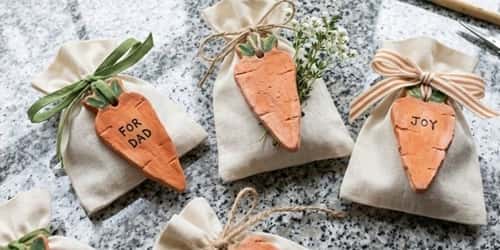
Gift tags shaped like carrots? Yes please.
Roll flat clay about ¼ inch thick. Use a small knife to cut carrot shapes. You can freehand them – perfect symmetry is overrated.
Use a straw to punch a small hole near the top.
Now add shallow carrot lines with a toothpick.
Attach tiny green clay leaves.
After drying completely, paint softly if desired. Thread ribbon through the hole.
Tie onto Easter baskets or treat bags. These cornstarch clay carrot easter crafts double as keepsake tags.
6. Clay Carrot Napkin Rings
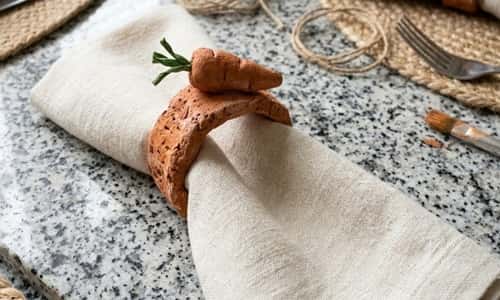
I wasn’t expecting this idea to be cute but wow.
Start by rolling clay into thin ropes about pencil thickness. Wrap the rope around a cardboard tube to form a ring shape.
Let it partially dry so it keeps the ring form.
Next sculpt a tiny carrot separately. Attach it onto the ring while clay is still slightly soft.
Add leafy top.
Once fully dry, paint orange and green.
Slide the ring onto cloth napkins. Instantly fancy without being fancy.
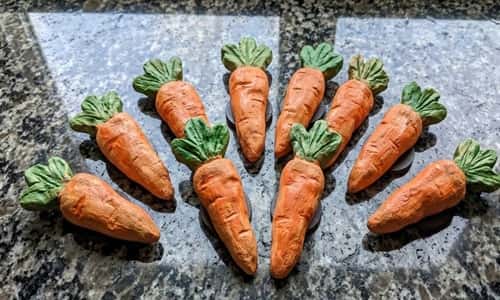
7. Easter Clay Carrot Bowl Fillers

These work beautifully as decorative fillers.
Roll several small carrot shapes in different sizes. Variety actually makes it look more natural.
Use a fork lightly to add carrot lines. Don’t press too hard though.
Add tiny clay leaf tops.
Let dry overnight.
Finished carrots should be placed in a dish with wooden beads, moss, or crushed paper grass. It creates rustic easter crafts decor for coffee tables.
8. Clay Carrot Wall Hooks
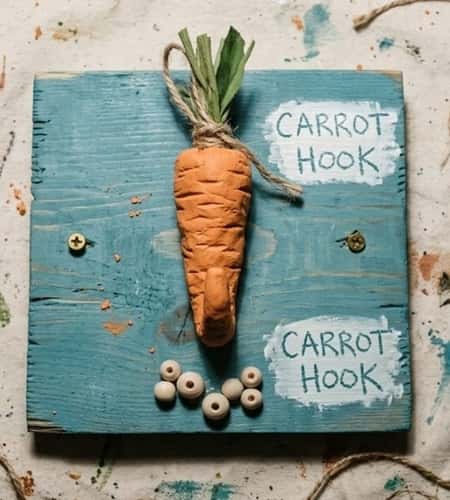
Functional crafts are my weakness.
Create thicker carrot shapes around 4 inches long. Before drying, press a small metal hook into the top back area.
Make sure clay wraps slightly around the hook base so it stays secure.
Add carrot ridges and leafy tops.
Once fully dry, paint lightly.
Mount the hook onto a wall board or wooden plank.
Now you got cute carrot crafts that can hold kitchen towels or keys.
9. Clay Carrot Garden Markers

This one mixes gardening with crafting.
Roll longer carrot shapes about 5 inches.
Before drying, insert a wooden skewer into the bottom. Leave half of the stick visible.
Add carved carrot texture lines and leafy tops.
Let dry completely.
Push the stick into garden soil or herb pots.
Suddenly your basil plant has a carrot marker. Funny right.
10. Clay Carrot Keychains
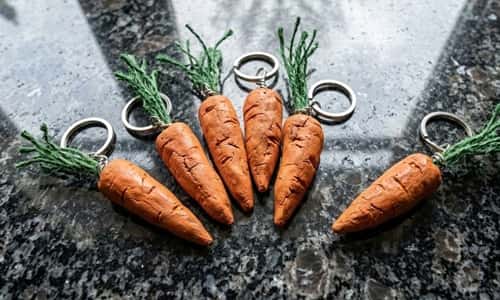
Keychains are simple cornstarch clay crafts beginners enjoy.
Roll small carrot shapes around 1.5 inches long.
Before drying, push a small eye screw into the top of the carrot.
Add tiny green leaves.
After drying, paint lightly if needed.
Attach a key ring through the eye screw.
Now your keys carry a tiny piece of Easter.
11. Clay Carrot Easter Tray Decor
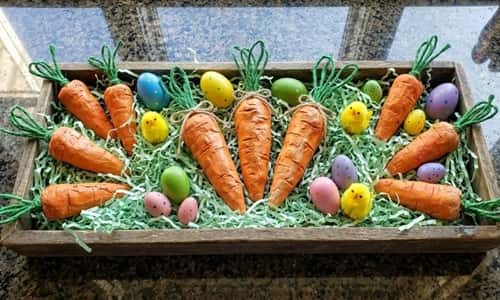
Last idea is decorative but easy.
Create several carrot shapes in different sizes. Some skinny, some chunky. Imperfection makes them look handmade.
Use toothpicks for carrot texture and attach leafy tops.
Once dry, arrange them loosely on a small wooden tray with paper grass and mini eggs.
These easter clay activities become charming centerpiece decor.
Honestly the tray doesn’t need to be perfect – rustic looks better anyway.
Final Thoughts
Cornstarch clay is interesting because it sits between craft dough and real clay.
It dries lightweight, holds detail well, and costs almost nothing to make. That’s why so many cornstarch clay crafts appear in seasonal decorating.
And carrot shapes? They are forgiving… a slightly crooked carrot still looks like a carrot.
If someone wants to start exploring easter clay activities, this material is a gentle entry point.
Just remember one thing: slow drying prevents cracks. Rushing drying process sometimes ruins the texture, and nobody wants a broken carrot after all that crafting effort.