Fall decorating doesn’t always need expensive supplies or perfect crafting skills.
Some of my favorite seasonal pieces have come from a lump of clay, a rolling pin, and a slightly messy kitchen table.
These Air Dry Clay Pumpkin Decor Ideas focus on texture, character, and handmade charm rather than perfection.
A tiny fingerprint, an uneven stem, or a slightly crooked shape often makes the finished piece feel even more special.
Whether you’re planning cozy autumn decorating, looking for pumpkin crafts using clay, or searching for creative clay activities to enjoy with kids, these projects offer something a little different from the usual pumpkin shelf decor.
1. Pumpkin Stack Cottage Totem
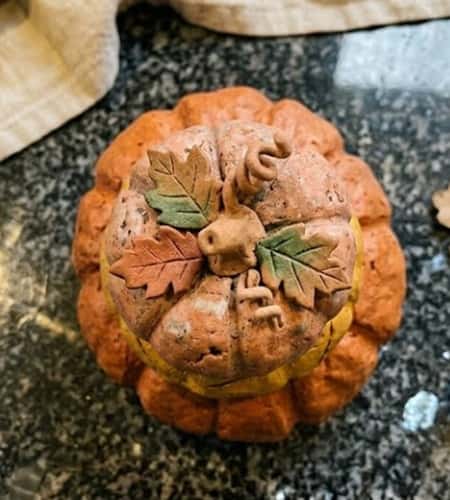
Instead of making one pumpkin, create a whimsical tower of pumpkins stacked on top of each other like a tiny storybook sculpture.
What You’ll Need
- Air dry clay
- Wooden skewer
- Clay sculpting tool
- Small bowl of water
- Acrylic paint
- Matte sealer
Step-by-Step Instructions
Start by dividing your clay into three portions. Make one large ball, one medium ball, and one small ball.
Roll each portion into a pumpkin shape. Don’t aim for perfect circles. Real pumpkins are lumpy. In actuality, the final piece grows more intriguing the more uneven they appear.
Using a clay tool, press vertical grooves around every pumpkin. Turn the pumpkin slowly as you work. Try making some grooves deeper than others.
Push a wooden skewer through the center of the largest pumpkin. Leave the skewer standing upright.
Slide the medium pumpkin onto the skewer. Then add the smallest pumpkin on top.
Now comes the fun part.
Pinch one side of each pumpkin slightly. This makes them look naturally grown instead of factory-made. It looks weird at first but trust me it works.
Create tiny clay leaves and attach them where the pumpkins meet. Use a damp finger to blend the seams.
Give everything a minimum of 24 to 48 hours to dry.
Paint the pumpkins in different muted shades such as dusty cream, faded sage, warm terracotta, or smoky orange.
Add a dry-brushed brown wash into the grooves. This brings out all the texture.
Seal and display on a mantel, bookshelf, or fall entry table.
Why it stands out: Most air dry clay pumpkin crafts focus on individual pumpkins. This stacked totem feels like a handmade folk-art sculpture.
2. Pumpkin Recipe Card Holder
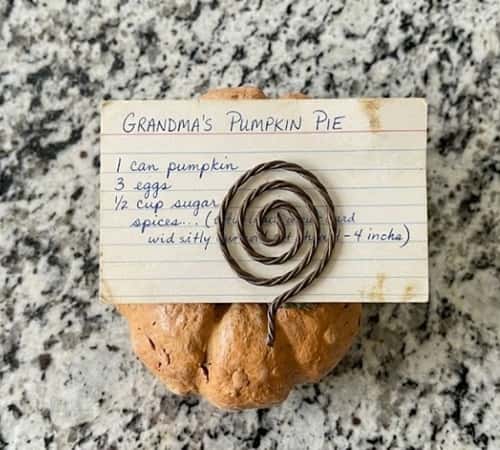
This one doubles as decor and functionality. I actually think these look adorable on a Thanksgiving table.
What You’ll Need
- Air dry clay
- Butter knife
- Small wire
- Paint
- Sealer
Step-by-Step Instructions
Roll a baseball-sized piece of clay into a squat pumpkin shape.
Flatten the bottom slightly so it sits securely.
Using a butter knife, create deep pumpkin ridges around the surface.
Cut a 4-inch piece of floral wire.
Shape the wire into a loose spiral. Think of a cinnamon roll shape.
Insert one end of the spiral into the top of the pumpkin.
Push gently until secure.
Next, roll a tiny clay stem and attach it beside the wire.
Smooth the connection with a damp fingertip.
Before drying, use a toothpick to add tiny dots and scratches across the surface. Nature isn’t smooth.
Let the pumpkin dry completely.
Paint with warm fall colors or neutral farmhouse shades.
When finished, slide recipe cards, place cards, menu cards, or family gratitude notes into the spiral.
These work beautifully for Thanksgiving gatherings, pre K fall party ideas, and even pumpkin activities preschool crafts where older children can personalize cards.
3. Pressed Wildflower Pumpkin Plaque
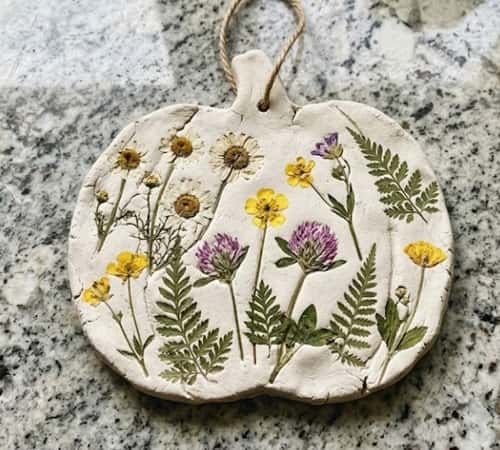
This project mixes botanical art with fall decor, creating something that feels much more expensive than it actually is.
What You’ll Need
- Air dry clay
- Rolling pin
- Dried flowers
- Round bowl
- Clay knife
- Acrylic sealer
Step-by-Step Instructions
Roll your clay until it reaches about ¼ inch thickness.
Place dried flowers and small leaves onto the surface.
Roll gently over them one more time.
Lift the flowers away carefully. They should leave detailed impressions behind.
Now place a large bowl upside down over the clay.
Cut around it.
Using a clay tool, reshape the circle into a pumpkin outline by creating gentle bumps around the edges.
Add a small stem at the top.
Use a toothpick to create subtle pumpkin ridges.
If some flower impressions disappear, don’t panic. That happens sometimes.
Allow the plaque to dry flat.
After drying, lightly paint over the impressions using watered-down acrylic paint.
Wipe excess paint away with a cloth. The color remains inside the botanical details.
Add twine to the back for hanging.
The finished piece looks almost like ceramic wall art.
This can work wonderfully alongside fall art projects for preschoolers because children love pressing leaves into clay.
4. Pumpkin Lantern With Star Cutouts
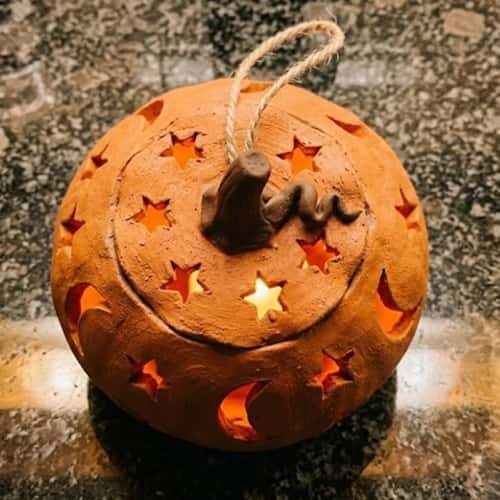
Most pumpkin lantern tutorials use actual pumpkins. This version lasts for years.
What You’ll Need
- Air dry clay
- Rolling pin
- Craft knife
- Battery tea light
- Water
- Pencil
Step-by-Step Instructions
Roll clay into a large rectangle about ¼ inch thick.
Using a pencil, draw a long strip that can wrap around itself into a cylinder.
Cut the strip carefully.
Now draw stars, moons, tiny leaves, or acorn shapes across the strip.
Cut each shape out using a craft knife.
Work slowly here. Rushing usually causes cracks.
Wrap the strip into a cylinder.
Blend the seam using water and your fingers.
Create a flat clay circle for the base.
Attach the cylinder onto the base.
Next, create a pumpkin-shaped lid.
Roll a ball of clay and flatten it into a domed pumpkin top.
Add grooves and a stem.
Leave the entire lantern to dry thoroughly.
This part takes patience. It takes longer than most air dry clay pumpkin decor ideas because the walls are thicker.
Once dry, paint in soft ivory, dusty orange, charcoal, or sage green.
Place a battery tea light inside.
The glowing cutouts create beautiful shadows at night.
Kids often loves seeing the light patterns appear on nearby walls.
5. Pumpkin Patch Name Blocks
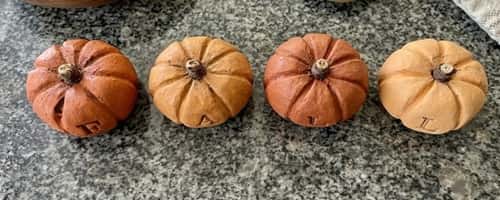
This project looks like something you would find in a small handmade gift shop, yet it’s surprisingly beginner friendly.
What You’ll Need
- Air dry clay
- Alphabet stamps or toothpick
- Rolling pin
- Acrylic paint
- Small paintbrush
- Matte sealer
Step-by-Step Instructions
Take a handful of clay and divide it into several equal portions.
Roll each portion into a small pumpkin shape about the size of a golf ball.
Press the bottoms slightly flat so they won’t wobble around your shelf later.
Using a clay tool, create pumpkin ridges all around each piece.
Now assign one letter to every pumpkin.
If you’re spelling “FALL,” you’ll need four pumpkins. For “HARVEST,” you’ll need seven.
Press alphabet stamps into the front. No stamps? A toothpick works perfectly. Draw the letters slowly and carefully.
Make tiny stems for each pumpkin and attach them with a little water.
Let everything dry completely.
Paint each pumpkin a different fall color. Think muted orange, creamy white, dusty olive, soft brown, or faded mustard.
Once dry, lightly sand any rough spots.
Line them up across a mantel, tray, or dining table.
For classrooms, these can even become part of easy preschool fall crafts where children decorate individual pumpkins with their initials.
Why it stands out: Instead of one decorative object, you create a customizable display that can spell names, seasonal words, or holiday messages.
6. Pumpkin Pocket Vase
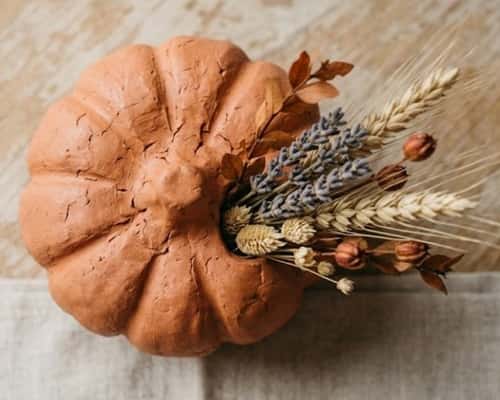
Here’s a project that blends pumpkin decor and dried floral arrangements into one piece.
What You’ll Need
- Air dry clay
- Small cup or bowl
- Clay tools
- Dried flowers
- Acrylic paint
Step-by-Step Instructions
Start with a large ball of clay.
Flatten it into a thick circle roughly half an inch thick.
Using a small bowl, cut out two matching pumpkin shapes.
One pumpkin becomes the back piece.
The second pumpkin becomes the front.
Before attaching them, gently hollow out the center area of the front pumpkin, leaving a border around the edges.
Think of it like creating a shallow pocket.
Score both pumpkin pieces along the edges using a fork.
Add a little water.
Press them together carefully, leaving the top section open.
Smooth the seam with your finger.
Add pumpkin grooves across the front and a small stem at the top.
Allow the entire piece to dry flat.
Once dry, paint it using warm autumn shades.
Insert dried wheat stems, bunny tails, preserved eucalyptus, or faux fall leaves into the pocket.
I wasn’t sure how sturdy this would be the first time I made one, but it actually holds lightweight florals really well.
This project works beautifully for seasonal entryway tables.
7. Woodland Animal Pumpkin Trio
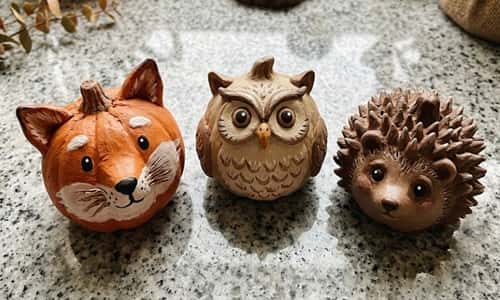
This idea combines pumpkin decor with adorable woodland creatures.
What You’ll Need
- Air dry clay
- Clay tools
- Acrylic paints
- Fine detail brush
- Water
Step-by-Step Instructions
Create three medium-sized pumpkins.
Shape each one slightly differently.
One should be round.
One should be squat.
One should be slightly taller.
After creating pumpkin ridges, choose a woodland animal theme for each pumpkin.
For example:
- Fox pumpkin
- Owl pumpkin
- Hedgehog pumpkin
Using small pieces of clay, add ears, beaks, noses, feathers, or tiny paws directly onto the pumpkin body.
Blend carefully with damp fingertips.
Try not to make everything perfectly symmetrical. Nature rarely is.
Allow the pumpkins to dry completely.
Paint the features using earthy colors.
The owl can have soft brown feathers.
The fox can have burnt orange details.
The hedgehog can feature textured brown accents.
For families with younger kids, this idea overlaps nicely with clay activities, easy toddler fall crafts, and pumpkin activities preschool crafts because children naturally enjoy creating animal characters.
8. Heirloom Velvet-Look Pumpkin Set
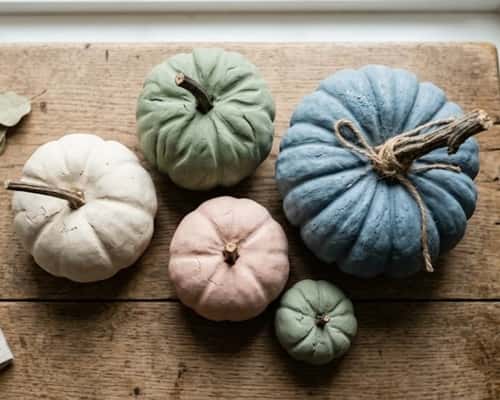
Real velvet pumpkins are everywhere. Clay pumpkins that mimic velvet texture? Much harder to find.
What You’ll Need
- Air dry clay
- Fine sponge
- Acrylic paint
- Soft matte varnish
- Clay tools
Step-by-Step Instructions
Create several pumpkins in different heirloom-inspired shapes.
Make one tall.
Make one deeply ribbed.
Make another slightly flattened.
Before the clay begins drying, gently dab the surface with a clean sponge.
Do not press hard.
The goal is to create thousands of tiny texture marks.
As the sponge lifts away, it leaves behind a subtle fabric-like surface.
Continue around the entire pumpkin.
Add realistic stems with natural bends and twists.
Allow everything to dry.
Now paint using muted heirloom colors:
- Dusty blue
- Sage green
- Pale cream
- Soft blush
- Smoky gray
Apply paint in thin layers rather than one heavy coat.
When finished, seal with an ultra-matte sealer.
The result creates an illusion of soft fabric from a completely hard clay surface.
Honestly, photos barely capture how interesting these looks in person.
9. Pumpkin Cottage Tealight Village
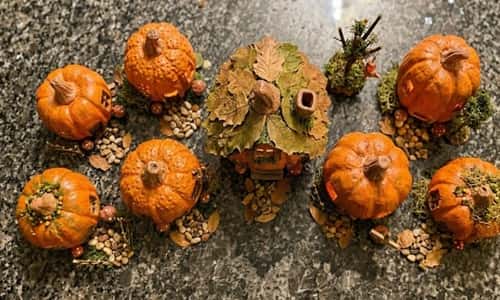
This one is probably the most unexpected project in the entire collection. Instead of decorating a pumpkin, you’re turning pumpkins into tiny houses.
What You’ll Need
- Air dry clay
- Craft knife
- Pencil
- Clay tools
- Battery-operated tealight
- Acrylic paint
- Sealer
Step-by-Step Instructions
Create three pumpkins in different sizes.
Make them large enough to fit a small battery tealight underneath.
Allow the pumpkins to firm up for about 2–3 hours. They should still be workable but not squishy.
Using a pencil, lightly sketch tiny cottage windows onto the pumpkins.
Draw little arched doors, heart-shaped windows, and even a round attic window if you’d like.
Carefully cut out the shapes using a craft knife.
Work slowly. One rushed cut can crack the wall.
Add tiny clay details around the openings. Create miniature shutters, climbing vines, mushrooms, or flower boxes.
Make twisted stems on top that resemble whimsical chimneys.
Leave everything to dry fully.
Paint the pumpkins in muted storybook colors. Cream, faded pumpkin orange, sage green, and soft brown work beautifully.
Place a battery tealight underneath each pumpkin.
At night, the windows glow like a tiny woodland village.
Kids absolutely love these. Honestly, adults do too.
10. Pumpkin Quilt Tile Wall Decor

Quilts and pumpkins aren’t usually paired together, which is exactly why this idea feels fresh.
What You’ll Need
- Air dry clay
- Rolling pin
- Ruler
- Clay knife
- Acrylic paint
- Twine
Step-by-Step Instructions
Roll clay to roughly ¼ inch thickness.
Using a ruler, cut several equal-sized squares.
Aim for six to nine tiles.
On each tile, create a different pumpkin-inspired pattern.
For example:
- Chevron pumpkin
- Patchwork pumpkin
- Sunflower pumpkin
- Leaf-covered pumpkin
- Geometric pumpkin
- Harvest vine pumpkin
Use clay tools to carve the designs directly into the surface.
Keep some patterns simple and others more detailed.
Once all tiles are complete, allow them to dry flat.
Paint every tile using a coordinated autumn palette.
Try to keep the colors related so the collection feels intentional.
After drying, thread twine through small holes at the top of each tile.
Hang them vertically or arrange them as a wall gallery.
This project can even inspire older children working on fall art projects for preschoolers, especially when simplified into larger shapes.
11. Pumpkin Memory Dish
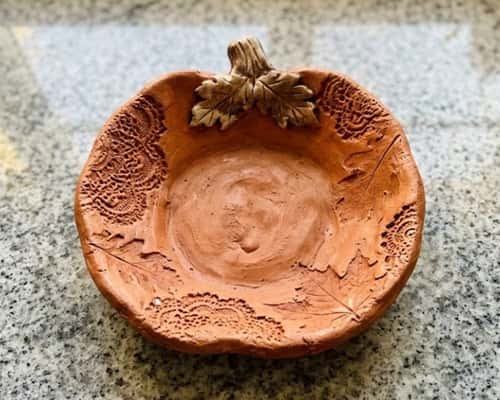
This project turns seasonal decor into something surprisingly meaningful.
What You’ll Need
- Air dry clay
- Rolling pin
- Small bowl
- Stamps, leaves, lace, or textured fabric
- Acrylic paint
- Matte sealer
Step-by-Step Instructions
Roll clay into a circle about ¼ inch thick.
Place the clay over an upside-down bowl.
Gently shape it into a shallow dish.
Now comes the personal part.
Press meaningful textures into the clay.
Maybe it’s grandma’s lace.
Maybe it’s a favorite sweater texture.
Maybe it’s a leaf collected during a family walk.
Create a pumpkin outline in the center.
Add pumpkin ridges using a clay tool.
Allow the dish to dry while resting on the bowl.
Once dry, remove carefully.
Paint lightly so the textures remain visible.
Use antiquing wax or watered-down brown paint to settle into the impressions.
The final dish can hold jewelry, keys, acorns, or handwritten seasonal notes.
There is something about preserving little memories in clay that feels extra special.
12. Harvest Pumpkin Crown Centerpiece
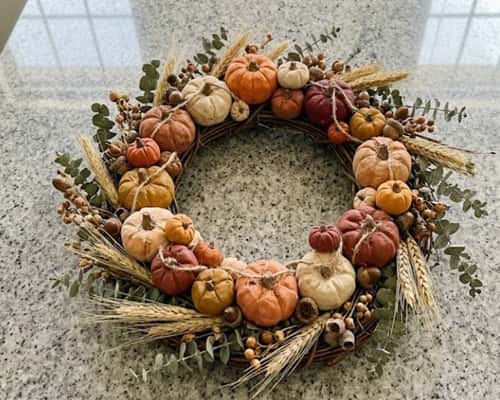
For the final project, let’s go bigger.
This centerpiece creates a dramatic fall display without requiring advanced sculpting skills.
What You’ll Need
- Air dry clay
- Rolling pin
- Clay tools
- Acrylic paint
- Faux berries
- Dried wheat stems
- Preserved eucalyptus
Step-by-Step Instructions
Create six to eight small pumpkins.
Make each pumpkin slightly different.
Some should be tall.
Others should be squat.
A few can even be crooked.
Perfect pumpkins can look boring sometimes.
Allow the pumpkins to partially dry until firm enough to hold their shape.
Next, create a thick circular clay ring.
Think of it as the base of a wreath.
Attach all pumpkins around the ring.
Overlap them slightly so the arrangement feels natural.
Fill gaps using clay leaves, acorns, tiny gourds, and twisting vines.
Blend all attachment points carefully.
Let the entire centerpiece dry completely.
Paint using a cohesive color palette.
Cream and sage create a farmhouse look.
Burnt orange and mustard feel more traditional.
After sealing, tuck dried wheat, eucalyptus, and faux berries between the pumpkins.
Place the finished crown around a candle, lantern, or decorative bowl.
The display instantly becomes the focal point of a dining table.
It look far more complicated than it actually is.
Why it stands out: Rather than decorating with one pumpkin, you create an entire sculptural centerpiece that changes the feel of a room.
Final Thoughts
One thing I’ve noticed after making dozens of seasonal clay projects is that the pieces people compliment most are rarely the perfect ones.
The slightly uneven pumpkin, the fingerprint that accidentally stayed behind, or the stem that bends a little too much often gives handmade decor its personality. That’s why air dry clay pumpkin decor remains such a popular fall craft.
Clay records tiny moments of the maker’s hand in a way manufactured decor never can. If you’re creating these for yourself, a classroom, easy preschool fall crafts, or even seasonal gifts, don’t chase perfection. Chase character.
The pumpkins with quirks are usually the ones people remember long after fall has passed.