Camping and clay might sound like an unusual pair at first, but they actually work together surprisingly well.
Whether you’re planning a backyard campout, organizing camping crafts for kids, or looking for relaxing adult crafts inspired by the outdoors, these camping clay projects bring a little wilderness to your craft table.
I wanted these ideas to feel different from the usual clay crafts you see everywhere.
Instead of generic animals and mushrooms, you’ll find miniature camp scenes, tiny survival-inspired creations, and rustic diy clay decor pieces that capture the feeling of sleeping under the stars.
Most projects use air dry clay, though a few can also be adapted for polymer clay crafts if you prefer a more durable finish.
1. Mini Campfire Memory Stone
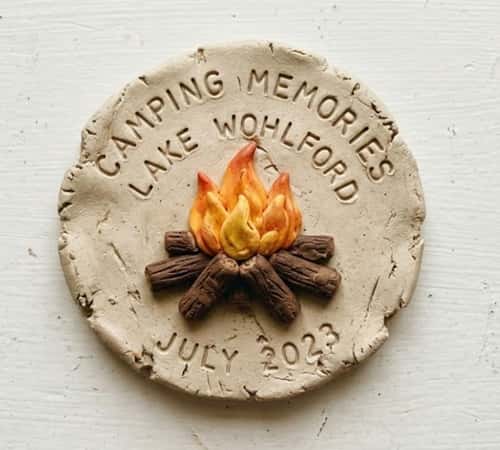
This project combines a campfire diy theme with a keepsake that can sit on a shelf long after the camping trip ends.
Start with a fist-sized ball of air dry clay. Roll it into a thick oval shape about half an inch thick. Flatten the top gently using your palm.
Now create the miniature campfire. Roll several tiny clay logs that are about the length of your thumbnail. Don’t worry if they look uneven. Real firewood ain’t perfectly cut either.
Arrange the logs in a crisscross pattern directly in the center of the stone. Press them lightly so they stay attached.
Next, make flames. Roll tiny teardrop shapes in three sizes. Place the largest flame in the middle and overlap smaller flames around it. Slightly bend the tips to make them look like moving fire.
Use a toothpick to add bark texture onto the logs. Tiny scratches and grooves make a huge difference.
Around the edge of the stone, use a pencil tip to write a camping date, family name, favorite campsite, or a short phrase such as “Under the Stars.”
Allow the piece to dry for 24 to 48 hours depending on thickness.
Once dry, paint the logs dark brown, the flames yellow, orange, and red, and the stone a natural gray or sandy beige.
Seal with a matte craft sealer if desired.
The finished piece works as a paperweight, shelf decoration, or camping trip memory marker.
2. Tiny Lantern Charm for Backpacks
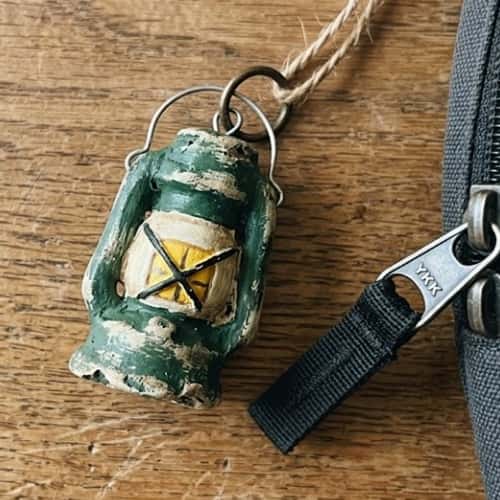
A lot of camping clay projects focus on tents and trees. This one celebrates something campers actually use every night.
Begin by rolling a clay ball about the size of a large grape.
Shape it into a small lantern body. Slightly flatten the bottom so it can stand upright.
Take a toothpick and carefully press a vertical groove down each side. These grooves imitate the metal framing found on old lanterns.
Create a tiny ring for the handle. Roll a very thin clay snake and curve it into a loop.
Attach the handle to the top using a tiny amount of water if you’re working with air dry clay.
Now comes the fun part.
Press a small circle into the center front of the lantern to represent the glass section. You dont need perfect symmetry here because handmade charm is part of the appeal.
Poke a tiny hole through the top handle before drying if you plan to hang it from a backpack zipper.
Allow the clay to dry completely.
Paint the lantern black, bronze, silver, or vintage green. Add a touch of pale yellow inside the glass area to imitate a glowing light.
Thread a small cord through the hole.
Kids love attaching these to camping bags, while adults often use them as decorative zipper pulls.
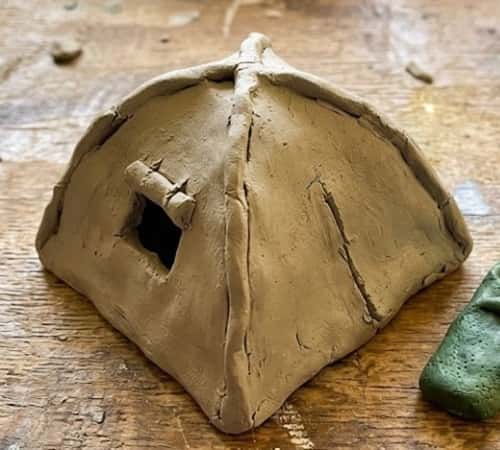
3. Forest Ranger Tent With Secret Message Compartment
This project feels like part camping craft, part treasure box.
Roll a large piece of clay into a thick rectangle approximately five inches long.
Shape it into a simple A-frame tent by folding the clay into a triangle profile. Leave the bottom hollow.
Smooth the outer surfaces gently with damp fingers.
Now create the hidden compartment.
Before the clay hardens, hollow out a small cavity underneath the tent using a spoon handle or your fingers.
This hidden area can hold tiny notes, wishes, camping memories, or secret messages.
Roll thin strips of clay and attach them to the outside to create tent seams.
Add small clay stakes at the corners.
For extra personality, create a tiny rolled sleeping bag and place it beside the tent.
A small clay lantern or camp mug can also be added if desired.
Let everything dry thoroughly.
Paint the tent in classic camping colors such as forest green, mustard yellow, tan, or rustic orange.
Add subtle weathering with dry-brushed brown paint around the edges. It makes the tent look like it has survived a few adventures.
One thing I noticed when making these is that the slightly crooked tents often looked more charming than the perfect ones.
Slip a handwritten message into the compartment and display the piece on a desk or bookshelf.
4. Campground Trail Marker Stones
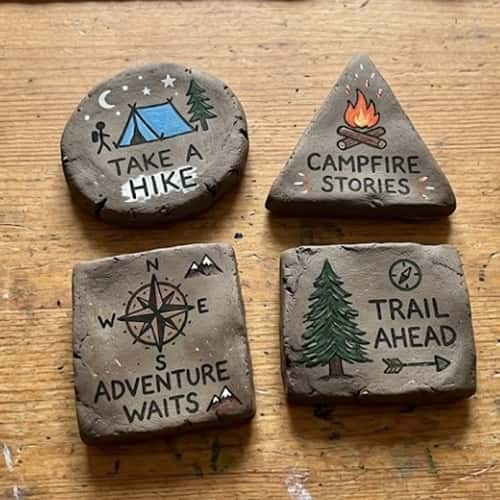
Ever noticed those little trail markers hikers follow through the woods? This project turns them into miniature clay keepsakes that look surprisingly realistic.
Start by taking a handful of air dry clay and dividing it into three or four portions.
Roll each portion into a rough stone shape. Avoid making perfect circles. Real rocks rarely cooperate like that.
Flatten one side slightly so each marker sits securely on a table.
Using your fingers, pinch random edges and dents into the clay. Those imperfections help sell the illusion later.
Now choose a camping symbol for each marker. You might create a tiny tent, campfire, pine tree, hiking boot, compass arrow, or mountain silhouette.
Roll small pieces of clay and attach them to the surface to form the symbols. Press firmly but gently.
Use a toothpick to add tiny cracks and stone texture around the edges.
Let the markers dry completely.
Once dry, paint the rocks in natural shades such as gray, sandstone, or weathered brown.
Paint the raised symbols using bright camping trail colors like white, yellow, blue, or red.
For extra realism, lightly dry-brush darker paint around the edges.
The finished markers can decorate bookshelves, desks, plant pots, or even become game pieces for family camping-themed activities.
This one works great for both kids and adults. And honestly, nobody makes the exact same set twice.
5. Moonlit Campsite Tealight Holder
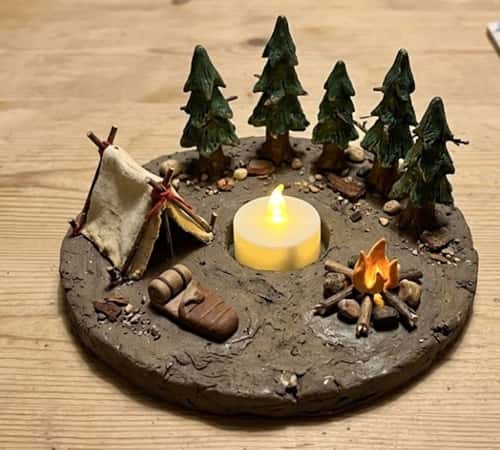
This project creates a tiny campsite scene that glows when a battery-operated tealight is placed inside.
Begin with a large piece of air dry clay about the size of a tennis ball.
Flatten it into a thick circle roughly six inches wide.
Press a battery-operated tealight into the center to create a shallow circular indentation. Remove it afterward.
Now build the campsite around that center space.
Create a miniature tent by forming two thin triangular walls and connecting them at the top.
Position the tent beside the tealight opening.
Roll several tiny logs and arrange them into a campfire ring.
Make miniature stones around the fire by rolling pea-sized clay balls.
Add a few pine trees by stacking cone-shaped clay pieces.
You can even create tiny clay fairies hiding behind the trees if you enjoy whimsical clay activities. A tiny touch like that makes people smile when they discover it later.
Allow everything to dry thoroughly.
Paint the base earthy brown or forest green.
Paint the tent, campfire, and trees in natural colors.
Once finished, place a battery-operated tealight in the center.
When lit, the glow spreads across the tiny campsite scene and creates a cozy effect.
It looks far more expensive than it actually is.
6. Woodland Fairy Campsite Hideaway
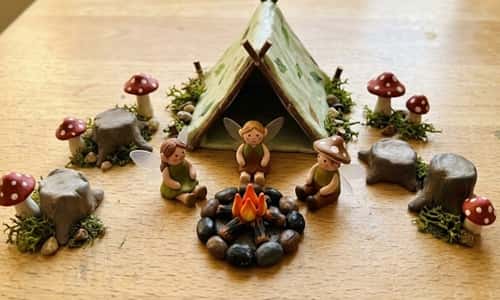
Most people have seen a clay fairy house before. But what if the fairies went camping too?
Start with a thick oval base made from air dry clay.
Smooth the surface with slightly damp fingertips.
Create a tiny tent instead of a traditional fairy house.
Roll two flat triangles and connect them into a miniature camping shelter.
Now build a tiny campsite around it.
Create a campfire diy setup using miniature logs and flames.
Add tiny mushrooms around the campsite.
Roll several very small figures to create clay fairies sitting near the fire. Don’t overcomplicate the details. Tiny shapes often look better than overly detailed attempts.
Use a toothpick to create wings by pressing simple vein patterns.
Make tiny tree stumps, pebbles, and woodland details throughout the scene.
Some people gets frustrated during this stage because the pieces are so small. Take your time and work slowly.
Allow everything to dry fully.
Paint the campsite using muted forest colors rather than bright cartoon shades.
Add touches of moss green, bark brown, mushroom red, and soft cream.
A light coat of matte sealer helps protect the tiny details.
This project blends camping crafts with fantasy elements and always becomes a conversation piece.
7. Mini Survival Backpack Sculpture
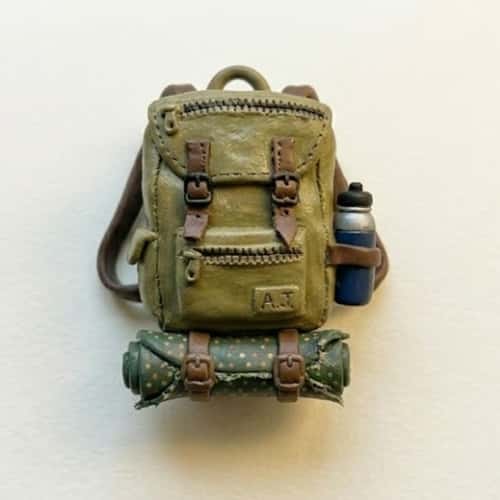
When people think of camping clay projects, they usually jump straight to tents and campfires. A backpack tells a bigger story. It suggests adventure before the adventure even begins.
Start by rolling a ball of air dry clay roughly the size of a golf ball.
Shape it into a rounded rectangle. This becomes the main body of the backpack.
Gently flatten the back side so the sculpture sits upright without wobbling.
Now roll two thin clay strips. Attach them vertically to create shoulder straps.
Roll another strip and place it across the top as the carrying handle.
Next, create a front pocket. Flatten a small piece of clay into a rectangle and attach it to the lower front section.
Use a toothpick to add zipper lines and stitching details. Tiny details like this makes the project look surprisingly realistic.
Want to make it look packed for a weekend trip?
Roll miniature items such as a sleeping mat, flashlight, water bottle, or rolled blanket. Attach them to the sides and top of the backpack.
Allow everything to dry completely.
Paint the backpack in camping-inspired colors like forest green, navy blue, tan, or burnt orange.
Use slightly darker paint inside the grooves to highlight the straps and pockets.
If desired, add a small name tag with a campsite name or family camping trip year.
This project works wonderfully for both children and adults because it feels realistic without being difficult.
8. Constellation Camp Map Plaque
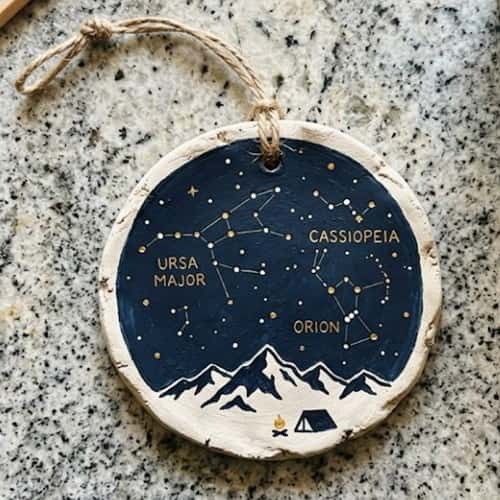
Some of my favorite camping memories involve staring at the night sky long after the campfire burns low. This project captures that feeling.
Begin by rolling out a slab of air dry clay about one-quarter inch thick.
Cut it into a rectangle or rounded plaque shape.
Smooth the edges using damp fingers.
Choose a favorite constellation such as Orion, Ursa Major, Cassiopeia, or the Southern Cross.
Lightly sketch the star pattern onto the clay using a pencil.
Use a straw, pencil tip, or clay tool to create small star impressions along the pattern.
Connect the stars using shallow engraved lines.
Now add camping elements below the night sky.
Create tiny silhouettes of pine trees, mountains, tents, or a campfire scene along the bottom edge.
Press these shapes into the clay or build them using small clay pieces.
At the top, write a phrase like “Camp Under the Stars” or the name of a memorable camping location.
Let the plaque dry completely.
Paint the background dark navy or deep charcoal.
Use white, silver, or pale gold paint for the stars.
Highlight the campsite silhouettes in darker earthy shades.
There is something oddly relaxing about this one. Maybe it’s the stars. Maybe it’s the memories attached to them.
Attach twine through two small holes if you want to hang the plaque on a wall.
9. Campfire Cocoa Mug Ornament
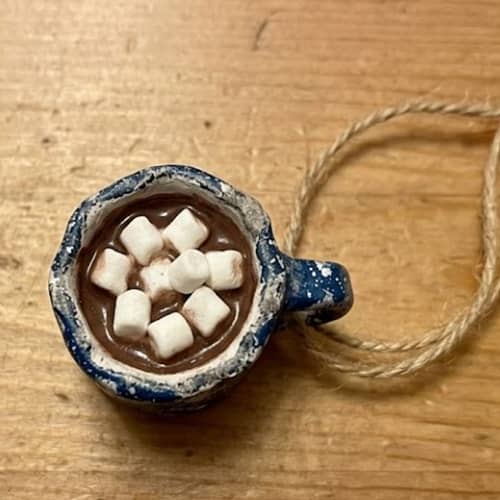
Nothing says camping quite like sipping hot cocoa while sitting beside a crackling fire.
This project transforms that cozy feeling into a miniature ornament.
Start by rolling a clay ball about the size of a walnut.
Flatten the bottom slightly.
Use your thumb to press into the center, creating a mug shape.
Carefully thin the walls by gently pinching outward.
Roll a very thin clay snake and curve it into a mug handle.
Attach the handle securely to one side.
Now create the cocoa.
Roll a small flat circle and place it inside the mug opening.
Add miniature marshmallows by rolling tiny cube-like pieces of clay.
You don’t gotta make every marshmallow identical. Real ones shift around anyway.
For extra camping charm, create a tiny clay stick resting across the top with an even tinier marshmallow attached.
Poke a hole near the handle if you plan to hang it as an ornament.
Allow the piece to dry thoroughly.
Paint the mug in rustic camping colors such as red enamel, deep green, or vintage blue.
Paint the cocoa rich brown and the marshmallows creamy white.
Finish with a satin sealer for a slightly glazed appearance.
This tiny ornament looks adorable on a camping-themed tree, backpack charm, memory board, or diy clay decor display.
10. National Park Passport Stamp Clay Tile

If you’ve ever collected passport stamps at national parks, hiking trails, or campgrounds, this project turns that idea into a handmade keepsake. It feels a little like scrapbooking and a little like clay crafts.
Start by rolling out a slab of air dry clay about one-quarter inch thick.
Cut it into a rectangle roughly the size of a postcard.
Smooth the edges using your fingertips or a damp sponge.
Choose a camping destination, national park, state park, or even a favorite family campsite.
Using a pencil, lightly sketch a simple badge or stamp design in the center. Think mountains, tents, pine trees, campfires, lakes, or hiking trails.
Now use a toothpick or clay tool to carefully engrave the design into the clay.
Create a border around the edge to mimic the look of an official travel stamp.
Add the year, location name, or a memorable camping phrase.
You can even include GPS coordinates if you want something extra personal.
Let the tile dry fully.
Once dry, paint the recessed areas darker and wipe excess paint away from the surface. This helps the engraved design stand out.
Apply a matte sealer if desired.
The finished tile looks great displayed on a shelf or incorporated into a larger collection of camping clay projects.
And honestly, every camping trip could become a new tile.
11. Campground Story Dice Set
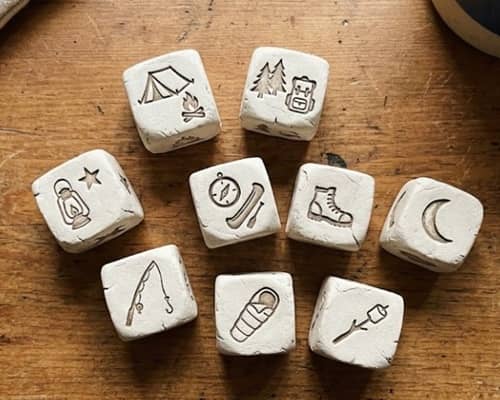
This project mixes camping crafts with imagination.
The result is a set of storytelling dice that can be used around a real campfire, during road trips, or on rainy afternoons inside a tent.
Start by dividing air dry clay into six equal pieces.
Roll each piece into a cube shape.
Don’t obsess over perfection. Slightly uneven dice often look more handmade and charming.
Allow the cubes to firm up slightly for about 20 minutes.
Now create simple camping-themed symbols on each side.
Ideas include:
- Tent
- Campfire
- Bear
- Lantern
- Canoe
- Pine tree
- Backpack
- Marshmallow
- Mountain
- Fishing rod
- Owl
- Compass
Use a toothpick to engrave the symbols into the clay.
Keep the designs simple and bold.
Allow the dice to dry completely.
Paint each engraved icon in a contrasting color.
Once dry, seal the dice for durability.
To play, roll three or more dice and create a camping story using the symbols that appear.
One roll might show a canoe, owl, and campfire. Another might create a completely ridiculous adventure. Thats half the fun.
Kids enjoy the creativity, while adults often turn it into a family storytelling game.
This project transforms ordinary clay activities into something people actually use again later.
12. Pocket Campfire Recipe Holder
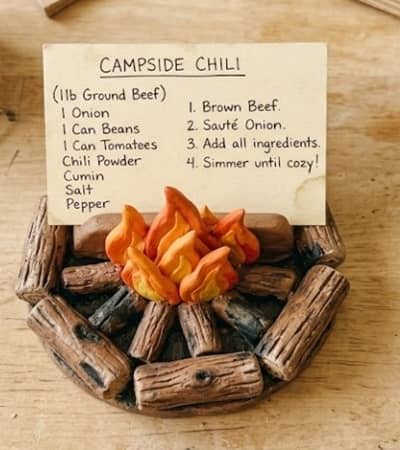
Most campers have a favorite campfire meal. This project creates a miniature holder designed to display recipe cards, meal ideas, or cooking reminders.
Begin with a thick oval piece of air dry clay about four inches long.
Flatten the bottom so it sits steadily on a table.
Now build a miniature campfire on top.
Roll several tiny clay logs and arrange them in a stacked campfire diy pattern.
Attach them securely to the base.
Create flames using teardrop-shaped clay pieces and position them between the logs.
Before the clay dries, carefully cut a narrow slot behind the campfire.
The slot should be wide enough to hold an index card or folded note.
Smooth any rough edges around the opening.
Use a toothpick to add bark texture to the logs.
Allow everything to dry completely.
Paint the logs weathered brown and the flames in layered yellow, orange, and red shades.
For extra detail, dry-brush a little black paint onto parts of the logs to mimic charred wood.
Slide a favorite camping recipe into the holder.
Pancakes, foil packet dinners, campfire nachos, or s’mores recipes all work perfectly.
The project doubles as diy clay decor and a practical campsite-inspired kitchen accessory.
I wasn’t expecting this one to be so useful, but it actually earns a permanent spot on a countertop.
Final Thoughts
One thing many people overlook with camping clay projects is that they can become a visual journal of outdoor experiences.
A tiny clay tent, campfire, or trail marker may seem simple today, but years later it can trigger memories that photos sometimes miss.
That’s because handmade objects carry the small details of the moment they were created.
If you’re crafting with kids, consider adding dates, locations, or funny trip memories directly into the clay.
Over time, those pieces become more than camping crafts. They become a collection of stories you can actually hold in your hands.