There is a distinct magic in miniature sculpting.
Transforming a formless block of clay into a beautiful polymer clay hamster that looks like it could twitch its nose and scurry off your palm requires more than just basic shaping – it requires an understanding of anatomy, depth, and color gradients.
While cartoonish clay figures rely on simplified shapes, crafting a realistic miniature hamster demands strategic structural mapping.
Every crease determines where the fat sits, and every brush stroke of pigment defines the underlying muscle and coat pattern.
Tools Needed To Make Polymer Clay Hamster
Before pulling off your clay, ensure your workstation is immaculate. Dust is the mortal enemy of white polymer clay.
- Polymer Clay: Premium white clay (such as Premo or Fimo Professional) for the body, and a tiny amount of pale pink/peach clay for the paws and nose.
- Sculpting Tools: A flat metal spade/canine tool, a fine metal pin tool, a micro ball-stylus, and a flexible craft blade.
- Eyes: Two 1mm to 2mm glossy black glass beads or glass eyes on pins.
- Coloring Mediums: High-quality chalk pastels (black, dark grey, and soft pink) and a hobby knife to scrape them into powder.
- Brushes: A soft, dry, round-tip blending brush and a fine-detail spotter brush.
- Finishing: Polyurethane or acrylic high-gloss varnish.
- Curing: A dedicated craft oven or conventional oven with an oven thermometer.
Quick Information
- Craft Type: Polymer Clay Animal Craft
- Difficulty: Intermediate
- Time Required: 45 to 60 Minutes
- Drying/Baking Time: 30 Minutes
- Age Recommendation: 10+ with supervision
- Mess Level: Low
Instructions To Make Polymer Clay Hamster
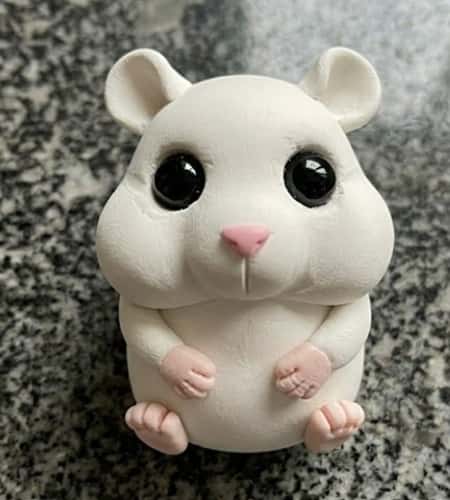
Let’s try to create a similar version Of this Polymer Clay Hamster
Step 1: Structural Mapping
The foundation of a realistic miniature is establishing proper proportions before adding any facial features or limbs.
If the core shape is incorrect, the final piece will look like an abstract blob rather than a rodent.
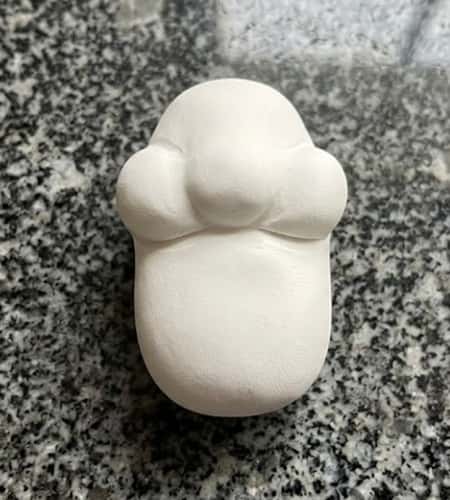
- Condition and Roll the Core: Take a piece of pure white polymer clay and condition it thoroughly between your palms until it is completely pliable and free of air bubbles. Roll it into a smooth, plump oblong capsule shape, roughly the size of a large almond.
- Isolate the Head and Torso: Hold the capsule horizontally. Take your flat metal spade tool and press a shallow indentation crosswise about one-third of the way down from the top. This ridge defines the neck area, separating the head from the main body.
- Flair the Cheek Pouches: Real hamsters are defined by their expansive cheek pouches. Using the flat side of the spade tool, press down firmly on either side of the muzzle area. This action forces the clay outward, creating full, wide, three-dimensional cheeks that frame the lower face.
Step 2: Defining the Muzzle and Setting the Sockets
With the main mass of the head established, you need to transition the clay from a smooth capsule into a complex facial structure.
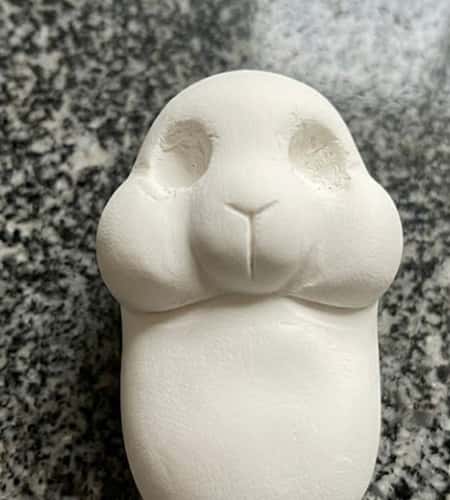
- Score the Philtrum: Hamsters have a distinct split upper lip. Take your fine metal pin tool and score a precise, vertical line down the dead center of the front muzzle. This forms the philtrum.
- Carve the Chin Recess: Immediately below the philtrum line, use the edge of the spade tool to press a tiny horizontal indentation under the snout. This defines the lower jawline and chin, giving the face a realistic profile projection.
- Implant the Eye Sockets: Position your micro ball-stylus tool just above the outer boundary of the cheek pouches. Press directly into the clay to create two perfectly symmetrical, deep, round sockets. Pressing these sockets creates a natural “brow ridge” above them, which is essential for realistic eye placement.
Step 3: Integrating Facial Features and Limbs
This stage transitions the piece from a structural model to a character. The key here is scale; the limbs and ears must match the micro-proportions of a real dwarf hamster.
- Seat the Eyes: Take your two glossy black glass beads. Using fine tweezers, drop them directly into the pre-made sockets. Press them back firmly into the clay. The displaced clay around the edges will form natural eyelids.
- Attach the Nose: Roll a microscopic speck of pale pink clay into a soft triangle. Place it directly at the top of the philtrum line and tap it down gently with a silicone color shaper so it fuses seamlessly without losing its triangular form.
- Sculpt and Place the Ears: Cut two identical, tiny scoops of white clay using your spade tool. Roll them into balls, flatten them slightly against your finger, and cup them inward. Secure them to the top corners of the head, blending the back bases into the skull.
- Form and Segment the Paws: Roll out a very thin “snake” of pale pink clay and slice it into four equal segments. Take the first two segments and press them directly underneath the front cheek pouches to serve as the front paws. Place the remaining two at the lower rear of the body for the hind feet. Use the razor edge of your craft blade to tap two tiny vertical lines onto each paw, instantly defining the delicate toes.
Step 4: Hyper-Realistic Coat Shading

Realism is achieved through depth of color. Monochromatic white clay looks artificial; applying chalk pastel gradients mimics the natural density and variance of real animal fur.
- Prepare the Pigment Powder: Take a premium black and dark grey chalk pastel block. Run a clean craft blade along the edge to scrape off a fine, ultra-soft powder onto a clean sheet of paper or a grid pallet.
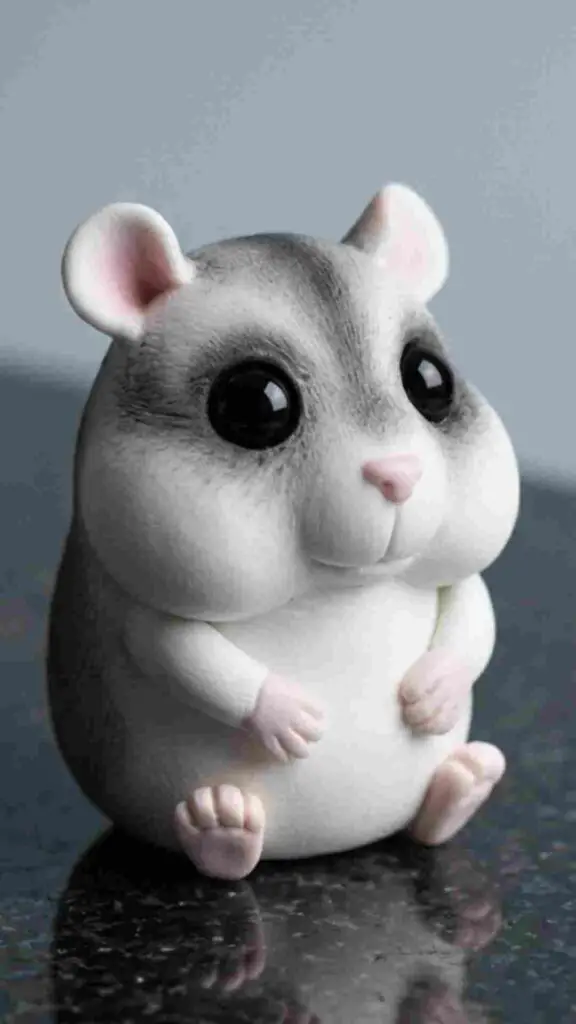
- Apply the Dorsal Stripe: Dip a completely dry, soft-bristled round paintbrush into the dark grey pigment. Tap off the excess. Starting from the top of the head between the ears, sweep the brush straight down the center of the spine in a continuous motion. This creates the classic, soft-edged dorsal stripe found on Djungarian or Winter White hamsters.
- Blend the Facial Radiance: Use the residual powder left on the brush to lightly shade the outer crown of the head and the outer edges of the eye sockets. Switch to a clean, fluffier brush to softly blend the grey pigment downwards around the flank boundaries, ensuring a flawless gradient into the white underbelly.
- Inject Vitality with Pink Accents: Take a clean cotton swab and dip it into a small amount of bright pink pastel dust. Lightly swirl the swab inside the cup of the ears to create a warm, fleshy depth. Dab the remaining pink pigment onto the snout around the nose and over the raw pink paws to blend them naturally into the white body fur.
Step 5: Precision Curing
The final phase transforms the delicate, malleable clay into a durable, glass-featured heirloom.
- The Bake: Place the shaded hamster on a ceramic tile lined with parchment paper to prevent shiny flat spots on the bottom. Bake in a preheated oven according to your specific clay brand’s instructions (typically 275°F / 135°C for 30 minutes per 1/4 inch of thickness). Use a standalone oven thermometer to verify the temperature; spikes can scorch your delicate pastel work.
- The Wet-Look Polish: Once the piece is baked and completely cooled to room temperature, open your high-gloss varnish. Dip a micro-detail spotter brush into the glaze and carefully paint a single, precise layer over the black glass eyes and the tiny pink nose. Avoid getting glaze on the surrounding pastel-shaded body clay. This optical layer mimics natural moisture, giving the piece an unmistakable spark of life.
Final Thoughts
Look, the common mistake amateurs make is relying on paint after baking, which creates a thick, artificial shell that obscures your hard-earned sculpting details.
By utilizing raw chalk pastels on unbaked clay, the pigments bond directly into the pores of the medium, creating an incredibly soft, organic gradient that perfectly mimics real fur.
Furthermore, never underestimate the power of contrast: leaving the body entirely matte while applying a high-carat gloss exclusively to the eyes and nose tricks the human brain into perceiving life.
Apply these precision principles to your next sculpt, and watch your miniatures truly come alive.