Halloween decorations don’t always need bright orange plastic and store-bought signs.
Some of my favorite pieces have a rough, aged look that feels like they came from an old farmhouse attic or a forgotten harvest festival.
That’s exactly why primitive clay halloween decor has become so interesting lately.
It mixes rustic charm with handmade imperfections, creating decorations that feel cozy, spooky, and surprisingly easy to make.
Whether you’re searching for halloween pottery ideas, beginner clay sculpting ideas, or unique diy halloween clay ideas, these projects focus on simple shapes, earthy finishes, and old-world character.
The best part? Every tiny fingerprint and uneven edge actually makes the finished piece look better.
1. Weathered Pumpkin Patch Clay Bowl
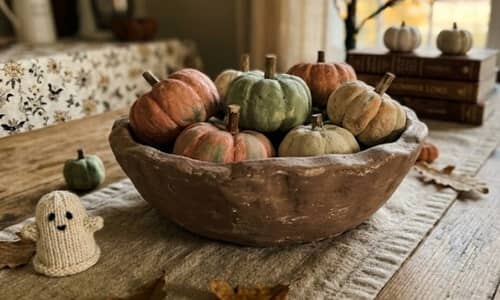
This project creates a shallow decorative bowl filled with tiny primitive pumpkins. It looks like something discovered at an old country harvest market.
Start by rolling a softball-sized piece of air-dry clay into a thick circle about 7 inches wide.
Don’t worry if the edges aren’t perfectly round. Primitive clay halloween decor looks better when it feels handmade.
Place the clay circle over an upside-down mixing bowl covered with plastic wrap. Gently press it into shape. Let it sit for about 20 minutes until the clay firms up slightly.
Now pinch and roughen the edges using your fingers. Create tiny dents and uneven spots. Smooth bowls are nice, but this isn’t one of them.
For the pumpkins, roll 8 to 12 small clay balls. Flatten each one slightly. Use a wooden skewer to press pumpkin grooves from top to bottom.
Make every pumpkin different. Some should look crooked. Some should look squashed. Real pumpkin patches ain’t perfect.
Create stems using tiny clay cylinders. Attach them with a small amount of water.
Allow all pieces to dry completely for 24 to 48 hours.
Paint the bowl with a mixture of matte brown and gray paint. Wipe most of it away using an old cloth. This creates an aged finish.
Paint the pumpkins in muted orange, dusty cream, faded green, and antique beige instead of bright Halloween colors.
Glue the pumpkins into the bowl after everything dries.
The finished piece works beautifully on an entry table, fireplace mantel, or dining centerpiece.
2. Crooked Moon Lantern With Cut-Out Stars
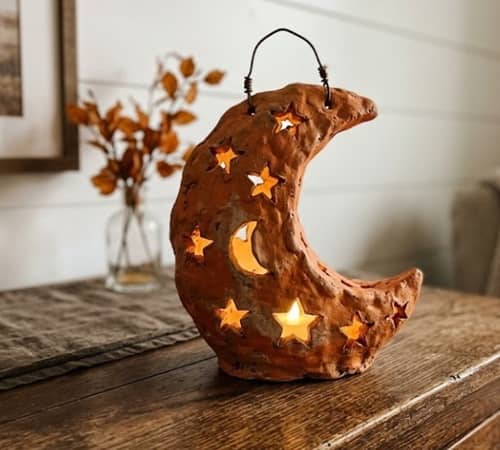
Among all halloween sculpture ideas, this one becomes a conversation starter almost instantly.
Take a large piece of clay and roll it to about ¼ inch thickness. Draw a crescent moon shape using a pencil.
Cut the shape carefully with a craft knife. Don’t make the moon perfectly symmetrical. A slightly awkward moon actually feels older and more mysterious.
Roll another long strip of clay. Attach it around the outer edge to create thickness.
Using a drinking straw, punch various star-shaped openings. If you don’t have star cutters, simply create random holes. It still looks fantastic.
Press tiny texture marks using an old toothbrush. This gives the clay surface a weather-beaten appearance.
Create a flat base and attach the moon securely.
Before drying, place a battery-operated tea light behind it temporarily to check how the openings glow.
Leave it to dry completely.
Paint with layered washes of charcoal gray, brown, and a tiny touch of black. Wipe sections away before the paint fully dries.
The result resembles an old lantern from a forgotten village festival. Sounds dramatic, but it really does.
Place a battery candle behind the moon at night and watch the shadows dance across the room.
3. Ancient Crow Perch Shelf Sitter
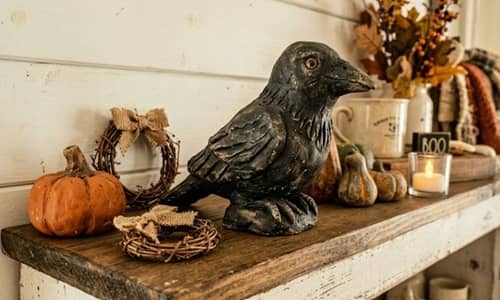
If you’re looking for fall clay art that feels a little spooky without being scary, this crow is worth making.
Roll a thick oval piece of clay for the body.
Create a smaller rounded piece for the head. Score both surfaces using a toothpick and add a tiny amount of water before attaching them together.
Shape a simple beak by pinching clay forward from the head. No need to sculpt every feather. Primitive style works because of simplicity.
Use a toothpick to scratch rough feather patterns along the body.
Create small folded wings and attach them to the sides.
For the feet, shape two chunky bases rather than delicate bird claws. This helps beginners avoid frustration.
I know many people try making detailed birds. Most end up looking strange. Keep this one basic and it turns out better.
Allow it to dry completely.
Paint the crow with matte black mixed with dark brown. Dry-brush gray over the raised feather texture.
Lightly sand a few spots afterward. The worn areas make it look decades old.
Place the crow on a shelf edge, mantel, or windowsill where its feet can slightly hang over.
This beginner clay sculpting idea is simple enough for first-timers but still has strong visual impact.
4. Ghost Village Clay Candle Tray

This project combines several tiny ghosts into one decorative scene. It feels different from most air dry clay ideas for halloween because it tells a story.
Begin with a rectangular clay slab approximately 10 inches long.
Round the corners and rough up the edges using your fingertips.
Create five to seven small ghost figures by rolling clay into teardrop shapes.
Flatten the bottoms so they stand upright.
Use a pencil tip to create two simple eye holes. That’s it. Resist adding too much detail.
Arrange the ghosts around the tray as though they are standing in a tiny village square.
Add miniature clay fence posts, tiny mushrooms, and little pumpkins around them.
Some ghosts can lean slightly. One ghost can be shorter than the others. Weirdly enough, those little imperfections make everything more charming.
Allow the entire tray to dry thoroughly.
Paint the tray with layered brown, gray, and cream washes.
Paint the ghosts soft ivory rather than bright white. Bright white feels too modern for primitive clay halloween decor.
Once dry, place battery-operated tea lights in the center of the tray.
At night, the shadows create a wonderfully eerie effect without looking frightening.
5. Rustic Witch Hat Herb Drying Hanger
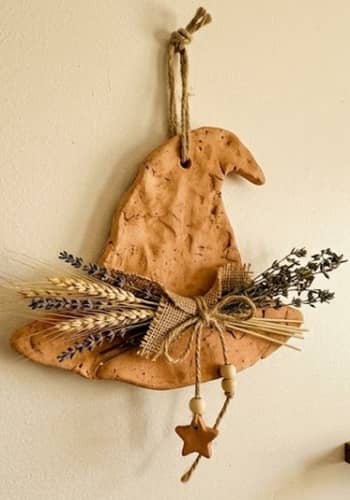
This piece combines primitive charm with a slightly magical harvest-season look. It fits beautifully with clay fall ideas because it feels rustic rather than cartoonish.
Start by rolling a palm-sized clay circle about ¼ inch thick.
Shape another piece of clay into a cone. Don’t aim for perfection here. In fact, a slightly lopsided cone often looks more authentic. A perfectly shaped witch hat can look factory made, and thats not what we’re after.
Attach the cone to the clay circle using the score-and-slip method. Scratch both surfaces with a toothpick, add a little water, then press together firmly.
Use your fingers to bend one side of the hat tip slightly. Primitive decor often looks aged and weather-worn.
Create three small holes near the brim using a straw or skewer. These will hold twine later.
Press a rough fabric scrap, burlap, or old lace into the clay surface to leave texture impressions.
Allow the piece to dry completely.
Paint the hat using layers of dark brown, charcoal, and muted black. Before the paint dries fully, wipe some areas with a cloth to expose the clay beneath.
Thread natural jute twine through the holes.
Tie small dried herbs, wheat stalks, cinnamon sticks, or dried leaves onto the twine.
Hang it near a shelf, entryway, or kitchen corner. The combination of clay and natural materials gives it an old-world Halloween feel that stands apart from typical diy halloween clay ideas.
6. Harvest Skull Pumpkin Totem
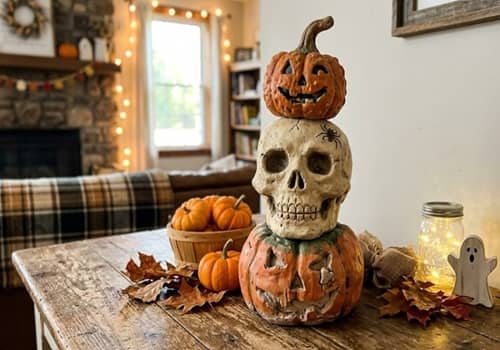
Most skull decorations are overly polished. This version looks older, rougher, and much more interesting.
Begin by creating three separate clay shapes: a pumpkin, a skull, and a smaller pumpkin.
Roll a large clay ball and flatten it slightly. Use a wooden skewer to carve pumpkin grooves.
For the skull, shape an oval piece of clay. Press eye sockets using your thumb. Add a small triangular nose opening.
Don’t spend hours making perfect anatomy. Primitive clay halloween decor benefits from simplified forms.
Create a smaller pumpkin using the same technique as the first one.
Insert a wooden skewer through the center of all three pieces while the clay is still soft. Stack them vertically with the skull between the pumpkins.
Leave enough clay thickness around the skewer hole to prevent cracking later.
Allow everything to dry thoroughly.
Paint using muted harvest colors. Try dusty orange pumpkins and an aged ivory skull.
Lightly brush brown paint into crevices, then wipe away the excess.
The finished piece resembles an old harvest marker from a forgotten countryside celebration. Sounds odd, but it works surprisingly well.
Display it beside candles, hay bundles, or autumn leaves.
7. Forgotten Cemetery Marker Plaques

Among halloween pottery ideas and halloween sculpture ideas, this one has the strongest storytelling element.
Roll clay into several rectangular plaques approximately 5 to 7 inches tall.
Do not make the rectangles perfectly straight. Slight warping adds character.
Use a butter knife to chip corners and roughen edges.
Carve playful Halloween phrases such as:
- Beware of Pumpkins
- Ghost Crossing
- Witch Parking Only
- Haunted Harvest Road
Press tiny cracks into the surface using a toothpick.
Add miniature pumpkins, ravens, moons, or stars around the lettering.
Before drying, lightly crumple aluminum foil and press it against the clay surface. This creates aged stone texture.
Allow to dry completely.
Paint with gray, taupe, brown, and cream layers.
After drying, lightly sand some raised areas. The worn finish helps the signs resemble antique stone markers.
One thing people often forget is contrast. Make the lettering slightly darker than the background so it remains easy to read.
Display several plaques together instead of using just one. A collection creates much stronger visual impact.
8. Woodland Spirit Acorn Lantern
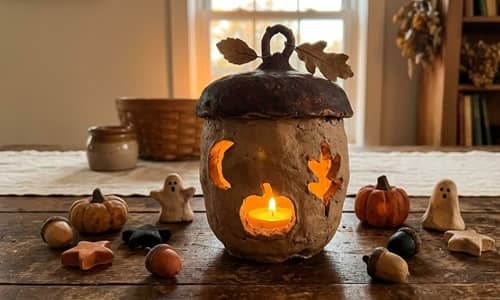
This project takes inspiration from nature and gives it a mysterious Halloween twist. It blends beautifully with fall clay art and seasonal decorating.
Roll a large ball of clay about the size of a grapefruit.
Shape it into an oversized acorn.
Cut the acorn in half horizontally and carefully hollow out both sections using a spoon.
Leave at least ½ inch wall thickness. Thin walls may crack during drying.
Create small moon, leaf, star, and pumpkin-shaped openings around the body.
Texture the acorn cap using a pencil tip or toothpick. Work slowly. Hundreds of tiny marks create a realistic acorn appearance.
Attach the cap section securely.
Place a small battery tea light inside temporarily to test the glow effect.
Allow everything to dry completely.
Paint using earthy browns, muted greens, and dark walnut tones.
Dry-brush cream paint lightly over the raised texture to emphasize detail.
The lantern doesn’t need perfection. Actually, if it leans a little to one side, it often feels more handmade and charming.
At night, the glowing cutouts create soft shadows that feel cozy rather than spooky.
This is one of those beginner clay sculpting ideas that looks much harder than it really is.
9. Hollow Black Cat Pumpkin Watcher
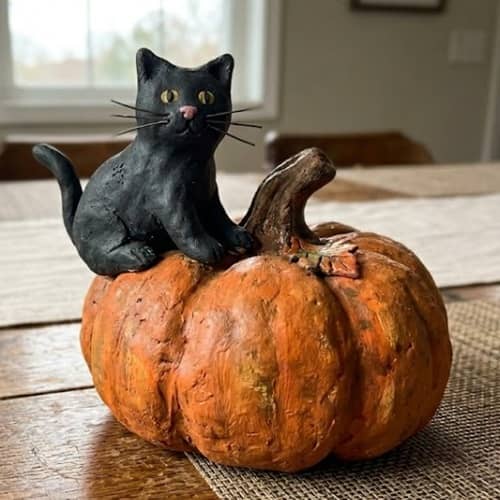
This isn’t the usual cute Halloween cat. The goal is to make it look like an old porch decoration someone might have displayed for decades.
Start by forming a medium-sized pumpkin shape from clay. Make it about the size of a grapefruit.
Use a wooden skewer to create deep pumpkin grooves.
Next, create a simple sitting cat figure. Roll a thick cylinder for the body and a small ball for the head.
Attach the head using the score-and-slip method. Add two pointed ears. Keep the shapes chunky and uncomplicated.
Now carefully flatten the bottom of the cat so it sits securely on top of the pumpkin.
Use a toothpick to lightly scratch fur texture into the clay. Don’t overdo it. Primitive clay halloween decor works best when details stay simple.
Before the clay dries, carve tiny crescent moon eyes into the cat’s face.
Allow both pieces to dry completely.
Paint the pumpkin in faded orange with touches of brown and mustard yellow. Paint the cat matte black with hints of charcoal gray brushed over the surface.
Glue the cat onto the pumpkin after everything has dried.
Sometimes beginners worry their cat looks too rough. Honestly? The rougher it looks, the more primitive character it has.
Place it on a mantel, shelf, or entry table.
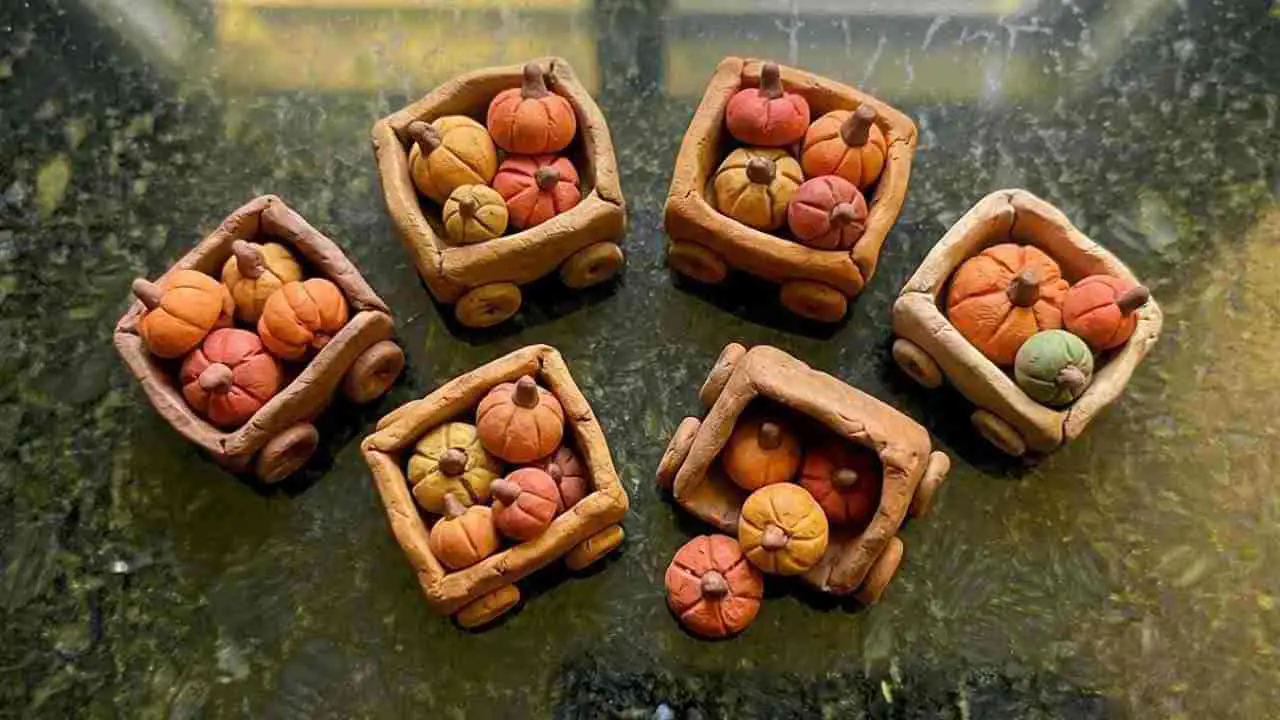
10. Pumpkin Wagon Filled With Tiny Ghosts
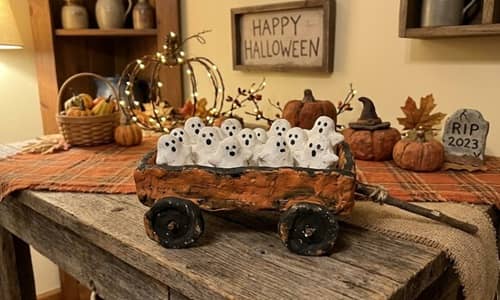
This one feels playful without looking childish. It also photographs beautifully for seasonal displays.
Begin by rolling a thick clay slab approximately 8 inches long.
Shape it into a shallow wagon body with raised sides.
Create four chunky wagon wheels separately. Don’t make them perfectly round. Old wagon wheels rarely looked perfect anyway.
Attach the wheels securely using score-and-slip.
Now create several tiny ghost figures using teardrop-shaped clay pieces.
Press simple eye holes using a pencil tip.
Make each ghost a slightly different height. One can lean sideways. Another can be shorter. Variety makes the arrangement more interesting.
Allow the wagon and ghosts to dry separately.
Paint the wagon using aged barnwood colors like weathered brown, gray, and muted beige.
Paint the ghosts soft ivory rather than bright white.
Once dry, glue the ghosts into the wagon as though they are riding through a haunted pumpkin patch.
There are people who spend hours making every piece identical. I dont recommend that here. Uneven pieces actually add personality.
This project fits perfectly among diy halloween clay ideas because it combines storytelling and decoration in one piece.
11. Old Harvest Moon Wall Medallion
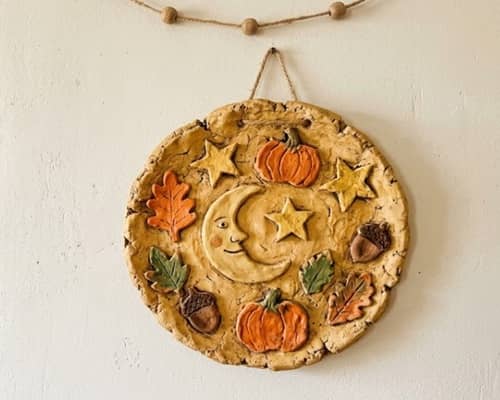
This project draws inspiration from antique folk art and old harvest festival decorations.
Roll out a large circle of clay about 8 inches wide and ¼ inch thick.
Don’t use a template. Hand-shaped circles often look more authentic.
Using your fingers, gently shape a smiling crescent moon face directly into the clay.
Add simple eyes, a nose, and subtle cheek details. Avoid making it cartoon-like.
Around the outer edge, attach small handmade pumpkins, stars, acorns, and leaves.
Press texture into every element using toothpicks, forks, and old fabric scraps.
Create a hanging hole near the top before the clay dries.
Allow the medallion to dry fully.
Paint the background in aged cream, soft gray, or antique beige.
Use muted orange, faded green, and walnut brown for the surrounding details.
After painting, apply a diluted brown wash over the entire piece and wipe most of it away. This instantly creates an aged appearance.
Many people skip this step. Big mistake. The wash is what transforms the piece from craft project to primitive decor.
Hang it near an entryway, fireplace, or gallery wall.
This combines elements of halloween pottery ideas, clay fall ideas, and primitive seasonal decorating all in one project.
12. Tiny Haunted Pumpkin Cottage
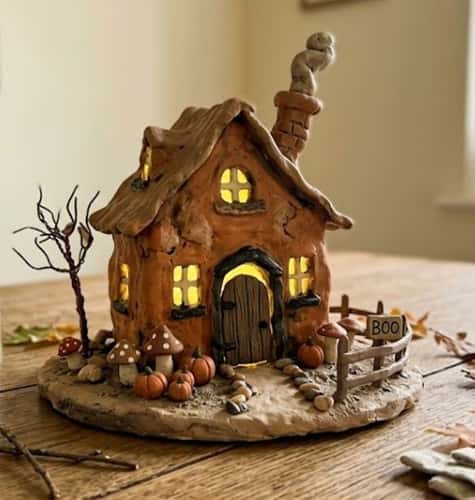
This may be the most unique project in the entire collection.
Imagine a pumpkin that became a tiny haunted cottage. That’s exactly what we’re building.
Start by forming a large pumpkin shape from clay about 5 to 6 inches tall.
Flatten the bottom so it stands securely.
Carve a small door into the front. Add tiny window openings on both sides.
Roll thin clay ropes and use them to frame the windows and door.
Create a twisted chimney on top. Make it crooked. Make it lean. It should look like it’s been standing for a hundred years.
Add tiny pumpkins, stones, mushrooms, and vines around the base.
Texture the pumpkin grooves deeply using a wooden skewer.
Allow everything to dry completely.
Paint using muted autumn shades rather than bright Halloween colors.
Apply dark brown paint into every crack and groove. Wipe away excess paint from raised surfaces.
Place a battery-operated tea light inside through a removable opening in the back.
When illuminated, the windows glow softly and bring the little cottage to life.
It looks almost like something from an old folk tale. Weirdly charming, slightly spooky, and very different from common air dry clay ideas for halloween.
Final Thoughts
The secret behind memorable primitive clay halloween decor isn’t perfection. It’s character.
Tiny fingerprints, uneven edges, slightly crooked pumpkins, and rough textures often make a piece feel more authentic than something machine-made.
That’s why many traditional folk artists intentionally embraced imperfections.
As you experiment with these halloween pottery ideas and fall clay art projects, pay attention to texture more than detail. Texture tells a story.
A simple shape with an aged finish can feel far more interesting than an overly complicated sculpture. Sometimes the flaws become the best part of the decoration.