Finding decor that looks handmade without making a room feel crowded can be surprisingly difficult.
That is exactly why I keep coming back to the humble air dry clay planter.
It takes very little space, costs far less than most store-bought decor, and somehow adds personality to a corner that felt boring five minutes earlier.
If you enjoy air dry clay crafts, clay inspirations, or simply want creative air dry clay planters for small spaces, these ideas offer something a little different. Some hang on walls. Some sit quietly on shelves. Others become conversation starters. Ready to get your hands messy?
1. Floating Pebble Pocket Air Dry Clay Planter
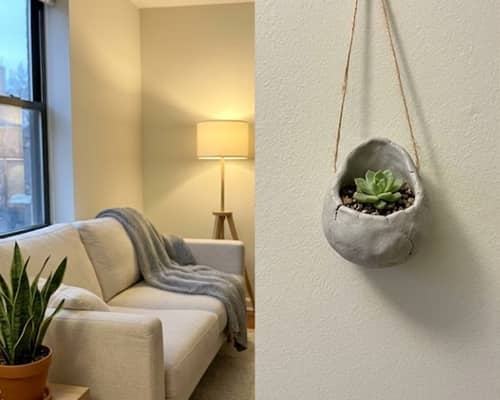
This planter looks like a smooth river stone attached to a wall, except it secretly holds a tiny succulent.
It is one of my favorite clay art ideas for home decor because it almost disappears into the room until someone notices the plant.
Start with about 500 grams of air dry clay.
Roll the clay into a large ball. Flatten it gently until it becomes an oval shape roughly 8 inches long and 5 inches wide.
Now place a small bowl upside down on one side of the oval and gently curve the clay upward around it. This creates the pocket where your plant will sit.
Use your fingers dipped in water to smooth every crack. Take your time here. A rushed surface always looks rushed later.
Flip the piece over carefully.
Create two small keyhole-shaped hanging slots using a wooden skewer. These holes allow the planter to hang flat against a wall.
Smooth the edges again.
Let it dry for 24 to 48 hours.
Once dry, lightly sand rough spots.
Paint with a mixture of gray, beige, and off-white acrylic paint. Dab instead of brushing. Real stones aren’t perfectly one color.
Seal using a matte varnish.
Add a tiny nursery pot inside the pocket rather than planting directly into the clay. It makes watering easier and prevents moisture problems.
The finished piece looks almost sculptural. Visitors usually thinks it came from a boutique shop.
2. Tiny Balcony Lantern Planter
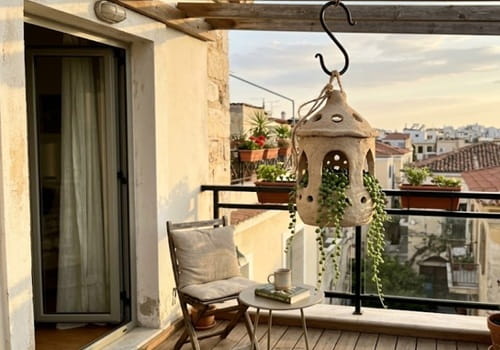
What if a planter looked like a miniature lantern hanging in a balcony corner? Sounds unusual, right? That is exactly why this one stands out.
Take approximately 600 grams of clay.
Roll the clay into a slab about ¼ inch thick.
Cut four rectangles measuring roughly 5 x 4 inches.
These will become the sides.
Cut a square base.
Attach the walls using slip made from clay mixed with water.
Press seams firmly from both sides. Don’t just stick them together and hope for the best.
Create window cutouts on each side. Small arches work beautifully.
Roll thin clay ropes and frame each opening.
Add a slightly curved roof piece on top.
Create a circular hanging hole near the roof.
Allow everything to dry slowly.
There may be tiny cracks appearing. Thats perfectly normal. Fill them using fresh clay paste before complete drying.
Paint in aged terracotta, sage green, or chalk white.
Insert a small plastic nursery pot holding a trailing plant like string of pearls.
Hang it where sunlight touches it during the morning hours.
The shadows created through the openings makes the entire planter feel far more expensive than it really is.
3. Sleepy Fox Corner Planter
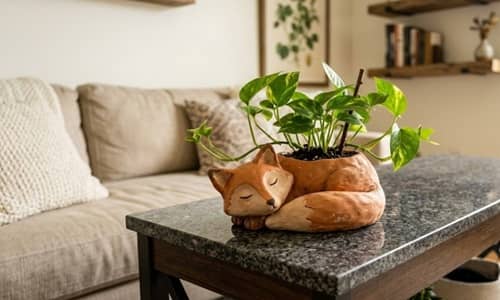
If you enjoy clay art cute animal planter projects, this one is ridiculously charming without feeling childish.
Begin with about 700 grams of clay.
Shape a rounded bowl approximately 5 inches wide.
This becomes the planter body.
Now create a sleeping fox wrapped around one side of the bowl.
Roll a clay cylinder for the body.
Curve it naturally around the planter.
Add a pointed tail overlapping slightly.
Shape the head separately.
Create tiny ears and attach carefully using slip.
Use a toothpick to add subtle fur texture.
Don’t overdo it though. Too much texture can make it look cartoonish.
Blend every connection point until it appears sculpted from one piece.
Create a drainage tray separately if desired.
Let the entire project dry slowly over several days.
Sand lightly.
Paint using muted rust orange, cream, brown, and tiny black details around the eyes.
A small pothos, peperomia, or succulent works beautifully inside.
The fox almost looks asleep beside the plant. There is something oddly calming about it.
Among all pot clay ideas, this one usually gets the most compliments from guests.
4. Vertical Herb Tile Air Dry Clay Planter
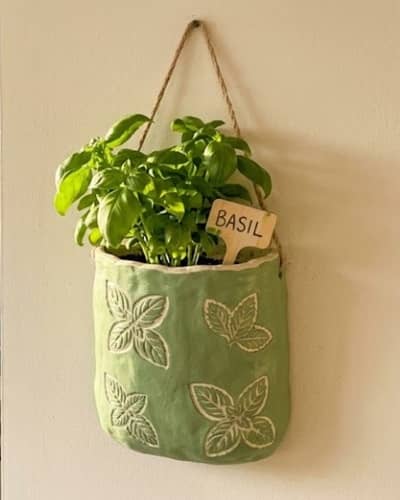
Most planters sit on a surface and demand space. This one borrows space from the wall instead. If your kitchen feels crowded already, you’ll probably appreciate this project.
Start with approximately 700 grams of air dry clay.
Roll the clay into a large rectangular slab measuring about 10 inches tall and 7 inches wide.
Smooth both sides using a damp sponge.
Now create a pocket.
Roll another slab measuring 6 inches by 4 inches.
Curve it slightly and attach it to the lower half of the rectangle using clay slip.
Press firmly around every edge except the top opening.
Use a wooden tool to blend the seams from the inside if possible.
Turn the planter over.
Create two hanging holes near the top.
Decorate the front with simple leaf impressions using fresh herbs from your kitchen. Basil, mint, and parsley all leave beautiful patterns.
Allow the piece to dry flat for 48 hours.
Sand rough edges gently.
Paint using soft linen white, warm cream, or muted sage tones.
Seal with matte varnish.
Insert a lightweight nursery pot containing fresh herbs.
The finished planter works wonderfully in small kitchens because it adds greenery without stealing precious counter space.
I have seen similar clay pot decoration ideas in boutique cafes, but making your own feels way more rewarding.
5. Folded Paper-Inspired Shelf Planter
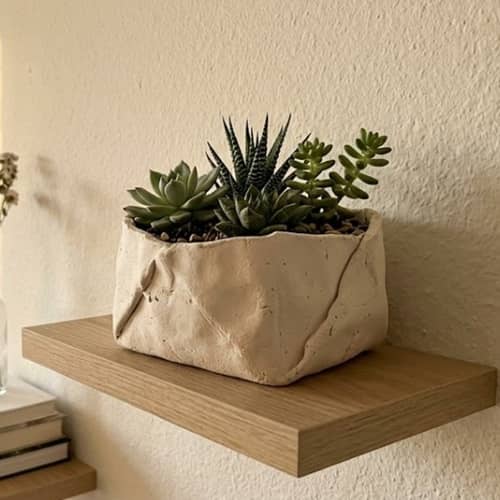
This planter was inspired by folded paper sculptures. The funny thing is, it looks complicated but it really isn’t.
Grab about 600 grams of clay.
Roll a slab roughly ¼ inch thick.
Cut a rectangle measuring 8 inches by 8 inches.
Instead of keeping the edges straight, gently fold and pinch sections inward while the clay is still soft.
Think of crumpled paper that someone carefully unfolded halfway.
Don’t worry about symmetry.
Actually, slight unevenness makes it prettier.
Form the clay into a shallow planter bowl.
Blend any cracks using a damp fingertip.
Create a flat bottom so it sits securely on a shelf.
Allow the piece to dry completely.
This part takes patience because thicker folds dry slower.
Sand lightly.
Paint using matte stone colors, dusty blush, soft taupe, or off-white.
Add a protective sealer.
Place a compact succulent arrangement inside.
The sharp folds catch light throughout the day, creating tiny shadows that change constantly. It dont look handmade at first glance, which makes people inspect it more closely.
This design fits beautifully into modern clay inspirations and air dry clay artwork ideas because it feels artistic while remaining functional.
6. Crescent Moon Window Ledge Planter
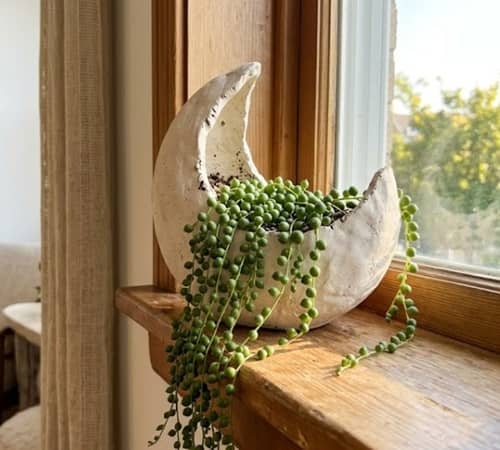
Not every planter needs to be round. Sometimes unusual shapes are exactly what a tiny space needs.
Begin with roughly 800 grams of air dry clay.
Sketch a crescent moon shape on paper first.
Use the sketch as a template.
Roll your clay into a slab approximately ⅜ inch thick.
Cut two identical crescent moon shapes.
Create a clay strip about 3 inches wide.
Attach the strip between the two moon shapes to create depth.
This forms the planter cavity.
Secure all seams with slip.
Blend carefully.
Use a damp brush to smooth every connection point.
Leave a flat section at the bottom so it rests securely on a windowsill.
Allow drying for several days.
Large projects dry unevenly if rushed.
Sand smooth.
Paint with soft ivory, sandstone, matte white, or pale beige.
You can even add subtle gold dry-brushed highlights.
Place a cascading string of pearls plant or trailing sedum inside.
Position it near a sunny window.
The contrast between the crescent shape and trailing greenery feels surprisingly elegant. There are many air dry clay planters for small spaces online, but very few have this sculptural look.
One thing I learned the hard way is this: thicker walls crack less than thin ones. I was impatient once and regretted it later.
7. Hanging Rain Pocket Air Dry Clay Planter
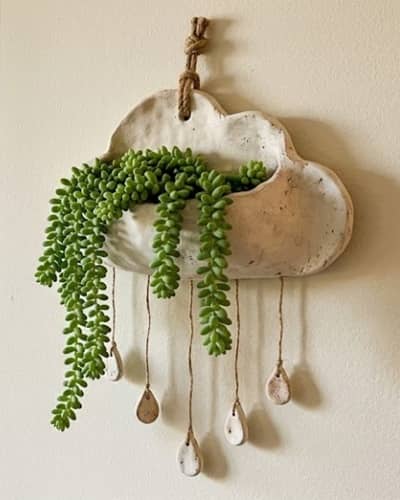
Some planters hold plants. This one creates movement too. Every time someone walks past it, the hanging clay drops sway slightly, making the whole piece feel alive.
Start with about 750 grams of air dry clay.
Roll a slab approximately ¼ inch thick.
Cut a large teardrop shape about 9 inches tall.
This becomes the planter backing.
Now create a curved pocket measuring roughly 5 inches wide and 3 inches deep.
Attach the pocket to the lower section using clay slip.
Press firmly around all edges.
Smooth the seams using a damp brush.
Next, roll several small clay raindrop shapes.
Make them different sizes.
Uniformity is boring here.
Use a skewer to create hanging holes at the top of each raindrop.
Create matching holes along the bottom edge of the planter.
Once dry, connect the raindrops using jute twine or thin cord.
Allow everything to dry completely.
Sand rough spots.
Paint using soft stone shades, warm white, dusty gray, or pale clay colors.
Seal thoroughly.
Place a trailing succulent or compact ivy inside.
When mounted on a wall, the dangling clay pieces create subtle shadows throughout the day. It are surprisingly eye-catching for something so simple.
Among modern air dry clay crafts, this one doubles as wall art and a planter at the same time.
8. Tiny Village House Planter Row
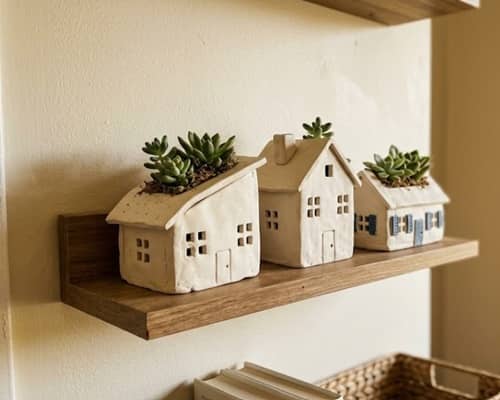
Have you ever looked at a shelf and thought it needed a little story? This planter creates exactly that feeling.
You’ll be making three miniature house-shaped planters instead of one large planter.
Start with 900 grams of clay total.
Divide it into three equal portions.
For each planter, roll a slab approximately ¼ inch thick.
Cut walls and a simple house silhouette.
Assemble each planter as an open-top box.
The front should resemble a tiny cottage.
Create little window impressions using a wooden stick.
Add doors, roof lines, and tiny architectural details.
Nothing needs to be perfect.
Actually, slightly crooked details often look more charming.
Create drainage trays separately if desired.
Allow the houses to dry completely.
Sand gently.
Paint each house differently.
Try chalk white, muted sage, warm beige, dusty blue, or soft terracotta.
Seal using matte varnish.
Plant tiny succulents inside each house.
Arrange all three together on a narrow shelf.
The result feels like a miniature streetscape growing greenery from its rooftops. People usually ask where you bought it because it doesn’t resemble traditional pot clay ideas at all.
This project also fits beautifully within clay art ideas for home decor because it works as both sculpture and planter.
9. Mushroom Cap Shelf Planter
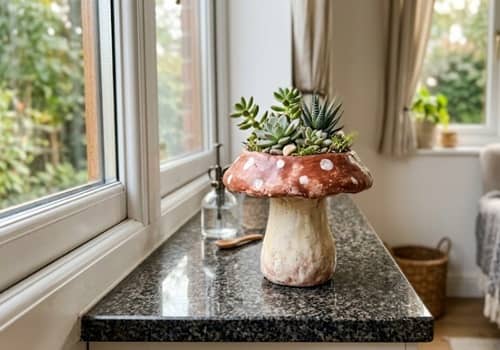
Mushrooms are everywhere right now, but most mushroom decor looks mass-produced. This version feels handmade in the best possible way.
Begin with approximately 700 grams of clay.
Create a shallow bowl shape about 6 inches wide.
This forms the mushroom cap.
Now sculpt a thick stem underneath.
Flatten the bottom slightly so the planter sits securely.
Blend the stem into the cap.
Use your fingers and a damp sponge to smooth transitions.
Add subtle gill textures underneath using a craft knife.
Don’t carve too deeply.
Create a planting cavity in the center.
Check the wall thickness.
Aim for around ⅜ inch thickness throughout.
Allow drying for several days.
Sand lightly.
Paint using earthy mushroom colors.
Warm cream stems paired with soft caramel, rust, or taupe caps work beautifully.
Seal thoroughly.
Plant a compact succulent cluster or small peperomia inside.
Place it on a bookshelf, veranda table, or side console.
The finished piece looks like something discovered during a woodland walk rather than something made at a dining table.
I messed up my first version because I made the stem too narrow. Learn from my mistake and keep it sturdy.
This design blends perfectly with clay inspirations, air dry clay artwork ideas, and creative clay pot decoration ideas that feel organic instead of manufactured.
10. Open Book Air Dry Clay Planter
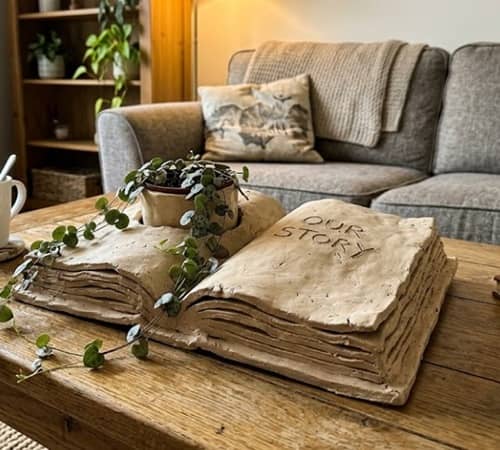
This planter is for people who love books but don’t want another generic bookshelf decoration. From a distance, it looks like an old book left open on a table. Then someone notices a plant growing from the pages.
Start with approximately 850 grams of air dry clay.
Roll a slab about ¼ inch thick.
Cut two identical rectangles measuring roughly 8 x 6 inches.
These will become the “pages.”
Gently curve both pieces upward.
Position them side by side so they resemble an open book.
Create a center spine using a thick clay roll.
Attach everything with clay slip.
Blend every seam carefully.
Now create a shallow planting cavity across the center fold.
Keep the cavity compact so the planter doesn’t become too heavy.
Use a butter knife or sculpting tool to add page lines along the edges.
Not too many though.
Overdoing details can make it look fake.
Allow the entire piece to dry slowly.
Sand rough spots.
Paint in aged ivory, antique cream, or weathered parchment shades.
Add subtle brown dry-brushed accents around the edges.
Seal with matte varnish.
Place a small trailing plant inside.
The greenery spilling from the center creates the illusion that nature is growing from the pages themselves.
I honestly wasn’t expecting this design to become one of my favorites, but here we are.
11. Tiny Mountain Ridge Planter
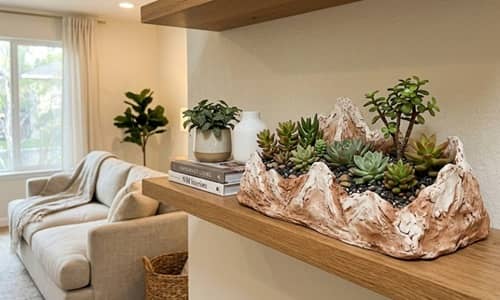
Most planters focus on the container. This one focuses on the landscape.
If you’ve ever wanted something that feels like a miniature nature scene, try this.
Start with about 900 grams of clay.
Roll a thick slab approximately 10 inches long.
Sketch a mountain range profile directly onto the clay.
Cut along the outline.
Create two matching mountain silhouettes.
Connect them using clay strips approximately 3 inches wide.
This forms the planter cavity between the ridges.
Secure everything with clay slip.
Blend the joints carefully.
Add subtle rock textures using crumpled aluminum foil pressed lightly into the surface.
Keep the texture random.
Nature isn’t symmetrical.
Allow the planter to dry fully.
Sand lightly if needed.
Paint with layered shades of stone gray, soft beige, charcoal, and warm earth tones.
Seal thoroughly.
Plant compact succulents inside.
Different heights work best because they resemble tiny trees scattered across a landscape.
The finished planter feels more like a sculpture than a container.
There is something oddly relaxing about looking at a miniature mountain range sitting on a shelf.
It were originally meant for my veranda, but it ended up staying indoors because I liked it too much.
This project naturally fits alongside air dry clay planters for small spaces because it creates visual impact without taking much room.
12. Moon-Gazing Cat Planter
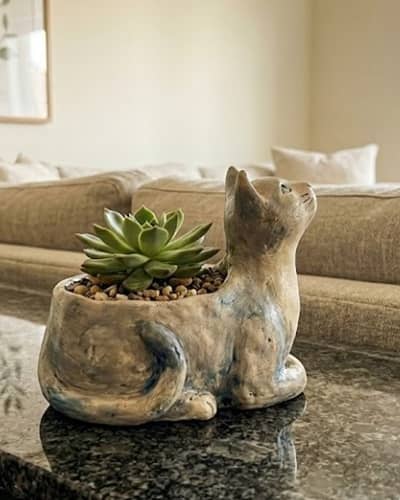
Let’s finish with something playful.
Not childish. Just playful.
This design combines a planter with a decorative sculpture, making it ideal for people who enjoy clay art cute animal planter projects that still look sophisticated.
Start with approximately 800 grams of clay.
Create a rounded planter bowl about 5 inches wide.
Set it aside temporarily.
Now sculpt a sitting cat figure separately.
Shape the body first.
Then add the head.
Attach pointed ears.
Create a gently curved tail wrapping partially around the planter.
Position the cat so it appears to be looking upward.
Next, sculpt a small crescent moon rising behind the cat.
Attach it securely to the back of the planter.
Blend all seams carefully.
Use a damp brush to smooth the surface.
Create subtle facial features using a wooden stylus.
Keep the details minimal.
Simple designs usually age better.
Allow everything to dry completely.
Sand rough spots.
Paint using matte cream, warm gray, terracotta, charcoal, or soft beige.
Seal thoroughly.
Plant a small succulent or compact peperomia inside.
The finished piece tells a story without saying a word. That’s probably why people stop and stare at it for a second longer than expected.
Among all the clay inspirations in this collection, this one feels the most personal.
Final Thoughts
Here’s something interesting that most people don’t realize… the best air dry clay planters rarely look perfect.
Tiny fingerprints, slightly uneven edges, and subtle imperfections often make handmade decor feel more valuable because it carries evidence of the person who created it.
When working with air dry clay planters, focus less on achieving factory-level precision and more on creating pieces that reflect your space and personality.
A planter can hold a succulent, sure, but it can also tell a story, soften a room, or become a conversation piece.
That’s where handmade decor quietly wins. Every little flaw becomes part of the design instead of something that needs fixing.