If you’ve ever looked around your space and felt like something was missing, you’re not alone.
I had the same feeling. The furniture looked fine. The walls looked okay. Yet the room lacked personality. That’s where living room clay decor completely changed the vibe for me.
Clay lets you create pieces that feel handcrafted, warm, and a little imperfect in the best possible way.
Some projects cost less than a coffee shop visit. Others look surprisingly expensive once displayed.
Whether you love air dry clay decor, quirky pottery, or modern handmade accents, these ideas can help transform a plain room into something memorable without spending a fortune.
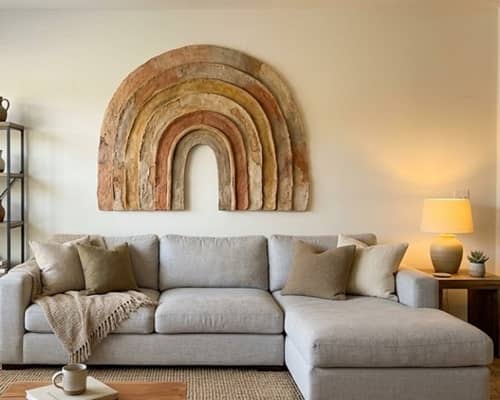
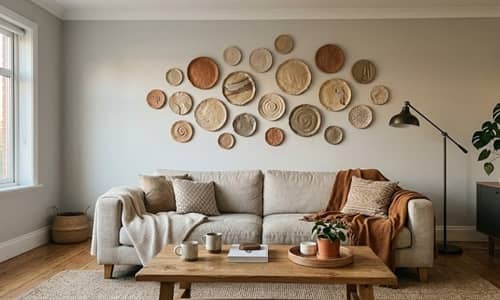
1. Floating Botanical Clay Wall Tiles
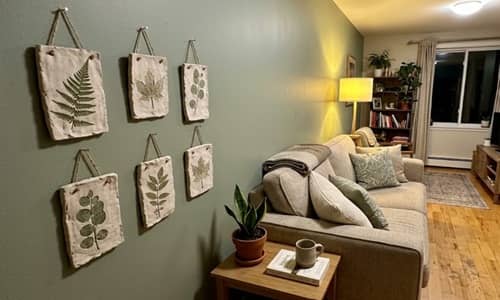
Instead of hanging another framed print, why not create a wall feature that feels collected from a small artisan market? These botanical clay tiles bring texture to living room wall decor using clay without making the room feel crowded.
Instructions
Start with a packet of air dry clay decor clay. Roll the clay onto a smooth surface until it becomes approximately ¼ inch thick. Don’t stress if it isn’t perfectly even. Tiny imperfections actually make it look handmade.
Using a drinking glass, small bowl, or cardboard template, cut out six to ten circular or oval tiles. Place them on parchment paper.
Now walk outside and collect leaves with visible veins. Ferns, eucalyptus leaves, and even backyard weeds work surprisingly well. Press each leaf firmly into the clay surface. Roll gently over the leaf with a rolling pin or glass bottle.
Carefully peel the leaf away. The pattern stays behind.
Use a straw to create a hanging hole near the top of each tile.
Let the pieces dry for at least 24 hours. Depending on humidity, it may take longer. Mine took almost two days once because the weather were unusually damp.
Once dry, lightly sand rough edges.
Paint the tiles using muted colors like cream, sage green, clay beige, or dusty terracotta. Dry brush a little white paint across the raised areas so the leaf details pop.
Thread natural jute string through the holes.
Hang the tiles vertically in groups of three. Keep some spacing between them. The empty space is part of the design.
This project works especially well above a sofa or reading chair where large artwork would normally go.
2. Clay Pebble Mirror Frame
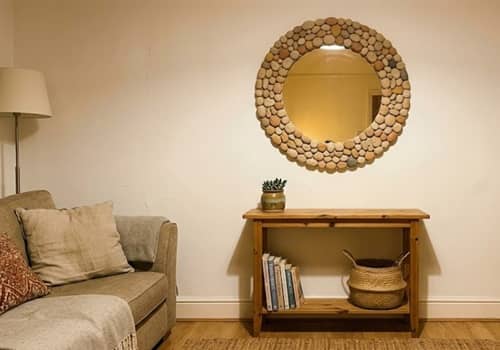
This idea was inspired by beach stones, but with clay. It gives ordinary mirrors a sculptural look that feels expensive without actually being expensive.
Instructions
Find a simple round or rectangular mirror from a thrift store or discount shop.
Take air dry clay and roll dozens of small balls. Then gently flatten them into pebble-like shapes. Each piece should vary slightly. Uniform shapes actually look less natural.
Leave some pebbles large. Make others tiny.
Allow the pebbles to partially dry for about one hour. This helps them keep their shape.
Paint the pebbles using earthy colors. Mix cream, taupe, sand, terracotta, and soft gray shades.
Once dry, arrange them around the mirror before gluing anything. Play with the layout. Shift things around. Move them again.
When you’re happy with the arrangement, attach each pebble using strong craft adhesive.
Continue layering pebbles outward from the frame edge. The irregular arrangement creates depth.
Let the glue cure completely overnight.
Hang the mirror where natural daylight can hit the textured surface.
The result feels somewhere between quirky pottery and modern gallery decor. Guests often assume it came from a boutique store.
If you enjoy clay pot ideas aesthetic content on Pinterest, this project has a very similar visual appeal.
3. Mini Dinosaur Fossil Shadow Box Display
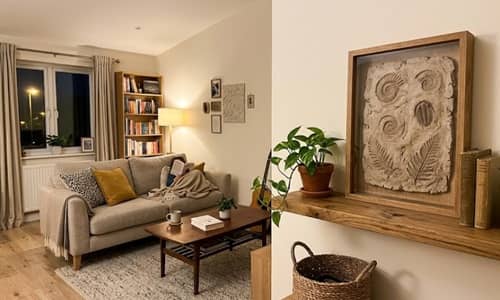
Most living room clay decor follows predictable patterns. Vases. Bowls. Trays. This one goes in a completely different direction.
It combines clay dinosaur inspo with subtle artistic decor that doesn’t feel childish.
Instructions
Purchase a small shadow box frame or use an old picture frame with depth.
Roll air dry clay into a rectangle slightly smaller than the frame backing.
Smooth the surface but don’t obsess over perfection.
Take small plastic dinosaur toys. Press sections of them into the clay. A tail here. A footprint there. Part of a rib cage shape. The goal is to create fossil impressions rather than complete dinosaurs.
Remove the toys carefully.
Use a toothpick to add tiny cracks and weathered details around the impressions.
Allow everything to dry fully.
Paint the clay using layered colors. Start with dark brown. Then add tan. Finish with dry-brushed ivory highlights.
The weathering effect creates a convincing fossil appearance.
Mount the clay panel inside the shadow box.
For extra personality, add a tiny handwritten label beneath each impression.
This project quietly nods to handmade dinosaur pottery trends while remaining sophisticated enough for adult spaces.
Honestly, people usually don’t realize they’re looking at dinosaur-inspired decor until they get close.
There is something kinda fun about that.
4. Suspended Clay Moon Shelf Accent
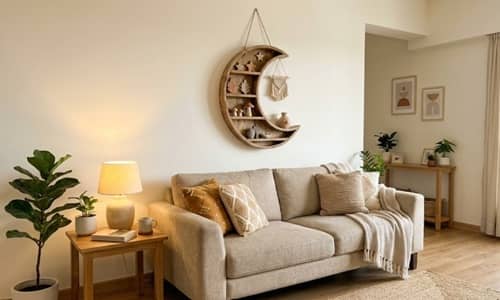
Most shelves sit flat against a wall. This one feels lighter, almost floating. The clay becomes part sculpture and part storage, which makes it a memorable piece of living room clay decor without overwhelming the room.
Instructions
Start by purchasing an inexpensive unfinished wooden crescent moon shape or cut one from lightweight plywood.
Roll air dry clay into several organic shapes about the size of your palm. Think river stones rather than perfect circles.
Press texture into some pieces using crumpled paper, lace, or rough fabric. Leave others smooth.
Allow the clay pieces to dry completely. This usually takes 24 to 48 hours.
Sand lightly to remove sharp edges.
Paint them in warm tones such as sandstone, muted terracotta, oatmeal cream, and soft taupe. Mix finishes. Some should look matte while others can have a subtle satin finish.
Glue the clay pieces onto sections of the wooden moon shape. Leave visible wood in some places. Too much clay can make it feel heavy.
Attach sturdy rope or leather cord to both ends.
Hang the moon shelf securely from a wall anchor.
Add a tiny plant, candle, or small framed photo.
The contrast between the floating shelf and textured clay details creates something far more interesting than ordinary wall decor. It almost look like something found in a small artisan shop.
5. Clay Pottery Gallery Wall Squares
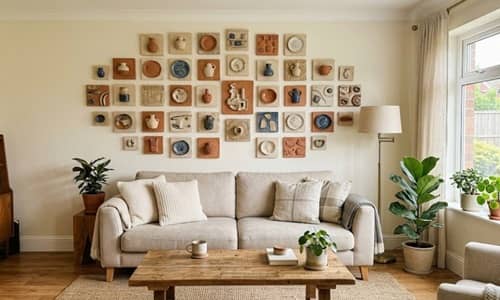
Gallery walls are everywhere. But most people fill them with prints and photos. Why not create tiny pottery-inspired art panels instead?
This project takes inspiration from quirky pottery and clay pot inspo trends while staying affordable.
Instructions
Purchase several inexpensive wooden canvas panels or square MDF boards.
Roll air dry clay into different shapes.
Create miniature vases.
Make abstract arches.
Form tiny bowls.
Build simple geometric sculptures directly onto the boards.
Each square should be different from the next. That variation is what makes the collection interesting.
Let all clay pieces dry thoroughly.
Paint each board and sculpture in complementary tones. Cream, clay pink, warm beige, rust, and muted olive work beautifully together.
After drying, lightly brush a contrasting color across raised surfaces.
Arrange the finished panels on the floor before hanging them.
Move pieces around until the collection feels balanced. Don’t overthink symmetry.
Mount the boards in a cluster above a couch or console.
The finished display resembles an art installation but costs very little. Some visitors may even assume you purchased them from a handmade pottery market.
I wasn’t expecting the shadows to be so pretty, but they really adds another layer of texture.
6. Storybook Clay Village Mantel Display
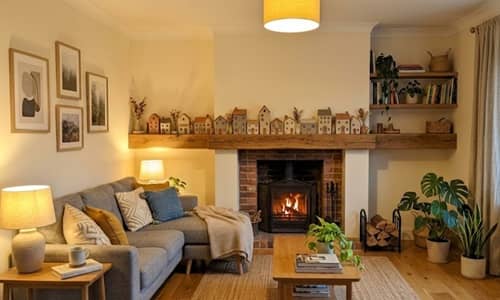
Tiny decorative villages are common during holidays. A permanent clay village for everyday decor? That’s much rarer.
This project creates charming architectural accents that work year-round.
Instructions
Roll out air dry clay to approximately ¼ inch thickness.
Using a craft knife, cut simple house silhouettes. Make some tall and narrow. Others short and wide.
Cut separate roof pieces and attach them using a little water.
Add tiny windows and doors using a toothpick.
Don’t aim for perfection. Slightly crooked windows actually increase the handmade appeal.
Allow the houses to dry flat overnight.
Once dry, paint each building in neutral shades. Cream, soft gray, beige, and dusty clay colors work beautifully.
For added texture, lightly sponge paint onto certain areas.
Create between eight and fifteen houses of varying sizes.
Arrange them along a mantel, floating shelf, or media console.
Add a few clay trees if desired.
The village becomes a quiet focal point that changes character depending on where the sunlight hits it throughout the day.
This is also a great way to use leftover clay from other air dry clay craft projects.
A friend told me these looked store-bought. They definitely wasn’t.
7. Layered Clay Arch Wall Sculpture
Sometimes a room doesn’t need more furniture. It just needs a focal point. This layered arch sculpture creates depth on a blank wall without costing much, and it fits beautifully into modern living room clay decor styles.
Instructions
Begin by drawing three to five arch templates on cardboard. Each arch should be slightly smaller than the previous one.
Roll out air dry clay to about ¼ inch thickness.
Place the templates on the clay and carefully cut around them using a craft knife.
Smooth the edges with a damp finger.
For added texture, gently press crumpled parchment paper onto some arches. Leave others smooth. The contrast looks fantastic later.
Allow all pieces to dry completely on a flat surface.
Once dry, sand any rough spots.
Paint each arch a slightly different neutral shade. Think warm ivory, sandstone, clay beige, mushroom gray, and soft terracotta.
When dry, stack the arches using strong craft glue, keeping them centered so a layered effect appears.
Mount the finished sculpture onto a wooden backing board or directly onto the wall using removable strips.
The shadows between layers create visual interest all day long. And honestly, photographs don’t fully capture how nice it looks in person.
This style works especially well if you love polymer clay decor aesthetics but want a larger statement piece.
8. Clay Branch Wall Hanging With Tiny Sculptures
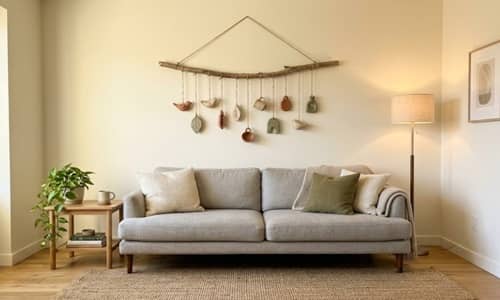
Most wall hangings use yarn or macrame. This one uses clay in a way people don’t expect.
The result feels artistic, organic, and just a little whimsical without becoming childish.
Instructions
Find a sturdy fallen tree branch around 18–24 inches long.
Clean it thoroughly and allow it to dry.
Using air dry clay, create several small decorative shapes.
Try tiny abstract faces.
Make miniature houses.
Create simple moons, suns, leaves, and geometric shapes.
If you enjoy quirky pottery styles, this is where you can really have fun.
Use a toothpick to create a small hole at the top of every clay piece.
Allow everything to dry completely.
Paint each shape using a coordinated color palette. Soft terracotta, ivory, muted olive, dusty blue, and warm beige work beautifully together.
Thread thin twine through each hole.
Tie the clay pieces to the branch at varying lengths.
Don’t make every strand the same length. The uneven arrangement creates movement.
Attach hanging hardware to the branch and display it above a reading nook, console table, or sofa.
The finished piece feels collected rather than manufactured. That’s part of its charm.
I made one years ago and the shapes weren’t perfectly aligned, but somehow that made it better.
9. Textured Clay Lantern Covers
Many people focus on daytime decor. This project transforms the room after sunset too.
The glow through textured clay creates a surprisingly cozy atmosphere.
Instructions
Purchase a few inexpensive glass candle holders or LED lanterns.
Measure the circumference of each holder.
Roll out air dry clay into thin sheets.
Cut rectangles sized to wrap around the glass containers.
Before wrapping, create patterns across the clay.
Press lace into the surface.
Use a straw to create tiny holes.
Carve simple geometric shapes.
Experiment a little. You don’t have to follow rules here.
Allow the clay sheets to partially dry for about an hour so they become firm but still flexible.
Carefully wrap them around the glass holders.
Remove and let them finish drying completely.
Paint in neutral colors or leave natural clay exposed.
Once dry, secure them around the lanterns using strong adhesive or decorative twine.
Place battery-operated candles inside.
When illuminated, the textured patterns cast soft shadows around the room.
The effect feels much more expensive than the actual cost. It also pairs nicely with clay pot ideas aesthetic trends seen throughout modern home decor.
There are moments when simple projects end up looking the most impressive. This is one of those.
10. Clay Terrarium Wall Pockets
I love decor that looks useful and beautiful at the same time. These clay wall pockets bring a little greenery into the room while doubling as artistic living room clay decor.
Instructions
Start by drawing a simple teardrop or half-moon shape on cardboard. This will become your template.
Roll air dry clay to about ¼ inch thick.
Cut two matching shapes for each pocket.
Leave one piece flat. Slightly curve the second piece using a bowl so it develops a gentle rounded shape.
Let both pieces firm up for about an hour.
Carefully score the edges with a toothpick. Add a little water and press the pieces together around the sides and bottom, leaving the top open.
Smooth the seam with damp fingers.
Use a straw to create one or two hanging holes near the top.
Allow the pocket to dry completely. Don’t rush this step. Trapped moisture can cause cracks later.
Lightly sand rough spots.
Paint in warm earthy shades such as clay beige, muted terracotta, soft olive, or creamy white.
Once dry, hang the pockets and add faux greenery, dried eucalyptus, pampas grass, or preserved moss.
Avoid heavy live plants unless the pocket is reinforced.
The finished result sits somewhere between sculpture and planter. It feels fresh without screaming for attention.
This project also fits beautifully with clay pot inspo trends while offering something a little less expected.
11. Handmade Clay Record-Inspired Wall Art
This project was born from staring at an old vinyl collection and wondering if circles alone could become wall art.
Turns out they can.
The finished piece feels modern, artistic, and surprisingly sophisticated.
Instructions
Roll out several sheets of air dry clay.
Using bowls or large cookie cutters, cut circles in multiple sizes.
Create between six and twelve discs.
Before drying, add texture to some pieces.
Press rough linen fabric into one disc.
Create concentric rings on another using a bottle cap.
Leave a few completely smooth.
Let everything dry fully.
Paint the discs using a coordinated palette. Cream, charcoal, muted terracotta, warm taupe, and sandstone work wonderfully together.
Some discs can be painted half-and-half for a contemporary look.
Arrange the circles on the floor first.
Experiment with layouts until you find a grouping that feels balanced.
Mount them directly onto the wall using removable adhesive strips.
The varying sizes create movement across the wall.
From a distance, the display almost resembles oversized records or abstract pottery forms.
And the best part? No two arrangements ever look exactly the same.
I tried measuring every gap once and it actually looked worse.
12. Tiny Dinosaur Pottery Shelf Collection
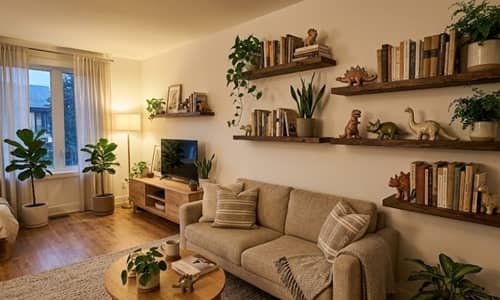
Most people expect dinosaur-themed decor to belong in a kid’s room.
This project proves otherwise.
Inspired by clay dinosaur inspo and handmade dinosaur pottery trends, these small sculptural pieces become charming conversation starters for open shelves and consoles.
Instructions
Roll small portions of air dry clay into palm-sized shapes.
Create simplified dinosaur silhouettes rather than realistic ones.
Think rounded brontosaurus shapes.
Tiny stegosauruses.
Chunky triceratops forms.
Keep details minimal.
Use basic tools or toothpicks to add subtle eyes, scales, or surface texture.
Don’t aim for perfection. The slightly awkward shapes often end up being the cutest.
Allow the figures to dry thoroughly.
Sand lightly where needed.
Paint them using mature, earthy colors rather than bright children’s colors.
Try warm stone gray.
Dusty terracotta.
Creamy beige.
Muted olive.
For a pottery-inspired finish, dry brush a lighter shade across raised areas.
Display the collection in groups of three or five on floating shelves, bookcases, or media units.
Mix them among books, candles, and small plants.
The result feels artistic and unexpected rather than themed.
A few of mine ended up leaning sideways after drying, which wasn’t exactly planned but somehow added even more personality.
Final Thoughts
The secret to memorable living room clay decor isn’t perfection. In fact, perfection can sometimes make handmade pieces feel less interesting.
The tiny fingerprints, uneven edges, and unexpected textures are often what give clay creations their character.
When decorating a space, many people focus only on color or furniture, but texture quietly does a huge amount of the work.
Clay introduces depth, shadow, and warmth that mass-produced decor often lacks. That’s why air dry clay decor, polymer clay decor, quirky pottery, and even unusual ideas inspired by handmade dinosaur pottery continue gaining attention.
A room doesn’t need more stuff. Sometimes it simply needs a few pieces that have a story behind them.