If you’re anything like me, you probably look at fallen leaves and wonder if they could become something more than yard waste. That’s exactly why I love creating cornstarch clay leaf decor.
The texture of real leaves pairs beautifully with homemade clay, and the results look surprisingly charming without costing much.
Some projects feel rustic, others look almost boutique-store worthy. The best part? Most of these ideas are beginner-friendly and don’t require special tools.
Whether you’re trying a clay leaf dish craft, experimenting with a clay leaf bowl craft, or simply searching for fresh clay leaf craft ideas, these unique Cornstarch Clay Leaf decor projects will help you create pieces that feel personal rather than mass-produced.
1. Pressed Botanical Leaf Trinket Dish
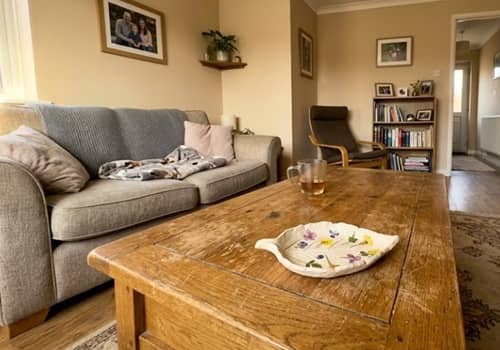
This Diy cornstarch clay leaf dish combines real leaf textures with delicate pressed flowers, creating something that feels handmade in the best possible way.
Start by making your cornstarch clay. In a saucepan, combine 1 cup cornstarch, 2 cups baking soda, and 1¼ cups water.
Cook over medium heat while stirring continuously. After several minutes the mixture will thicken into a mashed-potato-like consistency.
Transfer it onto a plate and cover with a damp cloth. Let it cool until comfortable to touch.
Knead the clay for about 5 minutes. If it sticks, dust your hands lightly with cornstarch.
Roll the clay to about ¼ inch thick.
Choose a large leaf with visible veins. Maple leaves work nicely but almost any textured leaf can work.
Place the leaf vein-side down onto the clay and roll gently over it with a rolling pin.
Remove the leaf carefully. You should now see detailed impressions.
Use a craft knife to cut around the leaf shape.
Gently place tiny pressed flowers or dried petals into selected areas. Press them lightly so they become part of the surface.
Place the leaf onto an upside-down bowl to create a shallow dish shape.
Give it 24 to 48 hours to dry. Turn it occasionally so drying remains even.
Once dry, seal with matte Mod Podge or a clear acrylic sealer.
It don’t need to look perfect. In fact, slight imperfections make it feel more authentic.
2. Floating Leaf Wall Tiles

Most clay leaf craft ideas focus on bowls or trays. This one becomes wall art instead, which gives it a completely different personality.
Prepare your cornstarch clay using the same recipe.
Roll the clay into a large flat sheet roughly ¼ inch thick.
Instead of making one large leaf, create several leaf shapes ranging from 3 to 6 inches.
Press different leaf varieties into each piece. Try mixing oak, eucalyptus, and magnolia leaves for variety.
Cut around each impression.
Before drying, use a straw to create a small hole near the top of every tile.
Allow the pieces to dry completely.
Lightly sand rough edges.
Paint each tile using diluted watercolor paint. Soft sage green, dusty beige, muted terracotta, and faded cream work beautifully together.
Thread natural jute twine through the holes.
Hang the leaves at staggered heights from a driftwood branch or rustic stick.
The arrangement looks almost like leaves floating through the air. People often ask where it came from because it dosent resemble typical DIY decor.
Display the finished piece above a side table, reading nook, or entryway.
3. Layered Woodland Leaf Bowl

If you’ve ever searched for how to make clay leaf dish projects but wanted something deeper and more sculptural, this layered design is worth trying.
Prepare fresh cornstarch clay.
Roll the clay into several medium-sized sheets.
Select three different leaf shapes. The variation creates a more organic appearance.
Press leaf textures into each sheet.
Cut out the leaf shapes.
Choose a medium mixing bowl and cover the outside with plastic wrap.
Place the largest leaf on top of the bowl.
Add the second leaf slightly overlapping the first.
Continue layering until the bowl shape feels balanced.
Gently smooth only the overlapping edges while preserving most of the texture details.
Leave the entire piece on the bowl while drying.
After 24 hours, remove carefully and continue drying if needed.
Paint lightly with watered-down acrylics in mushroom brown, dusty olive, or faded bronze.
Apply a matte finish.
The overlapping leaves create depth and shadows that shift throughout the day. Sometimes the bowl look completely different depending on where the sunlight lands.
This clay leaf bowl craft works beautifully on entry tables for keys, dried flowers, or seasonal decorations.
4. Fossil Frame Leaf Gallery
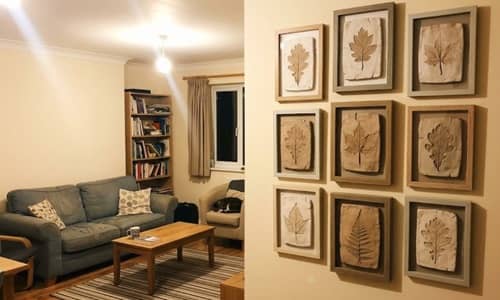
Some cornstarch clay leaf decor ideas look best when they feel like little discoveries from nature. This project creates the appearance of botanical fossils displayed inside a frame.
Prepare your cornstarch clay and knead until smooth.
Roll it to about ¼ inch thickness.
Gather several leaves with dramatically different vein patterns. Ferns, maple leaves, and rose leaves create interesting contrasts.
Press each leaf firmly into the clay.
Instead of cutting around the leaf shape, cut square or rectangular tiles around each impression.
Carefully remove the leaves.
Use a ruler to keep the tile edges neat.
Allow the tiles to dry completely for 24 to 48 hours.
Once dry, lightly sand the edges.
Mix a small amount of brown, gray, and cream acrylic paint.
After painting the entire tile, use a cloth to quickly remove the majority of the paint. This highlights the recessed leaf details and creates a fossil-like effect.
Place several finished tiles inside a shadow box frame or large picture frame.
Space them evenly.
You dont need expensive materials here. The texture itself becomes the artwork.
Hang the frame in a hallway, living room, or reading corner.
5. Leaf Lantern Glow Plaque
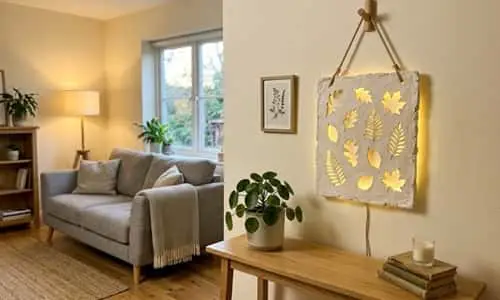
Want something that feels cozy after sunset? This cornstarch clay decor project allows light to peek through leaf-shaped openings.
Prepare fresh clay.
Roll it into a rectangle approximately 8 inches by 10 inches.
Smooth the surface gently.
Place several real leaves onto the clay.
Instead of creating impressions, trace around each leaf with a craft knife.
Remove the leaf shapes completely so open spaces remain.
Think of it like creating a stencil.
Allow the plaque to partially firm up for about 30 minutes.
Create two small holes at the top for hanging.
Let it dry completely.
Once hardened, paint it with soft earthy tones or leave it natural.
Thread twine through the holes.
Hang the plaque in front of a battery-operated candle lantern or LED light source.
Never place it near real flames.
As the light shines through the leaf cutouts, beautiful shadows appear across the wall.
The first time I made one, I kept checking it throughout the evening because the shadows changed constantly.
This project works especially well during autumn decorating season.
6. Storybook Leaf Name Tags
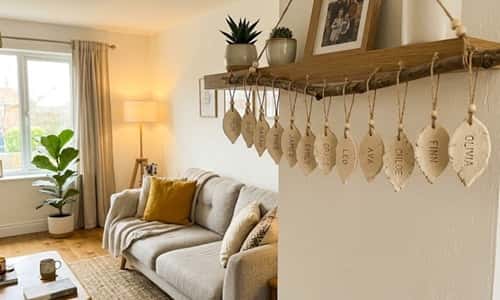
This project turns ordinary leaf decor into something personal. It also makes wonderful seasonal gifts.
Prepare your cornstarch clay mixture.
Roll the clay into a smooth sheet.
Choose medium-sized leaves with attractive shapes.
Press each leaf into the clay.
Cut around every leaf.
Before drying, use a wooden skewer to carefully write names, meaningful words, dates, or short family quotes into the clay.
You can write things like “Gather,” “Home,” “Thankful,” or family member names.
Create a small hole at the top.
Allow the leaves to dry completely.
Sand rough areas gently if needed.
Apply a thin wash of diluted acrylic paint.
Wipe away excess paint to keep the engraved letters readable.
Thread ribbon, twine, or natural cord through each tag.
Hang them from baskets, decorative branches, shelves, or seasonal centerpieces.
Its funny how a simple word can make a handmade object feel much more meaningful.
These tags also pair beautifully with other clay leaf craft ideas around the home.
7. Woven Clay Leaf Mobile

Most people think clay is rigid and heavy. This project plays with movement instead, which makes it stand out from typical cornstarch clay leaf decor ideas.
Prepare your cornstarch clay as usual.
Roll the clay into a sheet about ¼ inch thick.
Press several different leaves into the clay surface.
Cut around each leaf shape carefully.
Create at least 10 to 15 leaves in various sizes.
Before drying, poke two tiny holes near the top and bottom of each leaf.
Allow them to dry completely.
Once hardened, paint them using soft earthy colors. Try muted sage, warm cream, faded bronze, or dusty terracotta.
After the paint dries, thread natural jute twine through the holes.
Connect the leaves vertically so they form hanging strands.
Tie several strands to a wooden embroidery hoop, driftwood branch, or sturdy stick.
Leave different lengths between strands for a more natural look.
When air moves through the room, the leaves sway gently. It almost feels like a tiny indoor tree moving with the breeze.
Hang the finished mobile near a window, reading chair, or corner shelf.
This cornstarch clay decor project looks surprisingly elegant despite being very beginner friendly.
8. Leaf Pocket Vase For Dried Stems

If you’re searching for unusual clay leaf craft ideas, this one feels almost like something from a boutique home store.
Prepare fresh cornstarch clay.
Roll out two large leaf impressions using oversized leaves.
Rhubarb leaves work wonderfully if available, though large maple leaves also work well.
Cut out both leaf shapes.
Place one leaf flat on your work surface.
Position the second leaf on top.
Leave the upper portion open while gently sealing the side and bottom edges together.
Think of it like creating a pocket.
Smooth only the edges where the leaves meet.
Preserve all vein details.
Let the piece dry while resting against a rolled towel so it develops a slight curved shape.
Allow 24 to 48 hours for drying.
Paint lightly with diluted acrylic paint or leave natural.
Apply a matte sealer.
Once finished, insert dried grasses, eucalyptus stems, bunny tails, or preserved flowers into the pocket opening.
The result looks artistic but not overly polished. Sometimes handmade decor is more interesting when it looks a little imperfect.
This project pairs beautifully with a Diy cornstarch clay leaf dish displayed nearby.
9. Forest Canopy Leaf Wreath
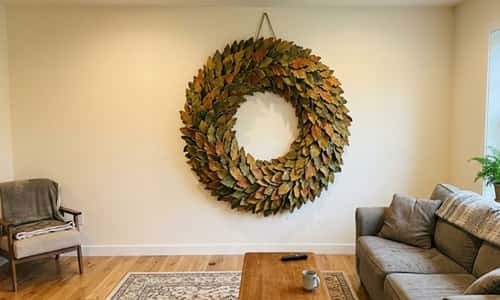
Traditional wreaths often use artificial greenery. This version relies almost entirely on handmade leaves, creating a completely different visual effect.
Also, before you could start with this project, you must know that this project will take time and its kinda time consuming.
So, approach or start this project only if you could ride that pain of spending hours building it.
If you intend to go ahead with this project then prepare a large batch of cornstarch clay.
Roll the clay into multiple sheets.
Press various real leaves into the clay.
Create at least 20 to 30 leaf cutouts in different sizes.
Some should be large. Others should be quite small.
Before drying, gently bend a few leaves to create natural curves.
Dry all pieces completely.
Paint them in layered woodland colors such as moss green, faded olive, bark brown, muted gold, and soft cream.
Allow the paint to dry thoroughly.
Use a grapevine wreath base or metal wreath ring.
Attach the clay leaves using strong craft glue.
Layer them in overlapping clusters.
Turn some leaves sideways rather than placing everything flat.
That little trick creates much more depth.
Add a few dried seed pods or preserved twigs if desired.
There is something oddly satisfying about seeing dozens of individual handmade leaves come together into one statement piece.
Display the finished wreath above a fireplace, on a living room wall, or over a console table.
10. Negative-Space Leaf Sculpture

This is probably the most unexpected project on this list. Instead of focusing on the leaf itself, you’ll showcase the empty space around it.
Prepare your cornstarch clay mixture and knead until smooth.
Roll the clay into a rectangle about 8 inches wide and 10 inches tall.
Place a large leaf in the center.
Use a craft knife to carefully cut around the leaf.
Remove the leaf-shaped section completely.
What remains is a frame with a leaf-shaped opening in the middle.
Allow the piece to dry for about 20 minutes so it becomes slightly firmer.
Gently curve the entire piece before it fully hardens. You can prop it between books or small containers.
Let it dry completely.
Sand rough edges lightly.
Paint with soft neutral shades such as warm stone, creamy beige, or pale gray.
Apply a matte sealer.
Place the sculpture upright on a shelf, mantel, or side table.
As sunlight moves through the room, shadows pass through the leaf opening and create changing patterns on nearby surfaces.
I was surprised how expensive-looking this turned out considering the materials cost very little.
This project proves that cornstarch clay leaf decor doesn’t always need lots of embellishment to feel special.
11. Four-Season Leaf Calendar Display
This project combines home decor with a storytelling element, making it one of my favorite cornstarch clay leaf decor ideas.
Prepare your cornstarch clay.
Create four large leaf impressions.
Each leaf will represent a different season.
For spring, choose a fresh green-inspired design.
For summer, create a leaf with subtle sun patterns etched into the clay.
For autumn, emphasize detailed veins and texture.
For winter, add tiny snowflake-inspired markings around the edges.
Allow all four leaves to dry completely.
Paint each leaf according to its season.
Use soft watercolor-style washes rather than heavy paint.
Attach the leaves vertically to a wooden board using strong adhesive.
Under each leaf, write a favorite family memory, seasonal goal, or meaningful date using a paint pen.
You can update these memories every year if you like.
The display becomes part decor and part family keepsake.
It remind you how quickly seasons pass, which makes it feel more meaningful than ordinary wall art.
Hang the finished piece where family members can easily see it.
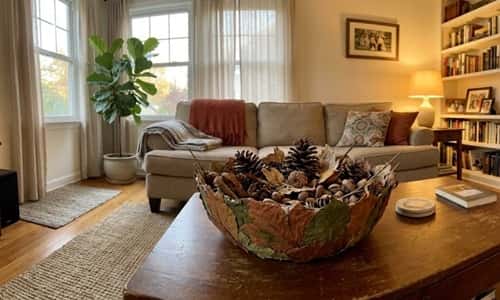
12. Woodland Harvest Centerpiece Bowl
If you’ve been wondering how to make clay leaf dish projects that can become a true focal point, this one delivers.
Start by preparing a generous batch of cornstarch clay.
Roll out multiple sheets.
Create several large leaf impressions using different leaf varieties.
Cut out the leaf shapes carefully.
Choose a large mixing bowl and cover the outside with plastic wrap.
Layer the leaves over the bowl, overlapping edges generously.
Unlike a traditional clay leaf bowl craft, this version should look full and abundant.
Press overlapping areas together gently.
Allow some leaf tips to curl naturally upward.
Leave the entire structure on the bowl while drying.
After 24 to 48 hours, remove carefully.
Continue drying if needed.
Paint with layered earthy colors such as olive green, muted gold, soft brown, and warm copper.
Apply a protective matte sealer.
Fill the finished bowl with pinecones, dried oranges, acorns, preserved eucalyptus, or seasonal decorations.
Every leaf contributes texture, making the finished piece feel rich and dimensional.
There are plenty of clay leaf dish craft tutorials online, but few create the dramatic layered effect that this centerpiece offers.
Final Thoughts
The thing I enjoy most about cornstarch clay leaf decor is how it captures details that often go unnoticed outdoors.
A tiny vein, a curled edge, even a small tear in a leaf can become part of the finished design. That’s what makes these projects feel different from mass-produced decorations.
Nature already provides the patterns; we’re simply preserving them in another form.
The next time you spot an interesting leaf on a walk, don’t rush past it.
Some of the best clay leaf craft ideas begin with something most people would never think to pick up.
Creativity isn’t always about adding more. Sometimes it’s about noticing more.