Farmhouse clay decor has a funny way of making a home feel collected rather than decorated. Maybe it’s the handmade texture.
Maybe it’s those tiny imperfections that factory-made pieces can never copy.
I love projects that look expensive but quietly reveal they were made on a kitchen table with simple supplies. That’s exactly what this list is about.
These aren’t the usual clay crafts you see over and over again.
Instead, you’ll find creative farmhouse clay decor ideas that blend rustic charm, vintage-inspired details, and practical styling.
Some even have potential as clay crafts to sell or unique adult DIY crafts for local markets and craft fairs.
1. Hanging Clay Seed Packet Wall Display
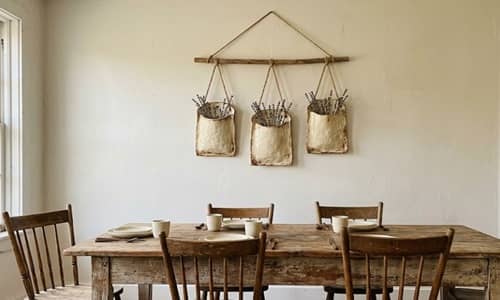
This project was inspired by old farmhouse gardens where seed packets were often tucked into wooden crates and baskets.
Instead of using paper pockets, you’ll create decorative clay seed packet holders that become wall art.
Start by rolling your air dry clay project into a slab about ¼ inch thick. Use a ruler because eyeballing it sometimes works and sometimes don’t.
Cut rectangles measuring roughly 5 inches tall and 3 inches wide.
Now gently fold the bottom third upward to create a pocket shape. Press the side edges firmly so they seal together. Leave the top open.
Using a toothpick, lightly scratch faux wood grain lines across the front. Don’t make them perfectly straight. Real wood never behaves itself.
Create two small holes at the top corners using a straw.
Allow the pieces to firm up for about 2 hours before adding details.
Press tiny clay lavender sprigs, wheat stems, or simple leaf shapes onto the corners. Blend the edges carefully with a damp fingertip.
Let everything dry completely for 24-48 hours.
Paint with warm cream chalk paint.
After drying, lightly dry-brush brown paint over the raised texture.
Thread jute twine through the holes.
Place dried flowers, faux seed packets, or handwritten farmhouse labels inside the pockets.
The finished display creates farmhouse decor using clay that feels collected from an old country cottage rather than purchased yesterday.
2. Rustic Clay Barn Quilt Tiles
Barn quilts are popular in farmhouse decorating, but most people make them from wood. Clay gives them an entirely different personality.
Roll homemade clay into a large slab about ⅜ inch thick.
Cut four 6-inch squares.
Smooth the edges gently.
Draw simple geometric quilt patterns using a pencil. Think diamonds, stars, and pinwheel shapes.
Do not overcomplicate it. Simple designs often looks better from a distance.
Use a clay tool to carve shallow grooves along your pattern lines.
Let the tiles partially dry for about 4 hours.
Mix muted farmhouse colors like dusty blue, faded red, cream, sage green, and soft mustard.
Paint each section carefully.
Once dry, lightly sand random areas to create a naturally aged appearance.
Seal with matte varnish.
Attach picture hangers to the back or place them on floating shelves.
What makes this farmhouse clay decor idea special is the combination of traditional barn quilt styling with handcrafted clay texture.
These also work surprisingly well as polymer clay crafts to sell at local craft events.
3. Clay Herb Bundle Plaques
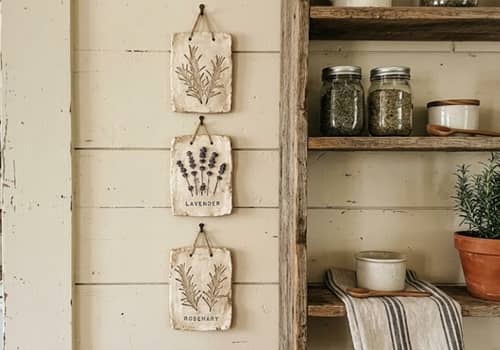
I made something similar years ago after noticing how beautiful hanging herb bundles looked in old farmhouse kitchens. Instead of real herbs, you’ll preserve the look permanently in clay.
Roll clay to approximately ¼ inch thickness.
Cut oval plaques about 8 inches tall.
Smooth the surface but leave a little texture. Too smooth feels store-bought.
Gather fresh rosemary, thyme, sage, or lavender stems.
Press them firmly into the clay surface.
Remove them carefully.
The impression left behind becomes your design.
Next, sculpt a tiny bow from clay and place it at the top of the herb arrangement.
Blend the attachment points using a damp brush.
Create a hanging hole near the top.
Allow the plaque to dry completely.
Paint with soft cream, antique white, or pale beige.
Apply a brown antiquing glaze and immediately wipe most of it away.
The glaze settles into the herb impressions and highlights every detail.
Finish with matte sealer.
Hang individually or group three plaques together vertically.
This clay craft for farmhouse decor works beautifully in kitchens, laundry rooms, entryways, and even covered porches.
As a bonus, they often attract buyers looking for clay projects to sell because each plaque can feature different herbs and finishes.
4. Clay Fence Post Lantern Frames
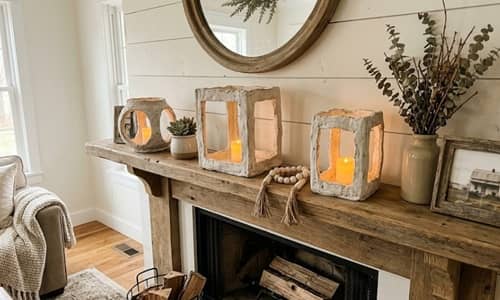
Most farmhouse lanterns are metal or wood. That’s exactly why this version catches attention. It feels familiar, but people can’t quite figure out why it looks different.
Start by rolling air dry clay into long strips about ½ inch wide and ¼ inch thick.
Cut four strips measuring roughly 8 inches long.
Create a square frame by joining the strips together. Reinforce every corner with a small amount of clay.
Make three additional matching frames.
Allow them to firm up for 1 or 2 hours.
Stand the frames upright and connect them using shorter clay strips at each corner.
Work slowly here. If the clay is too soft, things gets wobbly fast.
Create a simple peaked farmhouse roof using two clay rectangles.
Attach the roof carefully.
Add subtle wood-grain texture using a toothpick.
Allow the structure to dry completely.
Paint with weathered white chalk paint.
Lightly distress edges with fine sandpaper.
Place a battery-operated tea light inside.
The lantern frame throws beautiful shadows at night while still looking like farmhouse clay decor during the day.
These are excellent diy clay decor pieces because they work in every season without needing major changes.
5. Vintage Butter Mold Clay Wall Collection
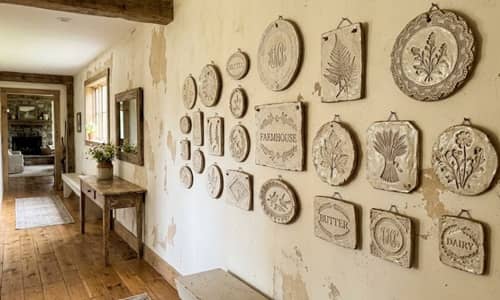
Old butter molds inspired this project, but instead of hunting antique markets, you’ll create your own collection.
Roll homemade clay into a slab about ⅜ inch thick.
Using round cookie cutters, cut circles between 4 and 6 inches wide.
You can also make squares and rectangles for variety.
Now comes the fun part.
Press lace, vintage doilies, woven placemats, wooden stamps, leaves, or textured fabric into the surface.
Apply even pressure.
Remove carefully.
The texture should remain clearly visible.
Create a small hanging hole at the top of each piece.
Allow everything to dry fully.
Paint with soft cream.
After drying, rub a very thin layer of brown wax or antiquing glaze over the raised patterns.
Wipe excess away immediately.
This creates depth and age.
Arrange five to seven pieces on a wall as a collection rather than hanging one by itself.
A grouped display feels much more authentic.
This farmhouse decor using clay often sparks conversation because every piece carries a different pattern and story.
Many crafters also turn these into clay crafts to sell by offering personalized textures or family initials.
6. Clay Grain Sack Wall Tags
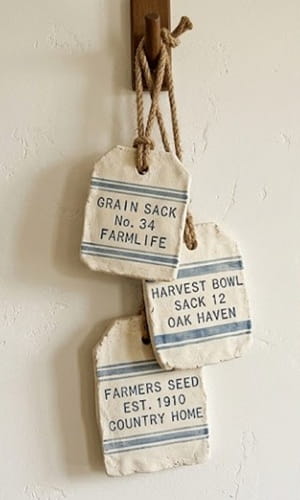
Grain sacks have been part of farmhouse style for years, but clay versions create a completely unexpected twist.
Roll clay into a large slab about ¼ inch thick.
Cut oversized tag shapes about 7 inches tall.
Round the corners slightly.
Create a large hole at the top using a bottle cap or round cutter.
Smooth edges lightly.
Now use a ruler and toothpick to carve simple grain sack stripes running vertically.
Keep the lines slightly uneven.
Perfect lines actually makes it look less handmade.
Stamp words like “Lavender,” “Harvest,” “Farm Fresh,” or “Gather” into the center.
You can use alphabet stamps or carefully carve letters yourself.
Allow the tags to dry completely.
Paint with warm ivory or aged linen colors.
Add faded blue-gray stripes.
Dry-brush tiny amounts of brown paint around the edges.
Thread thick jute rope through the top opening.
Hang individually or in groups of three.
The oversized scale gives these pieces strong visual impact without overwhelming the room.
They’re also a great example of an air dry clay project that looks expensive despite using inexpensive materials.
If you’re looking into polymer clay crafts to sell, smaller versions of these tags perform surprisingly well at craft fairs.
7. Clay Washboard Botanical Wall Panel
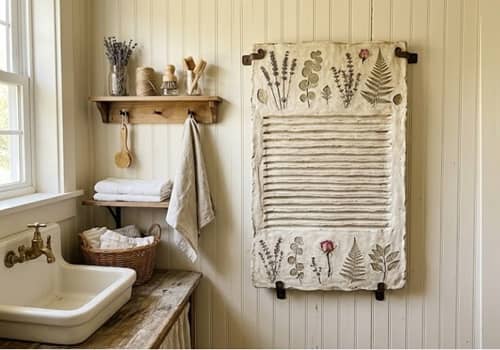
Every farmhouse home seems to have a washboard somewhere. But instead of hanging a real one, why not create a clay version that doubles as artwork?
Roll your clay into a rectangle roughly 10 inches tall and 7 inches wide.
Smooth the edges but don’t obsess over perfection. Tiny flaws is what gives handmade decor its character.
Now create the classic washboard ridges.
Use a wooden skewer or pencil and gently press horizontal grooves across the center section. Space them evenly.
Leave a smooth border around the outside.
Before the clay dries, press small sprigs of rosemary, eucalyptus, wheat stems, or lavender into the border.
Remove them carefully.
The impressions should remain visible.
Create two hanging holes at the top.
Allow the panel to dry completely.
Paint the frame area with antique white chalk paint.
Use a light gray wash over the ridges.
After drying, apply a small amount of brown antiquing wax to settle into the grooves.
The contrast creates beautiful depth.
Hang it in a laundry room, mudroom, or hallway.
People often think it’s a vintage flea market find rather than a homemade clay creation.
This farmhouse clay decor project blends rustic utility and botanical beauty in a way that feels genuinely different.
8. Farmhouse Recipe Board Clay Display
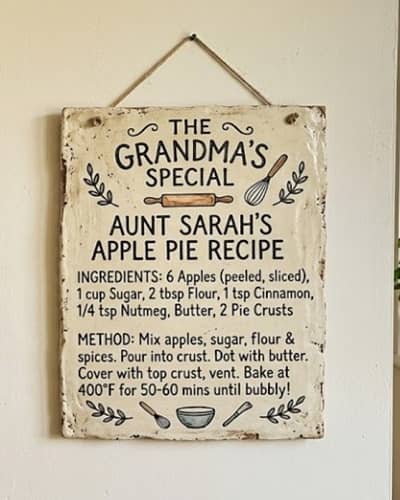
I love decor that tells a story. This project turns a treasured family recipe into farmhouse wall art.
Roll clay into a large rectangle about 11 inches tall and 8 inches wide.
Smooth the surface lightly.
Choose a short family recipe title such as “Grandma’s Biscuits” or “Sunday Cornbread.”
Using alphabet stamps, press the title near the top.
Below that, lightly carve ingredient names using a stylus or dull pencil.
Do not carve every measurement.
Keep it decorative rather than instructional.
Next, create a small rolling pin, spoon, wheat stalk, or mixing bowl from clay.
Attach these accents around the edges.
Blend seams gently with a damp finger.
Allow everything to dry fully.
Paint with warm cream or soft oatmeal tones.
Dry-brush brown paint over raised details.
Lightly distress corners using fine sandpaper.
Add jute twine for hanging.
The finished piece feels personal because nobody else’s version will be exactly the same.
And honestly, those personal touches are what makes farmhouse decor using clay stand apart from mass-produced decor.
This idea can also become one of those clay projects to sell when customized for customers with family names or favorite recipes.
9. Clay Window Shutter Accent Medallions
Here’s something you rarely see.
Instead of decorating a wall directly, these clay pieces decorate existing farmhouse shutters, cabinet doors, or wooden wall panels.
Roll clay into a slab about ⅜ inch thick.
Cut circles roughly 5 inches wide.
You can also use hexagons if you want a slightly different look.
Press a small bowl into the center to create a shallow recessed area.
Next, sculpt a simple raised design.
Try wheat bundles, cotton stems, barn stars, wildflowers, or simple leaf clusters.
Keep the design bold rather than overly detailed.
Fine details often disappear once painted.
Allow the medallions to partially dry for several hours.
Refine edges if needed.
Let them dry completely.
Paint with soft white chalk paint.
Apply an antiquing glaze and wipe away the excess.
The recessed center naturally catches shadows, making the design stand out.
Mount them onto decorative shutters, cabinet doors, entryway panels, or reclaimed wood boards.
It instantly creates architectural interest without spending much money.
This clay craft for farmhouse decor works especially well because it feels like something rescued from an old farmhouse renovation.
Not every adult DIY crafts project manages to pull that off.
10. Clay Flour Scoop Wall Pockets
This one started as an accident. I was trying to make a decorative bowl and ended up with something that looked like an old flour scoop. Turns out, it looked even better hanging on a wall.
Roll air dry clay into a slab about ¼ inch thick.
Cut an oval approximately 8 inches tall.
Now cut a second matching oval.
Set one aside.
Take the second oval and gently curve it into a scoop shape.
Support it with a bowl while it firms up for about 2 hours.
Once slightly firm, attach the curved piece to the flat backing oval.
Press the edges together carefully.
Reinforce the seam with a thin clay coil.
Create a handle at the top using a rolled clay rope.
Texture the handle with light grooves to resemble aged wood.
Allow the entire piece to dry completely.
Paint with antique white chalk paint.
Dry-brush a tiny amount of warm brown paint across the edges.
Hang it on the wall and tuck in dried wheat, lavender stems, faux cotton branches, or seasonal greenery.
The result feels like something pulled from an old farmhouse pantry.
Because it serves both decorative and functional purposes, this farmhouse clay decor project stands out from many common wall plaques.
11. Faux Salvaged Corbel Clay Wall Art
Real architectural corbels can be expensive. Heavy too. Mine nearly fell off a wall once, which was not a fun afternoon.
This clay version captures the same farmhouse character without the weight.
Roll clay into a thick slab approximately ½ inch thick.
Draw a simple corbel profile inspired by vintage farmhouse trim.
Think gentle curves, scrolls, and rounded edges.
Cut two matching pieces.
Press decorative details into the surface using lace, carved stamps, or textured fabric.
Create shallow grooves around the outer edges.
These little details makes a huge difference later.
Allow the pieces to firm slightly.
Attach a backing strip to each piece for additional strength.
Dry completely.
Paint with aged white, soft cream, or weathered gray.
Once dry, lightly distress raised areas with fine sandpaper.
Mount them onto reclaimed wood boards or display them on floating shelves.
They instantly add architectural charm without overwhelming the room.
This farmhouse decor using clay creates a vintage look that many people assume came from an antique market.
For anyone interested in clay crafts to sell, smaller versions can become popular shelf decor pieces.
12. Clay Orchard Harvest Plaque Collection
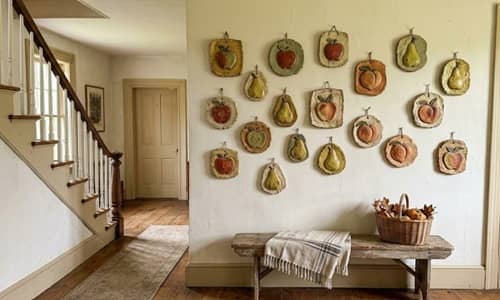
Instead of generic pumpkins or leaves, this collection celebrates the fruits often found around old farmhouses.
Roll homemade clay into a slab roughly ¼ inch thick.
Cut several plaque shapes.
Mix circles, ovals, and arches for variety.
Now sculpt raised fruit designs directly onto the plaques.
Try pears, apples, figs, blackberries, peaches, or cherries.
Keep the shapes simple.
You don’t need museum-level sculpting skills here.
Add tiny leaves and stems to each fruit.
Blend attachment points carefully.
Create hanging holes near the top.
Allow everything to dry fully.
Paint the plaques in muted farmhouse colors.
Think faded greens, dusty reds, soft yellows, and antique creams.
Apply a brown antiquing glaze.
Wipe it away from raised surfaces while allowing it to settle into crevices.
Arrange five to seven plaques together on a wall.
The mixed shapes create movement and visual interest.
What I love most is how this farmhouse clay decor feels seasonal without screaming a specific holiday.
That means it stays relevant much longer throughout the year.
It also works beautifully as an air dry clay project for beginners because the fruit shapes are forgiving and easy to sculpt.
Final Thoughts
The secret behind memorable farmhouse clay decor isn’t perfect sculpting, expensive supplies, or even advanced artistic skill. It is texture.
Old farmhouses naturally collect layers of texture through weathered wood, worn metals, aged fabrics, and handmade objects.
Clay happens to mimic that lived-in character exceptionally well. When creating your own diy clay decor, don’t rush to hide every fingerprint or tiny imperfection.
Those marks often become the details that make a piece feel authentic.
Whether you’re exploring an air dry clay project for your home, creating adult DIY crafts for relaxation, or experimenting with polymer clay crafts to sell, the pieces that tell a story usually end up being the ones people remember most.