I have noticed that most clay photo holder ideas online look nearly identical. Same shapes. Same colors.
Same tiny wire sticking out of a lump of clay. Boring, right? This collection takes a different path.
These projects lean into personality, quirky details, and practical display ideas while still staying beginner-friendly.
Whether you love air dry clay, enjoy experimenting with a new clay craft, or simply want a handmade DIY picture holder for your desk, these ideas are designed so you can actually recreate them without guessing steps.
Grab your clay, clear a little workspace, and lets make something that deserves attention instead of blending into the background.
1. Pebble Stack Clay Photo Holder
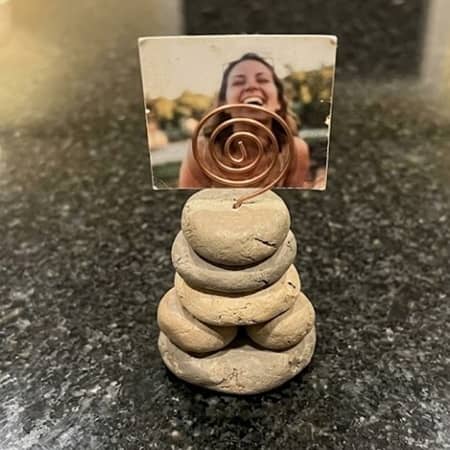
This design looks like a stack of smooth river stones balancing on top of each other. It feels modern but still handmade.
Start with a tennis-ball-sized piece of air dry clay photo holder clay. Divide it into four uneven portions. Roll each piece into a ball, then gently flatten them into thick pebble shapes about 1 inch thick.
Use your fingers to smooth every edge. If cracks appear, dab a tiny amount of water and rub gently.
Take the largest pebble and place it on your table. Stack the others on top while lightly pressing them together. The stack should look slightly imperfect. Perfect is actually less interesting here.
Cut a 5-inch piece of floral wire. Bend the top into a small spiral using pliers. Insert the straight end firmly into the top pebble.
Now carefully separate the pebbles one at a time. Add clay scoring marks where they touch. Brush a little water onto the scored areas and restack them.
Smooth the seams with your finger.
Leave it to dry for 24 to 48 hours.
Once dry, paint each pebble a slightly different earthy shade such as sand, charcoal, gray, or beige. Add a matte sealer if desired.
Slide a photo, postcard, or mini art print into the wire spiral.
This idea is particularly useful as a homemade clay picture holder for floating shelves and office desks.
2. Tiny Rain Cloud Photo Holder
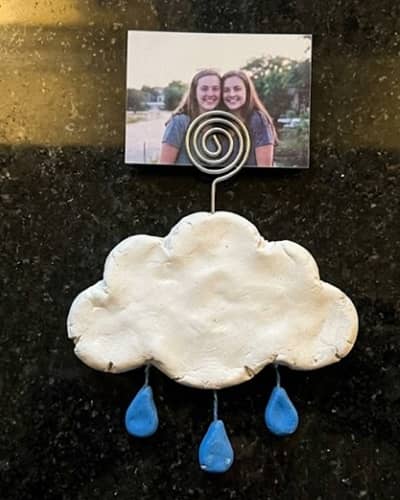
This one feels playful without becoming childish. I actually like how it looks beside framed family photos.
Take a chunk of air dry clay about the size of a large lemon.
Roll it into a ball and flatten the bottom slightly.
Shape the top into a fluffy cloud by pinching gentle rounded bumps around the edges. Don’t overthink it. Clouds isn’t supposed to be symmetrical anyway.
Create five tiny raindrop shapes separately.
Attach the raindrops underneath the cloud using scoring and a little water.
Push a floral wire photo holder into the top center of the cloud.
To make it more stable, gently flatten the base again after inserting the wire.
Let the clay dry completely.
Paint the cloud soft white or pale gray. Paint the raindrops sky blue, navy, or even pastel rainbow colors.
For extra detail, use a fine brush to add tiny highlights on each raindrop.
This doubles as a fun air dry clay picture holder for children’s artwork, school photos, or inspirational quote cards.
The finished piece have a cheerful look without taking up much space.
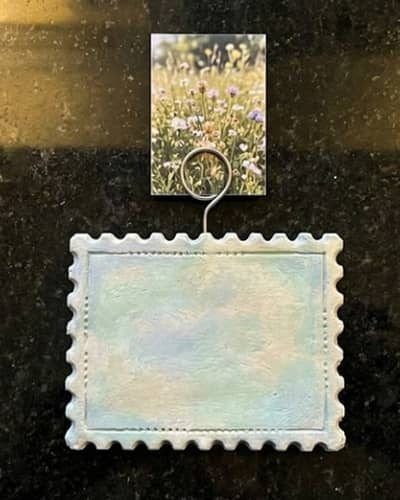
3. Vintage Postage Stamp Photo Holder
If you love travel journals, postcards, or old letters, this one has character.
Roll out air dry clay until it is roughly ¾ inch thick.
Using a ruler, cut a rectangle measuring about 4 inches by 3 inches.
Now create the stamp border. Use a drinking straw to gently press evenly spaced semicircle notches around all four edges.
Take your time here. Small details make a huge difference.
Cut a piece of wire about 5 inches long and twist the top into a decorative loop.
Insert it into the center of the stamp base.
For extra charm, press tiny markings into the clay using old buttons, pen caps, or textured objects before the clay dries.
Leave everything to dry thoroughly.
Paint the holder in faded vintage colors such as cream, dusty blue, antique green, or muted pink.
Dry brush darker paint lightly around the edges to mimic an aged postage stamp.
You can even write a fake postmark date using a fine marker.
This unique diy photo holder displays travel memories beautifully and stands apart from typical clay photo holder designs.
4. Mushroom Lantern Clay Photo Holder
Most mushroom-themed holders stop at being cute. This one secretly creates a cozy display by combining a photo holder with a tiny lantern effect. It feels like something from a miniature storybook village.
Start with a baseball-sized piece of air dry clay. Separate about one-third of the clay for the mushroom cap and reserve the rest for the stem.
Roll the larger portion into a thick cylinder about 3 inches tall. Flatten the bottom so it stands securely.
Use a pencil to gently hollow out a shallow cavity underneath the stem. This space can later sit over a battery-operated tea light if desired. That is what gives this clay photo holder with smart lighting design its charm.
Shape the remaining clay into a rounded mushroom cap. Press it gently onto the stem without attaching yet.
Score both connecting surfaces using a toothpick. Add a little water and firmly join the pieces.
Create several small circular window holes around the mushroom stem using a straw. Don’t make them too large or the structure may weaken.
Cut a 5-inch floral wire. Create a spiral at one end and insert the straight end into the top center of the mushroom cap.
Smooth all fingerprints using slightly damp fingertips.
Allow the project to dry completely.
Paint the cap in earthy red, burnt orange, sage green, or even cream. Paint the stem a soft beige color. Add tiny white dots if you want a woodland look.
Slide a photograph, recipe card, or artwork into the wire spiral.
The finished piece looks magical on a bookshelf, especially during evenings.
5. Folded Paper Boat Clay Photo Holder
I rarely see this design, which is surprising because it works beautifully as a diy picture holder.
Take a large piece of air dry clay photo holder clay and roll it into a thick slab about ¾ inch thick.
Using a craft knife, cut a simple folded paper boat shape. Don’t worry if it isn’t perfectly symmetrical. Real paper boats are usually a little wonky.
Use your fingers to pinch and define the folds. Focus on creating recognizable boat edges and peaks.
Once the shape looks right, gently flatten the underside so it stands securely.
Create a small hole in the center ridge using a skewer.
Take a floral wire and bend the top into a spiral. Insert the straight end into the hole.
Remove the wire temporarily.
Allow the clay boat to partially firm up for about 30 minutes. Then reinsert the wire using a dab of glue if needed.
Let the project dry completely.
Paint it to resemble folded newspaper, vintage maps, comic strips, or watercolor paper. This makes every piece unique.
You could even write tiny destination names on the sides.
6. Moon Crater Polaroid Holder

This project takes inspiration from the moon rather than stars, which makes it feel fresh compared to common celestial crafts.
Begin with a large ball of air dry clay roughly the size of an orange.
Flatten it into a thick circle around 4 inches wide and 1 inch thick.
Use the rounded end of different tools – such as paintbrush handles, markers, and bottle caps – to press crater shapes across the surface.
Vary the sizes. The moon looks more realistic when the craters aren’t all identical.
Flatten the bottom edge slightly so the piece stands upright.
Create a deep slot in the top center using a craft knife. The slot should be wide enough to hold a photo directly without wire.
If desired, insert a decorative wire holder instead.
Refine the crater edges with your fingers.
Allow everything to dry thoroughly.
Paint the surface in layered shades of gray. Use a dry brush technique with lighter gray paint to highlight crater textures.
A little silver paint on the highest spots looks amazing.
This air dry clay polaroid holder displays instant photos beautifully because the moon itself becomes the focal point.
Honestly, it almost looks like a tiny movie prop sitting on a desk.
7. Melted Ice Cream Scoop Clay Photo Holder
This one looks like somebody dropped a scoop of ice cream onto a table and somehow turned it into art. It is quirky, unexpected, and a great conversation starter.
Take a fist-sized piece of air dry clay and roll it into a smooth ball.
Place it onto your work surface and gently press the bottom. Now use your fingers to create soft “melting” drips flowing outward from the base. Let some drips be longer than others. Nature don’t make everything identical.
Create a shallow dome on top so it resembles a scoop of ice cream sitting on a puddle.
Cut a 5-inch floral wire and bend the top into a spiral photo clip.
Insert the straight end into the center of the scoop.
Smooth the clay with damp fingertips and check that the holder stands flat.
Allow it to dry completely.
Paint it like strawberry ice cream, mint chocolate chip, blueberry cheesecake, mango sorbet, or any flavor you like. Add tiny painted sprinkles if desired.
The melting shape gives the piece extra stability while keeping the design playful.
8. Zipper Pull Clay Photo Holder
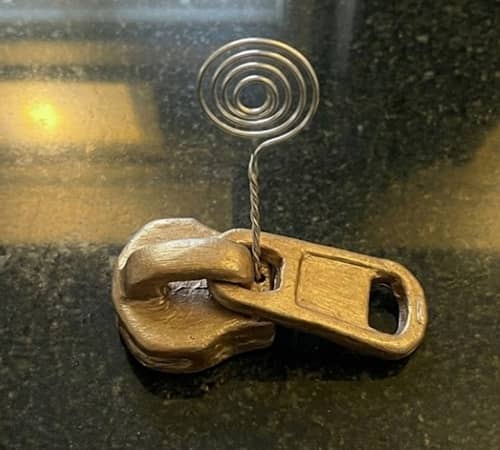
Most people have seen clay animals and flowers. A giant zipper pull? Probably not.
Start with a large piece of air dry clay and roll it into a thick rectangular slab about 4 inches tall.
Shape the slab into a zipper pull tab by rounding the corners and creating a large opening near the top.
Use a craft knife to carve zipper details along one side. Create small repeating tooth shapes. Don’t rush this part because the texture sells the illusion.
Make a separate clay rectangle and attach it to the bottom to mimic the zipper slider body.
Score and join the pieces securely.
Insert a floral wire holder into the top section.
Smooth rough edges using a damp finger.
Let everything dry fully.
Paint the holder metallic silver, brass, black nickel, or antique gold. Add darker paint into the zipper grooves for depth.
When finished, it looks like an oversized zipper frozen in time.
This unusual diy picture holder instantly stands out on a desk or craft shelf because people rarely expect everyday objects to become display pieces.
I still think this one feels oddly satisfying to look at.
9. Tree Stump Ring Photo Holder
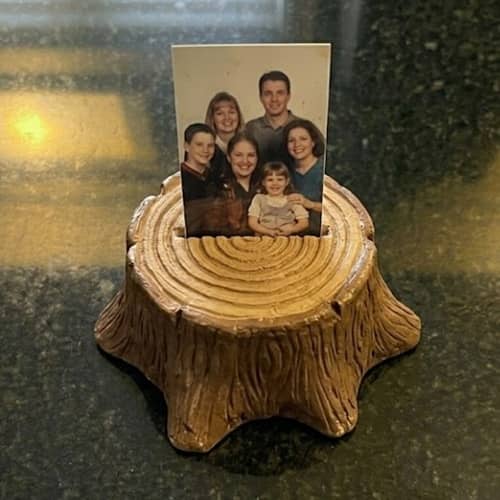
Instead of making a whole tree, focus on the part that tells the story. The growth rings.
Take a ball of air dry clay about the size of a grapefruit.
Roll it into a thick cylinder roughly 3 inches wide and 2 inches tall.
Flatten both ends carefully.
Using a pencil, draw concentric circles across the top surface to mimic tree rings. Some rings should be uneven because real trees are rarely perfect.
Next, use a toothpick to add tiny bark textures around the sides.
Create a narrow slot across the center of the top surface. This slot will hold photos directly, eliminating the need for wire.
If you prefer, you can still insert a decorative wire clip.
Let the piece dry thoroughly.
Paint the top in layered shades of tan, light brown, and dark walnut. Dry brush lighter paint across the raised rings.
Paint the sides slightly darker to resemble bark.
The finished result looks surprisingly realistic and feels more sophisticated than many traditional clay photo holder designs.
This air dry clay picture holder pairs beautifully with nature photos, botanical prints, and rustic home décor.
Somehow it look expensive even though it costs very little to make.
10. Crumpled Ticket Clay Photo Holder
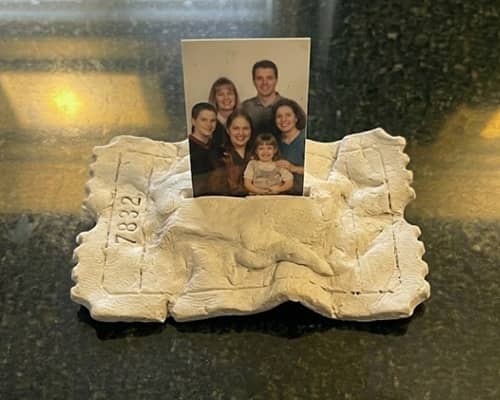
This idea was inspired by old concert tickets, movie stubs, train passes, and little paper keepsakes that usually end up forgotten in drawers.
Take a large piece of air dry clay and roll it into a rectangle about 5 inches long and 3 inches tall.
Round the corners slightly.
Now comes the fun part.
Gently pinch random areas around the rectangle to imitate a ticket that has been folded, bent, and carried around in a pocket for weeks. Don’t overdo it. A few natural-looking creases work better than dozens.
Use a ruler and toothpick to create decorative ticket-style borders.
Press small circles into the edges to mimic ticket perforations.
Create a narrow slot along the top edge for holding photos directly.
Smooth sharp areas with damp fingertips.
Allow the clay to dry completely.
Paint it in faded cream, vintage yellow, pale blue, or light tan. Add handwritten numbers, dates, or fictional destinations using a fine-tip marker.
This diy photo holder feels personal because it resembles the kinds of keepsakes people actually save.
A favorite vacation photo looks right at home here.
11. Floating Lily Pad Clay Photo Holder
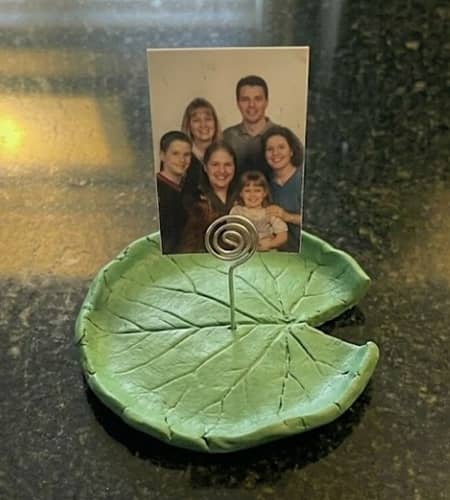
Most flower-themed projects focus on petals. This one focuses on the leaf, which makes it feel a little different from typical floral crafts.
Start with a ball of air dry clay roughly the size of a small orange.
Flatten it into a circular disc about 4 inches wide.
Cut a small wedge from one side to create the classic lily pad shape.
Use a toothpick to draw vein patterns radiating from the center.
Gently curve some edges upward. A perfectly flat lily pad can look lifeless.
Create a thick folded section near the back of the pad to act as the support area.
Insert a floral wire holder into this thicker section.
Smooth fingerprints using slightly damp fingers.
Let the clay dry completely.
Paint the lily pad in layered greens. Add touches of darker green near the veins and lighter green on raised areas.
For extra character, paint tiny water droplets using glossy clear sealer.
This diy clay photo holder looks beautiful with nature photography, garden snapshots, and small artwork prints.
There is something calming about it that photographs surprisingly well.
12. Folded Blanket Corner Clay Photo Holder
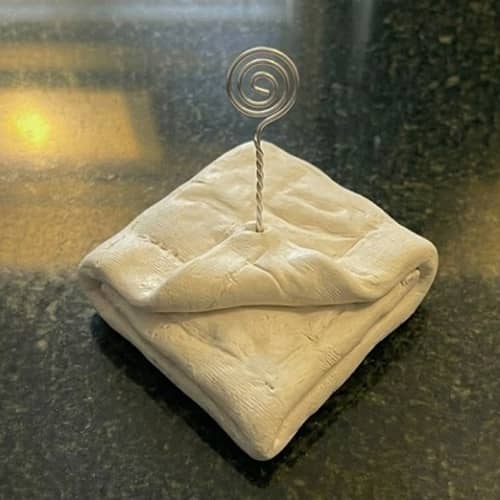
This might be the most unusual project in the entire collection.
Instead of sculpting an object, you are recreating the look of a soft blanket corner folded over itself. The illusion catches people off guard because clay suddenly looks like fabric.
Roll out air dry clay into a rectangle about 5 inches wide and 4 inches long.
Keep it slightly thick so it remains sturdy.
Lift one corner and fold it diagonally toward the center.
Use your fingers and a clay tool to create soft fabric-like wrinkles along the fold.
Pay attention to reference photos of folded blankets if needed.
The goal is gentle movement, not sharp creases.
Create a hidden support wedge underneath the folded area using leftover clay.
Blend it smoothly into the design.
Insert a floral wire holder into the highest folded corner.
Refine all the fabric textures before drying.
Allow the project to dry completely.
Paint it to resemble denim, knitted fabric, fleece, linen, or a cozy woven blanket. Dry brushing works especially well here.
The result becomes a clay photo holder that doesn’t immediately look like clay at all.
People usually need a second glance before they figure out what they’re looking at.
That alone makes it memorable.
Final Thoughts
One thing I have learned while making clay crafts is that the most memorable projects rarely come from copying what everyone else is already doing.
A strong clay photo holder isn’t just a stand for a picture.
It can quietly tell a story, spark a conversation, or remind someone of a place, hobby, season, or memory.
That is why unusual designs often feel more meaningful than perfect ones.
The slight fingerprints, tiny asymmetries, and handmade details become part of the finished piece rather than flaws to hide.
Next time you work with air dry clay, try designing around an emotion, memory, or everyday object instead of following trends. The results are usually far more interesting, and nobody else will have made the exact same thing.