Fall always makes me want to pull out clay, clear a small corner of the table, and make something a little strange.
Maybe that’s why a coraline clay craft feels right at home during spooky season.
The movie’s odd little details, button eyes, secret doors, curious creatures, and slightly unsettling charm fit perfectly beside pumpkins and autumn craft projects.
If you’ve ever wondered, “was Coraline made with clay?” the answer is partly yes – its stop-motion characters were built using handcrafted elements, which makes these projects even more inspiring.
These coraline clay crafts lean into that handmade feeling. Nothing polished. Nothing factory-perfect.
Just creative, slightly quirky pieces that look like they stepped out of a mysterious little world.
1. Mossy Button-Eye Coraline Acorn Guardian
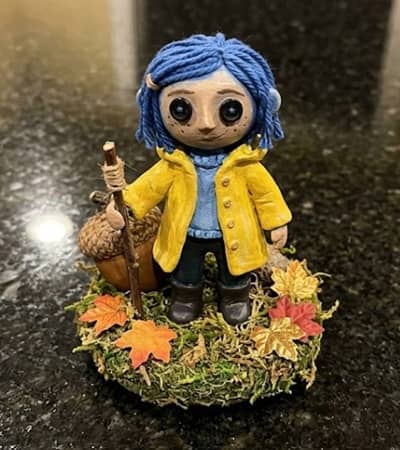
This project combines a woodland autumn craft vibe with classic Coraline-inspired details.
Start by rolling a ball of blue air-dry clay about the size of a walnut. Gently flatten the bottom so it stands upright without wobbling. This becomes the head.
Roll a smaller oval shape using yellow clay. Attach it beneath the head using a toothpick piece or clay scoring method. Smooth the connection carefully. Don’t rush this part because the neck area can crack if it’s too thin.
Create two tiny white circles for eyes. Press them gently into the face. Using a needle tool, make four holes in each eye so they resemble buttons. Already getting spooky, isn’t it?
Roll several thin blue clay strands and attach them around the head to create Coraline’s messy hair. Allow some strands to overlap. Perfect hair isn’t the goal here.
Now make a tiny autumn acorn cap. Use brown clay and press texture into it with a toothbrush. Place it slightly tilted on the head.
For the body, add miniature twig-like arms. Texture them with shallow lines. Attach tiny clay leaves in orange, rust, and golden yellow colors along the sleeves.
Finish by creating a moss-covered base. Blend green clay with tiny rolled balls to mimic moss texture.
Allow everything to dry completely before sealing with a matte varnish.
2. Secret Autumn Door From the Other World
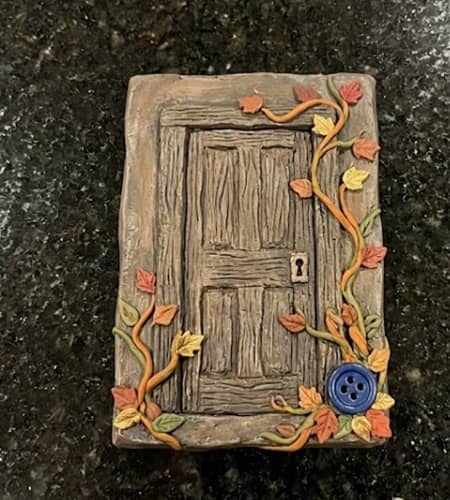
Many diy coraline project ideas focus on characters. This one focuses on the famous door instead.
Roll a rectangle of dark brown clay roughly five inches tall.
Flatten the surface using a rolling pin or smooth glass.
Round the top corners slightly to create an old-fashioned door shape.
Use a sculpting tool to carve wooden plank lines vertically. Make them uneven. Real wood never looks perfectly straight.
Create a tiny door frame using darker clay strips. Attach them around the edges.
Now add miniature autumn vines creeping across the frame. Roll very thin clay snakes and twist them naturally around the door.
Create tiny fall leaves. Maple-shaped leaves work especially well. Press vein details into each one using a needle.
For the keyhole, shape a small brass-colored clay oval and place it in the center.
Here’s where things gets fun.
Create a tiny crack in one corner of the door and place a single blue button partially visible inside. It creates the illusion that another world exists behind the door.
Let dry thoroughly before displaying upright on a shelf.
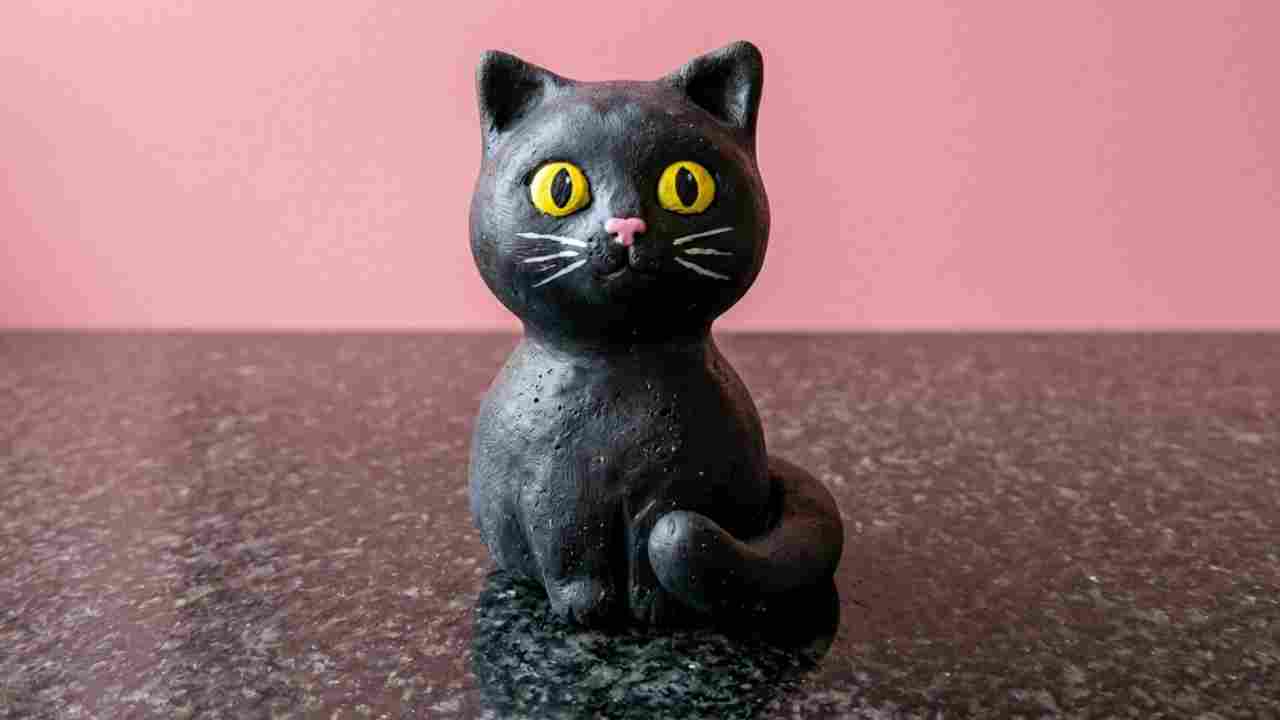
3. Pumpkin Patch Coraline Black Cat
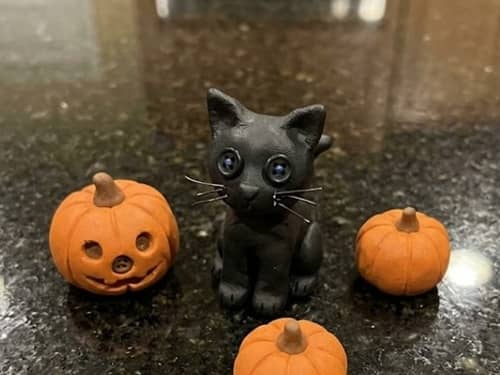
A black cat feels right at home among spooky clay crafts.
Begin with a black clay oval about three inches long.
Pinch one end slightly to form the cat’s chest.
Create four small cylinders for legs. Attach them evenly underneath.
Roll a long curved tail and secure it at the back. Bend it upward for extra personality.
For the head, create a round clay ball slightly larger than a marble.
Add triangular ears. Press gently at the center of each ear to create depth.
Use yellow clay for the eyes. Instead of regular eyes, make button-style eyes by pressing four tiny holes into each one.
Attach tiny whiskers using thin rolled clay strands.
Now create miniature pumpkins around the cat.
Roll several orange balls. Flatten them slightly and carve pumpkin ridges vertically. Add brown stems.
Position the cat sitting among the pumpkins as if guarding a mysterious autumn garden.
One thing people dont realize is that tiny details matter more than size. Even a small leaf beside the cat helps tell the story.
Allow the sculpture to dry fully before sealing.
4. Button-Eyed Crow Scarecrow From the Pink Palace Garden
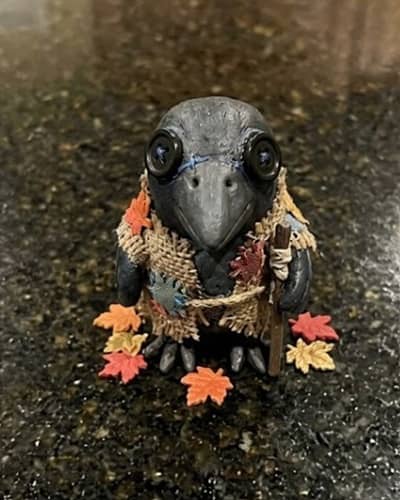
This one blends harvest-season charm with the slightly odd energy that makes Coraline-inspired creations so memorable.
Start by making the scarecrow body. Roll a thick brown clay cylinder about four inches tall. Flatten the bottom so it stands securely.
Create two thinner cylinders for arms. Attach them horizontally across the body. Blend the joints with your fingers.
For the head, roll a black clay ball about the size of a large grape.
Shape a small pointed beak using dark gray clay and attach it to the front.
Instead of regular bird eyes, create two tiny button eyes using cream-colored clay. Press four holes into each one using a toothpick.
Now make the hat. Roll a flat brown circle and place a small dome shape on top. Texture the edges so it looks weathered.
Add tiny straw details using thin yellow clay strands poking from the sleeves and collar.
The fun part comes next.
Create miniature autumn leaves scattered around the scarecrow’s feet. Make each leaf slightly different. Nature isn’t symmetrical and neither should your clay leaves be.
Place the crow scarecrow onto a textured clay patch resembling an overgrown garden.
It look even better if one sleeve hangs slightly lower than the other. Small imperfections make handmade crafts feel alive.
Let everything dry completely.
5. Harvest Moon Snail Messenger
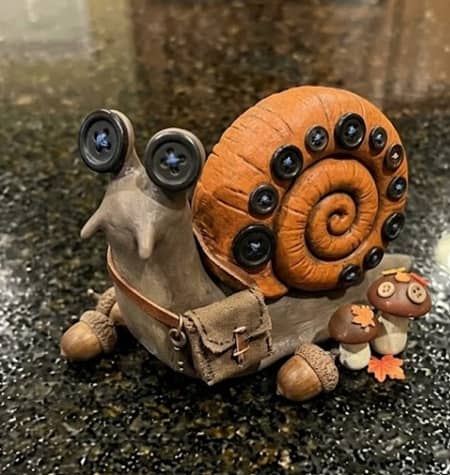
If you’re searching for unusual coraline ceramic ideas or coraline air dry clay projects, this one definitely stands out.
Begin with the snail shell.
Roll a large ball of orange clay. Flatten it slightly and spiral it inward from one side to create a shell.
Next, roll a thick gray clay snake shape for the body.
Attach the shell gently on top.
Create two eyestalks using thin clay pieces. Instead of traditional eyes, add tiny button eyes at the ends. Slightly creepy. Very Coraline.
Now make a miniature messenger bag hanging from the snail’s side.
Roll a tiny rectangle of brown clay and attach a thin strap across the shell.
Inside the bag opening, place a rolled-up clay scroll.
For extra autumn personality, add miniature acorns and tiny mushrooms along the snail’s path.
Texture the shell lightly using a toothbrush.
You don’t need perfection here. Actually, a slightly uneven spiral often looks more natural.
Allow the piece to dry slowly to reduce cracking.
This project sort of feels like it wandered out of a hidden forest nobody knows about.
6. Lantern Mushroom Village Hidden Behind the Little Door
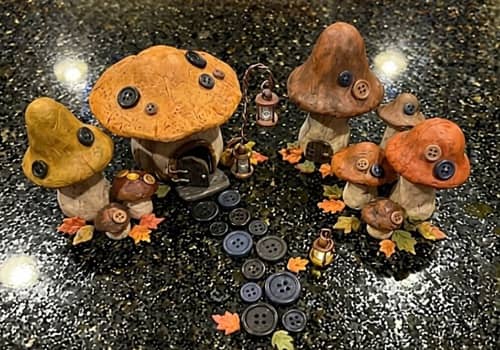
Among all coraline clay crafts, this one creates an entire tiny scene instead of a single character.
Start by creating the mushroom houses.
Roll several mushroom stems using cream-colored clay.
For the caps, use deep orange, burnt red, and golden brown clay shades inspired by fall forests.
Attach each cap carefully.
Using a needle tool, poke tiny window openings into the mushroom stems.
Create tiny lanterns by rolling miniature yellow clay cubes. Attach them beside the doors.
Now build the famous little door.
Use brown clay to make a small arched doorway positioned between the mushroom houses.
Add tiny climbing vines around the frame.
Create a winding pathway using flattened clay strips connecting all the houses.
Here’s a detail many beginners skip.
Add texture everywhere. Press tiny dots into mushrooms. Add bark patterns on doors. Create stone textures along the path. Those tiny details transforms a simple project into a miniature world.
Make several tiny button-shaped stepping stones leading toward the mysterious door.
Some of them can be slightly crooked. Villages built by hand should feel handmade.
Let the entire scene dry on a flat surface.
This idea quietly nods to diy studio ghibli crafts and studio ghibli crafts too because it captures that whimsical tiny-world feeling while still staying firmly rooted in Coraline’s spooky atmosphere.
7. Forgotten Button Tree of the Other Garden
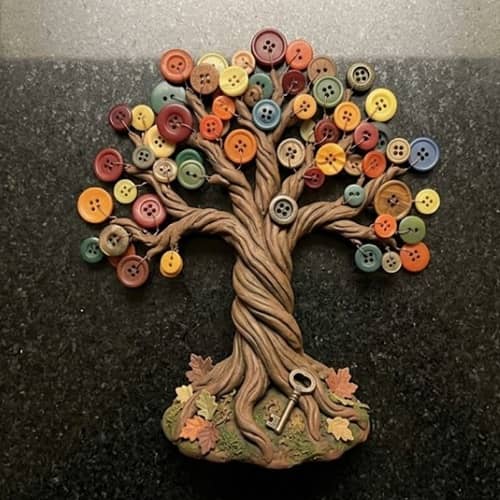
This project feels like something Coraline might stumble across during a chilly autumn afternoon.
Start by creating the tree trunk.
Roll a thick cylinder of brown clay about five inches tall. Gently bend it so the tree leans slightly to one side. Straight trees can look a little boring sometimes.
Press shallow grooves from top to bottom using a sculpting tool to create bark texture.
Now make the branches.
Roll several thin clay ropes and attach them near the top of the trunk. Twist them naturally. Let some branches stretch farther than others.
Instead of leaves, create dozens of tiny buttons using clay.
Roll small balls in shades of blue, cream, black, mustard yellow, and faded orange. Flatten each one and poke four holes through the center.
Attach the buttons throughout the branches as if they are growing from the tree.
Next, create a small pile of fallen button leaves underneath. Scatter them naturally across the base.
For extra mystery, place a tiny clay key half-buried near the roots.
Many people focus only on characters when making coraline clay crafts, but props and environments often tell richer stories.
The tree shouldn’t look too neat. A slightly crooked branch actually makes it feel more believable.
Allow the sculpture to dry completely before sealing.
8. Coraline’s Autumn Raincoat Ghost

Ever wondered how to make a coraline doll with clay without actually making a full character replica? This idea takes inspiration from her iconic raincoat while adding a spooky fall twist.
Begin by shaping a simple ghost body from white clay.
Roll a large teardrop shape and flatten the bottom so it can stand upright.
Gently pull and stretch the lower edges to create soft ghost-like folds.
Now create a miniature yellow raincoat.
Roll yellow clay thinly and cut small coat panels.
Wrap the panels around the ghost body, leaving portions of the white ghost visible underneath.
Create tiny sleeves and a collar.
For the face, add two button eyes using dark blue clay.
Keep the mouth simple. A tiny curved line works perfectly.
Next, create several floating autumn leaves around the ghost.
Use orange, amber, and rusty red clay colors. Press leaf vein details using a needle tool.
Attach the leaves as if they’re swirling around the figure in a windy autumn afternoon.
The coat don’t have to fit perfectly. In fact, slight wrinkles add character.
Let the entire piece dry thoroughly.
9. Midnight Pumpkin Carriage Mouse
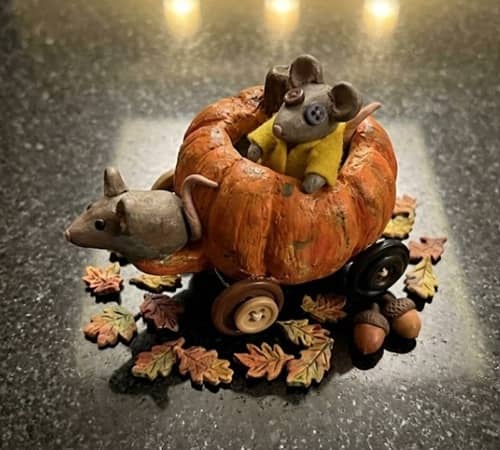
Fans often ask whether “was Coraline made with clay” because so many characters feel handmade and tactile. This project captures that same handcrafted charm.
Start with the mouse.
Roll a gray clay oval for the body.
Add four tiny legs underneath.
Shape a pointed nose and attach two round ears on top.
Create a long curved tail using a thin clay rope.
For the eyes, use miniature black buttons instead of traditional eyes.
Now build the pumpkin carriage.
Roll an orange clay ball slightly larger than the mouse.
Carve vertical pumpkin ridges around the entire surface.
Carefully cut out a small doorway opening.
Add a tiny brown stem on top.
Position the mouse beside the carriage or partially peeking out from the opening.
Create miniature wheels using button-shaped clay discs.
To bring everything together, add tiny scattered acorns and fallen leaves around the base.
One little detail can completely change the mood. A slightly tilted pumpkin door makes the carriage feel wonderfully strange.
This piece looks especially charming displayed with other spooky clay crafts during the fall season.
Allow everything to dry fully before handling.
10. The Button Collector’s Autumn Wagon
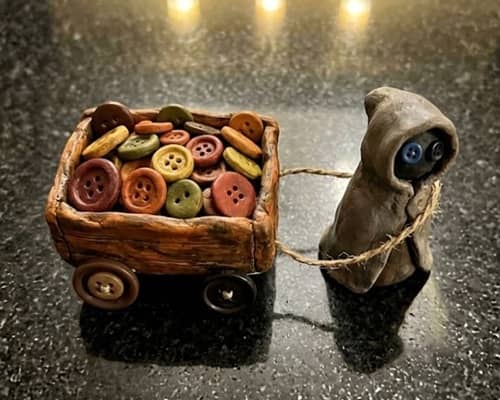
Some of the best diy coraline project ideas feel like they belong in the story without actually appearing in it. This is one of those.
Start by creating a small wooden-style wagon.
Roll brown clay into a rectangle about four inches long. Flatten the sides and smooth the edges.
Create four wagon wheels using clay discs. Press four tiny holes into each wheel so they resemble oversized buttons.
Attach the wheels carefully and allow them to support the wagon evenly.
Now create the Button Collector.
Instead of making a full character, sculpt only a tiny hooded figure.
Roll a cone-shaped body from dark gray clay.
Create a small round head and place it on top.
For the face, add two mismatched button eyes. One can be larger than the other for a slightly unsettling look.
Fill the wagon with miniature clay buttons in autumn-inspired colors. Use mustard yellow, burnt orange, faded teal, brown, cream, and dark navy.
Scatter a few buttons around the wagon as if they have spilled during a journey through the woods.
Add a tiny lantern hanging from one side.
Honestly, the messier the button pile looks, the better it usually turns out.
Let the sculpture dry completely before moving it.
11. Harvest Moon Button Moth

This project creates a creature that feels like it flew straight out of a forgotten corner of the Other World.
Begin by making the moth body.
Roll a narrow oval using dark gray clay.
Create a slightly larger ball for the head and attach it securely.
Add two curved antennae using thin clay strands.
Now for the wings.
Roll out cream-colored clay until thin.
Cut four wing sections, two larger upper wings and two smaller lower wings.
Press gentle vein patterns into each wing using a needle tool.
Instead of traditional wing spots, create tiny button shapes and attach them across the wings.
Use muted autumn colors such as rust, gold, faded orange, olive green, and brown.
Create a large harvest moon backdrop.
Roll a pale yellow clay circle and texture it lightly with tiny craters.
Attach the moth so it appears to be flying across the moon.
To make the display more interesting, add several miniature falling leaves beneath the moth.
A wing that bends slightly upward actually looks more realistic than one sitting perfectly flat.
This project sits somewhere between coraline clay crafts and decorative coraline ceramic ideas.
Allow everything to dry thoroughly.
12. The Tiny Autumn Apartment Behind the Little Door
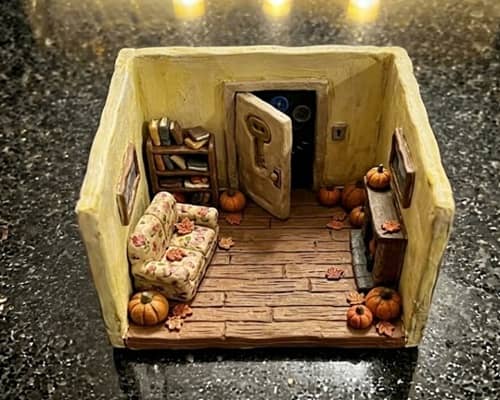
For the final project, let’s build something that feels like a complete miniature story.
Start with a rectangular clay base.
This base becomes the floor of a hidden apartment.
Create a small back wall using brown clay and attach it securely.
Now build the famous little door.
Shape a narrow arched doorway and place it at the center of the wall.
Add tiny wood textures using a sculpting tool.
Next, create miniature furniture.
Make a tiny chair.
A tiny table.
A tiny bookshelf.
Keep everything simple because small details matter more than complicated shapes.
Now decorate the apartment for fall.
Create miniature pumpkins.
Add tiny clay books stacked on shelves.
Make a small mug sitting on the table.
Create a miniature woven-style rug using textured clay.
Here’s where the magic happens.
Place a tiny pair of button eyes peeking from behind the doorway. Not a full character. Just enough to make someone wonder who’s watching from the other side.
That little detail changes the entire scene.
It makes the apartment feel alive.
Add scattered autumn leaves near the doorway and around the room.
Many beginners try to cram too many objects into miniature scenes. Resist that urge. Empty space often creates a stronger story.
Let the entire diorama dry on a completely flat surface before sealing.
This project combines elements of coraline air dry clay projects, miniature world building, spooky clay crafts, and even some inspiration people often associate with diy studio ghibli crafts, while still feeling unmistakably Coraline.
Final Thoughts
One thing I find fascinating about Coraline-inspired crafting is that the most memorable pieces usually aren’t the characters themselves.
They’re the objects. The door left slightly open. The button tucked beneath a tree root. The tiny room that hints at a larger story.
That’s what makes coraline clay crafts so different from many seasonal projects.
You’re not simply sculpting decorations; you’re creating clues that invite people to imagine what happens next.
During fall, when everything already feels a little mysterious, these handmade creations become miniature storytelling tools.
And honestly, that ability to spark curiosity might be the most powerful craft supply sitting on your table.