A Clay worry stone is one of those tiny clay crafts that looks simple until you actually hold one in your hand.
Then it starts making sense.
The smooth surface, the thumb groove, the little details you added yourself.
It becomes something personal. I love projects like this because they don’t require fancy tools, expensive supplies, or expert-level sculpting skills.
Just a bit of air dry clay or polymer clay and some patience.
What makes these handmade clay crafts different from ordinary clay items to make? They serve a purpose beyond decoration.
Some help with mindfulness. Others become pocket-sized reminders of goals, memories, or encouragement.
If you’re looking for clay craft ideas that feel meaningful instead of just pretty, these Clay worry stone projects are worth trying.
Choose Your Clay Type For Clay Worry Stone Craft
Air Dry Clay | Polymer Clay
Affiliate Disclaimer: Some of the links in this post may be affiliate links, which means I may earn a small commission if you choose to make a purchase through them – at no extra cost to you. I only share products that genuinely fit this project and can help make your ceramic mug clay craft process easier and smoother. Your support helps keep ideas like this coming.
1. Moon Crater Clay Worry Stone
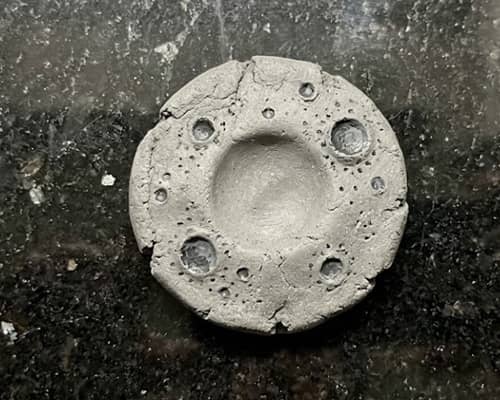
Most Clay worry stone tutorials focus on making the surface perfectly smooth. I wanted the opposite. What if the texture itself became part of the experience?
A moon crater worry stone feels surprisingly satisfying because your thumb naturally moves between the small indentations while still resting inside the main groove.
What You’ll Need
- Air dry clay or polymer clay
- Small ball tool or pencil eraser
- Rolling pin
- Fine grit sandpaper
- Acrylic paint in gray shades
- Clear sealer
Instructions To Make Moon Crater Clay Worry Stone
Step 1: Start with a ball of clay roughly the size of a golf ball and then roll it between your palms until smooth.
Step 2: Flatten it gently into an oval shape about 3 inches long and then press your thumb into the center to create the main worry groove.
Step 3: Make sure the groove is comfortable. Test it several times.
Step 4: Using a pencil eraser, press tiny circles across the surface and dont forget to vary the sizes. Real moon craters are not identical.
Step 5: Don’t place craters inside the thumb groove. Smooth all sharp edges with a damp finger.
Step 6: Allow air dry clay to dry completely according to package instructions and then sand lightly once dry.
Step 7: Paint the stone with medium gray paint and add darker gray inside deeper craters.
Step 8: Dry brush a lighter gray over raised areas and seal everything with a matte protective finish.
It don’t need to look perfect. In fact, a few uneven craters make it feel more realistic.
2. Hidden Message Pocket Worry Stone
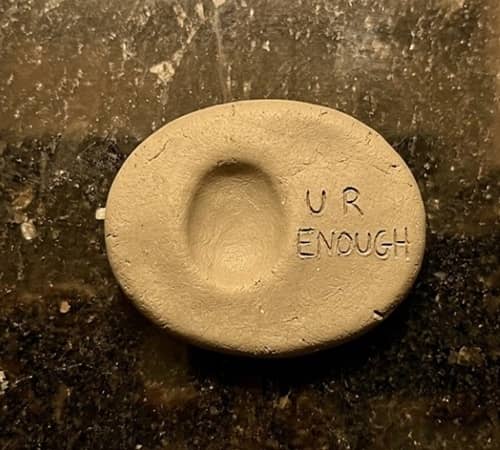
This one doubles as a secret encouragement stone.
The front looks ordinary. Flip it over and there’s a message only the owner knows exists.
Pretty neat, right?
What You’ll Need
- Air dry clay
- Toothpick
- Letter stamps or pencil tip
- Acrylic paint
- Fine brush
- Clear sealer
Instructions To Make Hidden Message Pocket Worry Stone
- Roll clay into a smooth oval.
- Shape it until it comfortably fits inside your palm.
- Create a thumb groove on one side.
- Turn the stone over.
- Using a toothpick, lightly sketch a short phrase.
- Keep it simple:
- Keep Going
- One Step
- You Got This
- Breathe
- Trace over the letters deeper.
- Smooth any rough clay around the wording.
- Let the stone dry completely.
- Paint the entire piece one solid color.
- After drying, use a tiny brush to fill the letters with a contrasting color.
- Wipe mistakes quickly before paint dries.
- Seal the finished stone.
Sometimes people overcomplicate these projects. This one works because it stays simple.
3. Tiny Planet Worry Stone
This one became a favorite because every stone ends up looking completely different.
Instead of copying Earth, invent your own miniature planet.
There are endless possibilities.
What You’ll Need
- White air dry clay
- Acrylic paints
- Small detail brushes
- Clear gloss sealer
- Water cup
Instructions To Make Tiny Planet Worry Stone
- Roll clay into a smooth sphere.
- Flatten it slightly into a thick round disk.
- Press a thumb groove into one side.
- Smooth every edge carefully.
- Dry the clay fully.
- Paint the base color first.
- Choose any theme:
- Lava planet
- Ice world
- Candy planet
- Desert planet
- Ocean planet
- Paint land shapes around the surface.
- Add tiny details using a fine brush.
- Create darker shadows near borders.
- Add lighter highlights on raised areas.
- Let paint dry completely.
- Apply a gloss sealer for a polished planet look.
Some people gets nervous about painting details. Don’t. Tiny imperfections actually make fantasy planets more believable.
4. Pressed Wildflower Clay Worry Stone
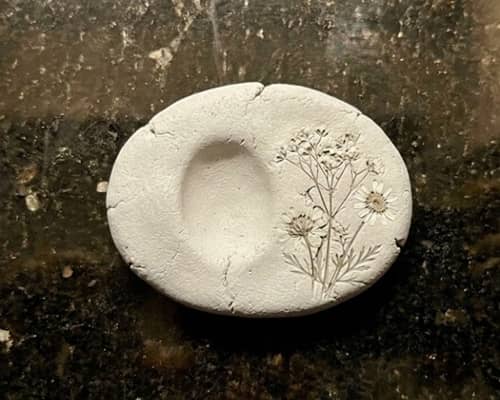
A lot of Clay worry stone ideas focus on paint. This one lets nature do most of the decorating. The finished piece looks calm, handmade, and just a little bit vintage. If you have ever picked up a flower on a walk and thought, “I should save this,” here is your chance.
What You’ll Need
- Air dry clay
- Small dried flowers or pressed leaves
- Rolling pin
- Smooth drinking glass
- Fine grit sandpaper
- Clear matte sealer
Instructions To Make Pressed Wildflower Clay Worry Stone
Step 1: Take a piece of air dry clay about the size of a golf ball.
Step 2: Roll it into a smooth ball using your hands.
Step 3: Flatten the clay into an oval shape approximately 3 inches long.
Step 4: Gently press your thumb into the center to create the worry groove.
Step 5: Test the groove several times. If your thumb feels cramped, make it slightly wider.
Step 6: Place your dried flower or leaf on top of the clay.
Step 7: Use a drinking glass to gently roll over the flower. Do not push too hard.
Step 8: Carefully remove any loose petals.
Step 9: Smooth the outer edges using a damp fingertip.
Step 10: Allow the Clay worry stone to dry completely.
Step 11: Once dry, lightly sand rough edges.
Step 12: Apply a thin coat of matte sealer to protect the botanical imprint.
It looks almost like something you found in an old keepsake box. Which is kinda the charm.
5. Puzzle Piece Clay Worry Stone
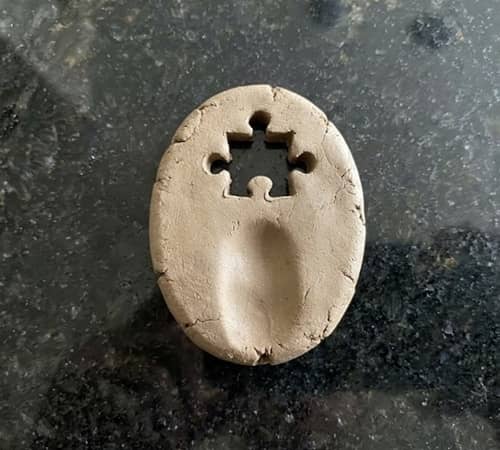
This design was inspired by the idea that nobody has everything figured out. We all carry unfinished pieces. That sounds deep, but honestly it also makes for a really cool Clay worry stone.
What You’ll Need
- Air dry clay or polymer clay
- Pencil
- Craft knife
- Rolling pin
- Sandpaper
- Acrylic paint
- Clear sealer
Step-by-Step Instructions To Make Puzzle Piece Clay Worry Stone
Step 1: Roll a ball of clay until smooth.
Step 2: Flatten it into a thick oval shape.
Step 3: Create a comfortable thumb groove in the center.
Step 4: Use a pencil to lightly sketch a puzzle-piece shape onto the surface.
Step 5: Cut the outline carefully using a craft knife.
Step 6: Remove only a small section to create the missing puzzle piece effect.
Step 7: Round all sharp edges with your finger.
Step 8: Check that the stone still fits comfortably in your palm.
Step 9: Let the clay dry completely.
Step 10: Sand rough spots gently.
Step 11: Paint the entire piece one color.
Step 12: Add shading around the missing section to create depth.
Step 13: Seal the finished project.
The first time I made one, the cutout was crooked. Guess what? It looked better that way.
6. Constellation Night Sky Clay Worry Stone
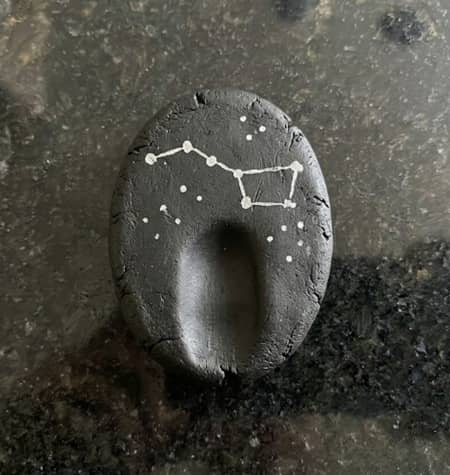
This one feels a little magical without being complicated. You do not need artistic talent. Seriously. If you can make dots and lines, you can make this project.
What You’ll Need
- Black air dry clay or painted clay
- Toothpick
- Silver paint marker
- Small paintbrush
- Clear gloss sealer
Instructions To Make Constellation Night Sky Clay Worry Stone
Step 1: Shape a smooth oval Clay worry stone.
Step 2: Press a thumb groove into the center.
Step 3: Smooth every edge carefully.
Step 4: Allow the clay to dry fully if using air dry clay.
Step 5: Paint the stone black if you started with white clay.
Step 6: Let the paint dry completely.
Step 7: Use a toothpick to lightly mark tiny star locations.
Step 8: Add silver dots where the stars will be.
Step 9: Connect selected stars with thin silver lines.
Step 10: Create your favorite constellation or invent your own.
Step 11: Add a few scattered stars around the design.
Step 12: Let everything dry.
Step 13: Apply a gloss sealer for a subtle night-sky shine.
Sometimes less stars actually looks better. It sounds wrong, but it’s true.
Extra Creative Twist
Create family constellations where each star represents someone important. It becomes more than one of those ordinary clay items to make. It turns into a story.
7. Finger Labyrinth Clay Worry Stone
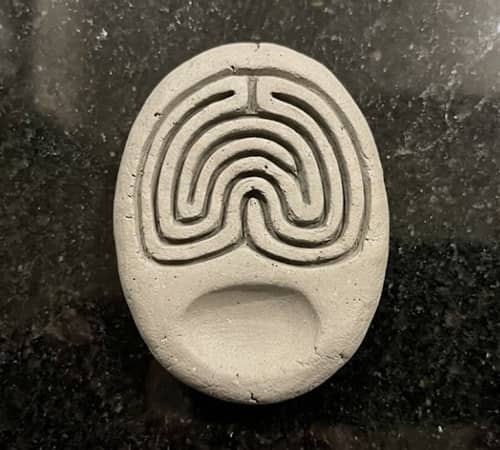
Most people rub a Clay worry stone in the same spot over and over. This design changes that completely. Instead of one groove, your finger follows a winding path like a tiny maze. It becomes part fidget tool, part mindfulness exercise, and part clay craft.
What You’ll Need
- Air dry clay or polymer clay
- Rolling pin
- Pencil
- Toothpick or sculpting tool
- Sandpaper
- Clear sealer
Instructions To Make Finger Labyrinth Clay Worry Stone
Step 1: Roll a ball of clay until smooth.
Step 2: Flatten it into an oval approximately 3 inches long.
Step 3: Round the edges using your fingers.
Step 4: Lightly sketch a simple winding path with a pencil.
Step 5: Start at one edge and create a continuous groove using a toothpick or sculpting tool.
Step 6: Keep the groove wide enough for a fingertip to comfortably follow.
Step 7: Avoid making sharp corners. Gentle curves feel much better.
Step 8: Deepen the path slightly but do not cut too far into the clay.
Step 9: Smooth rough areas with a damp fingertip.
Step 10: Allow the Clay worry stone to dry completely.
Step 11: Sand rough spots after drying.
Step 12: Leave it natural or paint it a single calming color.
Step 13: Seal the finished piece.
The first time you trace the path with your finger, you’ll understand why this design feels different.
8. Rain Drop Ripple Clay Worry Stone
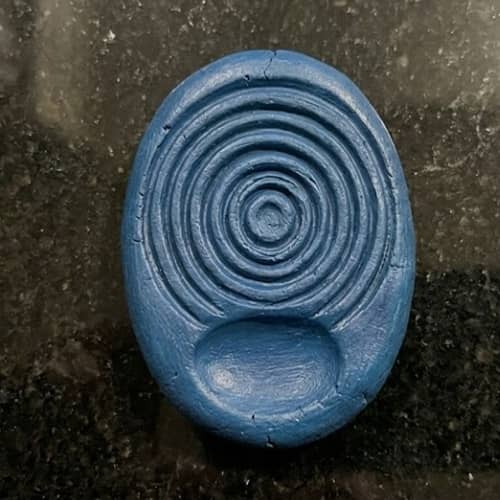
Ever tossed a pebble into a pond and watched the circles spread outward? That simple moment inspired this Clay worry stone. The ripple pattern feels surprisingly soothing beneath your thumb.
It also looks far more complicated than it actually is.
What You’ll Need
- Air dry clay
- Bottle cap or circular objects in different sizes
- Rolling pin
- Sandpaper
- Blue and white acrylic paint
- Clear sealer
Instructions
Step 1: Roll clay into a smooth ball.
Step 2: Flatten it into a round or oval shape.
Step 3: Press a thumb groove near the center.
Step 4: Take a bottle cap and lightly press a circle around the groove.
Step 5: Use smaller circular objects to create additional ripple rings.
Step 6: Space the circles unevenly for a natural water effect.
Step 7: Blend any harsh edges using a damp finger.
Step 8: Let the clay dry completely.
Step 9: Sand rough spots carefully.
Step 10: Paint the entire piece a soft blue shade.
Step 11: Dry brush a little white paint over raised ripple areas.
Step 12: Allow paint to dry fully.
Step 13: Apply a protective sealer.
Sometimes the circles end up uneven. That’s okay. Real water ripples ain’t perfectly symmetrical either.
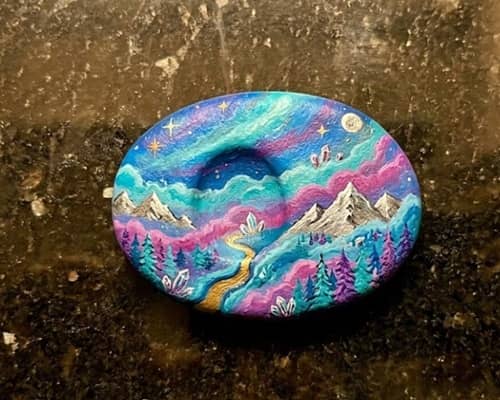
9. Tiny Window Scene Clay Worry Stone
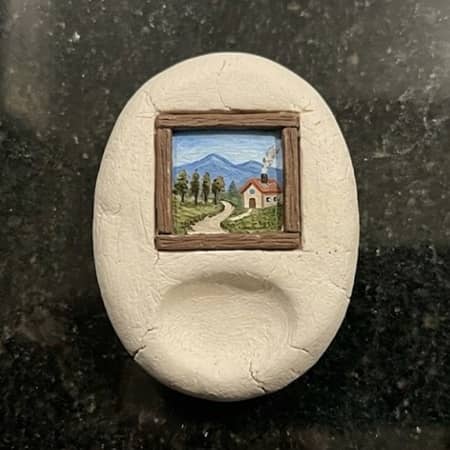
This is probably the most storytelling-focused Clay worry stone in the entire collection.
Instead of decorating the whole stone, you create a tiny framed scene that looks like you’re peeking through a miniature window.
The scene could be mountains. A beach. A forest. A desert sunset. Whatever makes you happy.
What You’ll Need
- Air dry clay
- Rolling pin
- Toothpick
- Acrylic paints
- Small paintbrushes
- Sandpaper
- Clear sealer
Step-by-Step Instructions
Step 1: Shape a smooth oval Clay worry stone.
Step 2: Create a comfortable thumb groove.
Step 3: On one side, lightly draw a small rectangle or arch shape.
Step 4: Press the outline slightly into the clay to create a window frame effect.
Step 5: Allow the clay to dry completely.
Step 6: Sand rough areas gently.
Step 7: Paint the stone a neutral color such as beige, gray, or cream.
Step 8: Inside the framed area, paint a tiny landscape scene.
Step 9: Add simple details like hills, trees, water, clouds, or a sunset.
Step 10: Keep details minimal. Tiny paintings often look better with less.
Step 11: Let the paint dry.
Step 12: Apply a protective sealer.
Step 13: Test the thumb groove and make sure it remains comfortable after painting.
My first attempt looked more like a potato field than mountains. Somehow it still worked.
Why It Stands Out
Every time you look at the stone, it feels like a tiny escape. That’s not something most handmade clay crafts can claim.
10. Thumbprint Legacy Clay Worry Stone
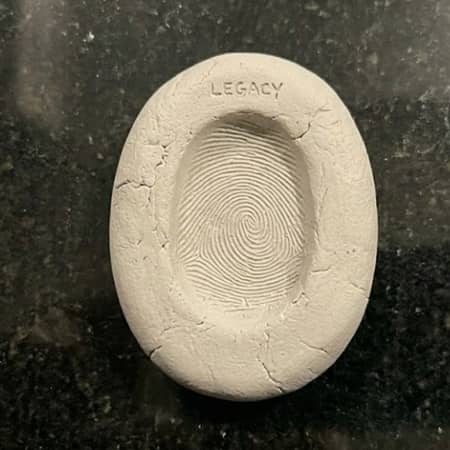
For the final Clay worry stone idea, I wanted something that feels personal rather than decorative.
A thumbprint lasts only a second when you press it into clay, yet it stays there forever once the clay hardens. That’s kinda fascinating when you think about it.
This project turns an ordinary worry stone into a keepsake. Parents can make one with their children.
Grandparents can create one for family members. Friends can exchange them. Years later, that little thumbprint becomes far more meaningful than any fancy paint job.
What You’ll Need
- Air dry clay or polymer clay
- Rolling pin
- Fine grit sandpaper
- Acrylic paint (optional)
- Small paintbrush
- Clear matte sealer
Instructions To Make Thumbprint Legacy Clay Worry Stone
Step 1: Roll a piece of clay into a smooth ball.
Step 2: Flatten the clay into an oval shape approximately 3 inches long.
Step 3: Round the edges until they feel comfortable in your hand.
Step 4: Press your thumb into the center to create the main worry groove.
Step 5: Choose a location near the edge of the stone.
Step 6: Press a clean thumb lightly into the clay.
Step 7: Lift straight up to preserve the fingerprint details.
Step 8: If desired, add a second smaller thumbprint from a child or loved one.
Step 9: Smooth any rough areas around the impressions.
Step 10: Allow the Clay worry stone to dry completely according to package instructions.
Step 11: Lightly sand rough edges after drying.
Step 12: Leave the stone natural or apply a soft wash of paint.
Step 13: For extra contrast, dry brush a slightly darker color into the fingerprint ridges.
Step 14: Let paint dry fully.
Step 15: Seal the finished project with a matte protective finish.
You don’t need artistic skills for this one. Honestly, the less perfect it looks, the more authentic it feels.
Creative Variations
- Parent and child thumbprints
- Sibling thumbprints
- Pet paw impression beside a thumbprint
- Graduation keepsake stone
- Teacher appreciation gift
- Family reunion keepsake
Final Thoughts
What makes a Clay worry stone interesting isn’t the clay itself.
It’s the intention hidden inside it. Scientists often talk about how repetitive hand movements can help redirect attention during stressful moments, which may explain why smooth stones, pocket tokens, and sensory objects have existed across different cultures for centuries.
The fascinating part is that a handmade version becomes uniquely yours.
A fingerprint, a constellation, a flower imprint, or a tiny painted world can turn a simple piece of air dry clay into something far more personal.
So before chasing complicated handmade clay crafts, try creating something small enough to fit in your pocket. Sometimes the tiniest projects leave the biggest impression.