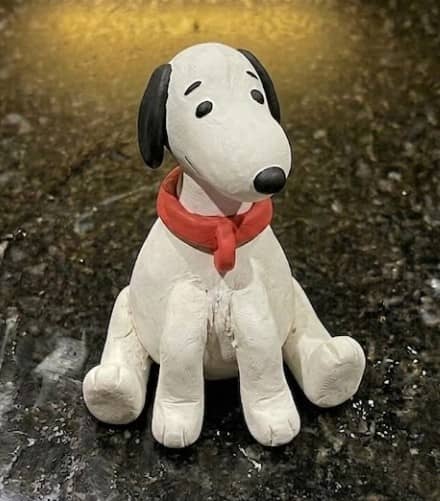
There is something oddly satisfying about turning a lump of clay into a character you instantly recognize.
That’s exactly why this snoopy clay craft project has become one of my favorite clay crafts lately.
Snoopy has a simple shape, clean lines, and a playful personality that translates beautifully into clay. Even better? You don’t need advanced sculpting skills to pull it off.
If you’ve ever searched for an easy cute clay dog, wondered how to make Snoopy out of clay, or looked at a complicated snoopy fondant tutorial and thought, “Nope, that’s way above my skill level,” then this project is for you.
We’ll create an adorable clay Snoopy step by step using air dry clay, focusing on simple shapes that slowly transform into the lovable beagle we all know.
Supplies Needed To Make Snoopy Clay Craft
Before starting, gather everything in one place.
- White air dry clay
- Black air dry clay
- Small amount of red clay
- Clay sculpting tool
- Toothpick
- Small rolling tool
- Craft knife
- Soft paintbrush
- Water in a small bowl
- Clear sealer (optional)
- Shiny granite countertop or granite-look surface
A clean workspace matters more than fancy tools. Seriously.
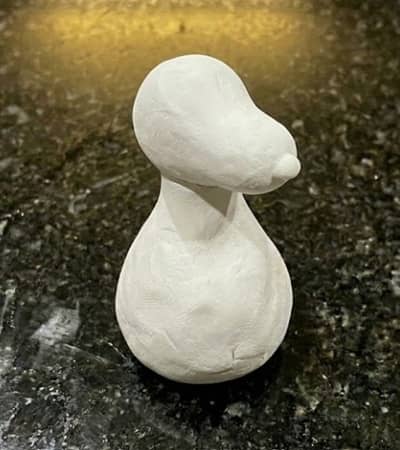
Step 1: Create Snoopy’s Main Body Shape
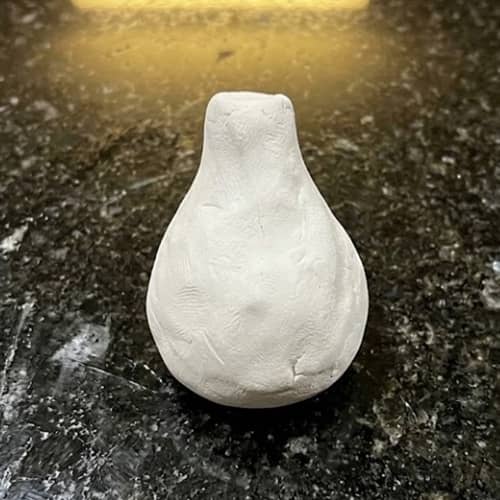
Start with a golf-ball-sized piece of white air dry clay.
Roll it gently between your palms until smooth. Flatten one side slightly. This will become the bottom so Snoopy can stand without falling over every five seconds.
Now shape the clay into a rounded pear. The wider section becomes his lower body and the narrower section becomes his chest.
Don’t stress about perfection. Snoopy’s charm comes from simple forms, not perfect geometry.
Place the body upright and view it from every angle. If one side looks awkward, gently push and smooth it until the shape feels balanced.
At this stage it should look like a tiny white snowman missing everything except the body.
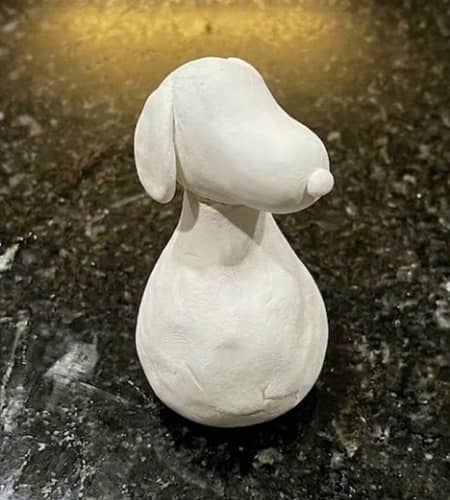
Step 2: Sculpt Snoopy’s Head
Take another ball of white clay slightly smaller than the body.
Roll it smooth.
Unlike many dog figures, Snoopy’s head is not perfectly round. Gently stretch one side outward to form a soft muzzle area. Think oval, not sphere.
Place the head on top of the body without attaching it yet.
Does it look oversized? Good. Snoopy’s head is supposed to be quite large compared to his body.
Once happy with the proportions, score both connecting surfaces using a toothpick. Add a tiny amount of water and press the head firmly onto the body.
Smooth the seam carefully with your finger.
This part are important because a weak connection can crack later.
Step 3: Build the Signature Snoopy Snout
Now comes the feature that makes him instantly recognizable.
Roll a small oval piece of white clay.
Attach it to the front lower portion of the head. Blend the edges gently so it becomes part of the face rather than a separate piece.
Use your sculpting tool to define a subtle separation between the muzzle and head.
Keep it soft.
Many beginners overdo this section and end up creating a bulldog instead of Snoopy.
The profile should remain smooth and friendly.
Step 4: Add the Long Floppy Ears
Take black clay and roll two equal teardrop shapes.
Flatten them slightly.
Snoopy’s ears are long but not paper thin. Leave some thickness so they hold their shape while drying.
Attach one ear to each side of the head.
Let them hang naturally downward.
One little trick I like? Bend one ear just slightly. Tiny asymmetry makes handmade figures feel alive.
Suddenly the figure starts looking like Snoopy instead of a generic dog.
Funny how fast that happens.
Step 5: Shape the Front Legs
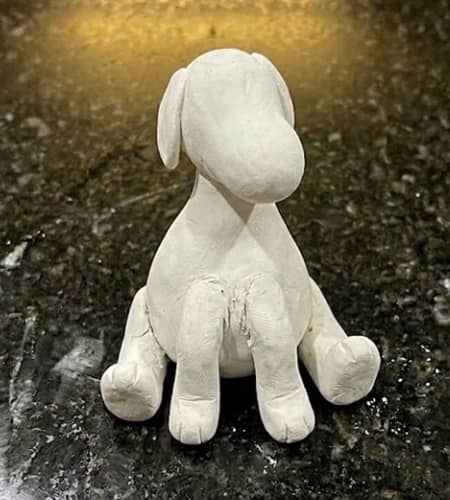
Roll two short cylinders from white clay.
Flatten the upper ends slightly.
Attach them to the front of the body, starting beneath the neck area.
The paws should point forward.
Use a sculpting tool to create tiny paw divisions at the bottom. Nothing dramatic. Just enough detail to suggest toes.
This reminds me of creating a simple clay fish project where tiny details matter more than large complicated shapes.
Small adjustments often make the biggest difference.
Step 6: Add the Nose and Facial Features

Take a tiny ball of black clay.
Shape it into a small oval.
Attach it to the tip of the muzzle.
Use a pointed tool to create two tiny eye indentations above the snout.
Snoopy’s eyes are surprisingly simple.
Less detail works better here.
A common mistake is making large cartoon eyes. Resist the temptation.
Tiny eyes create the classic Peanuts look.
The face is looking pretty cute now isn’t it?
Step 7: Make Snoopy’s Famous Red Collar
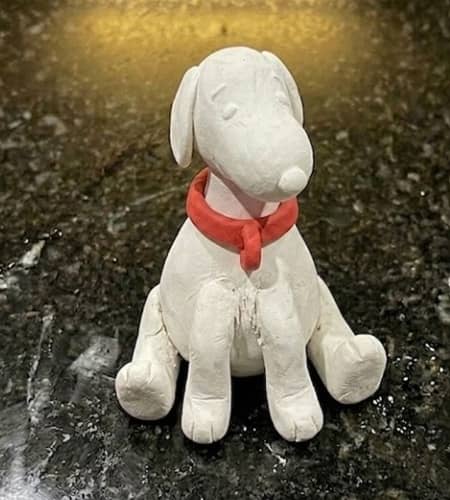
Roll a thin snake of red clay.
Wrap it around the neck area.
Trim excess clay.
Blend the ends together.
The bright red collar creates contrast against the white body and black ears.
Without it, something feels missing.
With it, the character instantly becomes recognizable.
It don’t take much clay either.
Step 8: Final Smoothing and Cleanup
Look over the entire sculpture carefully.
Check for:
- Finger dents
- Cracks
- Uneven ears
- Crooked paws
- Rough transitions
Use a damp paintbrush to smooth imperfections.
Rotate the figure frequently.
What looks perfect from one angle may look strange from another.
Take your time here.
Honestly, this stage separates a rushed project from one that looks thoughtfully handmade.
Step 9: Color It
Allow the sculpture to dry according to the clay manufacturer’s instructions.
Most air dry clay projects need 24 to 72 hours depending on thickness.
Avoid direct sunlight.
Once fully dry, color as per your liking and let the color dry too.
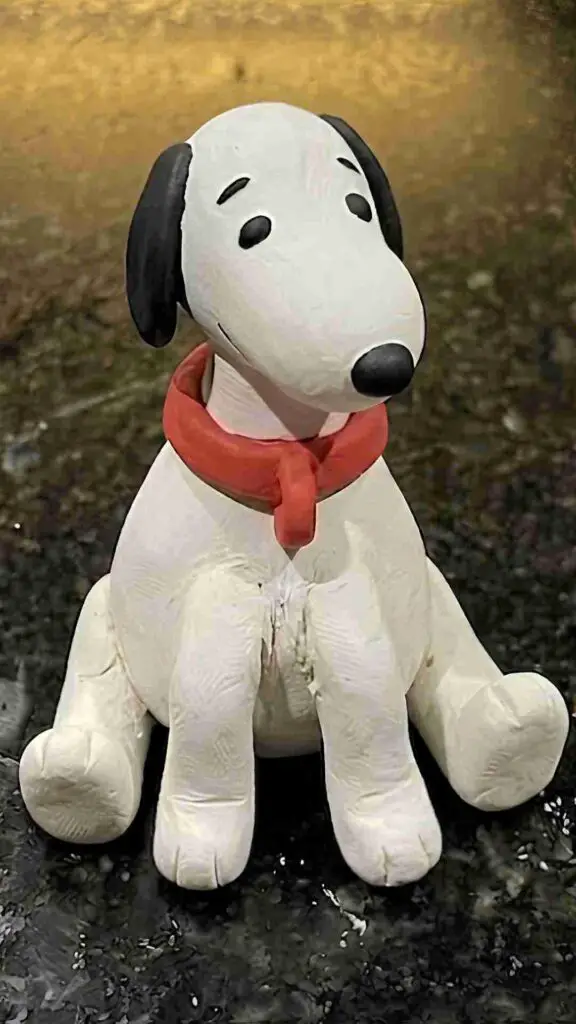
Congratulations.
You’ve completed an air dry clay Snoopy craft that is simple enough for beginners yet charming enough to display on a shelf, desk, or craft corner.
Creative Variations to Make It More Unique
Most people create the standard standing Snoopy.
Why stop there?
Try making:
- Snoopy sleeping on his doghouse
- Snoopy holding a heart
- Snoopy wearing sunglasses
- Snoopy reading a book
- Snoopy with Woodstock beside him
- Mini Snoopy keychains
- Holiday-themed Snoopy figures
Interestingly, many techniques used in an akita-inu clay figurine tutorial also work here.
Both projects rely on building simple forms before refining character details. If you’ve made an easy cute clay dog before, this project will feel surprisingly familiar.
Some crafters even borrow methods from a snoopy fondant tutorial when shaping the muzzle and ears because fondant and clay share similar construction principles.
Final Thoughts
Character-based clay projects teach something many beginners overlook.
They train your eyes to see shapes rather than details. When making a snoopy clay craft, you’re really learning how circles, ovals, cylinders, and gentle curves work together to create recognition.
That’s why mastering a project like this can make future creations easier, whether it’s a simple clay fish, a cartoon animal, or an original design.
Once you understand shape relationships, sculpting becomes less about copying and more about observing. And honestly, that’s where the real fun starts.