Some of the most memorable clay creature ideas aren’t perfect dragons or realistic animals.
They’re tiny characters with odd expressions, funny proportions, and lots of personality. That’s exactly why I enjoy making them.
A simple lump of clay can slowly turn into something that feels alive, even if it’s slightly crooked.
Whether you enjoy clay crafts, are searching for easy clay art projects, or simply need fresh inspiration beyond common polymer clay animal ideas, these beginner-friendly tutorials walk through every step so you can build each creature confidently without feeling overwhelmed.
Choose The Clay Type For This Project
Air Dry Clay | Polymer Clay
Affiliate Disclaimer: Some of the links in this post may be affiliate links, which means I may earn a small commission if you choose to make a purchase through them – at no extra cost to you. I only share products that genuinely fit this project and can help make your ceramic mug clay craft process easier and smoother. Your support helps keep ideas like this coming.
1. Mossy Forest Snail Creature
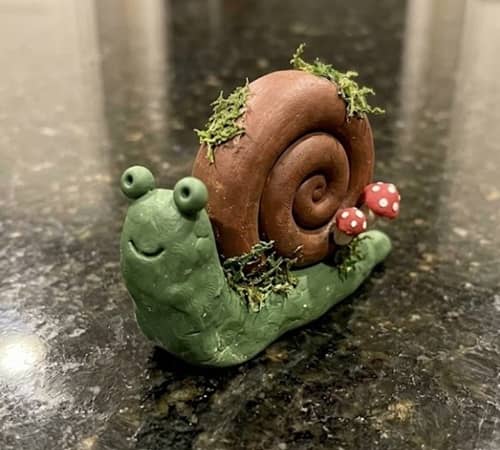
A tiny forest snail doesn’t have to look realistic. I actually prefer making mine look like they wandered out of a magical woodland.
The oversized shell and sleepy face gives it far more charm than perfect proportions ever could.
Start by rolling a ball of green clay about the size of a large grape. Gently stretch one end into a rounded neck while keeping the back thicker. Don’t rush this part because this becomes the entire body.
Flatten the bottom by lightly pressing it onto your table. This helps the creature sit without wobbling later.
Now roll two tiny sausages for eye stalks. They should be about the length of a pencil eraser.
Press one end of each stalk onto the head and smooth the seams using your fingertip or a silicone sculpting tool. Add two tiny black dots for the eyes.
Roll a long snake of brown clay. Try keeping the thickness even from end to end.
Coil it slowly into a spiral, starting tightly in the middle before working outward. If the spiral starts lifting, gently flatten it with your fingers. The shell should look chunky rather than perfectly flat.
Attach the shell to the creature’s back by pressing gently. Blend the edges where the shell meets the body so it feels secure.
Want extra woodland magic? Roll several tiny green balls and press them lightly around the shell.
These become little moss patches. Add two miniature white mushrooms with red caps if you like. It looks adorable, honestly.
Use a toothpick to press tiny smile lines and small texture marks underneath the eyes. Suddenly your snail has personality. Funny how little details changes everything.
Allow air dry clay animals like this to dry completely before painting, or bake according to your polymer clay instructions.
2. Bubble Belly River Monster
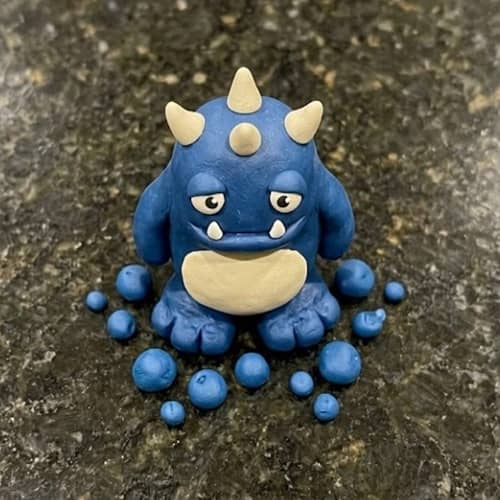
Ever seen a monster that’s more cute than scary? This one is exactly that. Kids usually laugh before they even finish making it.
Roll a large oval from blue clay. Keep it slightly taller than it is wide. Flatten the bottom just enough so it stands.
Next, create a slightly smaller cream-colored oval for the belly. Press it onto the front of the body and smooth only the outer edges.
Leave the center puffed up because that rounded belly makes the creature look soft.
Roll four thick little cylinders for arms and legs. Don’t worry if one ends up slightly longer.
Real handmade modeling clay crafts always have tiny imperfections, and thats part of the fun.
Press each limb firmly into the body. Blend only the top connection while leaving little folds visible near the shoulders.
Now make three tiny horns from dark blue clay. Roll teardrop shapes, bend them slightly, then attach them to the top of the head.
Create two oversized white eyes using flattened circles. Add black pupils pointing slightly inward. Cross-eyed creatures somehow always looks cuter.
Use a sculpting tool or toothpick to press a wide smiling mouth. Add two tiny white fangs sticking upward from the bottom lip.
Roll several tiny bubbles from light blue clay and place them around the feet or climbing onto one arm. These bubbles become part of the character instead of background clutter.
If you’re exploring things to make with modeling clay, this creature is a great confidence builder because almost every shape is just a ball or cylinder.
Bake or dry according to your clay type before adding optional gloss to the bubbles.
3. Mushroom Cap Hopper
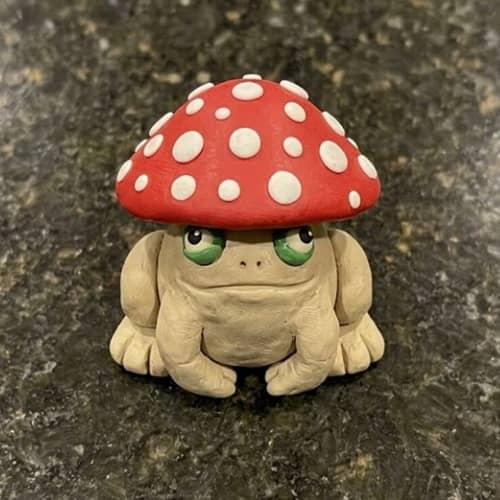
This creature always reminds me of rainy afternoons. It’s part frog, part mushroom, and somehow still looks friendly.
Begin with a rounded pear-shaped body using light beige clay. Make the bottom wider than the top so it balances naturally.
Roll two thick back legs and two smaller front legs. Bend the back legs slightly before attaching them because this creates the feeling that the creature is ready to hop.
Now comes the fun part.
Roll a red ball, flatten it into a dome, then gently place it over the creature’s head like a mushroom cap. Don’t press too hard or it’ll lose its rounded shape.
Create tiny white spots from miniature clay balls and gently flatten each one onto the mushroom cap.
Roll two small green balls for eyes. Place them just underneath the mushroom cap instead of on top. This tiny adjustment makes the face peek out from beneath the cap.
Use a needle tool to create two nostrils and a subtle curved smile.
Want even more personality? Add tiny beige hands resting on its belly. I wasn’t expecting them to make such a big difference, but they really do.
4. Tiny Moon Bat Creature
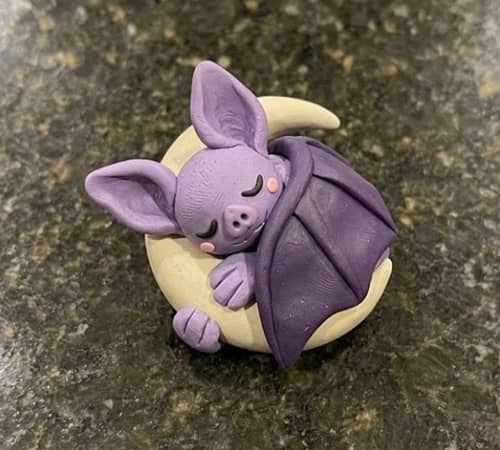
Bats usually get the spooky treatment. Why not make one that looks sleepy instead? I think they deserve better.
Roll a medium-sized lavender ball for the body. Gently shape one end into a tiny chin while keeping the back rounded.
Make two oversized ears from flattened triangles. Slightly curve them inward before attaching them. Smooth the joins carefully using your fingers.
Roll two miniature white circles for eyes and add tiny black pupils looking downward. The sleepy expression appears almost instantly.
Create two little pink cheeks by flattening very small clay balls beside the mouth.
Roll extremely thin snakes of dark purple clay for tiny folded wings.
Instead of spreading them wide, fold them gently against both sides of the body. Beginners often find folded wings much easier than fully opened ones.
For the feet, attach two tiny flattened ovals underneath the body. Add three little toe marks using a toothpick.
Now roll an off-white crescent moon and let the bat hug it with one wing. It don’t have to be perfectly symmetrical because handmade creatures rarely are.
Finally, press tiny texture marks inside the ears and add one miniature nose. Keep the details soft rather than sharp.
Among all the clay creature crafts I’ve made, this one actually ended up becoming my sons desk decoration because the expression feels calm and relaxing.
5. Glowtail Pebble Lizard

If you’ve never made a lizard before, don’t worry.
This one keeps everything simple while still looking different from the usual clay creature ideas you see online.
The glowing tail becomes the star of the whole project.
Start by rolling an egg-shaped piece of olive green clay about the size of your thumb.
This forms the body. Pinch one end slightly to create a neck while leaving the opposite end thicker.
Roll a long tapered snake from bright turquoise clay for the tail.
Make it nearly one and a half times the body length.
Curve it into a loose “S” shape before attaching it to the back. Blend the joint with your fingertip until the connection disappears.
Now roll four short cylinders for the legs. Flatten one end of each slightly so they attach more securely.
Press two onto each side of the body. Angle the front legs outward just a little while the back legs lean slightly behind. It gives the creature a relaxed pose.
For the feet, use a toothpick to gently separate three tiny toes. No need to cut deeply.
Create the head by softly rounding the neck with your fingers.
Add two flattened white circles for eyes and tiny black pupils looking toward one side. Funny enough, sideways eyes makes the whole creature feel curious.
Roll several tiny turquoise dots and press them along the spine all the way to the tail. Keep the spacing uneven because nature rarely repeats perfectly.
Want one little extra detail? Roll a miniature gray pebble from clay and place one front foot resting on top. Suddenly the lizard feels like it’s exploring its surroundings.
If you’re browsing things to make with modeling clay, this project is approachable because nearly every piece starts as a ball, cylinder, or snake shape. Beginners usually finish it quicker than they expect.
Allow the sculpture to dry completely if using air dry clay, or bake according to your polymer clay package instructions before applying a satin sealer.
6. Puffy Cloud Sheep Monster
Who says monsters need sharp teeth? This fluffy little fellow looks like a sheep that accidentally wandered into a fantasy world, and honestly I wouldn’t change a thing.
Roll a large white ball and gently flatten the bottom so it stands without rolling away.
Instead of smoothing the surface, pinch tiny sections all over using your fingertips. Keep the pinches soft and rounded. These become fluffy wool without needing special tools.
Roll four stubby gray cylinders for the legs. Make them fairly thick because skinny legs struggle to support the body.
Attach each leg underneath and blend the seams carefully.
Create a light gray oval for the face. Press it gently into the front of the fluffy body while leaving the wool texture visible around the edges.
Roll two spiral horns from dark gray clay. Start with thin snakes and curl them inward before attaching them beside the head.
Now make oversized sleepy eyelids instead of wide-open eyes. Roll two tiny clay strips and place them above small black dots. The sleepy expression somehow makes the creature even cuter.
Press two miniature pink cheeks beneath the eyes.
Add a tiny black nose and a short smile using a sculpting tool.
If you’re searching for easy air dry clay animals, this design works beautifully because there are no fragile pieces sticking far from the body.
It were one of those projects that surprised me after it was finished. The fluffy texture catches shadows really nicely.
Seal the finished sculpture if desired to protect the raised wool texture from dust.
7. Coral Reef Puff Fish
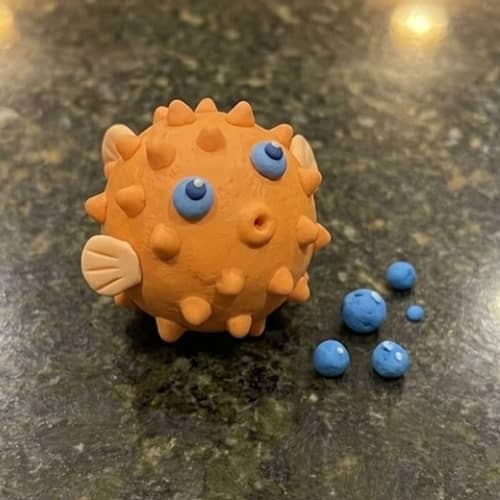
This cheerful little sea creature brings a splash of color without becoming overly complicated. It’s one of my favorite clay creature crafts whenever I want something playful that finishes in under an hour.
Roll a round orange ball until it’s perfectly smooth.
Very gently flatten the bottom so the fish stays upright.
Roll dozens of tiny cone-shaped spikes using lighter orange clay. Don’t make them needle sharp. Small rounded spikes are safer and look friendlier.
Attach the spikes evenly across the back, sides, and top while leaving the belly smooth.
Create two large white eyes with blue irises. Place them slightly farther apart than normal. Wide spacing makes the fish appear innocent.
Roll two tiny fins from pale orange clay. Flatten teardrop shapes and gently bend the tips backward before attaching them near the middle of the body.
For the tail, flatten a small fan shape and press shallow grooves into it using a toothpick.
Use a sculpting tool to press a tiny round “O” shaped mouth. It almost looks surprised. Why do surprised faces always makes us smile?
Roll several tiny blue bubbles and arrange only three or four beside the fish instead of filling the whole scene. Less clutter keeps the attention exactly where it belongs.
Whether you’re using polymer clay or exploring modeling clay crafts, this colorful project helps practice making repeated tiny details without feeling overwhelming.
Bake or dry completely before adding optional glossy varnish to the bubbles for a wet underwater appearance.
8. Acorn Woodland Sprite
Some creatures don’t need wings or giant eyes to feel magical. This tiny woodland sprite proves that simple shapes can tell a story all by themselves.
Begin with a small light brown teardrop shape for the body.
Roll an even smaller beige ball for the head and attach it carefully. Blend the neck until it looks natural.
Create two tiny leaf-shaped ears from green clay. Flatten them gently before attaching each side of the head.
Now roll a dark brown dome to become an acorn cap. Press shallow crisscross lines across the surface using a needle tool.
Place the cap loosely on top of the head instead of pushing it all the way down.
Roll two tiny black eyes and a small curved smile.
Make skinny arms using thin clay ropes. Bend one arm upward as if the sprite is waving. The other arm can gently hold a miniature acorn made from two tiny clay pieces.
For the feet, flatten two tiny ovals underneath the body.
Add one or two miniature green leaves around the base if you’d like, but don’t overcrowd the granite background. A clean composition helps every detail stand out.
This project fits nicely alongside polymer clay animal ideas, easy clay art projects, and even seasonal fairy collections, although its earthy design works beautifully all year long.
The small size also means beginners won’t use much clay, which is always nice.
Leave the sculpture to cure fully before sealing it with a matte finish if desired.
9. Sleepy Pinecone Hedgehog
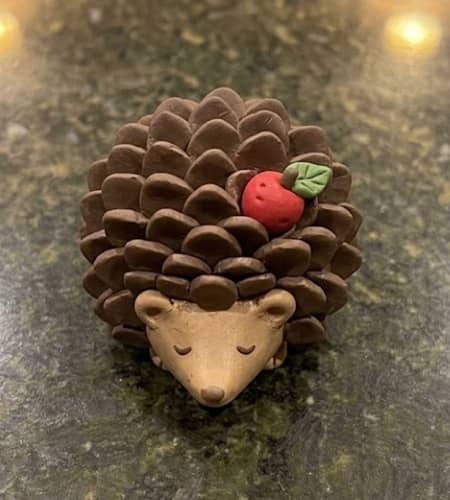
I always think tiny woodland creatures have the most personality, especially when they look like they’re about to take a nap.
This hedgehog is somewhere between a real animal and a fantasy creature, which makes it one of my favorite clay creature ideas for beginners.
Start by rolling a medium-sized ball of light brown clay. Gently stretch one end into a short snout while keeping the back nice and round.
Turn the piece over and lightly flatten the bottom so it won’t wobble after it’s finished.
Now make the “spines.” Roll lots of tiny teardrop shapes from dark brown clay. You don’t need to count them.
Simply make enough to cover the back. Starting near the neck, press each teardrop onto the body with the pointed end facing backward.
Slightly overlap each row so the creature begins to resemble a miniature pinecone.
Roll two tiny beige balls for the cheeks and blend them onto each side of the snout.
Create two tiny black eyes. Place them close together for a sleepy expression.
Instead of a wide smile, press only a short curved line beneath the nose. Small details often creates the biggest personalities.
Roll two little ears using flattened half circles and attach them near the front of the spines.
Want to make it feel even more alive? Roll a miniature red berry and a single green leaf, then tuck them gently between a few of the spines. It almost looks like the hedgehog collected a snack during its morning walk.
If you’re exploring easy air dry clay animals, this project teaches layering without becoming frustrating.
Every spine is simply another tiny teardrop, so your confidence builds naturally as you work.
Allow the sculpture to dry completely or bake according to the manufacturer’s instructions before adding a matte protective finish.
10. Moon Jelly Wisp

This isn’t exactly a jellyfish. It isn’t exactly a ghost either. That’s the fun part. Sometimes the best clay creature crafts don’t fit neatly into one category.
Begin with a smooth lavender ball about the size of a golf ball. Flatten the bottom just a little before gently rounding the top into a dome.
Roll six very thin lavender clay ropes for the floating tentacles. Try making each one a different length.
Straight lines look stiff, so softly curl each strand before attaching it underneath the dome.
Now create several tiny white dots and scatter them across the top. Press lightly so they stay rounded instead of becoming flat.
For the face, place two tiny oval eyes low on the body rather than directly in the center. Add a tiny curved smile between them. Doesn’t that instantly make it feel friendlier?
Roll two miniature star shapes from pale yellow clay. Keep them simple with rounded points. Attach one resting beside the creature and let the second one appear to float near a tentacle.
Use a sculpting tool to add very shallow vertical grooves around the edge of the dome. These soft lines mimic the folds seen on real jellyfish while still keeping the fantasy style.
If one tentacle ends up longer than the others, don’t fix it unless it truly bothers you. Nature is full of uneven details, and handmade crafts should be too.
This design fits nicely alongside easy clay art projects, modeling clay crafts, and even simple room decorations because it doesn’t require advanced sculpting techniques.
Dry or bake the sculpture completely before adding a satin finish if you want a gentle glow.
11. Pumpkin Shell Turtle
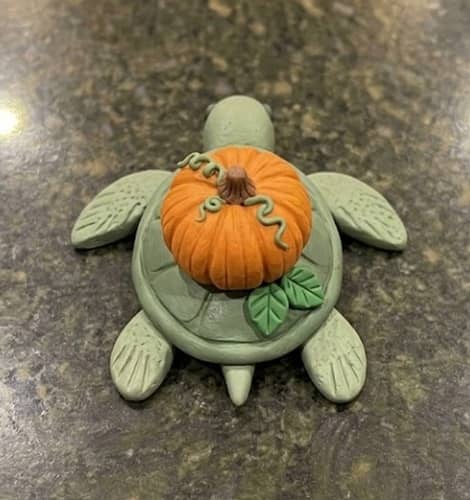
Who says turtles have to carry ordinary shells? I thought a pumpkin would be much more interesting, and honestly it turned out better than I expected.
Roll an oval of sage green clay for the body. Gently flatten the bottom so the turtle sits securely.
Next, shape four chunky legs using short cylinders. Attach one at each corner of the body and blend only the top edge where they connect.
Roll a small rounded cylinder for the neck and attach a slightly flattened ball as the head.
Create two tiny black eyes and a very small smiling mouth.
Now it’s time for the shell.
Roll an orange ball slightly larger than the turtle’s back. Flatten it into a rounded dome. Using a sculpting tool, press several shallow grooves from top to bottom, just like the sections on a real pumpkin.
Roll a tiny brown stem and place it right in the middle of the pumpkin shell. Add two little green vines curling gently around one side.
Carefully place the shell onto the turtle’s back and smooth only enough to keep it secure.
Would tiny leaves make it even cuter? I think so. Roll two miniature green leaves and place them near the base of the shell.
This project blends nicely with things to make with modeling clay, polymer clay animal ideas, and beginner collections because every part uses simple, forgiving shapes.
The shell dont need to be perfectly centered. Slight imperfections actually make the finished creature feel more handmade and charming.
Bake or air dry according to your chosen clay before sealing if desired.
12. Raindrop Blob Buddy
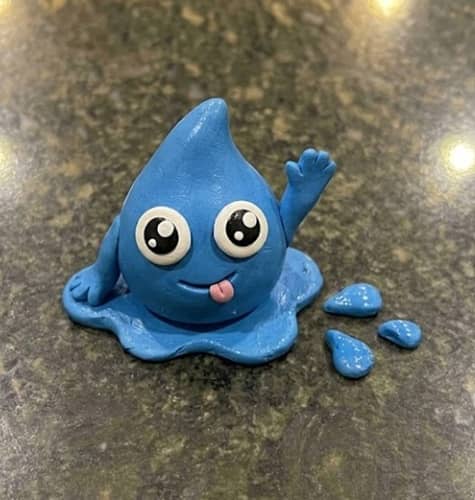
Sometimes the easiest projects become the ones people smile at the most.
This cheerful blob creature proves that you don’t need dozens of complicated pieces to create something memorable.
Roll a large blue teardrop shape. Stand it upright so the wider end forms the body while the pointed end becomes the top of the head.
Lightly flatten the bottom.
Create two oversized white eyes using flattened circles. Add large black pupils looking upward toward the pointed tip of the body.
Roll two tiny sky-blue circles and place them underneath as little cheeks.
Use a sculpting tool to press an open smiling mouth. Add a tiny pink tongue from a small flattened oval.
For the arms, roll two short blue ropes and bend them upward like the creature is excitedly waving hello.
Instead of legs, create two rounded puddle-like feet. Flatten tiny blue ovals and attach them underneath so the creature appears to be melting slightly into the ground.
Roll three miniature water droplets in different sizes and place them beside the character. Keep the arrangement simple because the clean granite background helps the sculpture stand out much better.
This is one of those easy air dry clay projects that works wonderfully for children, beginners, classrooms, or anyone simply looking for relaxing clay crafts without tiny complicated details.
Once fully cured, add a glossy finish to the droplets if you want them to resemble fresh rain.
Final Thoughts
One thing I’ve noticed after making dozens of little creatures is that memorable designs rarely depend on perfect sculpting.
They come from unexpected combinations – a pumpkin on a turtle, a sleepy bat hugging the moon, or a snail carrying tiny mushrooms.
That’s what keeps these clay creature ideas feeling fresh long after trends disappear.
As your confidence grows, try swapping colors, mixing features, or combining two creatures into something completely original.
Those small experiments often lead to your best work, and they’re also the fastest way to develop a creative style that’s uniquely your own.