Keeping track of dates doesn’t have to mean hanging a boring paper planner on the wall.
Some of my favorite clay calendar ideas double as decor, conversation starters, and creative little projects that actually feel fun to use.
If you enjoy clay crafts and love making things with your own hands, these projects bring together organization and creativity in a way that feels surprisingly satisfying.
A few of these would even work as diy Christmas gifts or products to make and sell clay calendar creations at local craft fairs. The best part? Most use simple materials, beginner-friendly techniques, and don’t require any fancy tools.
Choose Your Clay Type For This Project
Air Dry Clay | Polymer Clay
Affiliate Disclaimer: Some of the links in this post may be affiliate links, which means I may earn a small commission if you choose to make a purchase through them – at no extra cost to you. I only share products that genuinely fit this project and can help make your ceramic mug clay craft process easier and smoother. Your support helps keep ideas like this coming.
1. Rotating Moon Phase Clay Calendar
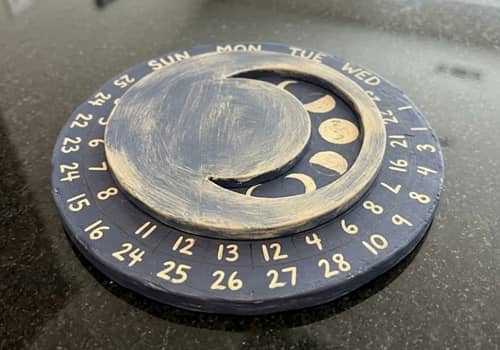
This one looks like something from a small artisan boutique, yet it’s beginner friendly enough for a weekend project.
Start by rolling air dry clay into a flat circle about 8 inches wide and roughly ¼ inch thick. Smooth the edges using a damp finger. This becomes the base.
Next, create a second slightly smaller circle. This will rotate on top.
Allow both pieces to partially dry for about 2 hours so they become firm but not completely hard.
Using a pencil, divide the bottom circle into 31 sections around the edge. Press the numbers 1 through 31 into each section using stamps, toothpicks, or hand lettering.
On the top rotating disc, cut out a crescent-shaped viewing window. The window should reveal only one date at a time.
Create tiny moon phase decorations around the top disc using small clay balls flattened into crescents, half moons, and full moons.
Once dry, paint with muted navy, cream, and dusty gray tones.
Use a small screw post, brad fastener, or decorative rivet through the center to connect both pieces.
Turn the top disc daily to reveal the current date.
I wasnt expecting this project to feel so satisfying, but rotating the wheel every morning becomes a surprisingly calming habit.
2. Tiny Greenhouse Calendar With Plant Markers
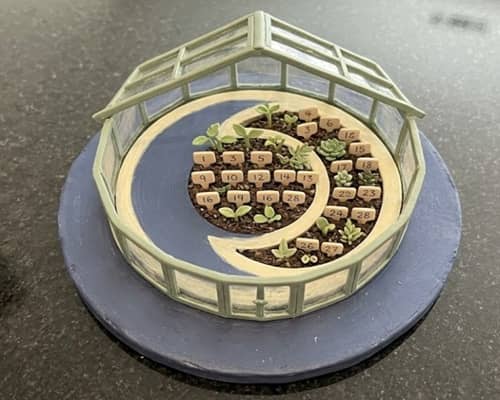
Want something cute clay themed that doesn’t look childish? Try this.
Roll clay into a rectangle approximately 10 inches wide.
Shape a miniature greenhouse frame around the edges using clay strips.
Inside the greenhouse, create 31 removable plant marker stakes.
Each marker represents one day of the month.
Write numbers onto the markers before drying.
Create small pockets along the bottom edge of the greenhouse where unused date markers can sit.
After drying, paint the greenhouse soft sage green and add tiny leaves around the frame.
At the start of each month, arrange all markers in order.
Move today’s marker into a special “Today” slot each morning.
It kinda feels like you’re growing time instead of simply counting it.
This calendar design works beautifully in kitchens, craft rooms, or homeschooling spaces where kids crafts are already part of everyday life.
3. Pocket Constellation Star Calendar
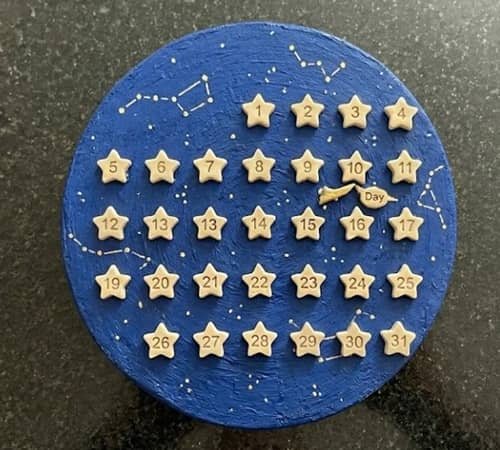
This calendar turns every day into a tiny treasure hunt.
Start by creating a large rectangular clay board.
Smooth the surface carefully using a damp sponge.
Sketch a night sky filled with stars.
Press 31 shallow pockets across the surface. Each pocket should be large enough to hold a small numbered clay star.
Create 31 individual stars separately.
Stamp numbers onto each star before drying.
Once everything dries, paint the background deep midnight blue.
Highlight constellation lines using white paint pens.
Each day, remove the corresponding numbered star and place it into a display area labeled “Today.”
Some days are messy. Some days feel magical. This project somehow reminds you both are normal.
The removable stars make this one especially appealing if you plan to make and sell clay calendar products at markets.
4. Vintage Postcard Travel Calendar
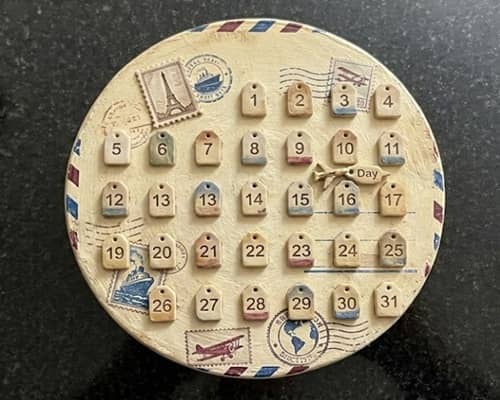
If you love travel-inspired diy clay projects, this one has personality.
Roll clay into a rectangle roughly postcard size.
Create a raised border around the edge.
Add clay details that mimic vintage travel stamps, ticket corners, and postal marks.
Create 31 miniature luggage tags from clay.
Number each tag.
Attach tiny hooks along the bottom edge of the calendar.
Every day, move the current date tag onto a larger “Today’s Destination” hook.
Paint using faded cream, dusty brown, soft blue, and vintage red tones.
Don’t worry if the edges aren’t perfect. In fact, slightly crooked details make the project look more authentic.
I actually think overly perfect clay crafts sometimes lose their charm.
This project feels like a little vacation sitting on your desk.
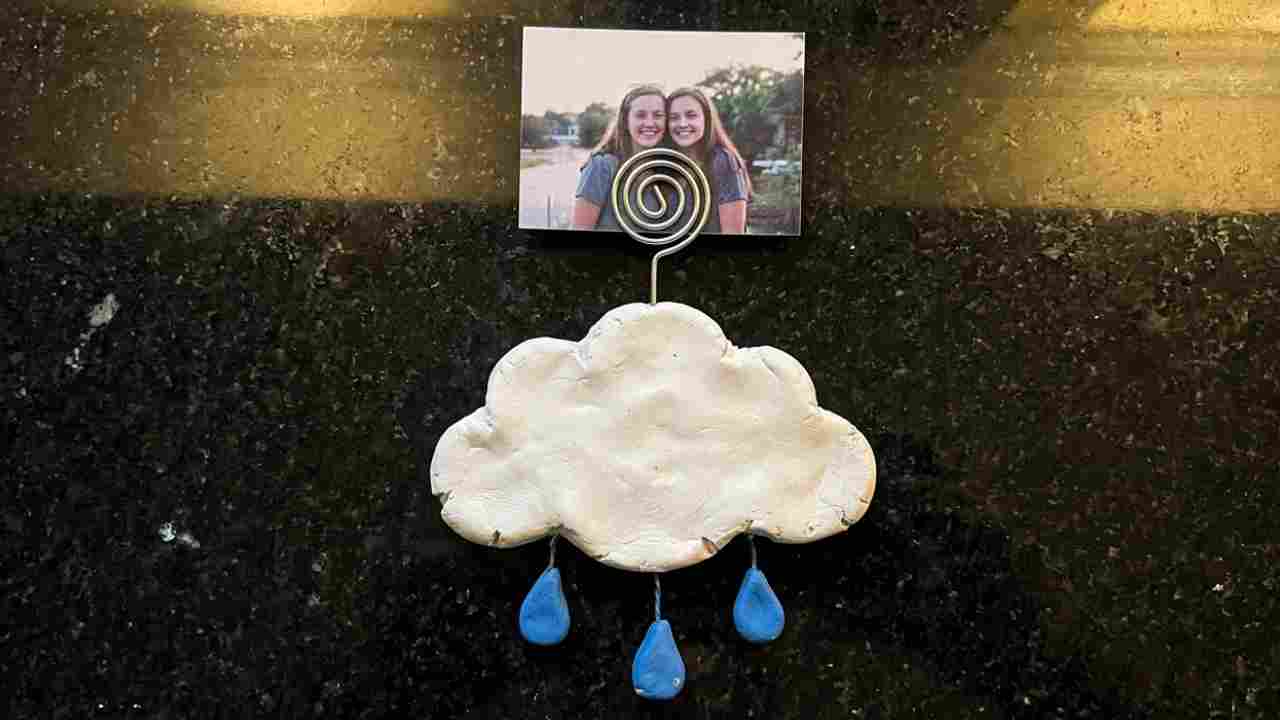
5. Weather Forecast Sliding Calendar
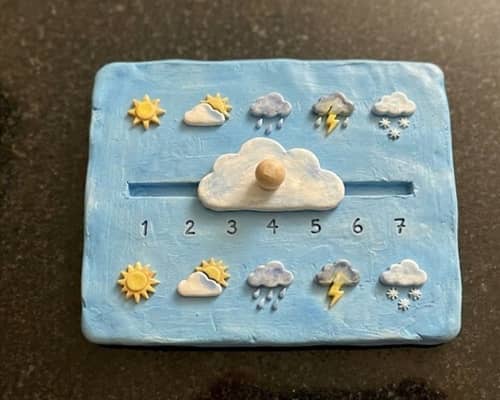
This one combines dates and daily weather tracking.
Create a rectangular clay board approximately 9 inches wide.
Across the bottom, carve numbered spaces from 1 through 31.
Above the dates, create a horizontal track.
Make a sliding clay cloud piece that moves across the track.
Beside the cloud, create tiny removable weather symbols including sun, rain, snow, wind, storm, and partly cloudy icons.
Paint the board a soft sky blue.
Each day, slide the cloud to the correct date and place the matching weather icon nearby.
Kids absolutely love interacting with this project.
And honestly, adults do too.
It turns something ordinary into a small daily ritual.
For families who enjoy air dry clay crafts and educational activities, this is one of those rare projects that’s decorative and useful at the same time.
6. Memory Jar Tile Calendar
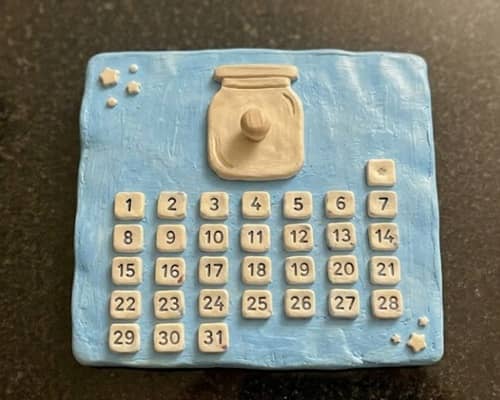
Most calendars tell you what day it is. This one quietly collects little moments you would have forgotten.
Start by rolling a clay slab about 10 inches wide and 8 inches tall. Smooth it using a damp sponge. Along the bottom half, create 31 shallow numbered slots.
Next, make 31 tiny clay tiles. Each tile should be roughly the size of a large coin. Press numbers 1 through 31 onto them while the clay is still soft.
Above the numbered slots, create a raised clay jar shape. Leave the center hollow. This becomes the memory jar.
After everything dries, paint the board in soft cream and light beige shades. Add tiny hand-painted flowers, stars, or leaves around the jar.
Every evening, write one happy memory on a small piece of paper. Fold it and place it inside the jar area. Move the matching date tile into a “Completed Day” section.
At the end of the month, open all the memories and revisit them. Youll be surprised how many good moments slip past unnoticed.
This is one of those clay calendar ideas that feels meaningful long after the month ends.
7. Mushroom Forest Date Tracker
Cute doesn’t have to mean complicated.
Begin by creating a woodland-themed clay base approximately 11 inches wide. Sculpt tiny grass patches around the edges.
Make 31 miniature mushrooms. Keep them slightly different from one another. Some taller. Some wider. Some leaning a bit.
Number the underside of every mushroom using a toothpick.
Create 31 shallow holes across the calendar base.
Once dry, paint the mushrooms in earthy reds, creams, browns, and soft oranges.
Each morning, place the correct mushroom into a special “Today’s Spot” near the center of the forest.
The result looks like a miniature fairy garden mixed with a calendar design.
Kids especially love this project because moving the mushrooms becomes part of the daily routine.
And honestly? Slightly uneven mushrooms look better than perfect ones.
This project naturally fits into cute diys using clay collections and seasonal home decor.
8. Rolling Typewriter Message Calendar

This one feels vintage and modern at the same time.
Start with a rectangular clay base around 10 inches wide.
Sculpt a miniature typewriter shape onto the top section. Don’t worry about making every key perfect. Most old typewriters looked a little rough anyway.
Create 31 small clay paper strips.
Write numbers onto each strip before drying.
Build a narrow slot where the numbered strips can slide in and out of the typewriter.
Once dry, paint the typewriter matte black, charcoal gray, and cream.
Each day, insert the matching numbered strip into the typewriter.
Want to make it extra special?
Write a tiny motivational quote on the back of every strip before placing it inside.
The calendar changes daily, but the little messages become the real reason people keep checking it.
Its funny how a tiny sentence can completely change a morning.
9. Seasonal Window Calendar
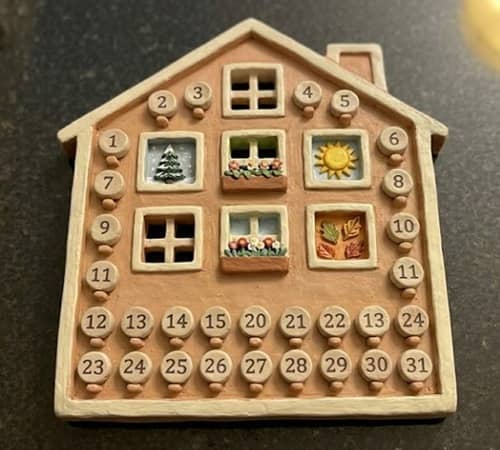
This project transforms throughout the year without rebuilding the calendar.
Roll a clay slab approximately 12 inches wide.
Create a house facade with a large central window.
Cut out the window opening completely.
Behind the window, build a removable tray system.
Create four seasonal background inserts: spring flowers, summer sunshine, autumn leaves, and winter snow scenes.
Then create 31 numbered clay discs.
Each morning, place the current day’s number inside the window frame.
Change the seasonal insert every few months.
The effect is surprisingly charming.
One month the window overlooks flowers. Another month it’s covered in snow.
I have seen many clay crafts, but very few feel this dynamic.
For people wanting to make calendar using clay that works year-round, this approach solves that problem beautifully.
10. Record Player Spin Calendar
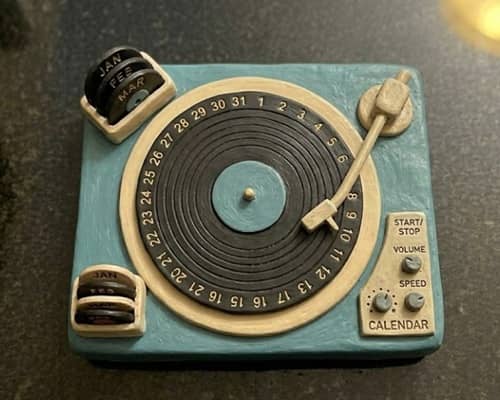
This final idea might be my favorite because it feels playful without looking childish.
Create a square clay base approximately 10 inches wide.
Sculpt a vintage record player onto the surface.
Make a large circular clay record that rotates in the center.
Divide the record into 31 sections around the outer edge.
Number each section carefully before drying.
Create a fixed clay pointer positioned above the record.
After everything dries, paint the record black and the player in retro colors like mustard, cream, sage, or dusty blue.
Connect the record using a small rivet or decorative fastener so it spins freely.
Every day, rotate the record until the current date lines up with the pointer.
Simple concept. Surprisingly addictive.
Visitors almost always reach for it because they want to spin it themselves.
If you’re looking to make and sell clay calendar products, this one has strong gift-shop appeal and stands out from common diy Christmas gifts.
Final Thoughts
Something interesting happens when a calendar becomes interactive. You stop seeing it as a tool and start treating it like part of your daily environment.
That’s probably why handmade calendars have survived despite phones, apps, and smart devices doing the same job faster.
The physical act of moving a tile, spinning a wheel, or placing a marker creates a tiny moment of mindfulness.
For beginners exploring clay craft projects, calendars are also surprisingly forgiving because slight imperfections add character rather than ruining the design.
That little fingerprint, uneven edge, or crooked detail? Sometimes that’s exactly what makes handmade work memorable.