If you’ve been searching for things to make with polymer clay that actually look good without needing years of crafting experience, you’re in the right place.
Look, I love projects that feel creative but don’t eat up an entire weekend, and these clay crafts fit perfectly.
Some are practical, some are decorative, and a few even make great crafts to make and sell at local markets or online.
Grab a few colors of clay, your rolling pin, and a baking tray because you’ll be surprised how many beautiful polymer clay craft ideas you can create with just a handful of supplies.
1. Mountain Sunrise Wall Hanging
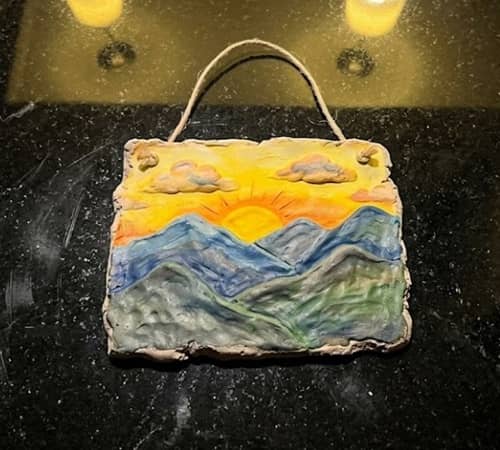
Instead of another rainbow decoration, why not bring a tiny landscape indoors? This wall hanging combines layered mountains, a rising sun, and soft textures.
It looks expensive, but honestly it isn’t hard once you break it down.
Start by conditioning white, terracotta, mustard yellow, dusty blue, and sage green polymer clay until every color feels soft and flexible.
Roll each color into sheets about ⅛ inch thick. Using a round cookie cutter, cut a large circle that will become the background.
Now create three uneven mountain layers. Don’t worry if every edge isn’t perfectly straight. Nature rarely is.
Stack the mountain pieces from back to front, pressing lightly so they bond together without flattening the design.
Roll a small yellow ball, flatten it gently, then tuck half of it behind the tallest mountain to create the sunrise effect.
Add tiny texture using an old toothbrush. It gives the mountains a surprisingly realistic finish.
Use a straw to punch two holes near the top before baking. Bake according to the package directions, usually around 275°F for 30 minutes depending on thickness.
Once cooled, thread cotton cord through the holes and tie a wooden dowel across the top.
You could even add small tassels underneath if you like a boho look. The finished piece feels calm without trying too hard, and people always ask where it came from.
2. Tiny Birdhouse Plant Stakes
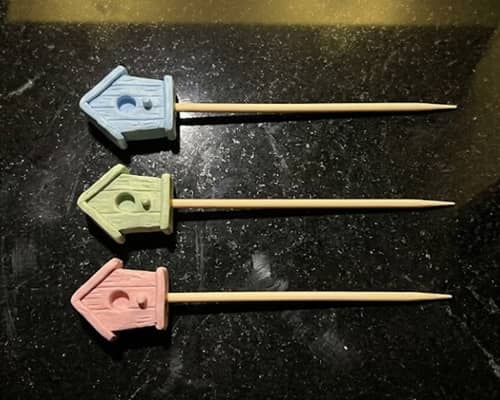
Houseplants deserve personality too. These miniature birdhouses make ordinary pots look cheerful, and they are surprisingly addictive to create.
Condition pastel-colored polymer clay until soft. Roll the clay to about ¼ inch thick. Cut out a rectangle roughly two inches tall. Roll it gently into a tube and seal the seam using your fingertip.
Shape a small roof by flattening another clay piece into a rectangle and folding it over the top. Press carefully without squashing the house. A wooden toothpick works nicely for adjusting the roof edges.
Use the end of a paintbrush to press a neat round entrance hole. Add tiny windows with a craft knife, then press miniature flower details beside the opening using tiny clay balls.
Insert a bamboo skewer halfway into the bottom before baking.
Make sure it sits perfectly straight because once baked it won’t move anymore. I forgot that once and mine leaned like it had survived a hurricane.
Bake according to package instructions. After cooling, brush on a thin coat of gloss varnish if you’d like extra shine. Pop the stake into a succulent or herb planter and suddenly the whole plant feels more alive.
These are fun polymer clay crafts that double as gifts, spring fairs, or even beginner-friendly crafts to make and sell.
3. Mosaic Initial Keychain
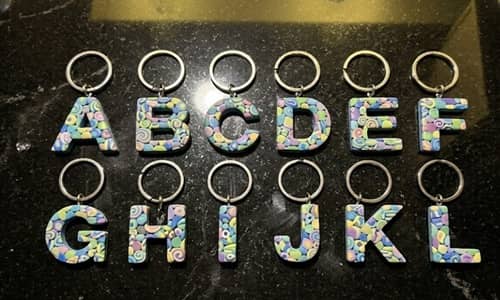
Looking for personalized cute charms that don’t look mass-produced? This one is a favorite because every letter turns out completely different.
Roll white polymer clay into a flat sheet around ⅛ inch thick. Using an alphabet cutter, cut out the first letter of your name. Smooth the edges with your fingertip.
Next comes the fun part. Roll tiny snakes of several bright colors like coral, teal, mustard, lavender, and navy. Slice each snake into miniature squares, triangles, and diamonds.
Arrange the little shapes over the letter like a mosaic puzzle. Leave tiny white spaces showing between some pieces because that makes the colors stand out much better.
Lightly roll over the design using an acrylic roller. Don’t press too hard or everything becomes one blob. Nobody wants a colorful pancake.
Punch a hole near the top using a straw before baking. Bake according to package directions.
After cooling completely, attach a jump ring and keychain hardware using jewelry pliers.
It becomes a colorful accessory for backpacks, purses, or keys.
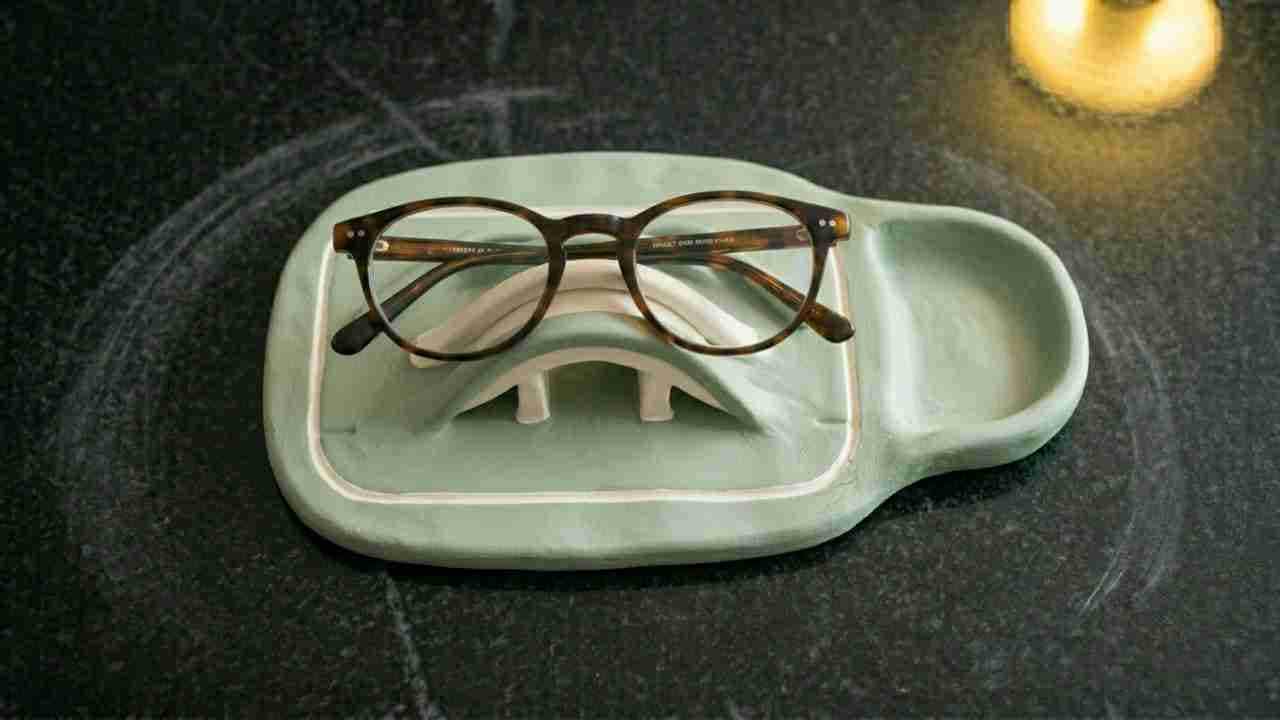
4. Minimalist Ring Cone With Gold Veins
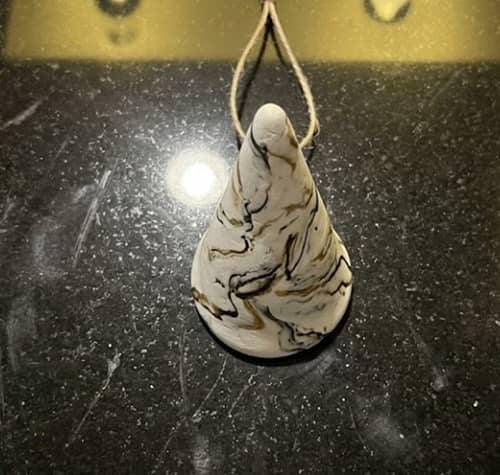
If you’re searching for a practical polymer clay jewelry holder, this project earns a permanent place on your nightstand.
Start by conditioning white polymer clay thoroughly. Roll it into a thick cone about four inches tall. Keep rotating it while shaping so all sides stay even.
Smooth every fingerprint using your fingertips dipped lightly in rubbing alcohol. This step takes patience, but the cleaner the cone now, the better it looks later.
Roll extremely thin snakes of black and metallic gold clay. Wrap them randomly around the cone. Blend some sections gently while leaving other areas raised to create natural marble veins.
Bake the cone standing upright on parchment paper. Check halfway through baking to ensure it hasn’t leaned over. Mine almost did once because I rushed placing it inside the oven.
After cooling, lightly buff the surface using a soft cloth. Stack your rings over the cone and suddenly your dresser looks much tidier.
It pairs beautifully with modern bedrooms and makes an elegant handmade gift.
If you enjoy jewelry crafts, this project teaches several techniques that you’ll use again and again.
5. Faux Stained Glass Bookmark
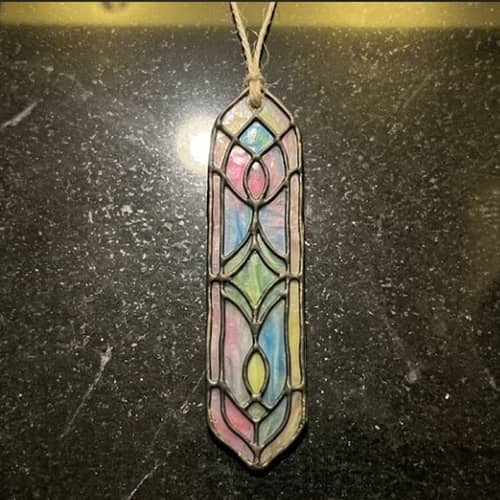
This is probably one of the most unusual things to make with polymer clay, especially if you enjoy reading. It creates the look of stained glass without using resin or actual glass.
Roll translucent polymer clay into a thin rectangle approximately six inches long and two inches wide. Chill it in the refrigerator for ten minutes so it becomes easier to cut cleanly.
Using a precision craft knife, carefully cut geometric openings throughout the bookmark. Think triangles, diamonds, arches, or curved windows. Leave enough clay between each cut so the bookmark stays sturdy.
Fill selected openings with tiny pieces of colored translucent clay.
Press them gently until level with the surface. Blend the edges carefully using a silicone sculpting tool. It dont have to be perfect because slight variation actually mimics real stained glass.
Punch a tassel hole at the top before baking. Bake following the manufacturer’s instructions.
Once cool, thread embroidery floss through the hole and knot it securely. Slide the bookmark into your favorite novel and watch the light glow softly through the translucent sections.
Projects like this prove that easy polymer clay doesn’t have to look ordinary, and they’ll definitely inspire even more polymer clay craft ideas.
If you’ve ever wondered how to make acrylic charms, you’ll notice several of the layering techniques used there also translate beautifully into polymer clay designs.
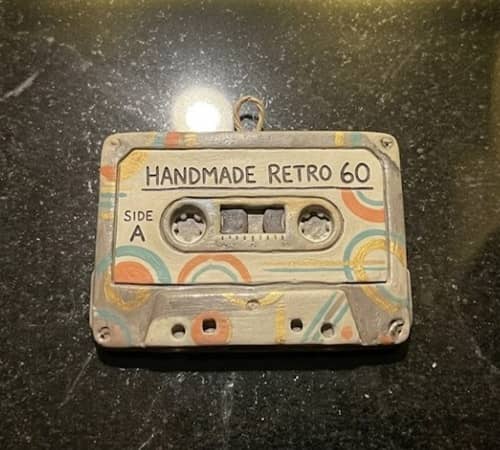
6. Retro Cassette Tape Magnet
There’s something oddly satisfying about shrinking old-school objects into miniature decor.
This tiny cassette tape magnet brings a little nostalgia to your refrigerator, locker, or office cabinet. It looks detailed, but every piece is built from simple shapes.
Condition black, white, gray, and one bright accent color until each one feels smooth.
Roll the black clay into a rectangle about 2½ inches wide and 1½ inches tall. Trim the corners with a craft knife so every edge looks crisp.
Roll a thin white sheet and cut a smaller rectangle for the cassette label.
Press it gently into the center without trapping air bubbles. Now roll two tiny gray balls and flatten them slightly. These become the tape reels. Place them evenly on both sides of the label.
Use a needle tool to draw a few horizontal lines across the bottom to imitate the tape opening. Don’t overdo the details. Less actually looks more realistic at this scale.
If you’d like extra personality, roll tiny strips of colored clay to create a fake music label.
Write absolutely nothing on it after baking or use a fine paint marker later. Tiny details make the whole piece feel finished.
Bake according to the manufacturer’s instructions. Let it cool completely before attaching a strong round magnet with industrial craft glue. Wait several hours before sticking it to metal.
It’s one of those polymer clay craft ideas that works for teens, adults, or anyone decorating a workspace. I gave one to a friend, and she still has it hanging on her fridge months later.
7. Citrus Slice Drink Coasters
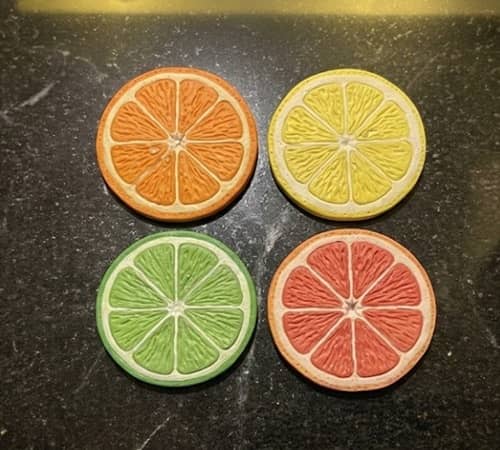
Need something colorful that actually gets used? These faux citrus coasters instantly brighten a coffee table and they’re much easier than they appear.
Choose orange, lemon yellow, lime green, white, and translucent polymer clay. Roll each color into thin sheets around ⅛ inch thick.
Start with the fruit center by cutting a white circle about three inches wide. Divide the circle lightly into eight wedges using a clay blade, but don’t cut all the way through.
Now create the fruit flesh. Roll tiny wedges from orange or yellow clay and fit them inside each section like puzzle pieces.
Next, roll a long snake of white clay and wrap it around the fruit to form the pith.
Finish with a thicker green or orange border to represent the peel. Smooth the seams carefully using your fingertips until everything looks like one continuous slice.
Use a toothpick to add tiny texture marks around the peel. It gives the coaster a surprisingly realistic appearance.
Your first one may not be perfect, but the second usually turns out way better.
Bake on a perfectly flat ceramic tile to prevent warping. Once cooled, apply several coats of heat-resistant clear sealer, allowing each coat to dry before adding the next.
These also make thoughtful housewarming gifts and are popular crafts to make and sell because every fruit combination feels different.
8. Tiny Campfire Desk Buddy
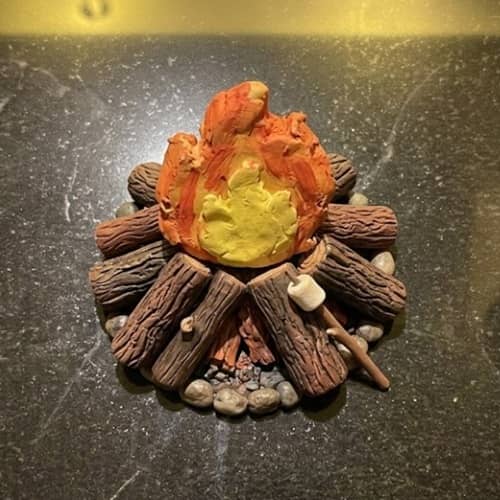
Some crafts don’t have a practical purpose, and honestly…that’s exactly why they’re fun. This miniature campfire brings cozy cabin vibes to any desk or bookshelf.
Condition brown, tan, black, orange, yellow, and translucent polymer clay. Roll two brown logs about two inches long and texture them using an old toothbrush or aluminum foil.
Stack the logs in a simple crisscross pattern. Press lightly where they touch so they’ll stay together during baking.
Roll tiny flame shapes from yellow, orange, and translucent clay. Layer the colors together with yellow in the center, orange surrounding it, and translucent clay forming the outer glow.
Attach the flame between the logs by gently pressing the base downward. Around the logs, scatter tiny gray and black clay pebbles to create a realistic fire ring.
Bake everything together according to package directions.
After cooling, dry brush a little white acrylic paint onto the logs to highlight the bark texture. Not much though because too much paint ruins the natural look.
The finished piece fits inside a shadow box, fairy garden, or camping-themed display. Kids usually loves making these because there are no complicated measurements to worry about.
9. Hanging Moon Phase Mobile
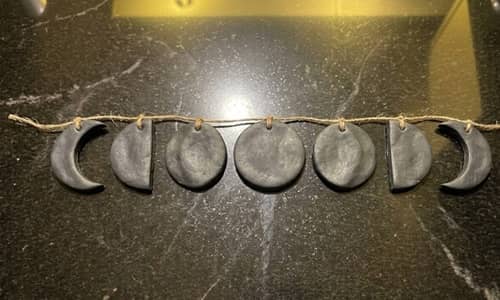
This project looks like something from a small artisan boutique, yet it’s surprisingly beginner friendly if you work slowly.
Condition white, ivory, and metallic gold polymer clay. Roll the clay into an even sheet roughly ⅛ inch thick.
Using round cutters in different sizes, cut one full moon, two half moons, two crescent moons, and several tiny stars. Smooth every edge using your fingertip or silicone sculpting tool.
Before baking, use a straw or needle tool to create hanging holes near the top of every moon and star. Double-check the hole placement because once baked, there’s no changing it.
Add delicate texture by pressing lace fabric gently onto the surface before removing it. The subtle pattern catches light beautifully without overwhelming the design.
Bake according to package instructions. Allow every piece to cool completely before assembly.
Connect the moon phases vertically using thin gold jewelry wire or embroidery thread. Attach the completed strand to a wooden dowel, driftwood stick, or brass hoop.
Hang it near a bookshelf or bedroom wall where it can move slightly with the air. It’s peaceful without being overly flashy, which I kinda love.
This is also an excellent introduction to hand crafted jewelry techniques because you’ll practice working with jump rings, wire, and alignment.
10. Miniature Paint Palette Earrings
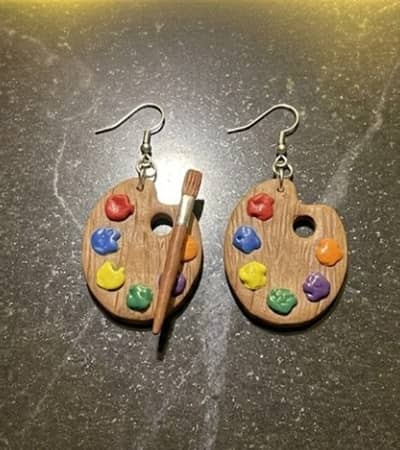
If you enjoy quirky accessories, these earrings start conversations almost every time. They’re especially fun for artists, teachers, or anyone who appreciates colorful jewelry crafts.
Condition white polymer clay and roll it into a sheet about ¼ inch thick. Cut two identical oval shapes roughly one inch long.
Trim one side slightly flatter to resemble a traditional artist’s palette. Use the end of a marker cap to cut a thumb hole near one edge.
Now roll tiny balls of bright polymer clay in red, blue, yellow, green, purple, orange, and white. Flatten each one gently before arranging them along the palette just like blobs of fresh paint.
Roll an ultra-thin brown snake to create a miniature paintbrush. Add a tiny silver ferrule and white bristles using small clay pieces. Attach the brush diagonally across the palette.
Bake everything carefully according to package instructions. Once cooled, insert eye pins or attach jump rings before connecting earring hooks with jewelry pliers.
They’re lightweight, playful, and surprisingly wearable. Plus, if you’re already making cute charms, this same palette design can easily become keychains, zipper pulls, or backpack accessories too.
11. Mini Greenhouse Terrarium Ornament
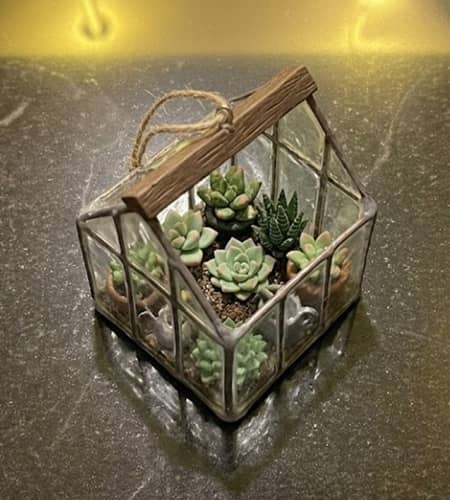
If you’ve ever wished you could keep a tiny greenhouse on your desk without watering it, this project is for you.
It mixes translucent clay with miniature plants to create something that looks surprisingly realistic. Honestly, people usually assume it came from a boutique gift shop.
Start by conditioning translucent, dark green, light green, brown, and white polymer clay until each color feels soft and smooth.
Roll the translucent clay into a sheet about ⅛ inch thick. Using a craft knife and ruler, cut five identical squares. These will become the greenhouse walls and roof.
Bake these translucent pieces first so they stay flat. Let them cool completely.
While they cool, make the base. Roll brown clay into a square roughly 3 inches wide and slightly thicker than the walls. Texture it lightly using aluminum foil to imitate soil.
Now create miniature succulents. Roll tiny green balls, flatten them slightly, then overlap them in circles to form rosettes.
For taller plants, roll tiny cylinders and pinch the tops gently. Don’t stress if every leaf isn’t identical because real plants aren’t perfectly symmetrical either.
Arrange your plants across the base. Leave a little walking path by adding tiny white pebbles made from rolled clay balls.
Using clear jewelry glue, carefully assemble the baked translucent walls around the garden. Attach the roof panels last. Work slowly here. If one wall shifts, everything becomes crooked.
Finish by adding a small loop of wire before gluing the roof if you want to hang it as an ornament. It also looks beautiful sitting on a bookshelf or office desk.
12. Faux Embroidered Patch Brooch

Embroidery is beautiful, but what if you could recreate that stitched look entirely with clay? This brooch has loads of texture and fools people at first glance.
Condition cream, navy, mustard, forest green, coral, and black polymer clay until soft. Roll the cream clay into an oval about 3 inches long and ¼ inch thick. This becomes your fabric patch.
Using a needle tool, gently draw your design. A mushroom, strawberry, sunflower, cowboy boot, or smiling ghost all work wonderfully. Keep the sketch simple.
Now roll incredibly thin clay snakes. Seriously, thinner than spaghetti. These tiny strands become the fake embroidery stitches.
Starting from one section at a time, place the thin clay strands directly over your sketch.
Instead of laying them perfectly straight, press them in tiny short segments so they resemble real stitched thread.
Alternate the direction of each strand slightly. That’s what creates the illusion.
Add a thin black border around the edge of the patch, then lightly texture the background using a clean toothbrush. The subtle texture helps sell the embroidered effect even more.
Bake according to the package instructions. Allow it to cool fully before attaching a metal brooch pin to the back using a strong jewelry adhesive.
You can wear it on denim jackets, backpacks, canvas totes, or even hats.
And here’s the fun part…every design becomes completely different, so you’ll never run out of fresh polymer clay craft ideas.
If you enjoy making hand crafted jewelry, this technique also works beautifully for pendants and decorative pins.
Final Thoughts
The best part about exploring things to make with polymer clay isn’t finishing a project.
It’s discovering how one simple technique can spark five completely different ideas.
Once you learn shaping, layering, blending, and texturing, you’ll naturally begin designing your own polymer clay crafts instead of following tutorials step for step.
That’s usually when your creativity really takes off. Don’t be afraid of fingerprints, tiny flaws, or slightly uneven edges either.
Those little imperfections are proof that someone actually made it by hand, and that’s exactly what gives handmade creations their personality.
Before long, you’ll probably be sketching your next project before the current one has even cooled.