Clay doesn’t have to stay plain. A little paint can completely change how a project feels, even if the shape itself is incredibly simple.
That’s exactly why I love experimenting with clay painting ideas. You don’t need years of experience or expensive supplies either.
Whether you’re using air-dry clay, polymer clay, or even paper clay, these beginner-friendly clay crafts focus on fun textures, color combinations, and easy techniques that anyone can recreate at home.
Some projects look handmade in the best possible way. Others almost resemble tiny pieces of hand painted pottery.
Grab your brushes because these ideas are all about making something you’ll actually want to keep.
1. Galaxy Moon Wall Hanging
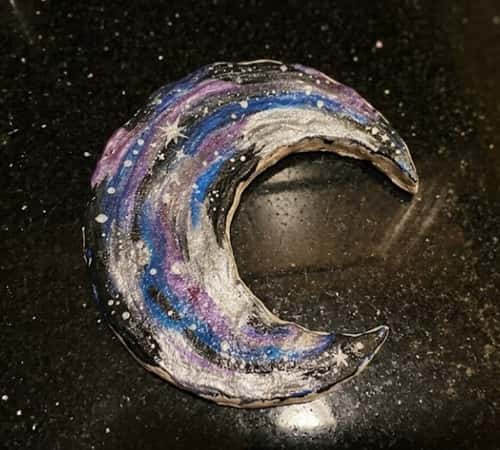
This project looks surprisingly impressive, yet the actual sculpting is incredibly forgiving. If you’ve never tried how to paint air dry clay, this is one of the easiest places to start.
Roll white air-dry clay until it’s about ¼ inch thick.
Don’t worry if the thickness isn’t exactly perfect because little imperfections actually adds character.
Use a large round cookie cutter or trace a cereal bowl to cut out one clean circle.
Now gently trim one side into a crescent moon using a butter knife. Smooth every edge with slightly damp fingertips until everything feels soft.
Poke two tiny holes near the top using a drinking straw. You’ll thread string through these later.
Allow the moon to dry completely for 24 to 48 hours. Flip it halfway through drying so both sides cure evenly.
Lightly sand rough edges using fine-grit sandpaper.
Paint the entire moon matte black.
Before the paint fully dries, dab navy blue, deep purple and dark teal randomly using a cosmetic sponge. Keep tapping instead of brushing. The colors blend much better that way.
Once dry, dip an old toothbrush into white acrylic paint and flick tiny stars across the surface.
Use metallic silver paint to highlight only the outer curved edge. Suddenly everything pops.
Finally glue tiny gold stars or rhinestones onto a few spots if you’d like extra sparkle.
Thread cotton twine through the holes and hang it on your wall.
2. Painted Wildflower Trinket Dish
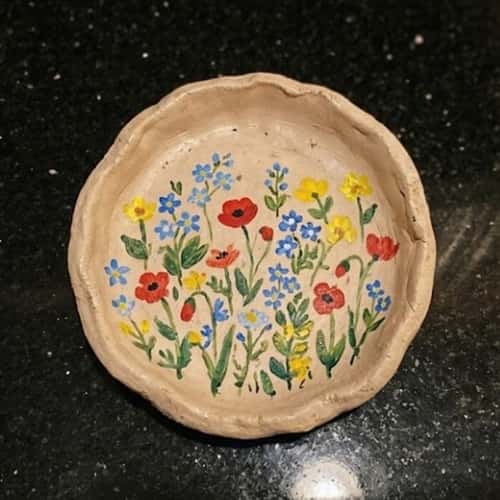
This little dish is probably the only clay bowl I’ll ever need. It catches rings, earrings and loose change while looking cheerful all year.
Condition your play clay or air-dry clay until soft.
Roll it to roughly ¼ inch thick.
Cut a circle about five inches across.
Carefully place it inside a cereal bowl lined with plastic wrap so it naturally curves downward.
Leave it overnight before removing.
Let it finish drying completely.
Sand the rim gently.
Paint the entire dish warm ivory instead of bright white. It feels softer.
Using a thin liner brush, paint tiny stems first with olive green paint.
Next add miniature daisies, lavender, poppies and tiny yellow buds. Build one flower at a time instead of rushing. Trust me, its easier.
Fill empty spaces with little leaves and dots.
Outline only a few flowers using an extra-fine black paint pen for depth.
Seal everything with satin varnish suitable for decorative clay creations.
The finished piece almost resembles delicate hand painted pottery, even though it’s wonderfully beginner-friendly.
3. Rainbow Mushroom Garden Stakes
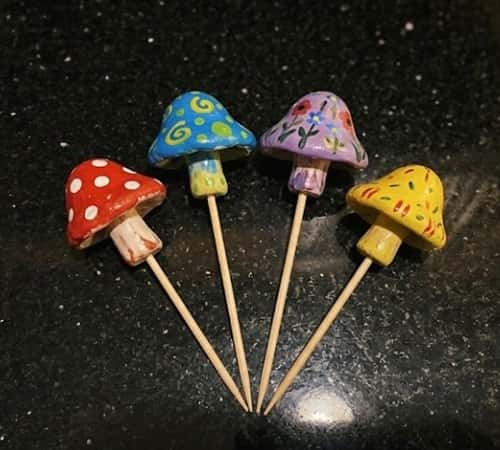
Want something playful for indoor plants? These painted mushrooms bring color without looking childish.
Roll several small clay balls.
Shape thick mushroom stems first.
Create separate dome caps.
Score both connecting pieces with a toothpick before pressing together.
Blend the seams using a damp finger.
Push a wooden skewer halfway into each stem while the clay is still soft.
Allow everything to dry completely.
Paint every mushroom cap a different color.
Think coral, sage, mustard, dusty blue, peach and terracotta.
Add tiny white dots using the back of a paintbrush handle.
Paint the stems warm beige with subtle brown dry brushing near the bottom.
Finish with clear matte sealer.
Slide each skewer directly into flower pots.
This little project also works beautifully with baking clay or polymer clay if you prefer oven curing instead.
4. Modern Abstract Face Plaque
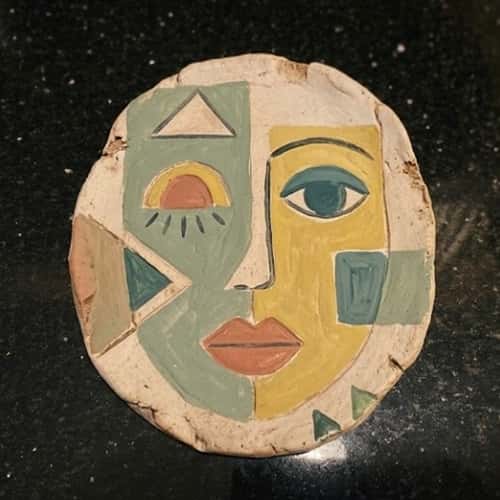
If you’ve admired minimalist sculpture painting, this project gives the same artistic vibe without complicated sculpting.
Roll clay into an oval roughly six inches tall.
Flatten gently.
Smooth every edge.
Roll thin clay snakes for eyebrows, nose and lips.
Attach them carefully using a little slip or liquid clay depending on your material.
Don’t overthink symmetry. Human faces rarely are.
Let everything dry completely.
Paint the entire plaque soft beige.
Once dry, use muted terracotta, olive green, charcoal and cream to paint bold geometric shapes behind the raised face.
Leave plenty of negative space.
Finally outline only the raised facial features using thin black acrylic paint.
Seal with matte varnish.
The result feels like modern gallery art while still being approachable for beginners exploring clay sculpture and painted wall décor.
5. Painted Koi Fish Hanging Ornament
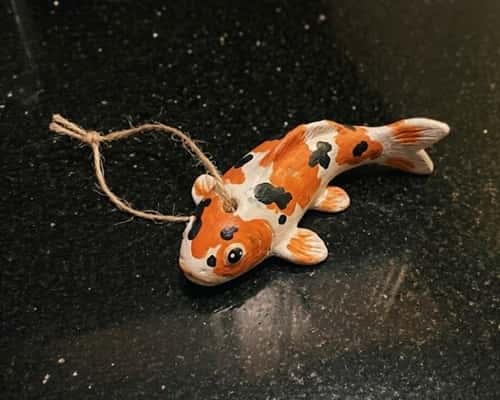
Fish designs aren’t just for coastal homes. This colorful ornament looks almost like tiny polymer clay art once finished.
Sketch a simple koi fish onto paper first.
Roll clay evenly.
Cut around your paper template using a craft knife.
Smooth every edge carefully.
Carve shallow scales using the rounded end of a paintbrush.
Add one hanging hole near the top fin.
Dry thoroughly.
Paint the entire fish bright white first.
Now layer orange patches followed by bold black markings.
Blend tiny hints of red near the fins.
Paint one glossy black eye.
Use metallic pearl paint lightly across raised scales.
It catches light beautifully without looking flashy.
Finish with clear gloss sealer and thread thin twine through the top.
This same painting method also works if you’re learning how to paint polymer clay after baking.
6. Vintage Postage Stamp Magnets
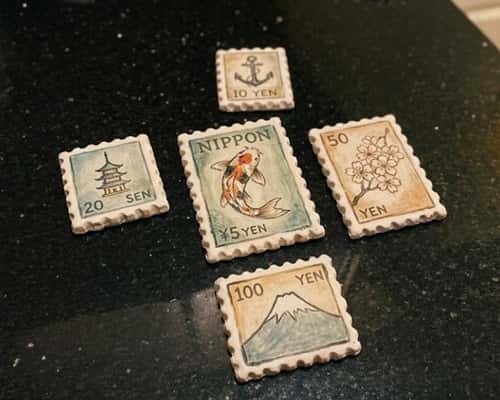
I love projects that look like they came from an old flea market. These tiny magnets have that nostalgic charm, but they only take basic supplies and a little patience.
They’re also a fun way to practice clay paint techniques on miniature surfaces.
Roll your clay into an even sheet about ¼ inch thick.
Use a ruler to lightly mark small rectangles measuring roughly 2 x 3 inches.
Cut them out carefully with a craft knife. Don’t stress if every edge isn’t perfectly straight. Old postage stamps never was perfectly identical anyway.
Using the rounded end of a toothpick, gently press tiny dots around the border to imitate perforated stamp edges.
Let the clay dry completely, turning each piece over after several hours so both sides dry evenly.
Lightly sand away any rough spots.
Paint every rectangle a soft cream base color.
Once dry, sketch a simple illustration in the center of each stamp. Think a bluebird, vintage bicycle, tiny lighthouse, maple leaf, sunflower, old mailbox, or butterfly.
Use muted shades instead of bright neon colors. Vintage designs usually feel softer.
With an ultra-fine brush, paint a fake denomination like “5¢” or “12¢” in one corner.
Add a thin brown wash around the edges by mixing a tiny amount of brown acrylic with water. Wipe away the excess using a paper towel before it dries.
Seal everything with matte varnish.
Glue a strong magnet onto the back using heavy-duty craft adhesive.
You’ll end up with unique refrigerator magnets that almost look like miniature collectibles instead of simple clay creations.
7. Colorful Cactus Pencil Holder
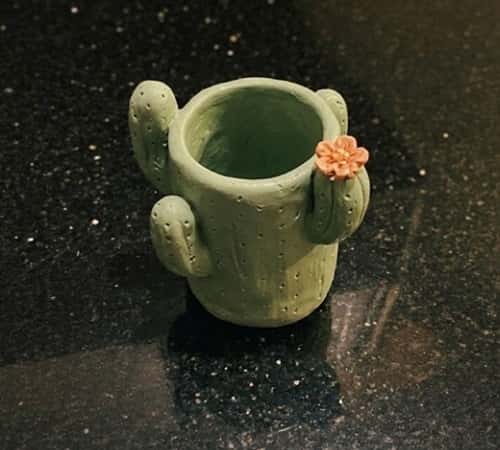
Most pencil holders are honestly kind of boring. This one isn’t. Better yet, it’s the only project in this list that gives the illusion of a plant without requiring any watering.
Start by shaping a thick clay cylinder about four inches tall.
Press your thumb gently into the center.
Slowly widen the opening while rotating the clay.
Keep the walls about half an inch thick.
Smooth both the inside and outside using slightly damp fingertips.
Create several shallow vertical grooves running from top to bottom. These imitate cactus ribs.
Allow the piece to dry completely.
Paint the entire holder sage green.
While the first coat is still slightly damp, dab darker green into the grooves using a sponge.
Next, lightly dry brush pale green across the raised ridges.
Use a tiny paintbrush to add short white cactus spines in evenly spaced clusters.
Around the rim, paint several small pink and yellow flowers.
Seal everything with matte varnish.
Now slide your pencils, paintbrushes or craft scissors inside.
It almost looks ceramic from a distance, but the handmade texture gives it much more personality.
8. Forest Owl Hanging Decoration
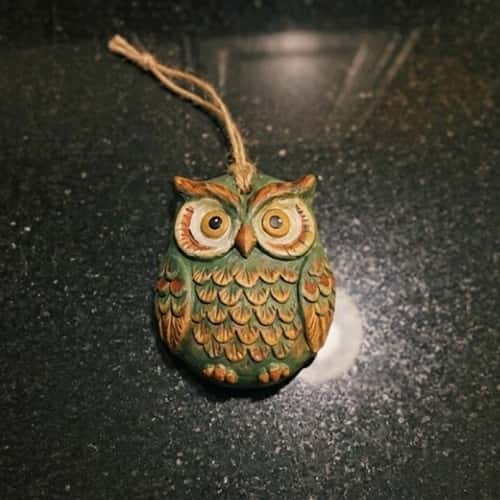
Owls have lots of tiny details, but don’t let that scare you. Breaking everything into small steps makes the whole project surprisingly relaxing.
Roll a ball of clay slightly larger than a golf ball.
Flatten it gently into an oval.
Pinch two pointed ears at the top.
Roll two tiny circles for the eyes.
Press them firmly into place.
Add an even smaller ball for the beak.
Using a toothpick, lightly score overlapping feather marks across the body.
Poke one small hanging hole above the owl’s head.
Allow everything to dry thoroughly.
Paint the body warm brown.
Blend lighter tan onto the raised feathers.
Paint the eyes cream with large black pupils.
Add tiny white highlights inside each eye.
Use burnt sienna around the wings to create depth.
Finish with a light coat of satin varnish.
Thread rustic jute through the top.
It doesn’t have to look perfect. Actually, a slightly uneven owl somehow looks cuter.
9. Citrus Slice Coasters
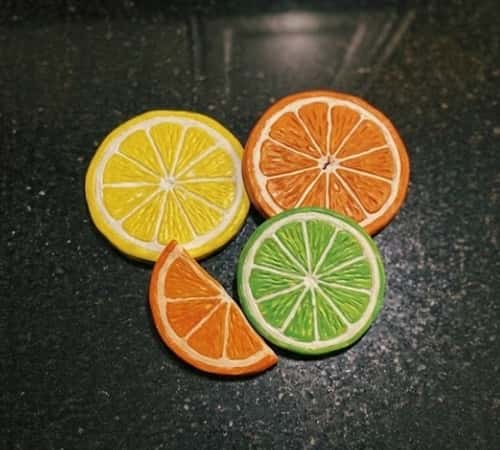
Bright fruit slices instantly make a table feel cheerful, especially during summer gatherings. These coasters are colorful without being overly complicated.
Roll clay to approximately ⅜ inch thickness.
Using a large round cutter, cut circles about four inches across.
Smooth every edge.
Allow the circles to dry completely.
Paint one coaster lemon yellow.
Paint another orange.
Paint another lime green.
If you’d like a fourth, paint it grapefruit pink.
Once the base dries, use a pencil to lightly divide every circle into wedge sections.
Paint thin white lines between each wedge.
Next, deepen the outer rind using a slightly darker version of the main color.
Add tiny white seed shapes randomly.
Seal with several thin coats of waterproof craft sealer if the coasters will hold cold drinks.
These bold designs are inspired by simple food illustrations rather than realistic fruit, giving them a playful handmade appearance.
You’d be surprised how many guests asks where you bought them.
10. Desert Sunset Mountain Plaque
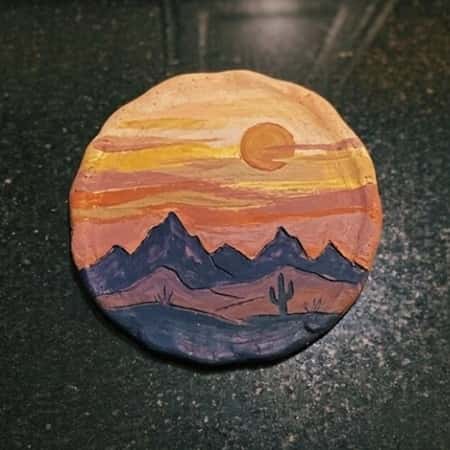
Landscape painting doesn’t always belong on canvas. A flat clay plaque creates beautiful texture while remaining beginner friendly.
Roll clay into a rectangle about six by eight inches.
Smooth the edges carefully.
Use thin clay strips to build simple mountain layers across the bottom half.
Blend each strip gently into the background.
Let the plaque dry completely.
Paint the sky using horizontal bands of pale yellow, peach, coral and dusty pink.
Blend softly where each color meets.
Paint the mountains dark terracotta, muted brown and charcoal, placing the darkest layer nearest the front.
Use a tiny round sponge to create a glowing white sun partly hidden behind the mountains.
Add a few flying birds using quick black “V” shapes.
Seal with matte varnish.
Attach picture-hanging hardware to the back after everything cures.
The finished piece combines sculpture painting with landscape art, creating depth that ordinary paintings can’t quite match.
11. Painted Monarch Butterfly Wall Charm
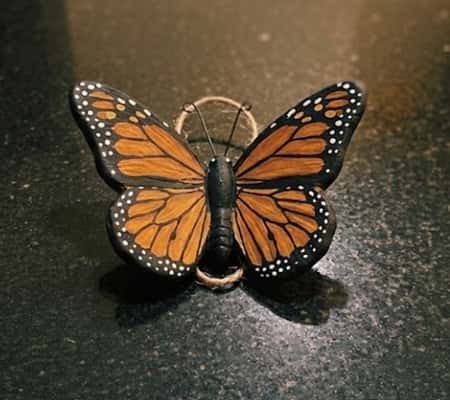
Butterflies are everywhere in craft stores, but this version feels a little different because the painted wings have subtle texture instead of perfectly flat color. It looks detailed, although the steps are much easier than they first appears.
Roll your clay into an even sheet about ¼ inch thick.
Draw a simple butterfly shape on paper and cut it out.
Lay the template on the clay and carefully trim around it using a craft knife.
Round off any sharp edges with your fingertips.
Roll a thin clay rope for the butterfly’s body and press it down in the center.
Use a toothpick to lightly score gentle vein lines across each wing. Don’t press too hard or the clay may crack later.
Poke a tiny hanging hole between the upper wings.
Allow the butterfly to dry completely. Turn it over halfway through drying so it stays nice and flat.
Lightly sand rough spots.
Paint the wings with a warm orange base coat.
Once dry, outline the wing edges using black acrylic paint.
Fill the outer border with small white dots using the end of a wooden skewer instead of a brush. The dots come out much cleaner that way.
Mix a little metallic gold into orange paint and lightly dry brush the center sections of the wings for a soft shimmer.
Paint the body charcoal black.
Seal everything with satin varnish before threading natural jute through the top hole.
The raised body combined with the painted wings gives this piece a nice balance between polymer clay art and decorative wall décor, even if you’re working with regular air-dry clay.
12. Faux Mosaic Initial Letter
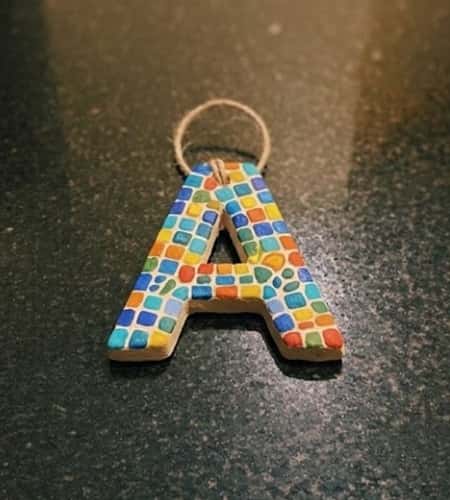
If you’re looking for something personal, this is probably my favorite project in the entire collection.
Instead of painting one solid color, you’ll build a fake mosaic effect that makes people look twice.
Roll your clay until it reaches roughly ¼ inch thick.
Print or draw a large block letter of your choice.
Place the template over the clay and carefully cut around it.
Smooth every edge with damp fingertips.
Use a ruler to keep long edges straight if needed.
Let the letter dry fully.
Lightly sand any rough areas.
Paint the entire letter matte white first. This bright base helps every other color stand out.
Using a pencil, lightly sketch irregular mosaic shapes across the surface. Keep each section slightly different in size. Perfect symmetry actually makes the design look less convincing.
Paint every section a different color.
Try combinations like teal, mustard, navy, dusty rose, sage green, burnt orange, cream and muted lavender.
Allow the paint to dry before moving on.
With a very fine brush or black paint pen, outline every painted section to imitate grout lines found in real mosaics.
If a few lines wobble, leave them. Handmade work always has tiny imperfections, and those little details makes it feel authentic.
Brush on two thin coats of satin sealer.
Attach adhesive hanging strips to the back or simply lean the finished letter on a bookshelf.
This project works equally well with air-dry clay, paper clay, or baking clay, making it one of the most versatile clay painting ideas for beginners who want colorful home décor without complicated sculpting.
Final Thoughts
One thing I’ve noticed after making lots of clay creations is that the paint often tells more of the story than the sculpting itself.
A simple shape can suddenly look elegant, playful or modern just because of the colors and brushwork you choose.
That’s why I encourage experimenting instead of chasing perfection.
Try layering paint, dry brushing raised textures, or mixing matte and glossy finishes on the same project.
Those small decisions create depth that photos don’t always capture immediately.
Over time, you’ll naturally develop your own painting style, and that’s far more rewarding than copying someone else’s project exactly.