Tiny clay creations have a charm that bigger projects rarely match.
I keep coming back to these small clay ideas because they don’t eat up an entire afternoon, they use very little material, and they’re surprisingly satisfying to finish.
If you’re new to air dry clay or polymer clay, don’t worry.
Every project below is broken into simple steps that even a complete beginner can follow.
Grab your clay, clear a little workspace, and let’s make something that looks handmade – in the best possible way.
Choose Clay Type For Small Clay Projects
Polymer Clay | Air Dry Clay
Affiliate Disclaimer: Some of the links in this post may be affiliate links, which means I may earn a small commission if you choose to make a purchase through them – at no extra cost to you. I only share products that genuinely fit this project and can help make your ceramic mug clay craft process easier and smoother. Your support helps keep ideas like this coming.
1. Tiny Mushroom Family That Fits on One Finger
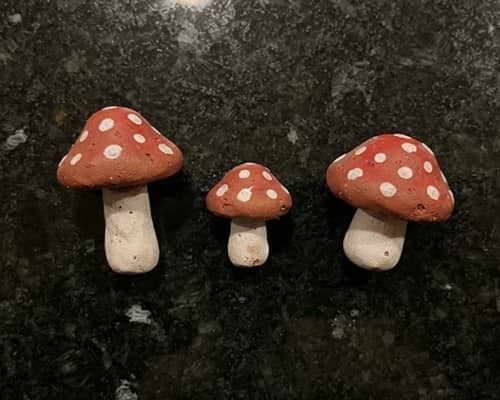
I love making mushrooms because no two ever has to look identical. The little imperfections somehow makes them cuter.
Start by pinching off a marble-sized piece of air dry clay or polymer clay.
Roll it gently between your palms until it becomes perfectly smooth. Divide that clay into two uneven pieces.
The larger piece will become the mushroom cap while the smaller piece forms the stem.
Roll the stem first. Keep it slightly thicker at the bottom so it can stand on its own without wobbling. If it starts leaning, simply flatten the base using your fingertip.
Now roll the larger piece into a tiny ball. Press it gently onto the table until it forms a rounded dome instead of a flat disc.
Flip it upside down and carefully press the center using the rounded end of a paintbrush or pencil. This creates the hollow underneath the cap.
Add a tiny drop of water if using air dry clay before attaching the stem. Press gently while twisting a little. That small twist really helps it stay together.
Want even more personality? Roll tiny dots from white clay and attach them to the cap. Don’t worry if the dots aren’t perfectly round. Real handmade crafts rarely is.
Use a needle tool to lightly score tiny vertical lines underneath the cap to imitate mushroom gills. They don’t need to be deep.
Allow the mushroom to dry completely or bake according to your clay package instructions.
Paint the cap with earthy reds, warm browns or soft beige colors. Finish with a thin coat of matte varnish if you’d like extra protection.
This is one of those small things which you can make out of clay that looks adorable displayed in groups instead of alone.
2. Pocket Lucky Whale With Tiny Water Splash
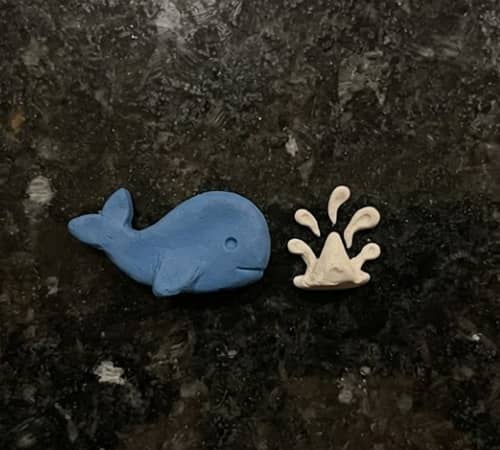
Ever noticed how something that fits inside your palm instantly feels special? This little whale is exactly that.
Begin with a grape-sized piece of blue clay. Roll it into a smooth oval. One side should stay rounded while the other becomes slightly narrower. Gently pinch the narrow end into a soft tail shape.
Flatten the tail just a little using your thumb.
Take a clay knife or toothpick and cut a shallow line through the tail to separate the fins. Don’t cut too deep because thin clay can break after drying.
Use your fingers to slightly lift both tail fins upward. Tiny adjustments make a huge difference here.
Now pinch two small side fins from the body instead of attaching separate pieces. It creates a cleaner look and fewer joints that might crack later.
Roll two microscopic black clay balls for eyes. Honestly, they don’t even need to match perfectly.
Smile? Totally optional. If you want one, gently press a curved line using the tip of a sewing pin.
For the water splash, roll three tiny teardrop shapes using white clay.
Join them together into a little splash and place it next to the whale rather than on top. It gives the illusion that the whale just jumped.
Leave everything to dry completely before painting any details.
This tiny sculpture doubles as a cheerful desk decoration and fits nicely into many clay art projects collections.
3. Mini Button Bowl for Rings and Earrings
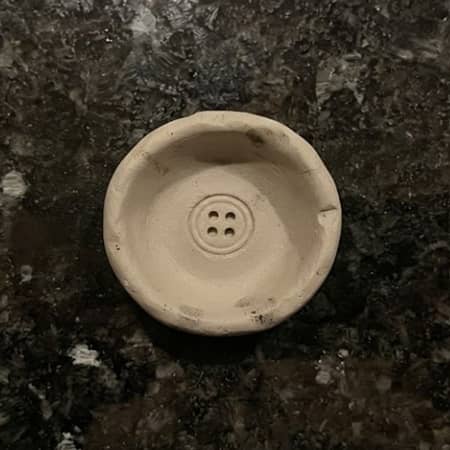
This one became one of my favorite functional clay crafts because I actually use it every evening.
Take a golf ball-sized piece of clay and roll it into a smooth ball.
Place it on your work surface and flatten it using a small acrylic roller or drinking glass until it reaches about ¼ inch thick.
Now grab a round cookie cutter or even the rim of a drinking glass. Cut out a neat circle.
Here’s the fun part.
Find an oversized shirt button at home. Press it gently into the center of the clay circle. Don’t push all the way through. You only want the button pattern to leave an impression.
Lift the clay circle carefully and place it over a small bowl turned upside down.
Let gravity do most of the work. Don’t force the edges downward because they may crack if stretched too quickly.
Smooth any rough edges with a damp fingertip.
Allow the bowl to dry slowly according to the clay instructions. Patience matters more than speed here.
Once dry, paint it with muted colors like sage green, dusty blue or soft terracotta.
Rub a tiny amount of darker paint into the button grooves before wiping the surface clean. This highlights every little detail beautifully.
It’s perfect for rings, earrings, coins or tiny keepsakes, making it one of my favorite useful polymer clay ideas and functional clay projects.
4. Tiny Sleeping Fox Curled Into a Circle
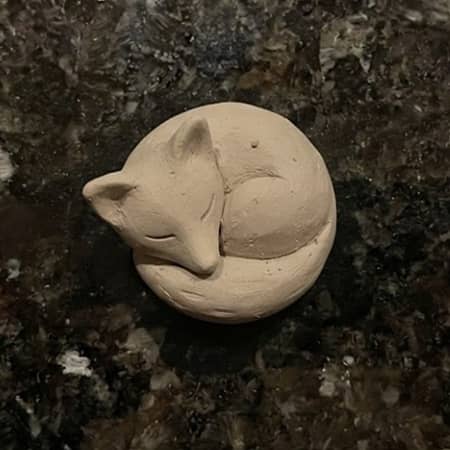
I always tell beginners to make sleeping animals first because they hide imperfections naturally.
Roll a walnut-sized piece of orange clay into a smooth oval.
Bend the oval into a loose letter C. This becomes the curled sleeping body.
Round one end slightly larger to form the head.
Gently pinch the opposite end until it becomes a fluffy curled tail.
Wrap that tail around toward the nose. Don’t rush this step because slow adjustments prevent cracking.
Roll two tiny triangles for ears. Flatten them gently before attaching with a little water if using air dry clay.
For the nose, add a microscopic black clay dot.
Instead of making open eyes, simply press two tiny curved lines with a needle tool. Funny enough, closed eyes often makes tiny animals feel much more expressive.
Press a small white teardrop onto the chest and another onto the tail tip.
Bake or air dry completely.
If you’d like, lightly brush soft pastel chalk over the cheeks before sealing. It gives the fox a warm sleepy glow.
Among all the small clay ideas, this one is especially popular because it works as a shelf decoration, tiny gift topper or part of a woodland clay sculpture display.
5. Tiny Cactus Pencil Buddy
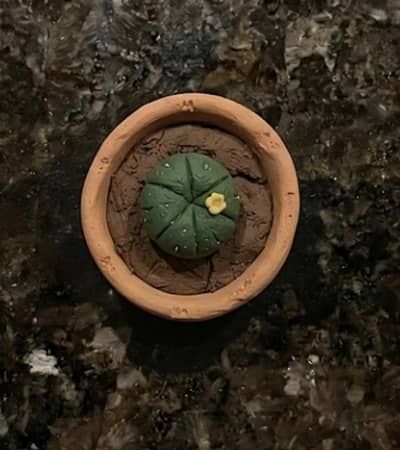
I wasn’t expecting this one to become so useful, yet now there’s almost always one sitting beside my notebook.
It takes only a tiny amount of clay, and it doubles as a cheerful pencil topper or a miniature desk decoration.
Start with a grape-sized piece of green air dry clay. Roll it into a smooth oval first.
Once it’s smooth, gently press the top with your finger so it becomes slightly flat rather than perfectly round.
Now roll an even smaller ball of green clay. Stack it on top of the first piece to create a two-section cactus.
Don’t press too hard or you’ll flatten everything. A gentle wiggle helps both pieces grip each other.
Use a toothpick to poke shallow holes all around the cactus. Keep them random instead of making perfect rows. Nature is a little messy anyway.
Roll the tiniest pink clay ball you can manage. Flatten it slightly into a flower and place it right on top. Add a tiny yellow dot in the center if you want a finished look.
Next comes the pot. Roll a walnut-sized ball of brown or terracotta clay and flatten it into a thick disc.
Carefully pinch the edges upward while slowly rotating it between your fingers. Keep checking the thickness so one side doesn’t end up thinner than the other.
If you’re making a pencil topper, gently push the eraser end of a pencil into the pot before the clay dries.
Twist instead of forcing it straight down. If its feels tight, remove the pencil and widen the hole just a little.
Smooth fingerprints lightly with a damp fingertip, but don’t erase every tiny mark. Handmade projects should still look handmade.
Let everything dry completely before painting. Use different shades of green to dry brush the raised areas. That tiny bit of color variation suddenly makes the cactus look much more realistic.
Among my favorite polymer clay ideas useful enough for everyday life, this one earns a permanent spot because it combines decoration with function.
6. Mini Toast With Happy Butter
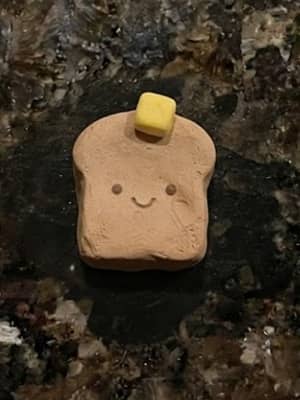
Who says breakfast can’t smile back? This little project always makes people grin before they even realize how tiny it is.
Roll a small piece of beige clay until it’s about the size of a postage stamp. Shape it into a rounded rectangle with softly curved corners.
Don’t make sharp edges because real toast never looks perfectly square.
Using a soft toothbrush, gently tap the entire surface. This creates the porous texture that makes the toast look surprisingly convincing.
Roll a very thin snake of darker brown clay. Wrap it carefully around all four edges to create the crust. Press lightly with your fingertip until the seam disappears.
Now make the butter. Roll a tiny yellow cube no bigger than a pea. Place it slightly off-center instead of exactly in the middle. Little imperfections create personality.
Want a face? Add two microscopic black dots for eyes and a tiny curved smile using a needle tool. Suddenly the toast feels alive.
Before drying, lightly press tiny random dents across the bread. Don’t overdo it. Less really is more here.
After curing, lightly dry brush white paint across the raised texture to soften the overall appearance.
This project fits beautifully into collections of cute air dry clay craft ideas and makes a fun magnet, keychain charm, or miniature shelf decoration.
7. Little Acorn Keepsake Charm
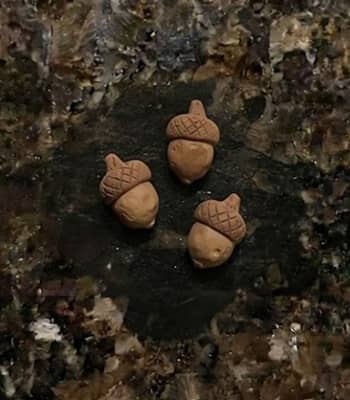
This one reminds me that simple shapes often create the prettiest finished pieces. You don’t need advanced sculpting skills here. Really, you dont.
Start by rolling a marble-sized piece of light brown clay into a smooth teardrop. Keep one end rounded while letting the opposite end taper naturally.
Set that aside.
Take a much smaller piece of darker brown clay and flatten it into a thin circle. Place it over the rounded top like a tiny cap.
Blend only the very bottom edge where both pieces meet. Leave the top edge slightly raised because real acorns have that distinct cap sitting above the nut.
Now grab a toothpick. Press tiny crisscross lines into the cap. Turn the acorn often as you work so the texture wraps all the way around.
Roll an extra tiny stem from dark brown clay. Attach it to the top with gentle pressure.
If you’re making a charm, insert a miniature eye pin before baking or drying. Push it straight down into the center while slowly twisting.
Once cured, lightly brush a darker brown wash into the textured cap, then wipe the excess away with a soft cloth. The texture instantly pops.
It’s amazing how something this small becomes one of those small things to make out of clay that people immediately pick up and admire. They never believes how easy it actually was.
8. Tiny Envelope With Hidden Heart
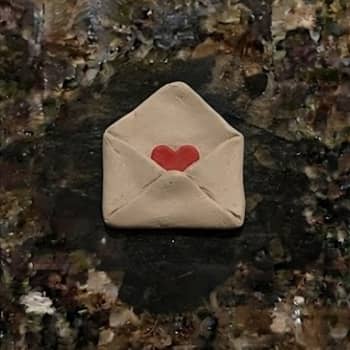
I love projects that include a surprise, and this one delivers exactly that. It looks like a miniature envelope until someone opens it.
Roll white or cream clay into a thin sheet about 3 mm thick. Use a craft knife to cut a small square roughly one inch across.
Lightly score diagonal lines from each corner toward the center. Don’t cut all the way through. You’re only marking where the folds will happen.
Fold the bottom corner upward first.
Next fold both side corners inward. Finally fold the top flap down, leaving it slightly open.
Now roll a tiny red clay ball. Flatten it gently into a miniature heart by pressing the top center with a toothpick while pinching the bottom into a point.
Slide the little heart just inside the envelope before sealing only the bottom corners. Leave the top flap loose so the heart can still peek out.
Use a blunt pencil to gently press along every fold line. This makes the envelope look like folded paper instead of a solid clay block.
After drying, paint a tiny stamp in one corner using blue or green paint. Add a few miniature scribble lines across the front to imitate handwriting.
This is one of those useful polymer clay projects that works beautifully as a necklace pendant, scrapbook embellishment, or thoughtful handmade gift.
9. Tiny Raindrop Ghost Holding a Leaf
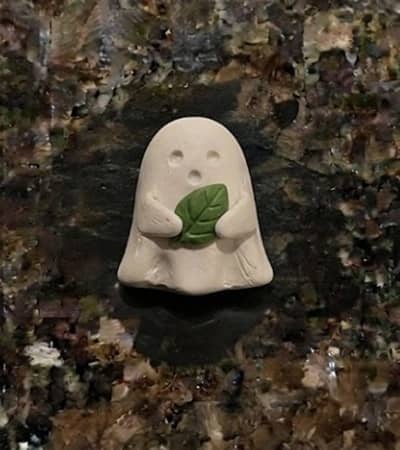
This little ghost isn’t spooky at all. It looks more like it wandered into a rainy forest and decided to keep a leaf as a tiny umbrella. That’s exactly why I keep making it.
Start with a marble-sized piece of white air dry clay. Roll it into a smooth ball.
Once it’s smooth, gently pull one end downward so it becomes a soft teardrop. The wider end will become the head while the narrower end forms the flowing body.
Stand it upright and lightly flatten the bottom so it won’t tip over.
Now, instead of making a perfectly straight ghost, gently bend the body a little to one side. That tiny curve makes it feel much more alive.
Use the rounded end of a paintbrush to create two shallow eye sockets. Fill them with microscopic black clay dots or paint them after the clay dries.
For the leaf, roll a pea-sized piece of green clay into an oval. Pinch one end until it becomes pointed.
Flatten it carefully and use a toothpick to draw a center vein with several tiny side veins branching out.
Place the leaf slightly above one side of the ghost’s head. Roll an incredibly thin brown clay snake to become the stem.
Attach one end to the leaf and the other to the ghost so it looks like it’s holding it overhead.
Don’t make everything perfectly symmetrical. Tiny uneven details are what make handmade clay sculpture projects feel charming instead of factory-made.
Once dry, seal it with matte varnish if you’d like extra durability.
Among all the small clay ideas, this one photographs beautifully because the clean white body contrasts nicely with the tiny green leaf.
10. Mini Honey Jar With Dripping Honey
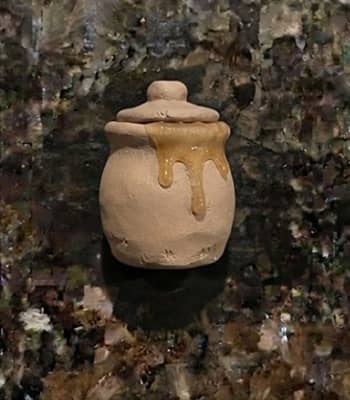
I smiled the first time I finished this because it looked almost edible. Almost. Don’t try it though.
Roll a walnut-sized piece of golden beige clay into a short cylinder. Flatten both ends gently so the jar sits level.
Using your fingertip, slightly round the shoulders near the top. Real honey jars aren’t completely straight.
Roll a thin strip of slightly darker clay and wrap it around the neck of the jar to create the lid.
Now comes my favorite part.
Roll an ultra-thin snake of translucent yellow or light amber clay.
Wrap small sections around the upper edge of the jar, letting tiny drips flow downward. Keep every drip a different length. Nature never repeats itself exactly.
Use the back of a craft knife to lightly press two horizontal grooves around the body. These imitate glass reflections once painted.
After curing, paint the jar with a glossy finish while leaving the lid matte. That contrast tricks the eye into seeing real glass.
If you’d like, paint a miniature cream label with a tiny bee icon in the center. No need for readable writing because the project is so small.
This fits nicely into collections of functional clay crafts, dollhouse accessories, or miniature kitchen clay art projects.
One side might lean ever so slightly, and that’s okay because tiny handmade jars rarely sits perfectly straight.
11. Tiny Sleeping Moon With Dangling Star
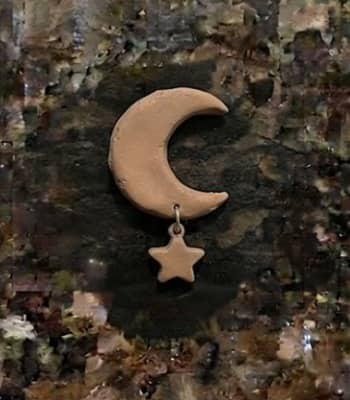
Whenever I need a relaxing evening project, this is usually the first thing I reach for. It’s simple, calming, and surprisingly elegant once finished.
Roll a grape-sized piece of pale yellow clay into a smooth ball.
Shape it into a crescent by gently pinching both ends while curving the center inward. Work slowly. If you bend too quickly, thin clay can crack along the inside edge.
Smooth every curve with your thumb until the moon looks soft rather than sharp.
Use a rounded sculpting tool to lightly press a tiny nose near the center. Add two closed eyes by pressing delicate curved lines with a sewing needle.
Roll an extremely thin clay rope and attach it underneath the moon.
At the bottom of that rope, attach a tiny five-pointed star made from a flattened yellow clay circle. Pinch each point individually instead of cutting them. The edges will stay smoother this way.
If the rope feels too fragile, let it firm up for ten minutes before attaching the star.
After drying, lightly dust soft peach pastel onto the moon’s cheeks for a sleepy expression.
I honestly think this is one of the prettiest polymer clay ideas useful for ornaments, nursery decorations, or handmade gift tags.
12. Mini Succulent Pebble Garden
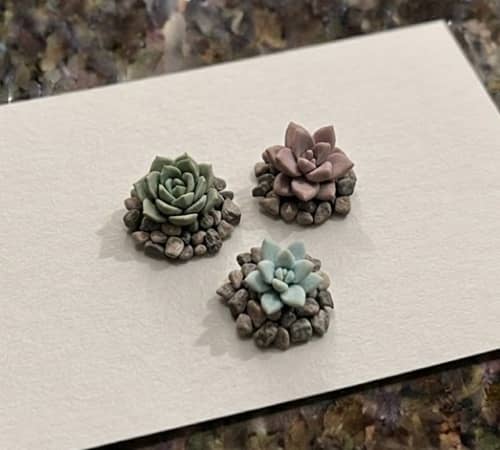
If someone told me this tiny project was addictive, I probably would’ve laughed. Then I ended up making six of them in one afternoon.
Begin by rolling three small balls of gray clay into smooth pebbles. Flatten each one just enough so they don’t roll away.
Now choose three different shades of green clay.
For the first succulent, roll six tiny teardrops. Arrange them in a circle with their pointed ends meeting in the center. Press gently. Add another smaller layer on top to create a realistic rosette.
For the second plant, roll several short cylinders. Stand them upright close together so they resemble thick succulent leaves growing from a central base.
The third one is even easier. Roll tiny balls and gently squash each into rounded leaves before stacking them into a compact cluster.
Place all three miniature plants onto the clay pebbles while they’re still soft.
Want extra texture? Lightly score a few leaf tips with a needle. Don’t overwork them because succulents naturally have smooth surfaces.
Allow everything to cure completely.
Paint subtle gradients instead of solid colors. Blend darker green near the base and lighter green toward the tips. That one small detail makes the plants look far more realistic.
This tiny arrangement is one of my favorite useful polymer clay projects because it brings a little greenery to a desk without ever needing water. Honestly, that’s my kind of plant.
Final Thoughts
The best thing about small clay ideas isn’t how quickly they come together.
It’s how they quietly teach important skills without feeling overwhelming.
Every tiny mushroom, little moon, or miniature jar helps you understand shaping, texture, balance, and proportion a bit better.
Before you even notice it, those simple projects begin improving your larger clay craft creations too.
That’s why I rarely think of these as “practice pieces.” They’re finished creations with their own personality.
Keep experimenting with different textures, mix air dry clay with new painting techniques, and don’t chase perfection.
Sometimes the smallest fingerprint left behind becomes the detail that gives your handmade piece the most character.