I keep coming back to goth clay craft projects because they have a strange way of making ordinary shelves, desks, and coffee tables feel full of personality without spending much money.
Some pieces look mysterious. Others are surprisingly practical. That’s what makes this collection different.
Instead of creating decorations that only sit around collecting dust, many of these projects double as functional clay pieces you can actually use every day.
If you’ve been searching for fresh gothic clay ideas, unique clay art crafts, or even DIY ideas for adults that don’t look like everyone else’s Pinterest board, these beginner-friendly tutorials will keep your hands busy for quite a while.
Choose Your Clay Preferences
Polymer Clay | Air Dry Clay
Affiliate Disclaimer: Some of the links in this post may be affiliate links, which means I may earn a small commission if you choose to make a purchase through them – at no extra cost to you. I only share products that genuinely fit this project and can help make your ceramic mug clay craft process easier and smoother. Your support helps keep ideas like this coming.
1. Raven Skull Ring Holder
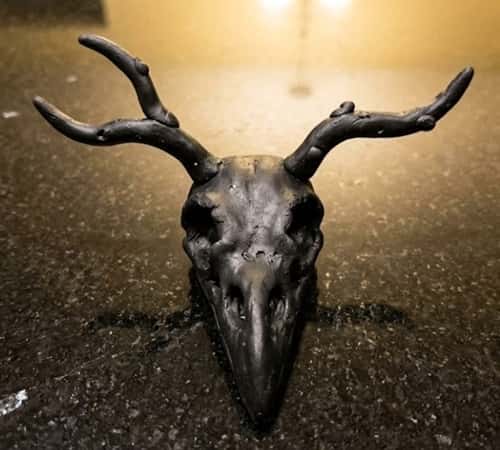
A tiny raven skull that also keeps your favorite rings organized? I honestly wish I had made one sooner.
It looks like something picked up from an old curiosity shop, yet it’s simple enough for someone touching polymer clay for the very first time.
This is one of those goth clay art projects that blends decoration with everyday use, making it a perfect example of creative product design ideas that don’t feel overcomplicated.
Start with a tennis-ball-sized piece of black polymer clay. Knead it for about five minutes until it becomes soft and flexible.
If the clay feels stiff, warming it between your palms really helps. Roll it into a rounded egg shape.
Flatten the bottom slightly against your work surface so it stands without wobbling. Don’t skip this part because fixing a leaning sculpture later becomes frustrating.
Now pinch one end into a long beak. Work slowly. Seriously, don’t rush this.
Instead of stretching everything at once, pinch a little, smooth a little, then pinch again. You’ll end up with cleaner lines.
Using a rounded sculpting tool or even the back of a paintbrush, gently press shallow eye sockets on both sides.
Roll two tiny clay balls and place them above each socket to form dramatic brow ridges. Suddenly the skull starts looking alive…well, sort of.
Cut a narrow opening where the beak separates. It doesn’t need to be deep. Just enough to create shadow.
Roll two short cylinders about 2 inches long and gently curve them. Attach them behind the skull so they angle upward like twisted branches. These become ring holders.
Blend every connection using your fingertips. You shouldn’t see harsh seams.
Texture the skull by lightly tapping with crumpled aluminum foil. Don’t overdo it though. Too much texture makes it resemble a rock.
Bake according to your clay manufacturer’s instructions.
Once cooled, dry brush light gray acrylic paint over the raised areas. Wipe away excess immediately so black remains inside the recesses. Finish with matte varnish.
It looks expensive but it isnt.
2. Crescent Moon Trinket Dish with Thorn Border
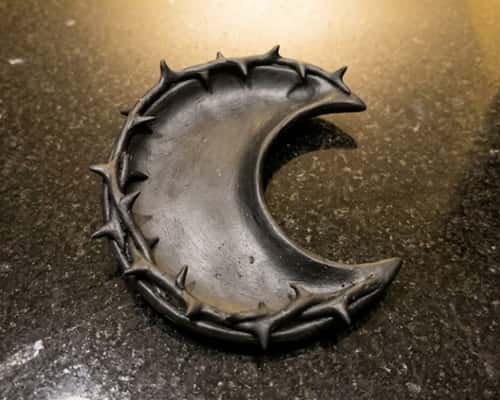
Some goth clay craft projects become favorites simply because they’re useful every single day.
This crescent moon tray catches earrings, keys, tiny crystals, paperclips, and even loose buttons without looking boring.
Roll conditioned black clay into a slab roughly ¼ inch thick using a rolling pin or acrylic roller. Lay a printed crescent moon template on top and carefully cut around it using a craft knife.
Lift away the extra clay slowly. If the edges become rough, smooth them using one fingertip dipped in a tiny bit of water.
Place the moon onto an upside-down ceramic bowl so it naturally curves into a shallow dish. Press gently. Gravity will do most of the work for you.
Next comes my favorite part.
Roll dozens of tiny teardrop shapes no larger than sunflower seeds. Attach them one by one around the outer edge, pointing outward like thorny vines.
Blend only the bases while keeping each point sharp.
Add tiny clay vines weaving between some thorns for more depth. Don’t make everything perfectly symmetrical. Nature never does, and neither should this.
Using a needle tool, press tiny lines into every thorn to resemble dried branches.
Bake while the clay remains on the ceramic bowl so it keeps its curved shape.
After cooling, lightly dust metallic silver wax onto only the thorn tips. The contrast looks amazing under soft lighting.
Your friends might ask where you bought it. Thats always funny because they never expect it was homemade.
3. Cathedral Window LED Tea Light Cover
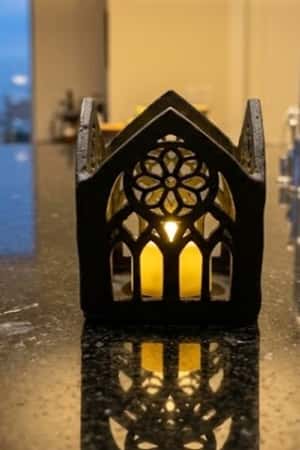
This one feels dramatic without demanding advanced sculpting skills.
Instead of making another ordinary candle holder, you’ll build something inspired by old cathedral windows that casts beautiful shadows around a room.
Roll black clay into a rectangle approximately 8 inches long and 3 inches tall.
Cut tall pointed arches evenly across the strip. Inside every arch, carefully remove small openings using a craft knife to imitate stained glass window frames.
Leave enough clay between cuts so the structure stays strong.
Roll several ultra-thin clay ropes. Attach them around each window opening to create raised framework.
Wrap the finished strip around a battery-operated LED tea light, leaving about half an inch of overlap.
Blend the seam carefully until invisible.
Cut tiny quatrefoil shapes above several windows if you’re feeling adventurous. They’re easier than they look because each one is simply four tiny circles touching together.
Bake the cylinder standing upright.
Once cooled, brush dark charcoal paint over everything, then wipe it away almost immediately. The remaining color settles inside tiny details and creates an aged stone appearance.
Never place a real candle inside polymer clay holders. LED lights only.
This project makes surprisingly good creepy crafts to sell, especially around Halloween, although honestly I’d display it all year.
4. Hanging Bat Planter Buddy
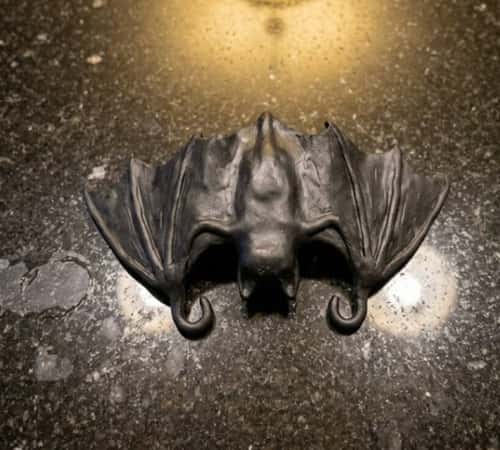
Plants deserve spooky roommates too.
Instead of making another decorative bat that sits flat on a shelf, create one that actually hangs from the rim of a flower pot.
It’s playful, slightly creepy, and definitely one of those fun things to sculpt that gets people talking.
Begin by rolling black clay into an oval roughly the size of a walnut.
Flatten one side slightly to become the bat’s belly.
Pinch tiny ears upward. Make each ear triangular but don’t worry if they’re uneven because real handmade charm comes from little imperfections.
Roll two small balls for eyes. If you prefer a more mysterious appearance, leave the face blank except for tiny indented eye sockets.
Create two wide wings by flattening separate clay teardrops. Cut three shallow scallops along the bottom edge of each wing.
Attach both wings while gently curving them forward as if wrapping around a flower pot.
Now shape two tiny hooked arms extending downward. Curve each hook over the edge of a ceramic mug while baking so they’ll naturally grip a planter afterward.
Add faint wrinkles across the wings using a needle tool. Keep the lines irregular instead of perfectly spaced.
Bake according to package directions.
Once cool, lightly dry brush dark purple paint across only the raised wing texture before sealing with matte varnish.
I wasn’t expecting this little bat to become my favorite desk decoration, but here we are.
5. Crystal Ball Crow Display Stand
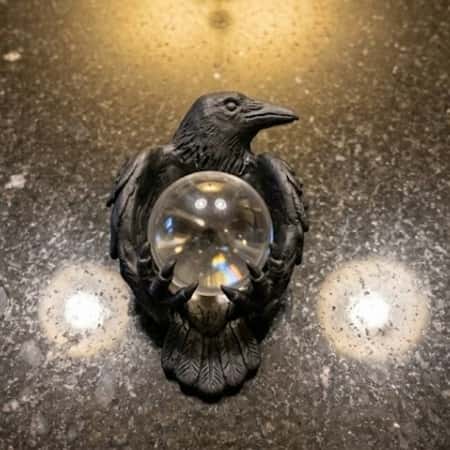
Some goth clay craft projects are purely decorative. This one isn’t. It becomes a display stand for a marble, crystal ball, glass orb, or even an LED light.
The finished piece looks dramatic without demanding advanced sculpting skills, making it one of my favorite clay craft projects when I want something that feels expensive but isn’t difficult.
If you’re exploring gothic clay decor or looking for unusual sculpey projects, this one checks both boxes.
Start by conditioning a large piece of black polymer clay until it feels smooth and stretchy. Roll it into a ball about the size of your palm.
Flatten the bottom so it won’t rock around later. A stable base makes everything easier.
Roll another thick cylinder for the crow’s body. Attach it slightly off-center on top of the base and blend the seam using your fingertips.
Shape a rounded head and pinch a long beak. Don’t try making the beak razor sharp right away. Small adjustments works much better than one giant squeeze.
For the wings, flatten two teardrop-shaped pieces. Press them onto each side while leaving the feather edges loose instead of blending them completely. This creates natural depth.
Use a needle tool to carve overlapping feather lines. Vary the length. Birds don’t have identical feathers everywhere.
Now make two curved claws using thick clay ropes. Position them in front of the crow so they gently wrap around a glass marble or crystal ball.
Test the fit before baking by placing the orb between them. It should sit securely without wobbling.
Add a small tail at the back for balance.
Bake following the clay package instructions.
After cooling, dry brush charcoal gray across the raised feathers, then lightly touch a few areas with antique silver wax. Suddenly the textures really stand out.
Place a crystal ball or glass orb between the claws and the entire piece instantly looks like something from an old gothic library.
6. Gothic Skeleton Hand Jewelry Tray
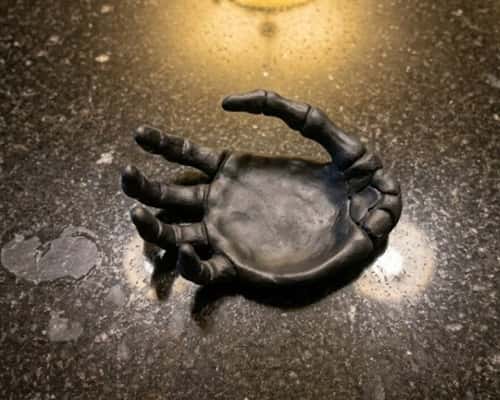
This is one of those functional clay ideas that keeps necklaces from turning into one impossible knot. It also works beautifully as goth clay art for a bedroom dresser.
Roll black clay into a slab about ¼ inch thick.
Print or draw a life-sized skeleton hand template and place it over the clay. Carefully cut around it using a sharp craft knife.
Smooth every edge with your fingertip before lifting the hand.
Lay the clay hand across an upside-down ceramic bowl so the fingers naturally curl upward. Press gently into the bowl until the palm forms a shallow dish.
Roll thin clay ropes and attach them along each finger to create raised bones. Blend only the center while leaving the edges visible.
Use a rounded sculpting tool to press tiny joints between every finger section.
Want to make it look older? Add tiny cracks using a needle tool. Don’t carve deep lines because they can weaken the clay.
Around the wrist, sculpt a narrow lace-inspired cuff with tiny scallops and miniature roses. This little detail makes the tray feel less spooky and more elegant.
Bake while resting on the ceramic bowl.
Once cooled, paint the entire tray matte black if needed. Dry brush ivory only over the raised bones, wiping away the excess before it dries. The aged effect happens almost instantly.
It looks delicate, but it’s surprisingly sturdy.
Lay rings in the palm, bracelets around the fingers, or even use it as a key tray near the front door.
7. Victorian Coffin Wall Key Hook
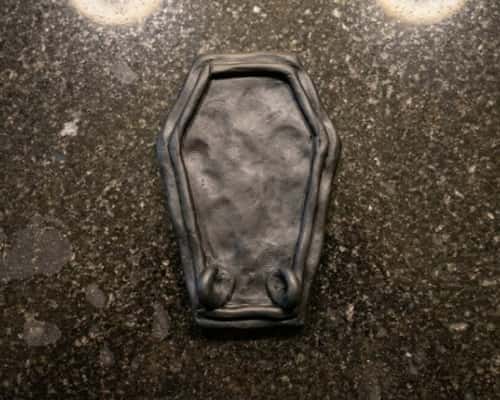
If you’ve ever misplaced your keys three mornings in a row, you’ll appreciate this project.
Instead of another plain key holder, you’ll create a gothic wall decoration that actually solves a problem.
That’s why I think creative product design ideas like this deserve more attention.
Condition black polymer clay until soft.
Roll it into a rectangle about ¼ inch thick.
Trim the top and bottom angles until the shape resembles a classic Victorian coffin.
Round the edges slightly with your fingertips so they don’t appear machine-made.
Roll several thin clay ropes and frame the outer edge like decorative molding.
In the center, sculpt a raised cameo frame. Inside the frame you can add a tiny raven, skull, black rose, moon, or antique key. Choose whichever style feels most “you.”
At the bottom, shape two thick decorative hooks from clay.
Push sturdy wire hooks through them before baking if you want the finished piece to hold actual keys. The clay becomes decorative while the hidden wire provides strength.
Texture the background lightly using crumpled foil so it resembles aged stone instead of perfectly smooth plastic.
Bake according to the manufacturer’s instructions.
After cooling, highlight the molding with metallic pewter wax and leave the center darker.
Attach a wall hanger to the back using strong epoxy glue after baking.
It’s one of those clay art crafts that guests always notice before anything else.
8. Haunted Potion Bottle Pen Holder
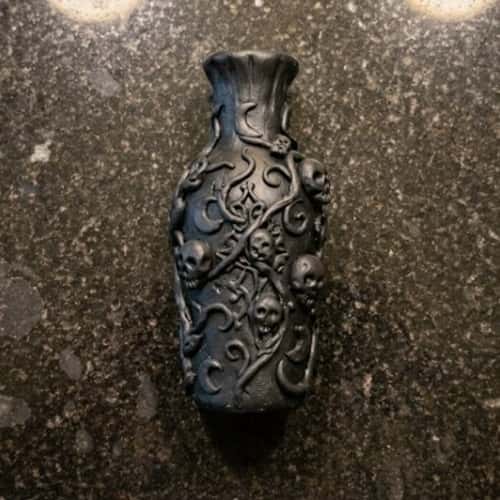
I love crafts that secretly organize clutter. This project looks like an oversized mysterious potion bottle, but inside it hides your pens, paintbrushes, crochet hooks, or makeup brushes.
It’s one of those DIY ideas for adults that blends storage with gothic clay decor.
Begin with an empty aluminum can or oven-safe glass cup to use as the inner support.
Roll black clay into a large sheet wide enough to wrap completely around the container.
Wrap the clay around it slowly, smoothing the seam until it disappears.
Cut away the excess around the top edge using a craft knife.
Roll several uneven clay ropes and wrap them around the body like ancient twisted vines.
Now sculpt tiny details across the bottle. Add miniature skulls, dripping wax, crescent moons, old keys, ravens, cracked stars, or thorny branches.
Don’t place everything evenly. Random placement actually looks more believable.
Create an oversized bottle neck by wrapping another strip of clay around the rim.
Texture the vines using a needle tool with short irregular lines.
Bake with the support still inside if it’s oven safe. If using an aluminum can, it can remain permanently inside for added strength.
Once cooled, lightly dry brush silver and charcoal over the raised decorations while keeping the recessed areas deep black.
Fill it with pencils, sculpting tools, or makeup brushes and it instantly becomes both storage and display.
There is something oddly satisfying about making organization look spooky.
9. Gothic Moth Bookmark with Hanging Tassel
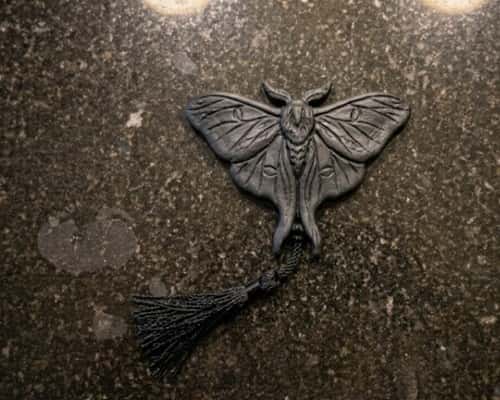
Bookmarks don’t have to be boring, and they definitely don’t need to be made from paper.
This goth clay craft is thin, lightweight, and surprisingly durable when handled carefully. I like that it feels elegant without being flashy.
If you’re searching for fun things to sculpt that are actually useful, this project deserves a spot on your list.
Condition a piece of black polymer clay until it feels soft and even.
Roll it between two stacks of playing cards or craft sticks so the thickness stays consistent, roughly ⅛ inch. Keeping it thin helps it slide into books without damaging the pages.
Draw or print a simple moth outline about 5 to 6 inches tall. Place it on the clay and carefully cut around the shape using a sharp craft knife.
Smooth the edges gently with your fingertip.
Now roll two tiny balls for the upper wings and two larger teardrops for the lower wings. Press them lightly onto the bookmark to create raised wing details.
Use a needle tool to carve delicate wing veins. Start in the center and work outward using light pressure. Don’t make every line perfectly straight because real moth wings have subtle variation.
Roll two paper-thin clay ropes and attach them as antennae. Blend only the bases.
Near the bottom, poke a small hole using a toothpick before baking. This will hold the tassel later.
Bake according to the package instructions and let it cool completely.
Lightly dry brush dark silver across the raised wing texture. Thread a black cotton tassel through the hole and tie a secure knot.
It almost looks too nice to hide inside a book.
10. Gargoyle Corner Shelf Guardian
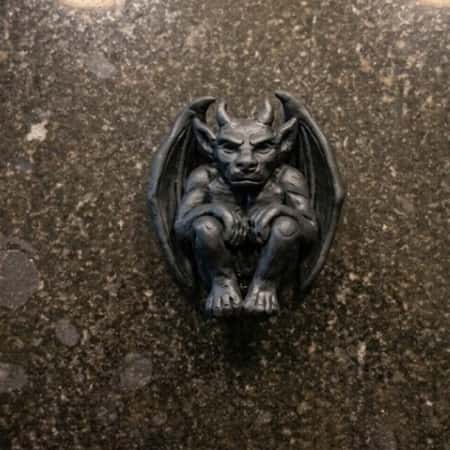
This is easily one of my favorite gothic clay ideas because it serves two purposes.
It becomes a small shelf decoration while also acting as a corner guardian for books, candles, or tiny collectibles.
It feels like something rescued from an ancient castle, except you made it yourself.
Start by conditioning a generous amount of black polymer clay.
Roll a thick triangle that will become the gargoyle’s base. Flatten the bottom so it stands securely.
Build the body using a rounded cylinder of clay. Blend it firmly into the base.
Shape two bent legs tucked underneath as though the gargoyle is crouching.
Roll two thick arms and rest the elbows on the knees. Position the hands under the chin. This classic thinking pose instantly gives the sculpture personality.
For the head, make a rounded ball and attach it to the body.
Pinch pointed ears and sculpt two short horns. They don’t have to match perfectly. Honestly, slightly uneven horns make it feel more handmade.
Roll two wide teardrops for the wings. Flatten them and attach them behind the shoulders, curving them slightly around the body.
Using a needle tool, carve overlapping stone-like cracks instead of feathers. Gargoyles are carved creatures, not birds.
Texture the body lightly with crumpled aluminum foil to imitate weathered stone.
Bake according to your clay manufacturer’s directions.
After cooling, dry brush layers of charcoal gray and tiny touches of silver onto the raised cracks. Seal everything with matte varnish.
Set the finished gargoyle beside books or candles, and suddenly the shelf has way more character than before.
I think this one looks harder than it really is.
11. Thorn Vine Photo Frame Corners

Not every goth clay art project needs to replace something. Sometimes it simply transforms what you already own.
These removable corner decorations can turn an ordinary photo frame into dramatic gothic clay decor without permanently changing it.
Condition black polymer clay until smooth.
Roll four thick ropes about 5 inches long.
Curve each rope into an “L” shape that fits around a picture frame corner.
Flatten the back slightly so each piece sits flush against the frame.
Now create dozens of tiny thorns by rolling miniature teardrops. Attach them along the vines with the pointed ends facing outward.
Don’t place them in perfect rows. Random spacing creates a much more natural thorny branch.
Roll extra-thin clay ropes and weave them between the larger vines, crossing over occasionally. Blend only where they meet.
Using a needle tool, press shallow bark-like lines along every vine.
Add a tiny black rose, crescent moon, raven feather, or miniature spider in one corner if you’d like a subtle focal point. Keep it simple so the frame still looks elegant.
Bake all four corners separately.
Once cooled, attach small removable adhesive strips or museum putty to the backs instead of permanent glue. That way you can swap them onto different frames whenever you want.
This project also makes one of those creepy crafts to sell because buyers can customize almost any existing frame.
Its amazing how four tiny pieces can completely change the mood of a room.
12. Moonlit Black Rose Incense Holder
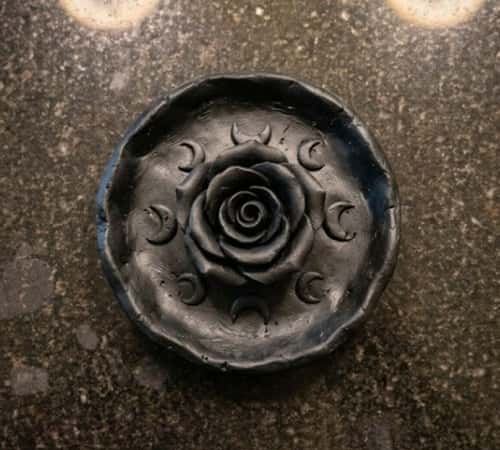
I always enjoy projects that slow me down for a few quiet minutes, and this incense holder does exactly that.
It combines functional clay, elegant clay art crafts, and a subtle gothic aesthetic without looking overly dramatic. It’s simple enough for beginners but still feels special once finished.
Condition a large piece of black polymer clay.
Roll it into a smooth ball and flatten it into a circle about 5 inches wide and ½ inch thick.
Round the outer edge using your fingertips.
Roll one long thin clay rope and coil it tightly into the center to begin forming a rose.
Continue wrapping additional thin strips around the center, gently opening each petal with a sculpting tool or toothpick. Work slowly. Flowers always look better when you resist making every petal identical.
Once the rose reaches about 2½ inches across, press it gently into the center of the base.
Roll two tiny crescent moons and place them opposite each other near the edge of the dish.
Use a needle tool to poke a small angled hole in the center of the rose for an incense stick. Test the fit before baking.
Scatter several tiny leaves or thorny vines around the rose, blending their bases into the dish.
Bake according to the package directions.
After cooling, lightly dry brush pewter across the petal edges while leaving the center almost entirely black. Finish with matte varnish.
The first time incense smoke curls around the rose, you’ll probably stop and stare for a second. I still do.
Final Thoughts
One thing I’ve noticed after making plenty of goth clay craft projects is that the pieces people remember most aren’t always the most detailed ones. They’re the ones with character.
A slightly crooked raven, uneven rose petals, or tiny fingerprints can make handmade work feel authentic instead of factory-made.
If you’re experimenting with gothic clay ideas, don’t chase perfection so much that you stop enjoying the process.
Over time you’ll naturally develop your own sculpting style, and that’s far more valuable than copying someone else’s work exactly.
The best gothic clay decor often begins as a simple lump of clay and a willingness to keep creating.